


fozzybear
-
Posts
2,270 -
Joined
-
Last visited
Content Type
Profiles
Forums
Gallery
Events
Blogs
Posts posted by fozzybear
-
-
3 hours ago, GasGiant said:
No I know. Id sell them through my own website. Just figuring out if its worth the hassle and if there is a market
I could do the same here in France have the same resources and equipment being in tubular steel manufacturing. But a small community to supply cost/delivery/time
-
also where in the world are you?
-
Welcome back into the fold
-
 1
1
-
-
1 hour ago, tonyglossop said:
Thany you, quite dark in the back garden, can go to the top of the snake pass in 5 mins in car and put the seestar s50 on the roof of the car for a while so quite lucky.
the snake pass Inn pub fond memories
-
Welcome Tony to SGL Me an ex Manc. Nice dark skies in Glossop. Enjoy and ask away no stupid questions here.
-
maybe a side view as well as no info on the end plate
-
 1
1
-
-
Heads up James has released a new Macro Version
Hey all, I'm happy to announce I've just released V16 of my astrophotography macros for Affinity Photo.
The update contains a new tone stretching method, plus several useful post-processing macros for tone compression, super textural enhancement, colour manipulation and more.
Here's the change list:
· Tone stretching macros no longer perform noise reduction: instead, there are now dedicated macros for denoising post or pre tone stretch. This also lets you use an external plugin such as NoiseXTerminator for superior noise reduction
· Neutral Tone Stretch: a new tone stretching method that provides a more balanced result with less colour bias
· Pre-Tone Stretch Denoise for RGB, L-RGB and SHO: performs noise reduction individually on each data layer before tone stretching for effective denoising
· Post-Tone Stretch Denoise: performs aggressive noise reduction on a tone stretched result
· Tone Compression & Contrast: a great option for adding contrast to the image whilst compressing bright and harsh highlights
· Tone Compression & Gamma: similar to the above, except the overall gamma is raised rather than contrast enhancement being applied
· Polynomial Contrast Curve: a good contrast option for most imagery that avoids brightening highlight detail
· Punch & Saturation: an all-round option to give an image more contrast and colour intensity
· Compress Highlights: renders a smooth roll-off for highlights whilst preserving colour intensity
· Super Texture: renders an over-the-top textural enhancement effect. You can then invert the mask and paint back in where you want it to apply, and also reduce the layer opacity if the effect is too strong
· Vivid Colour Boost: uses a weighted RGB transform to significantly enhance colour intensity, with a particular red bias
-
2
-
-
41 minutes ago, Ckr said:
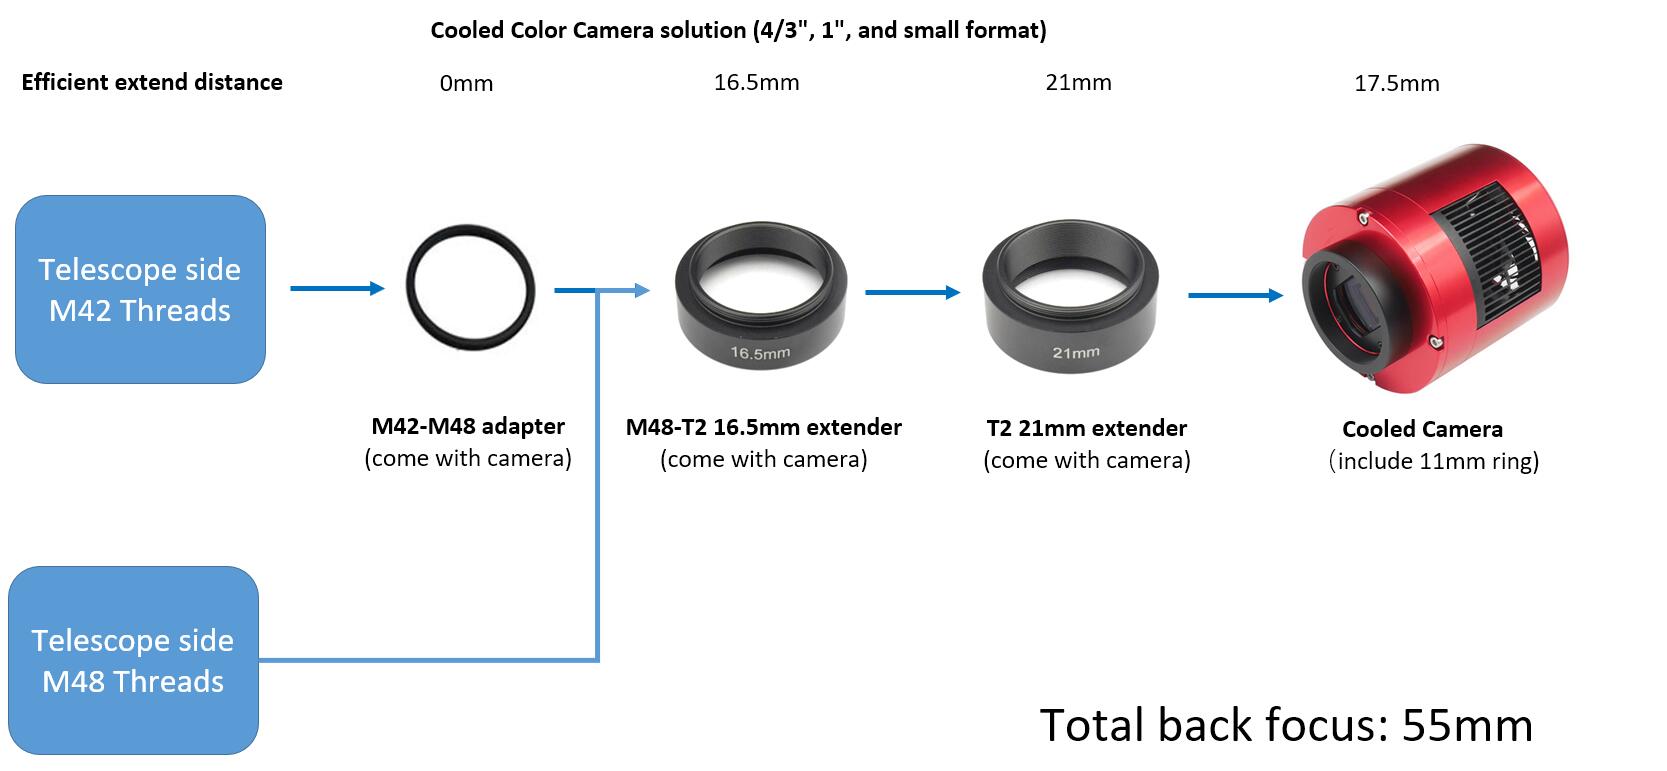
I don't believe the 55mm comes into play here as I'M NOT USING A REDUCER/FLATTENER/CORRECTOR.
If back focus is the distance from the last optical component to the image plane, then my objective lens back focus is 420mm and my telescope length is about 305mm at mid focuser travel, leaving 115mm between my image plane and the end of the draw tube. Subtract the camera ffd (6.5mm) and add for insertion into eyepiece holder (20ish mm)
As per the diagram above you need to add 134.4mm from end of the drawtube to your Camera lens minus 6.5mm
-
49 minutes ago, Ckr said:
I just got the same scope and couldn't find focus with my ASI294mc pro last night. It's my understanding that "back focus" applies only when using reducers/flatteners/correctors, and remains fixed for that reducer/camera combination. Please correct me if I'm wrong. What I'm missing is "out" focus. I'm going to set up (in daylight) and add extensions 'til I reach focus in the mid range of drawtube travel. I have found that it's easier in daylight, after finding a distant target, to assemble, adjust, and note (WRITE DOWN!) distances/extensions required to reach focus for all combinations of camera, scope, reducer, diagonal etc. that I expect to use.
So, with the SW 72ED focal length of 420mm and the distance from the lens to back of drawtube (at center of drawtube travel) being around 305mm, 420 - 305 - 6.5mm (ASI294 flange focal distance) = 108.5mm approx. extension required, plus insertion distance, call it 130mm (deja vu). At least on paper, with a broken measuring tape, in dim light with bad eyes, no glasses, and a headache. We'll see.
Good luck!
The best solution of 55mm back focus length

you need approx 134mm from end of scope drawtube to your sensor your camera has 17.5mm so you need 116mm extra extension if no other items ie FF or filter wheel
-
-
1 minute ago, Jim Smith said:
Thanks. I tried a non-UK ip address and it worked just fine!
glad you got sorted
-
1
-
-
your link works for me
-
1
-
-
the OP needs to source a new thumbscrew and try for the sake of a couple off quid as opposed to changing the focuser for now
-
1
-
-
Fire off an email to FLO to see if they source a replacement for you
-
1
-
-
-
12 minutes ago, zifnab said:
Hi bottletopburly
For whatever reason, it seems that mine does not have a focus lock, have a look at it.
from your picture looks like the thumbscrew has been sheard off the shiny piece is the remnants of the threaded screw you could try dis-assembly of the back plate the four outer hex screws but beware underneath the plate lie 4 orings then remove the damaged piece
-
1
-
-
-
17 hours ago, zifnab said:
Yes, it already has a Crayford dual focus on it, but it’s not a very good one and it has no lock functionality to hold in place the camera once focused. It also cannot adjust at any angle including facing straight up or straight down as it slips or stalls.
On the bottom of the focuser their should be a focus lock thumbscrew I have the std dual speed crayford and mine has the thumbscrew
-
-
5 hours ago, alacant said:
Thanks again
Unfortunately, it's the backfocus distance I'm missing. The three element version came with suggested backfocus distances. These depended upon the focal length of the telescope in which they were deployed. I copied those distances here:
The new version comes in a plain box devoid of any suggestions or explanation. Maybe the best plan is to assume it's the same as the old version and begin with a backfocus of around 65mm, point at Cygnus and hope it doesn't take all night to nail it.
Cheers
Ah Ok I misunderstood what info your where looking for hopefully you can sort it out.
-
21 hours ago, alacant said:
Thanks
Is the 55mm with the supplied 8.5mm collar in place?
TIA
the details i provided is the backfocus requirements for the 72ED you would need to check the flattener specs. So from the neck of the drawtube to the sensor is 134.4mm
eg using a DSLR wirth 55mm backfoucus your need to add 79.4mm from the edge of the focuser either with a FF or extensions or a combination, and visa versa with a CCD camera with a filter wheel and what ever else you have to to make up the 134.4mm if that makes scense
-
I use also an OVL FF on SW 72ED no problems. Maybe ask FLO for their advice on either the FLO or stellaMira options?
-
1
-
-
Here you go
-
1
-
-
Hi from France, Welcome to SGL


Hypothetically speaking.........
in DIY Astronomer
Posted
I made 3 piers and the hassle with transport cost's as well do your homework