


johninderby
-
Posts
15,408 -
Joined
-
Last visited
-
Days Won
78
Content Type
Profiles
Forums
Gallery
Events
Blogs
Posts posted by johninderby
-
-
For firther reading on the subject this covers many types of catadioptric designs many of which you probably won’t be familiar with.
http://www.photonics.intec.ugent.be/education/IVPV/res_handbook/v2ch18.pdf
-
 1
1
-
-
A package from Berlebach. 🙂
A new tray to replace the one that went missing during a house move

-
3
-
-
I thought it was more for imaging than visual. Prefered the Lunt 60 for visual. For imaging the Daystar is a far better buy than the Lunt though and maybe a little bit better. So think it comes down to if you will be doing more visual or imaging.
-
1
-
 1
1
-
-
There is a lot of useful info on Telescope Optics net if you want to explore the subject a bit more.
https://www.telescope-optics.net/obstruction.htm
https://www.telescope-optics.net/index.htm#TABLE_OF_CONTENTS
-
1
-
-
And most importantly did he wear his Hachimaki while waxing? 😁
Hachimaki - Japanese head band
-
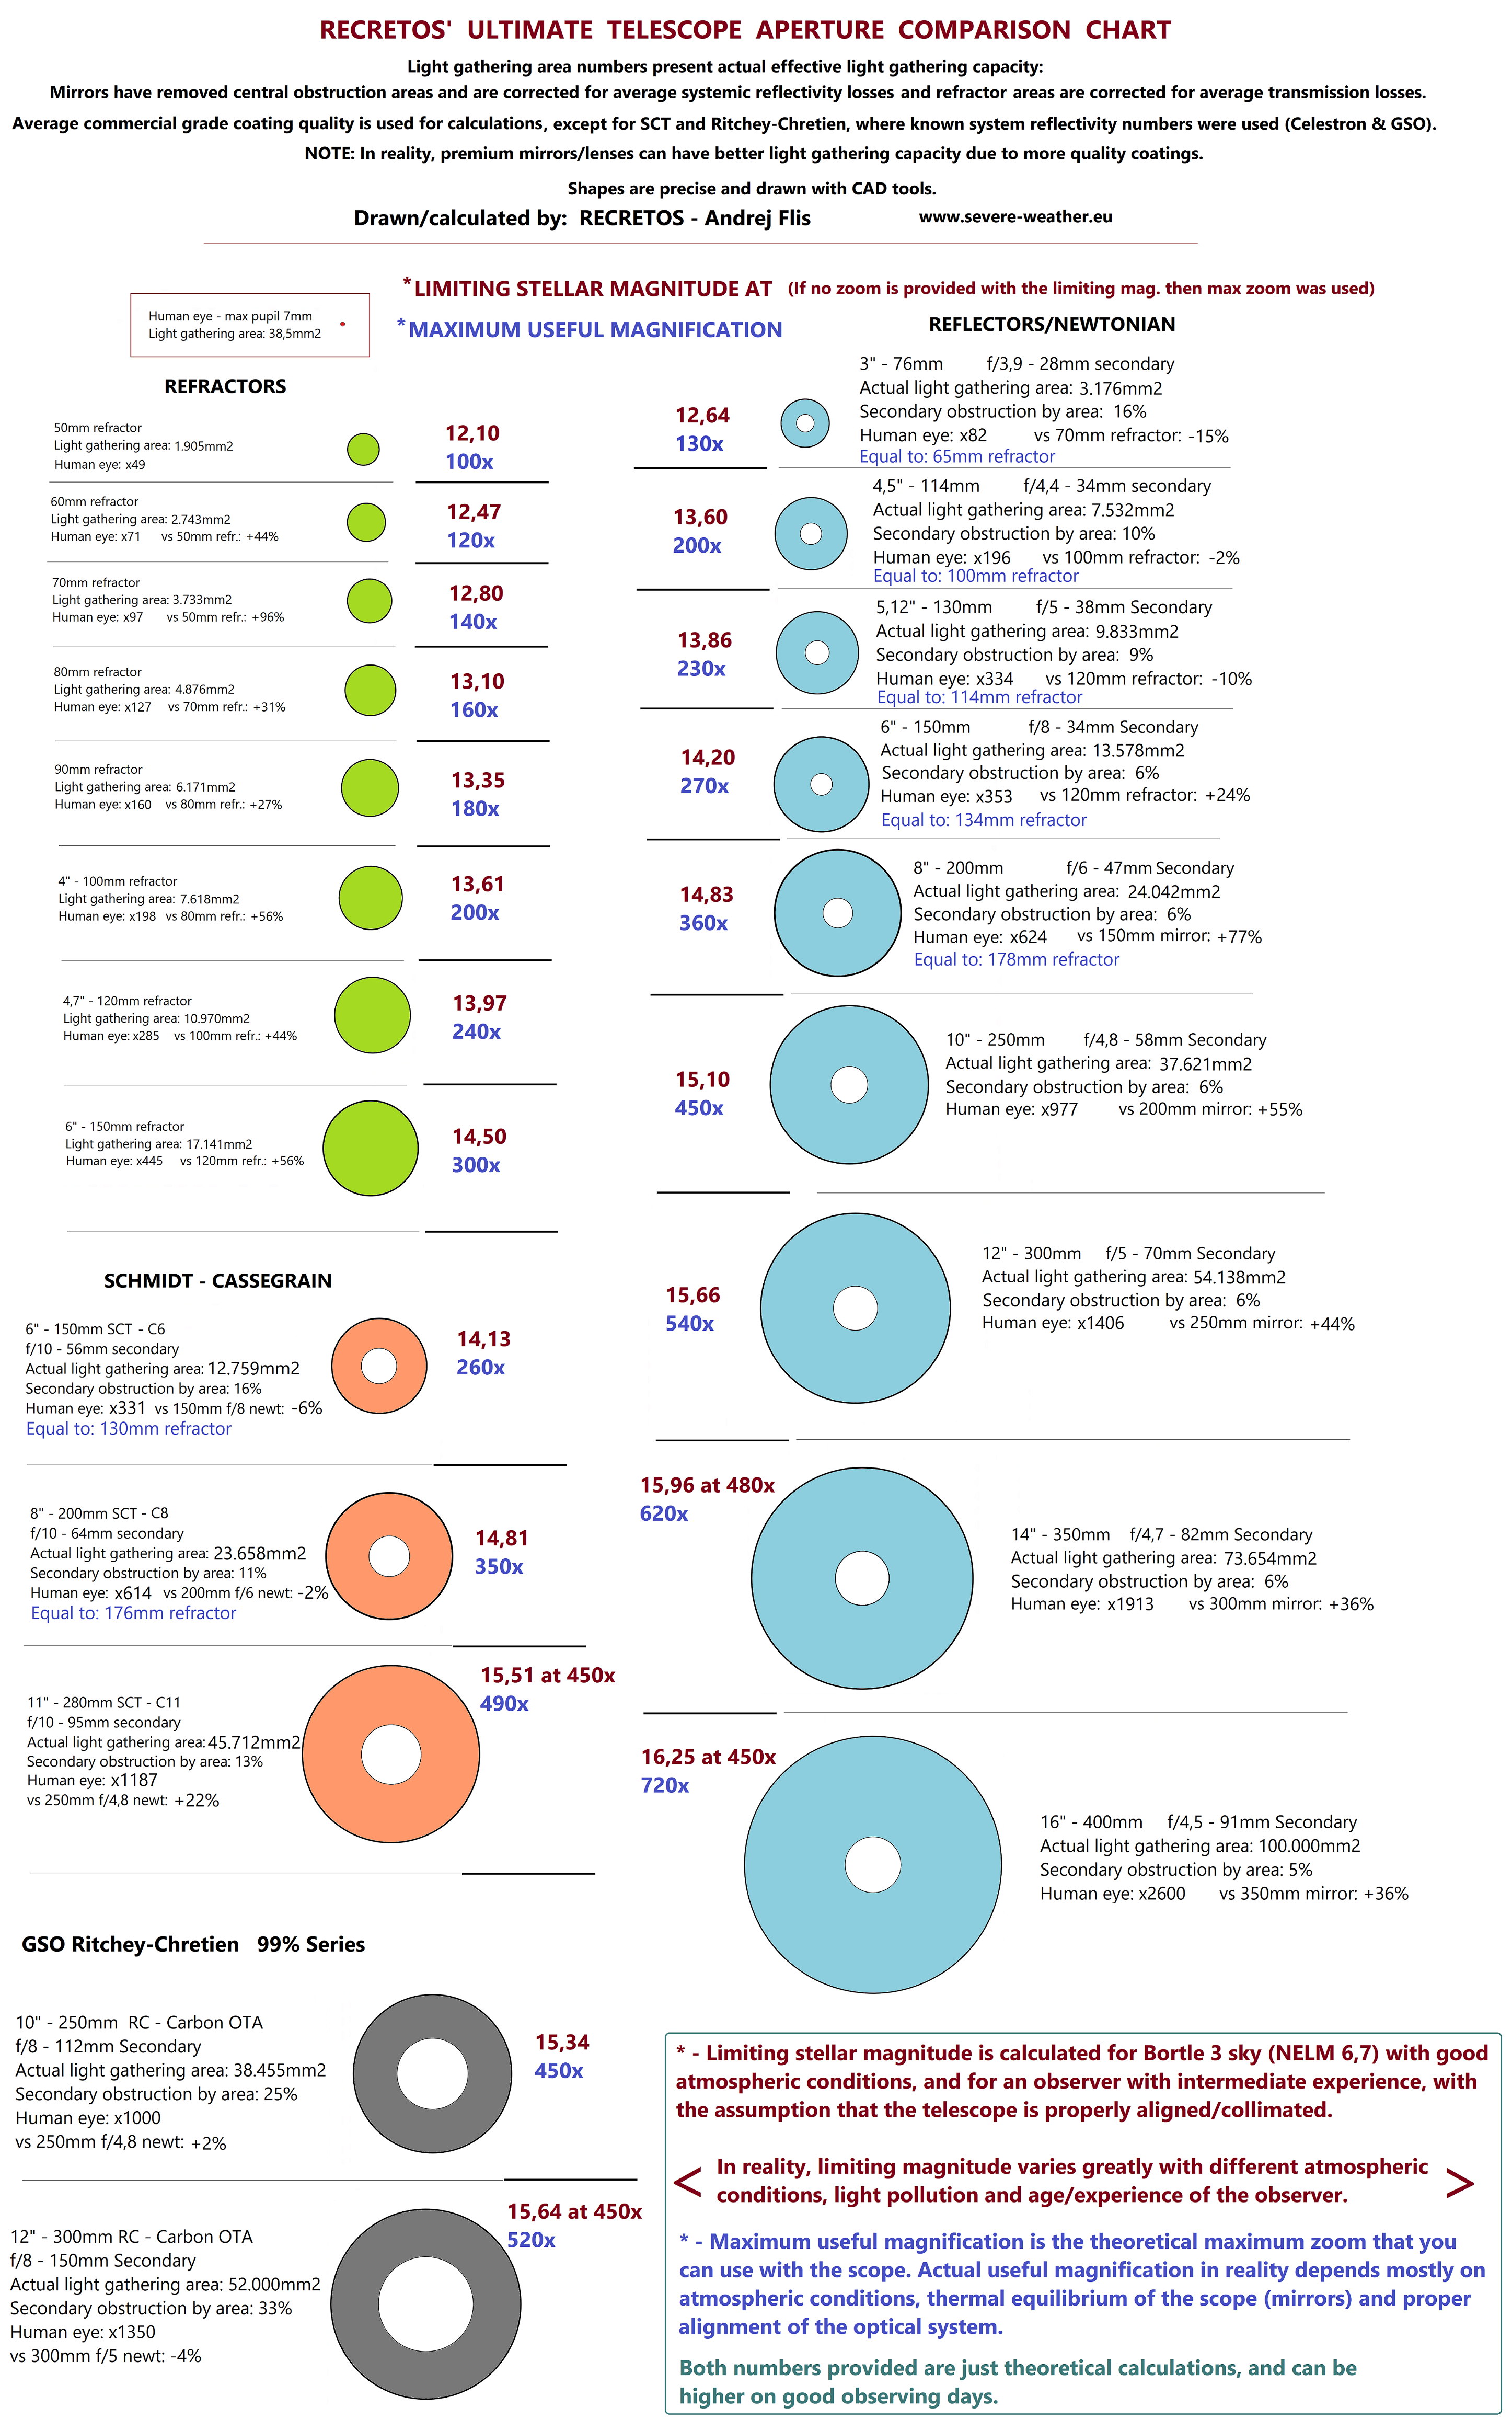
This chart should help.

-
4
-
2
-
-
-
A simple device but I now consider it the only way to set up a secondary. You might be surprised at how far out your secondary is when you check it with the Concentre.
-
20 minutes ago, JeremyS said:
You could always make an AZ100 advent calendar, John.
Different pic of a part of the mount behind each door.
But the BIG question is how many doors do you need?
Or maybe???? 😁😁😁
-
 5
5
-
-
It’s like waiting for Xmas. 😁
Bit at least it is getting closer.
-
1
-
-
I just ordered a custom made adapter from Telescope Express to adapt a focuser to a scope. Expensive ar €85 but no alterative really as it’s one of their focusers with a non standard size fitting. Will take three weeks or more.
-
Too many interesting new scopes comming out now. 😁
-
Looks like a nice solid lump. About 10kg so indeed no lightweight.
-
Should mention these are the instructions that come with the Orion version of the scope.
And more of the instructions.🙂
Secondary Mirror Adjustment
NOTE: Only adjust the three screws around the perimeter of the holder -- do not adjust the center screw! (Figure 9). Adjusting the center screw can cause the secondary mir- ror to fall off and will not be covered under warranty.
A 4mm hex key is required to perform collimation on the sec- ondary mirror (Figure 9).When adjusting one of these screws you will need to make counter-adjustments to the other two. Therefore, if you are loosening one screw you will need to tight- en the other two. At the end of the process you want all three collimation screws to be reasonably tight so the secondary mir- ror won’t shift while the scope is in use.
Always start by loosening one screw. Adjust the screws only very slightly -- by no more than 1/10 turn at a time, and one screw at a time before checking the view through the Cheshire again to see how things changed. Only tiny adjustments should be required to achieve collimation. This will also aid in the pre- vention of accidently putting the telescope grossly out of colli- mation. With each tiny tweak of a screw, make a mental note of which way and how far the center dot moved, as that will inform which screw to turn next and by how much. Experiment with different combinations of loosening/tightening the three screws one by one until the collimation eyepiece’s black dot is centered in the dark ring of the secondary mirror. The correct alignment of the secondary mirror is critical in determining if the optical axis requires alignment. Be sure you have properly aligned the secondary mirror before proceeding to the next step.Optical Axis (Primary Mirror) Adjustment
The optical axis is denoted by a thin outline of light (white) around the perimeter of the view through the collimation cap or Cheshire eyepiece (Figure 8A). If this outline is not a perfect circle of uniform thickness, as in 8C, that’s an indication that the optical axis (primary mirror) needs adjustment. This adjustment will require 3mm and 2.5mm hex keys.
Note that there are three pairs of screws on the rear cell of the optical tube where the focuser attaches (Figure 10). Each pair consists of a small black screw and a larger chrome screw. The small black screws are merely locking screws, which you should loosen before adjusting the mirror’s tilt. The larger chrome screws are spring-loaded collimation screws that actu- ally adjust the tilt of the primary mirror. Turn these collimation screws only a fraction of a turn at a time. Turn one and check the view through the Cheshire to see if it improved the white optical axis ring. Keep tweaking the collimation screws, each time checking the optical axis ring, until it is concentric and uni- form in width. Then tighten the three lock setscrews to fix the mirror in that position.
After adjusting the optical axis, re-check the collimation of the secondary mirror and make any necessary adjustments, then recheck the optical axis collimation. Optical axis collimation will not need to be performed very often, if ever.Star Testing
A star test can be performed to confirm the collimation accuracy of the telescope. The adjustment procedure on the telescope is the same as described above; testing, however, will be done in the night sky using a real star and you will not use thE collimation cap or Cheshire eyepiece. Choose a star close to the zenith (straight overhead) rather than at the horizon to minimize atmospheric distortions. Using Polaris as your target star can be helpful as minimal drift adjust- ments will be required.
It is recommended that you not use a star diagonal while per- forming this procedure. Rather, place an eyepiece directly into the 1.25" adapter in the focuser. It should be an eyepiece that provides moderate to high magnification. You may need to add all three of the extension rings in front of the focuser to be able to reach focus. Center the star in the field of view. Slowly de-fo- cus the image with the focusing knob until you can see a series of concentric diffraction rings form around the dark disk in the center. That dark disk is the shadow of the secondary mirror. In a well collimated telescope, the diffraction rings should appear round and concentric, with the dark disk exactly in the center (Figure 11). If the dark central disk is off center, the scope is out of collimation. Adjust the collimation of the secondary mirror and, only if necessary, the primary mirror while monitoring the defocused star until the dark central disk is exactly centered in the diffraction rings.
NOTE: It is important when checking or adjusting the collimation using a star, that the star be positioned in the center of the eyepiece’s field of view. If it isn’t, the optics will always appear out of collimation, even though they may be perfectly aligned! It is critical to keep the star cen- tered, so over time you may need to make slight corrections to the telescope’s position. -
Ypu can use an EQ6 tripod with the Skytee but need a Geoptik EQ5 adapter to do so. The Celestron CG5 tripod With the 2” legs will fit directly but very hard to find.
EQ6 tripod with a Berlebach spreader fitted.
-
1
-
1
-
-
Mainly visual but will take some lunar shots when the weather cooperates. 😁
Pretty straight forward to colimate. Here’s the procedure.from the manual
The optics in your new Classical Cassegrain optical tube have been aligned at the factory. However, rough handling during transit may warrant periodic re-adjustments. We have precisely center marked the secondary mirror with a small adhesive ring to aid in collimation. This ring does not affect the view through the telescope, so it should NOT be removed. You will need the quick-collimation cap or a Cheshire eyepiece to check and adjust collimation. We recommend doing the collimation during daytime. It can be done indoors or outside.
1. Remove any extension rings and attach the focuser directly to the optical tube.
2. For indoor collimation, set up your telescope in a well-lit room with the telescope oriented horizontally, and point it at a light colored wall. For outdoor collimation, point the telescope toward the sky but keep the telescope as close to horizontal as possible.
3. Insert the collimation cap or Cheshire eyepiece into the focuser via the included 1.25" adapter. If using a Cheshire eyepiece, make sure that the 45° reflecting surface of the Cheshire is aimed at a bright source of light, like a ceiling light or a clear sky outdoors.
4. Look through the collimation cap/Cheshire eyepiece. If using a Cheshire eyepiece you should see a small black dot and a dark ring within a larger bright circle. The dot is the hole of your Cheshire eyepiece. The dark ring is the center mark on the secondary mirror. And the bright circle is the reflective 45-degree surface of the Cheshire. The larger black circle outside that is the secondary mirror holder. (Figure 8AIf your scope is in good collimation, the black dot will be dead center in the dark ring, which will in turn be centered in the bright circle. If that’s the case, no further adjustments to the secondary mirror will be necessary. The optical axis is denoted by a thin white circle on the outer edge. You can disregard that for the time being; it will be covered in the following section.
If the view looks something like Figure 8B — with the dot of the collimation eyepiece NOT centered in the secondary center ring — you will need to adjust the three collimation setscrews at the front of the secondary mirror holder (Figure 9). This will adjust the tilt of the secondary, changing the relative position of the secondary center ring when peering through the collimation eyepiece.
Optical Axis (Primary Mirror) Adjustment
The optical axis is denoted by a thin outline of light (white) around the perimeter of the view through the collimation cap or Cheshire eyepiece (Figure 8A). If this outline is not a perfect circle of uniform thickness, as in 8C, that’s an indication that the optical axis (primary mirror) needs adjustment. This adjustment will require 3mm and 2.5mm hex keys.
Then it goes into the detailed explanation but the above will give you the idea.
-
1
-
-
I’ve only collimated it once but it hasn’t been used a lot with this weather. You might have to adjust the primary but should only need doing once. Adjusting the secondary is the normal method of colimating. It’s a bit different to collimating an SCT but once you get used to it quite easy.
-
Vibrations can be reduced to a level that they don’t interfere with viewing and that’s about it. Minimal rather than zero is the word.
All this talk of vibrations made me think of this. 😁
-
1
-
-
I found it easier to colimate my classical casegrain than an SCT and I’ve owned three SCTs. About as difficult as collimating a newt. The lack of dewing is a huge advantage over a mak or SCT. Remember it is a specialist planetary scope and delivers better lunar / planetary views than my C8 ever did. and of course zero image shift due to the fixed primary.
My Skymax180 was a very good lunar / planetary scope but the classical cassegrain is better.
Now if only the weather would cooperate.🤬
-
1
-
-
If you ask nicely Wolfi can be very helpfull.
-
Might be worth contacting Telescope Express and ask them if they could make up an adapter for you.
-
1
-
-
5 minutes ago, tooth_dr said:
Precise parts? I’ve an invoice for two adapters for the Tak by them at $337 without paying import tax as well 😮
Yes good old Precise Highway Robbery. 🙁
-
So frustrating when you just want a simple adapter. Found a US company that could make one up but you’d be looking at about £150.00.or more imported. 🙀🤬
-
Just pray health and safety don’t realise how dangerous observatories are. 😁
Just think of the regulations. 🙀


Moving to push-to alt-az, and need help choosing
in Discussions - Mounts
Posted
Just did a quick carry test of the TS-AZ5 with a 3.5kg weight and Berlebach tripod which weighs the same overall as the AZ100 without a weight. Quite easy to carry around and no problem carrying it upstairs, at least for me.
I would class the AZ100 as portable although you wouldn’t want to carry it too far.