


Uranium235
-
Posts
7,253 -
Joined
-
Last visited
-
Days Won
25
Content Type
Profiles
Forums
Gallery
Events
Blogs
Posts posted by Uranium235
-
-
2 hours ago, digitalcyanide said:
Thanks for the info everyone, does anyone know what side the thumb screws are?
I assume you ment "size" and not "side".
Theyre M4, drill an M3 or M3.5 hole (personally I go for M3 for a better thread) then tap it out with an M4 tap (tap sets can be gotten from B&Q). Also its better if you have access to a bench drill (dont do it by hand!) to get a nice straight hole.
Then, you can nick a thumbscrew off a barlow or other EP accessory (as theyre all M4).
-
Personally, I would advise that you go with the third thumbscrew. Compression rings are fine for EP's, but not for coma correctors with attached cameras (been there, done that, chucked it in the bin).
-
2 minutes ago, Thalestris24 said:
It seems to be very handy to have engineering skills and to have the wherewithal to be able to apply them!
Thats what I love about astrophotography, its the perfect mix of computing, science, and engineering
")
-
 4
4
-
-
I found to going all threaded to be a must-have due to the weight of the imaging train, as im a fan of mosaics - and if you have a dodgy side/corner... you cant mosaic, so I needed a perfect field.
The cc (baader M48 cell) screws into the underside of the adaptor as you can see. Additionally, I adapted the SWCC by hacksawing off its stop collar - turning it into an M48 cell so it could also simply screw in.... that allowed me to chop and change at will.
Absolutely rock solid, and also allows for threaded collimation so its repeatable every single time.
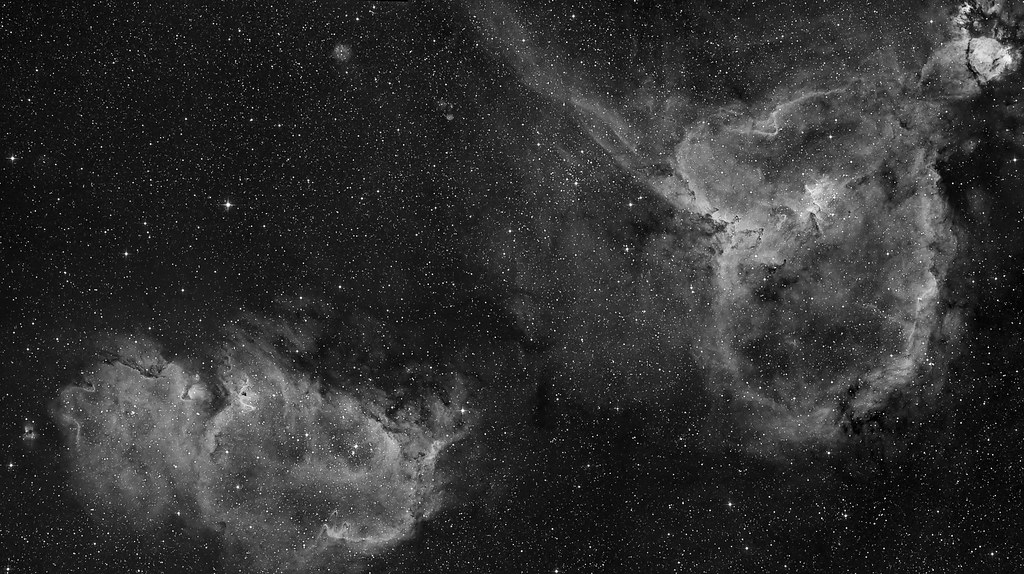
Proof of the pudding: (10 panel mosaic)
-
4
-
-
58 minutes ago, Thalestris24 said:
Hi Rob
I've not actually used my 130pds in ages...
 Still, it has a qhy8l attached plus a spacer plus the Baader MPCC which goes into the focus tube. I never had any cut-off stars. I've never understood your need for a custom adapter - please explain! Maybe I'm missing something here but my Baader goes all the way into the focus tube. I'm sure it would benefit from a third focus tube thumbscrew though!
 Louise
Probably easier to explain in pictures:


That threads directly onto the drawtube and provides an all threaded connection with built in coma correction and tilt control.
-
1 hour ago, Thalestris24 said:
Hi Rob
Isn't this only a problem if you use the SW coma corrector/reducer? I don't recall having any such difficulties with mine using the Baader CC and either dslr or qhy8l.
Louise
Unsure as Ive never used the Baader without the custom adaptor, but with it the drawtube is almost completely clear of the primary without modification.
-
1 hour ago, carastro said:
Thanks Rob, yes I tried to mask off the 2ndry with card (as per Astrobaby's tutorial), but I had difficulty in getting it to stand up and the 130PDS is a bit small to get your hands in to try to lift the card. I think I need a stiffer and larger bit of card, so I can bend it at the perimeter, this should help wedge it in the tube better.
Not having tried the Atik cameras in the scope yet, I don't know where the point of focus will be, I see you have an Atik383 Rob, do you have any problems with the focusser protruding into the light path? I only have Mono Atik cameras now my DSLR having died at Kelling a couple of weeks ago. I had a 15-P until a few days ago, but wanted a bigger FOV, and my stars were flattened one side because of the focusser.
Carole
I had no problems with the drawtube protuding into the lightpath because I used a custom built adaptor to sink the corrector inside the drawtube (the only one of its kind I believe).
For you the only option would be to either move the primary up the OTA a bit (to push the focus point out a bit), or shorten the drawtube by about 10mm (most people choose the latter). Or alternatively, you could not let it bother you
-
Thanks, I'll check out the clusters but with the focal length of my 200pds being nearly double that of the 130 its doubtful I will be able to fit them both in the same frame of the camera. However, I do have a 28mm EP which might cover them both visually.
For star tests I always use the double cluster - or cocoon nebula if possible becuase it sits in quite a dense starfield. My location is quite light polluted, so with that and a full moon - galaxies are usually out of the question (visually or photographically) until the Moon goes away.
lol..... me doing "visual".... now theres a novelty!

-
1
-
-
Good luck with that. Oddly enough, its also kicked me into squaring the steeltrack focuser on my 200pds this evening.... for which I need to remove the focuser and secondary (yikes!). However, getting the secondary round under the focuser is greatly aided by first blocking off the primary then using a sheet of coloured (I used red) paper opposite the focuser, then just rack it far enough so you can make out a concentric circle of colour around the the secondary in the sight tube. Then remove the blocking card and adjust to match the primary, replace the blocking card, get it concentric again, then so on and so forth until its collimated... took me about half an hour and not a laser in sight!
Next time its clear... which will probably be a full moon, I'll take it out for a bit of visual then bung the DSLR on it to check out the corners on a starfield or two.
-
2
-
-
19 minutes ago, carastro said:
Bit unclear on this never having had to collimate the secondary before. I thought somewhere I read that the central screw needs to be loosened in order to adjust the 3 secondary collimating screws, is that not right then?
Nope, not right at all!
Loosening the centre screw is the worst thing you can do because it messes up the factory set up/down tube position of the secondary. If you want to adjust the three collimation screws all you need to do is loosen one of them a little and then the others should move freely. Dont make bold adjustments, just a little at a time (1/4 turn).
The only time you tamper with the centre screw is if you are squaring the focuser, replacing it, or you find the collimation is seriously out of whack from new (unlikely).
Sounds like youre pretty close already with just being able to see the third clip, just give it a little tweak and you should be there. But dont sweat too much about getting the clips perfect, the best test will be under the stars.... as long as you get round stars in all four corners (should not be hard with your cameras) thats all that matters... dont try to chase that last 2%... it will drive you bonkers!
-
1
-
-
4 hours ago, carastro said:
Well I have been trying to collimate it, it seems a fair bit off. Not had a lot of experience with collimating despite having two Newtonian's before as all I ever had to adjust was the primary, but this time the 2ndry looks like it needs adjusting.
a) The central screw on the spider is locked tight, I am not quite sure if I need to adjust this but it's not budging and I am nervous of using force.
b ) There was no hex key included with the scope so I don't have a hex key to adjust the tilt as currently I can't see all 3 primary clips in the secondary, I don't think just adjusting the primary mirror only is going to cut it.
I have mislaid my own hex keys (assuming I have one the right size, and husband's all are attached to a ring with a 90 degree bend at the usable end.
I have been through all the packing several times to see if I have missed a hex key, yet I have a spanner and a screwdriver supplied.
Stuck now

Carole
1) Dont tamper with the central screw unless absolutely essential!
2) Hex keys are about 2 quid for a set from wilkos, buy three sets just in case you lose one or two
3) Dont use a laser, get a combined cheshire/sight tube (lasers dont tell you about secondary rotation)
4) Be prepared to take time with it, collimation is an acquired skill.
5) As for collimation, get the secondary appearing round and directly under the sight tube first. Then make further adjustments to get it lined up with the primary, then adjust the primary. If after those adjustments are done the secondary is no longer directly beneath the sight tube, dont sweat too much over it.... its a far lesser evil to have a slightly shifted secondary than it is to have one that is rotated. The only effect a slightly shifted secondary has is that it reduces the overall illumination of the CCD chip.
If youre still stuck, bring it along to SGL12 and I will take a look at it using my threaded collimatior (as play in thumbscrew/compression rings play a large part in miscollimation)
-
Another 130 user for the growing list!
Youre going to be quite surprised at just how dinky it is. The whole rig (with finderguider and CCD attached) can be easily carried in one hand.
-
9 hours ago, sagramore said:
Are any of you 130-PDS imagers going to be at the star party in October? I've not been to one before or met anybody so I'm quite looking forward to it!
Yep, I'll be there. Not sure if im bringing my 130 yet, as depends on a few factors (ie: how much space is left in the car)
-
On 04/09/2016 at 12:24, StamosP said:
Frames: 21x600" ISO1600
Integration: 3.5 hours
Darks: ~14
Flats: ~40
Bias: ~100
Youre getting a bit good at this
")
-
Erm.... Orion already?! Not fair!
We have to wait unit November before we get a good go on it.
-
1
-
-
200pds on the Veil:

-
3
-
-
Yay!
Its clear(ish) so im just doing some testing on the Veil.... lets see if I can get a colour pic out of this 8"!
One thing I can say though, is that the PA requirements for 1000mm are radically different to that of something like an 80ED or 130pds... if youre a little bit off - you get punished for it.
-
2
-
-
Boo hoo... not fair!
It was raining here last night, but I may see some action tonight.
-
1
-
-
56 minutes ago, Jokehoba said:
I'm heading that route, having ordered a ZWO ASI1600MM... I've also tried blending Ha (as luminance) into DSLR RGB but not very successfully - NB and RGB don't mix well
And if you are a member of Worcester AS, and have been at the Christmas quiz in Bromsgrove in the last few years, we may have even met!

Heh heh
Im not really a member of an AS, as SGL is the community I known since day 1. I'll be down at the next SGL star party in October if youre coming. This years topic for my processing workshop is likely to be mosaics.
But, I digress.... as this thread is supposed to be about the 130pds - so come on, lets see another image folks!
-
1
-
-
57 minutes ago, ChrisLX200 said:
I would take issue with that
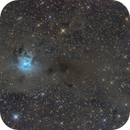
OIII channel can often add a lot of structural definition - this is my (3yr old) OIII channel for the Rosette:
ChrisH
Not always mate, there are plenty of occasions where its just a misty patch
with the exception of the Veil, crescent, M42 and a few others (where there are definite separate structures), other common targets have a good 90% of its structure in Ha (IC1396 for example), so OIII isnt really buying you that much in terms of detail. Same deal for Sadr region, and countless other Sharpless objects where Ha dominates.
Horses for courses
And its highly doubtful that anyone would notice minor OIII structures that are missing in a Ha rich image.... its an approach Ive used for years, and not once has someone stopped me to say... "hang about, theres a bit missing!" - but that has been when Ive imaged OIII at the same FL as the Ha, not sure I'd get away with it if resizing an OIII layer to nearly 300% its original size.
-
hmmm, thats got me thinking..... I wonder if I could use the Star71+DSLR at the same time as the 200pds (in Ha) to collect OIII data. Its not like you need a super clean OIII image becuase all youre looking for is a misty patch of OIII with no structure. All of the structure and detail would come from the Ha layer.
Though it would probably need to be rescaled to death... 350mm and 1000mm is quite a focal length difference!
-
Thats good, and its confirmed my suspicions that a DSLR would operate on two portions of the bayer matirx in OIII. I just never got around to trying it myself! (as I soley use the DSLR for RGB infilling of CCD luminance data now).
lol... and youre probably just up the road from me
I guess it aint too bad around here, I've lived in worse places for LP.
-
1
-
-
On 18/07/2016 at 12:23, Stub Mandrel said:
My first proper DSO with the 130P-DS. A sitting duck target, M13. This should not have worked! 50 30-second subs taken as the light was fading before 11:00pm. Yet here is not just M13 but up and to the left is the active galaxy NGC6207 and even a hint of Mag 15.3 IC4617.

Missed this one.... and for only your first proper outing... a good result. Good corners, but... the background is clipped slightly. If you are using photoshop, try to ensure the back point starts at about 15 on the histogram - ie: avoid having it hard left, and leave a bit of a gap. You can shave small values off, but you cant put it back
a bit like having your hair cut (if you have any!).
-
2
-
-
28 minutes ago, steve251 said:
Hi everyone
ive been dipping in and out of this titanic thread. 36 pages over two years wow! Well done everyone and some great pictures
i would love to have a go at Astrophotography and the 130pds seems like a great scope.
can anyone suggest an equipment list for a beginner
I recently bought a Nikon D7200 and am trying out some landscape photography
sadly i I live in London and have never seen the Milky Way
Thanks in advance
Steve
Its as expensive as you want to make it Steve
But the basis for a good setup is firstly the mount, you could start with the EQ5 or AVX but that would limit your future options should you ever want to get a larger or heavier telescope. So with that in mind, I would suggest an HEQ5.
Next, you would need some autoguiding - a simple setup like a 9x50 finder with a guidecam attached (QHY5) would be perfect for that telescope.
After that, you can either stick with your current camera - or take the leap into CCD imaging.... which is like stepping out of reliant robin and getting into a formula one car
But having said that, StamosP is getting some great images with his DSLR.... very impressive. Also you may want to get an LP filter, especially if living in London (which is pretty much LP hell). Eventually, you can move to narrowband imaging and bypass the LP altogether by shooting in glorious Ha with a CCD.
-
1
-

 Still, it has a qhy8l attached plus a spacer plus the Baader MPCC which goes into the focus tube. I never had any cut-off stars. I've never understood your need for a custom adapter - please explain! Maybe I'm missing something here but my Baader goes all the way into the focus tube. I'm sure it would benefit from a third focus tube thumbscrew though!


Ovoids with Mesu and Tak FSQ 85
in Imaging - Image Processing, Help and Techniques
Posted
Youre probably looking at a camera lens then.... but thats going to be pricey.
Fortunately, 2nd my Star71 turned out to be alright - but only when its perfectly focused. If im a bit off or I leave it to drift on a cold night then the corners do suffer.