


Uranium235
-
Posts
7,253 -
Joined
-
Last visited
-
Days Won
25
Content Type
Profiles
Forums
Gallery
Events
Blogs
Posts posted by Uranium235
-
-
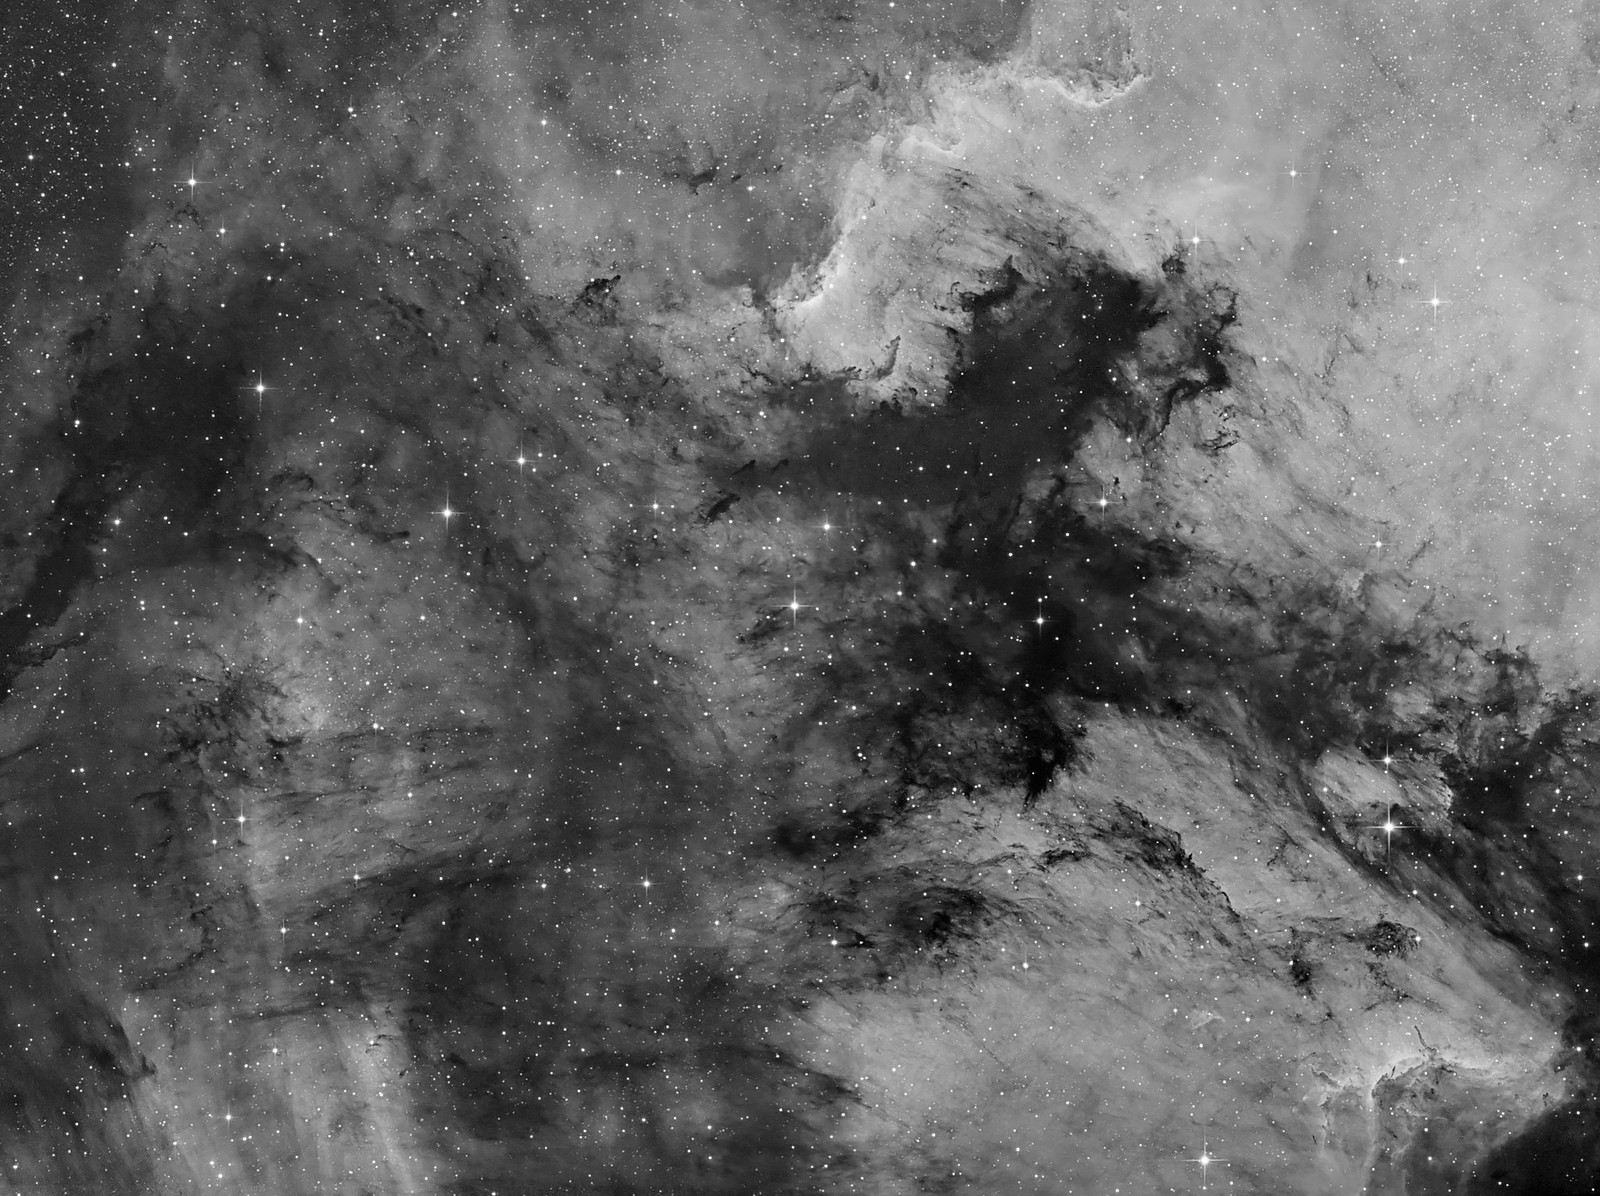
A quick update on the Pelican project. It was clear last night so I upped the exposure to 4hrs per pane:
-
 6
6
-
-
TazG, steady on old boy!
 That was high praise indeed, but the results from the 130 have been a combination of the following
- Tinkering and modifications to the telescope
- A solid, reliable EQ mount
- Good guiding and polar alignment
- A large format CCD camera (Atik 383L) - 8300 chipped
- Lots of data
- Lots of time
- Lots of collimation (took me a while to find a settled solution... depends on how demanding you are, and you have to be with an 8300)
- Lots of patience
There are a number of separate tenets that need to come together in order to create a good image, and as you become better at each separate skill - the end product will improve. You can check the other pages in this thread for the progress that I (and others) have made in improving the images (2" filters and more effective calibration frames).
However, you mentioned that you want a telescope to do smaller objects as well (ie: solar system objects, planetary nebulas or galaxies). Well, for small stuff like that - the 130pds isnt quite suitable as there is no such thing as a "do it all" telescope. So you need to take the approach of matching the telescope to your target, and avoid all forms of magnification in the optical train (ie: no barlows - unless doing solar system objects).
To simplify:
Big stuff (Andromeda, MW nebulas, galaxy clusters) = Small telescope (400-650mm)
Small stuff (dumbell, ring, crab etc) = Medium/Big telescope (800mm-1200mm)
So you would have the 130 for widefield, and then something like a 200 (8") for the smaller stuff.
-
6
-
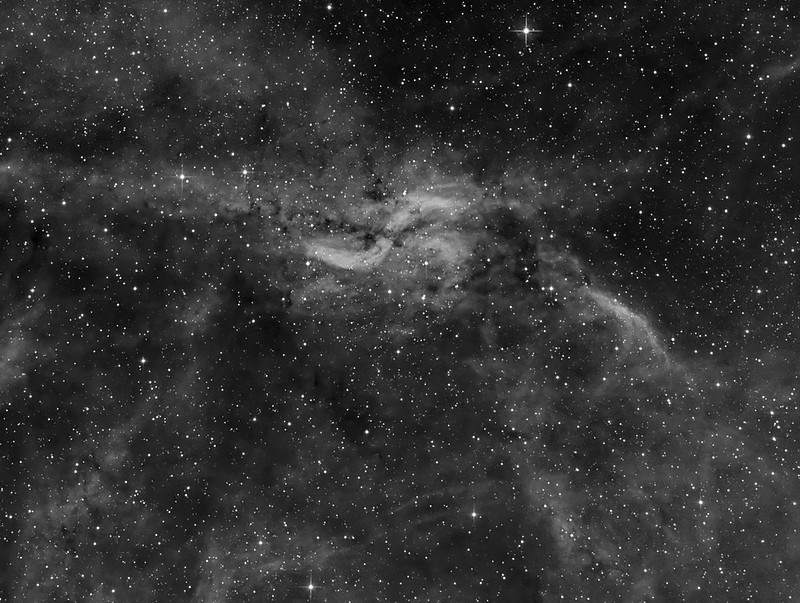
Thanks mate, when I get a bit of free time later on I'll have a proper look at it. Its only been through half of the normal process, and I'd like to find a way of turning down NGC7000 a bit - its quite bright so I dont want it to unbalance the image when I push the data harder (layer masks to the rescue!).
-
Right, we've had some good weather.... but not much darkness to play with. However, Cygnus was high enough to do a bit more work last night.
This is just a rough process (was pretty tired by end of session), and is just half the resolution of the finished item. I'll give it the proper U235 treatment later on and post in the imaging subforum - unless its clear again, in which case I might have a stab at grabbing some OIII (depending how high the moon is).

-
11
-
-
Im guessing theyre for the secondary? They should be the same size thread (I think all SW are the same at the secondary support) so shouldnt be a problem.
They will be going in the three little holes that surround the secondary holder centre screw (do not loosen that one unless you know what youre doing). Dont forget to remove the old screws first! Also, the telescope will need re-collimating once youve fitted them - but to reduce the upset to the secondary, its probably better to replace them one by one (ie: take one out, put the new one in & tighten it up, move on to the next).
-
The small, but mighty 130pds at work

-
7
-
-
Nice image! It took me a couple of seasons to find that one as its slightly off the beaten track and doesnt appear in the handset (DWB catalogue). So you have to either use stellarium/CdC or bang its RA/DEC straight into the handset.
Other wierd stuff here:
http://www.elisanet.fi/jere.kahanpaa/astro/MACindex.html
(lists bright/dark nebs by constellation... handy if youre doing a "whats on tonight" search)
-
1
-
-
The 130pds army continues to grow.....

-
4
-
-
Short exposures are ok if your telescope is fast, the target is bright, and youre not expecting to go deep. For the harder stuff, long subs are quite unavoidable (moreso in narrowband) because if you have something that barely shows up in one 1200s sub, its not going to appear at all in a 300s sub (ie: as 4 x nothing is still nothing!)
-
4
-
-
"ok" will be a bit of an understatement! You will be able to lift it (fully loaded) with one hand.
Heh
I see you wasted no time in getting it into your sig!-
1
-
-
More 130pds goodness..... (larger image & more info in deepsky section):
-
7
-
-
A few extras, probably the last of the broadband as Im now switching back to narrowband (yayyy!)
-
9
-
-
My Atik EFW2 screws directly to the Atik camera, so no space in between.
Blimey, youre going to have loads of space to play with then... if your chip backfocus is 13mm and the FW is 22mm, then you need a spacing of either 20-22.5mm from the T2 thread, or 22.5-25mm from the M48 thread.
There's a chance it wont be a light imaging train, so you will have to tweak the focuser tension a bit to cope with it.
-
Easy peasy... in fact it will be easier with your camera since your chip backfocus requirement is less than mine (yours is ~13mm, mine is 17.5mm). So you will probably need to make up about 15mm with extensions - assuming you have a short connection between your FW and camera.
I'd imagine that after a few years you already have most of the bits required (have a rummage through your bits box). This is where a set of digital calipers are worth their weight in gold.
-
Ahhh, ive seen the ad
 Somebody better move fast then! Sorry it didnt work out for you, im sure it will find a good home.
However, for the imagers - I have another cheap and easy mod to *vastly* improve grip, stability, and remove drawtube tilt:
http://stargazerslounge.com/topic/243409-skywatcher-focuser-ds-cigarette-packet-mod/
Did it last night, and it works a treat - all I need now are a few stars to test it on.
-
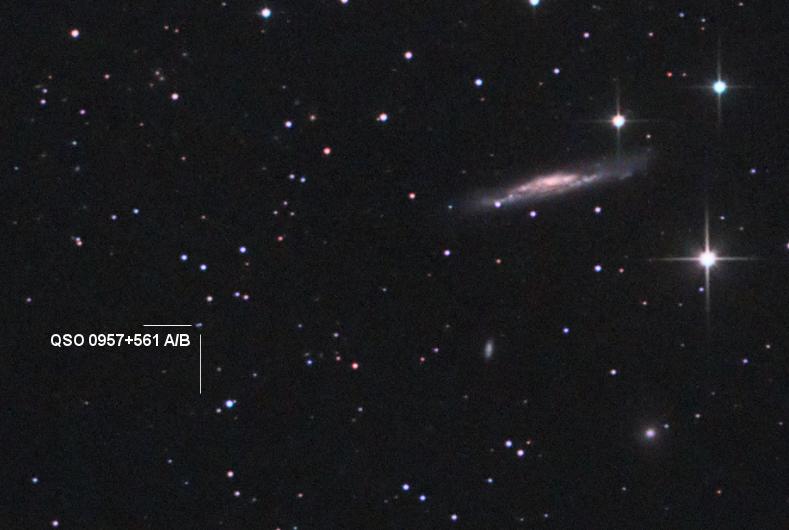
Forgot to include this one, Twin Quasar QSO 0957+561 A/B - approximately 7.8 billion light years distant.
-
9
-
-
Hi Frank
I have one of those and it works fine though my one doesn't have the visual adapters. Be aware that it has a 75mm backfocus so you would need about 20mm of spacers. However, in my case, it has allowed fitting a filter drawer (plus a 5mm spacer) in front of my Canon 1100d. http://www.teleskop-express.de/shop/product_info.php/info/p3979_TS-M48-quick-filter-changer-incl--1x-2--filter-drawer---low-profile-for-big-sensor.html
My 1100d has a full spectrum mod so I wanted to try it with an Halpha filter. I've not got around to trying that yet mainly because of problems with my mount and also the weather, of course!
Hope that helps
Louise
ps although the gso isn't reducing it increases focal length by about 10% so narrows the fov slightly i.e. 650mm becomes 715mm
Thats interesting.....
Perhaps it will be better at flattening if it slightly increases the FL (like the parcorr does), and a spacing of 75mm is pretty generous.
Blimey..... just took a look outside to see what all the noise is..... its horizontal hail. That will be a fun trip back to the office!
-
1
-
-
My 130 came with the wrong top on the focus tube, it has a compression ring top, the 1.25 reducer seems to be from an evo star frac, and no 2" tube not that it would fit any way. The joy of the used market
Or, at a pinch - you could borrow the one from your 150pds, its exactly the same M54 thread.
-
Hmmm.... do you have a 2" barlow you can take apart and use? My 130 came with a compression ring too (you've probably got the same TS adaptor), I ended up ripping the brass ring out with a pair of pliers, then drilling a third hole for another thumbscrew.
-
What part would that be? The 2" extension tube?
-
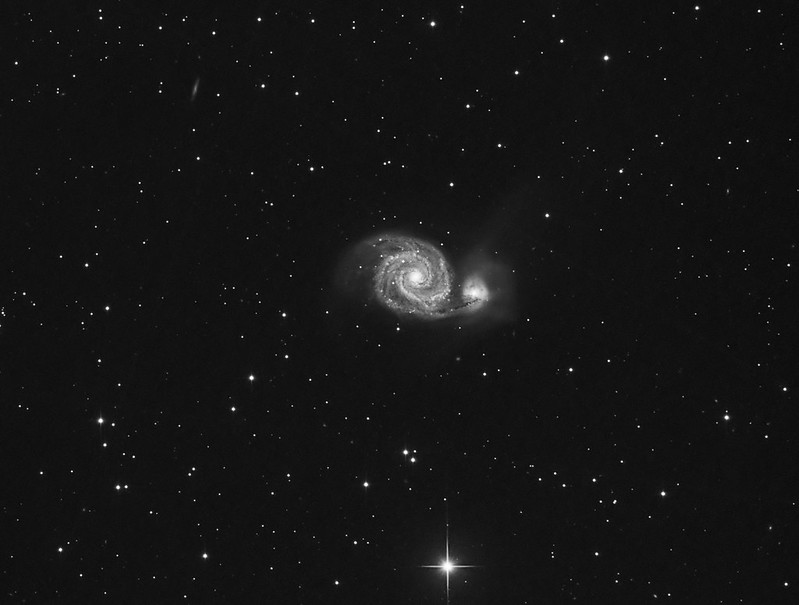
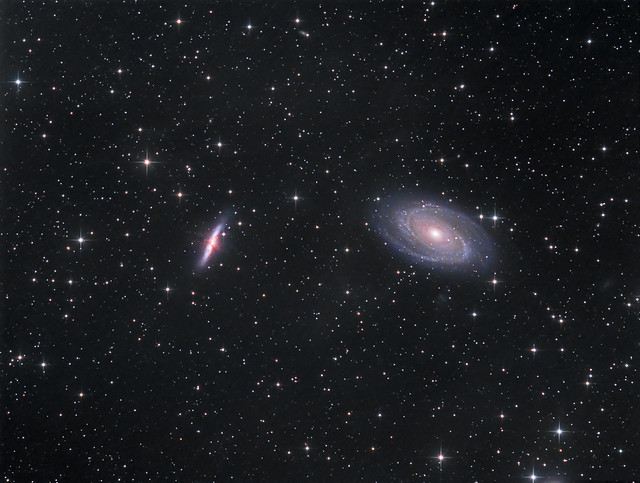
The 130 meets the Bodes @ SGLX (as found in deepsky subforum):
-
8
-
-
Welcome to club 130
Ok, the mount isnt ideal, but there is still stuff to be had - plenty of givers (M27, globs etc). Im not sure how long your max sub length will be before field rotation kicks in, but just give it a go and find the limit.
Ive got a couple more snaps to process from SGLX, but its just clouded over so im going to take the kit apart now.
-
I very much endorse the Astrotortilla/Eqmod solution: no need for finder. Getting the focus tight is the key with 130pds: I agree with Rob, need at least 30m
to cool down and stabilize. Fitting the inexpensive skywatcher motor focuser is one very efficient way to get the focus tight remotly from a warm room,
cheers
E.
Im still a bit old-skool when it comes to calibration and pointing, prefering to separate tasks out (netbook imaging, mount pointing). However, I do use Stellarium mount control from time to time (depends if I have a USB socket free), especially if im going off the beaten track. To take images over subsquent nights, I use the markers function in Artemis - which always gets me quite close. Low tech, but it works
-
Blimey, you need a finder!
Im using the Baader sky surfer (RDF), it came with the telescope as a freebie and it helps a lot with those initial calibration stars that have you doing a limbo dance under the telescope. But normally, after the first star is done, the following two always land fairly close to the centre of the CCD chip (I use the crosshairs in Artemis to calibrate the mount).
For your next test, try to find something in a good starfield and take a few subs for inspection of the corners. Youre using a nice camera, so you want to make sure you can use every last pixel (just in case you start getting into mosaics).
To get better balance, leg weights are pretty good.


Imaging with the 130pds
in Getting Started With Imaging
Posted
When you say sharpness, thats a bit of an open question because the there are quite a few things that contribute to the sharpness/contrast of an image, examples being:
1) Resolution: This is determined by the cameras pixel size, and the focal length and resolving power of the telescope. Its unlikely that you will find a pixel size small enough to oversample the 130, most DSLRs will yield roughly the same results.
2) Good data: That is data taken with good guiding and conditions (no clouds, no moon), long subs.
3) Processing: A fair amount of the contrast and sharpness is won back at this stage. You cant expect a newt to be as contrasty as a frac (eg: an 80ED), but where is does win out is with the depth of the data you have from running at f5 (can therefore stand up to more processing).
4) Collimation: Better the collimation, better the image
Yes you need a coma corrector if youre going to do anything serious with it, but when you ask for pinpoint stars - that wll be down to you and how you handle the telescope (ie: collimation etc). Its perfectly feasable to get a good field without much effort, but if youre asking for 100% perfect in each corner of a big chip (what I call "the last 1%") - thats a bit more difficult.... it depends on how demanding you want to be.