


Uranium235
-
Posts
7,253 -
Joined
-
Last visited
-
Days Won
25
Content Type
Profiles
Forums
Gallery
Events
Blogs
Posts posted by Uranium235
-
-
8 hours ago, Epicycle said:
Congratulations to you all and thank you! I am also very flattered as there were top notch images in the mix.
Epicycle
Heh
") somehow I don't think you will be ditching that 130 anytime soon, you're getting some good stuff out of it! A victory for the bargain basement of telescopes
somehow I don't think you will be ditching that 130 anytime soon, you're getting some good stuff out of it! A victory for the bargain basement of telescopes
-
Yay!!!
Congrats to all, but also a pat on the back for everyone else who entered - the standard of entries was quite high for this particular challenge.
-
1 hour ago, Gerry Casa Christiana said:
Hello
Can I ask did you use oxygen for the blue as well? Great picture I want to revisit it because I tried without guiding and hope to get a better result.
Yes, I used OIII for that image (same amount, 80min). But the blue is derived from the cannistra bilcolour process as detailed here:
http://www.starrywonders.com/bicolortechniquenew.html
It takes a bit of practice, and usually needs some selective colour adjusment in Ps to shift magenta to blue. Also, it helps if you remove all of the stars from the colour layer before blending with Ha luminance in order to prevent blue halos.
-
 1
1
-
-
9 hours ago, spillage said:
@sagramore sorry might be me...just brought some new kit. It has allowed me to lag my 130 so fingers crossed I get to try it all out.
You know, I'm not sure whether insulation on a telescope is the way forward. Surely all that does is lengthen the cool down process?
If you get a bit of ice on it after a long winter session, I don't see that as a bad thing. If anything, the colder it gets - the better it performs.... just don't try touching it with bare hands or licking it...lol
-
 2
2
-
-
Just revisiting some old 130pds data with 2017 processing methods, hard to believe just 80min of Ha went into this

-
 14
14
-
-
3 hours ago, Adam J said:
Anyone know if a badder click lock will allow you to reach focus on a 130PDS? It moves the camera out slightly by the looks of it.....
Unfortunately not, it will move the camera out way too far. Its better used for EPs to be honest.
-
1
-
-
I've tried getting my 130 to play nicely with the Star71, but it usually turns our to be a pain to process (star sizes).
The plan is that if I use identical focal lengths, and fairly similar pixel sizes it should (in theory) be a better match, and hence easier to process the data.
-
I've started ordering the bits required for a 130pds dual shooter, starting off with the mountings... a new vixen saddle, and some M5 socket head screws and nuts. Next up will be an ultra-short t-ring adaptor, then finally the telescope itself. Cant get it all straight away, but it should be ready sometime in December (with luck).
I'll be running the DSLR (for RGB or OIII) via the SWCC for the extra boost in photographic speed, and the CCD via the MPCC MkIII for (luminance or Ha).
-
1
-
-
6 hours ago, rotatux said:
I'm about to flock my tube too, but just a question BTW: is there any risk the flocking material could accumulate water / humidity, and raise condensation, during moisty nights ? or do you combine it with some heating device to avoid it ?
PS: what I actually have for flocking is a somewhat thick felt (I mean maybe equivalent to ±15 sheets of paper)
Not really, if you have a dew shield - dew will never make its way far enough down the tube to give you any issues.
-
1
-
-
Black holes cannot have a mass so small, the definition of a black hole is that it is a collapsed massive star... and as I'm sure you are aware - that is much, much heavier and denser than something that is merely a few times the earth's mass. No maths required really!
-
3
-
-
For those who were unable to make it to the workshop, had to drop out to deliver another talk (or who missed the first hour... whoops!) - I will attach the notes for both the basic and advanced sessions. The advanced did run over by quite a bit as it was always going to be a challenge to squeeze such a complex process into just one hour... although Mr Ibbo did quite well for his first bash at it.
For the original Scott Rosen walkthrough, the link is as follows:
Its slightly different to how I do it since we were using a couple of different tools, but both are suitable for skinning the same proverbial cat

(give yourself at least 2-3 hours to attempt it!)
* If you wish to distribute or quote any procedures or data, please remember to credit its original source (or link to this thread).
-
3
-
-
11 hours ago, moise212 said:
I didn't post to this thread for a while, although I took some shots with the 130PDS. Camera used is ASI1600MMC.
M1 is ~30min Ha and same for O3, binned 2x2, 1/4 crop, 60s exposures at 300 gain. This is just to see how large it is and if I should have a go at it after I move.
M13 I think is ~1h in 5s and maybe 30s exposures. Can't remember the other details.
M27 - ~6h of HaO3RGB, more details on astrobin: https://www.astrobin.com/297809/D/
M33 - ~12h of HaLRGB, more details on astrobin: https://www.astrobin.com/313011/
IC405 and IC410 - 4 panel mosaic, each panel is ~2h Ha, 180s exposures at 300 gain. I'm currently working on this, but it will be a combination with a wider lens that fills the whole area.
I should come back to this thread in the following period.
Clear skies!
Alex


Thats a smashing M27, it looks like you've got that 130pds nailed!
-
Hmmmm I may be making a belated return to this thread before long since I've flogged off most of my optics now - leaving just the Star71 and the 130pds.
I think I'll be just sticking to small telescopes from now on since I just don't (or wont) have the storage space soon for anything bigger.
But I'm happy that others have taken up the baton and put together some great images with that little telescope.
-
1
-
-
9 hours ago, DaveS said:
Ha ha, thanks!
Yes, I'll be sure to keep it extended. Mind you, the rain will probably put out any bonfires
 .
.
Shhhh! Dont mention the "R" word!
-
On 31/08/2017 at 19:39, Galen Gilmore said:
Once again I forget to post my pictures!
Baileys Beads with fuji Xt-1 at 1/4000 of a second at ISO 400.

I also forgot to edit my other eclipse photos...

I am the definition of procrastination everybody!

If I could give that two likes, I would!
-
2
-
-
I've just been browsing a few images from the 130pds (as you do), just to see how many of my images turn up via Google when I noticed a couple of what seemed like my images with a watermark on.... errr... whats going on here?! (I thought) as quite a few of my colour images have a very distinctive colour scheme.
So, I've taken a closer look and yes - indeed they are mine. Any AP'er will usually know their images as well as their own kids, so its a bit of a silly idea to try and nick something then slap a watermark on it, because sooner or later it will get found out. Fortunately for them, I'm not overly precious about vast majority of my images - I'd only get seriously miffed (and take action) if one of my competitive images turned up in a similar way.
They could have at least asked me if it was ok! But, on the other hand I'll take it as a compliment that they've used it to try and sell something
It looks like a Malaysian version of gumtree or fleabay, and probably the ad is a little misleading since the images were taken with a modified 130pds, and not with the actual scope on sale (if selling a scope, I awlays use images taken with that exact telescope).
http://www.mudah.my/Sky+Watcher+Explorer+130PDS+EQ3+Steel+Telescope-55553369.htm
-
3 hours ago, Susaron said:
Which object is this?
Its also designated as IC5070 (Pelican Nebula). Another panel above that would be NGC7000 (North America Nebula)
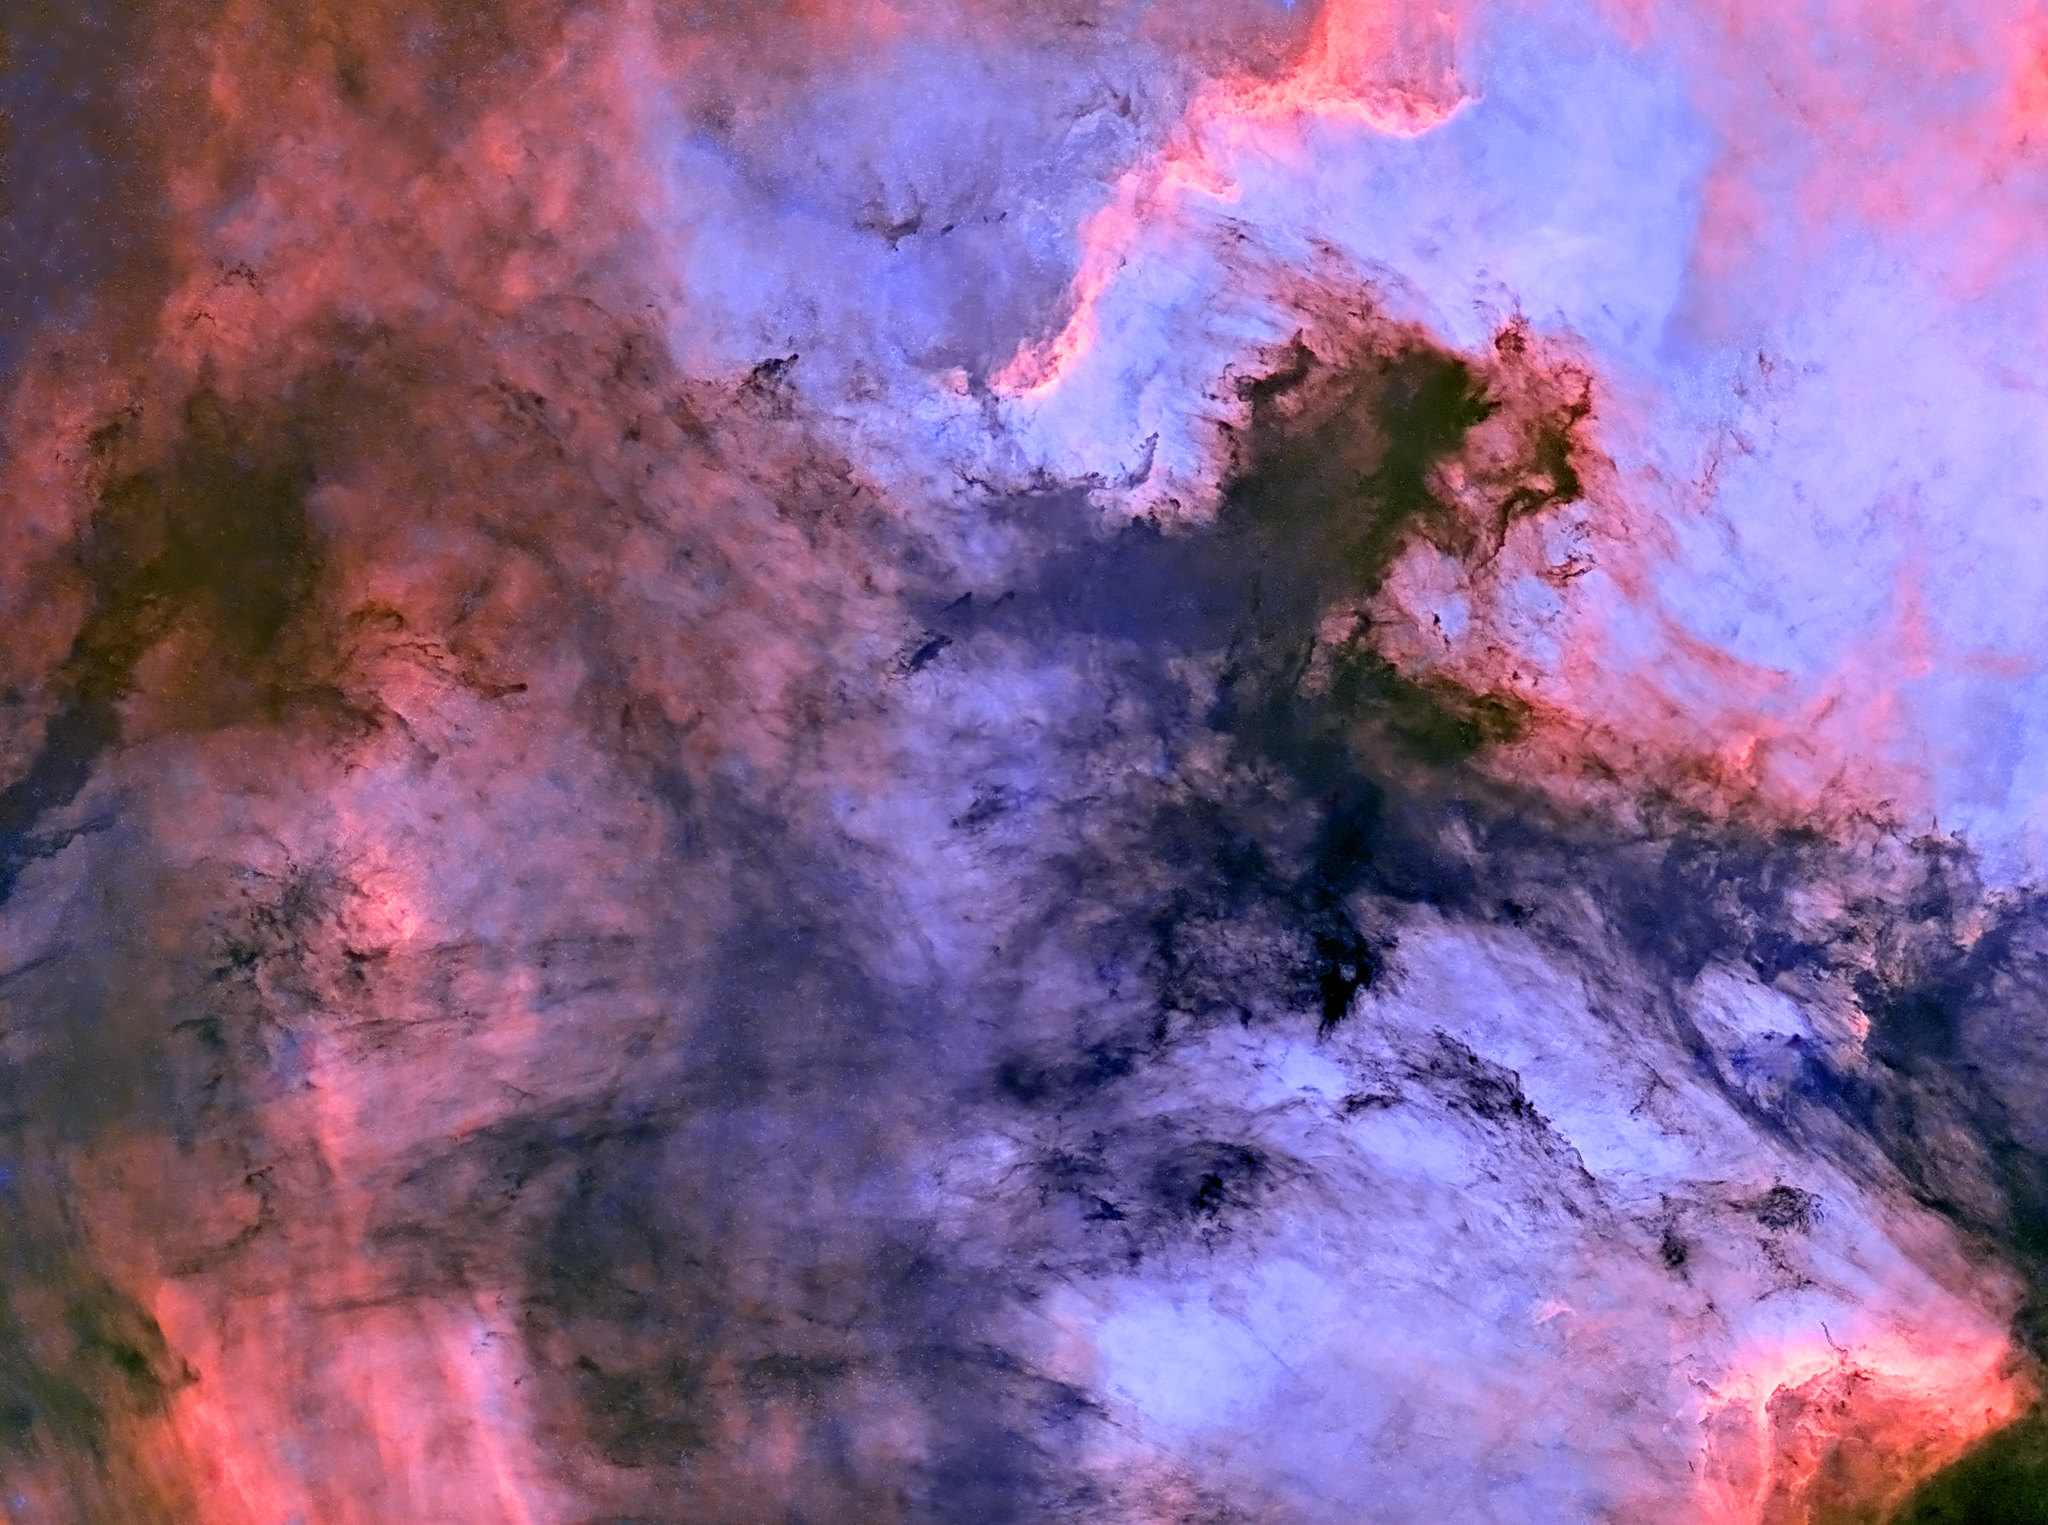
4 panel mosaic - 130pds.
-
1
-
-
On 19/06/2017 at 12:00, Igwiz said:
1/ The stars in the R image are "bigger" than B and G. (And G is bigger than B). Naturally that leaves red halos when I combine the images. Is this simply a focus issue with the filters not being exactly parfocal?
Its usually standard practice to refocus between filters, even on an apochromatic system like a newtonian. Thats mainly due to the focus shift that occurs as the telescope cools over the course of a session, but also takes into accout any other bits of additional glass you may have between the telescope and camera (ie: coma corrector).
-
1
-
-
If you tweak the tension just right, you dont need to use the locking screw
")
-
1
-
-
40 minutes ago, alacant said:
is there any cure for the focuser? It just doesn't seem capable of -or was designed to- carry a dslr.
After a bit of tweaking the tension (so its quite stiff), mine was ok with the 383L+ and FW, which is the best part of 2kg. There are no clear instructions from SW on which hex bolts to tighten up on the focuser, but you might find this useful:
https://teleskop-austria.at/information/pdf/SWN1507eq3_Skywatcher_Crayfor-Auszug_justieren.pdf
You might need some counterweight at the primary end too, a lot of the time peoples setups are quite camera heavy. I used a strap-on leg weight for mine.
-
1
-
-
1 hour ago, alacant said:
First light: Markarian's Chain. Having got used to 208mm f3.9, the first thing that strikes you is how much longer you need to get anywhere near... but hey, just look at that FOV...
Stuff that is gonna need fixing: the focuser, the springs on the primary, the secondary allen key adjusters, the flimsy dovetail, the tube... The latter is a bit of a flashback to those awful blue skywatchers from the 90's; breathe too heavily and it /bent/flexed/dented and went out of collimation. I thought that by now they'd have done something about that. Aluminium perhaps? At least something that doesn't make that awful tinny sound when you drop the allen key down the tube.
But these are minor quibbles. For what it cost, it's amazing. I'm gonna read through the whole thread and see if I can pick up any hints.
Any comments/hints/tips most gratefully received. Clear skies and thanks for looking.
Youre right about the primary and focuser needing a little attention (moreso the focuser), but everything else is already in a passable state - except the inside would need flocking (including the drawtube), the paint they use isnt quite black enough for my taste.
The steel tube is preferable to aluminium, and its dinky size is its strength (small tubes flex less) - and the dovetail will suffice (lets face it, its not a heavy telescope!). Your starfield looks ok, so no need to go adjusting any tilt yet. Quite a few have done something to modify theirs, usually in improving the camera mounting method - ie: drilling a third hole in the EP holder so you have three thumbscrews 120deg apart (helps prevent tilt in the imaging train).
Oh, get a dovetail bar for the top as well. That will be your guider platform, and it has the added bonus of increasing overall rigidity (also, a pretty useful handle). For info, the holes on top of the tube rings are 1/4" UNC, or if you cant get that a 1/4" Whitworth will do the job.
-
2
-
-
3 hours ago, alacant said:
Hi. I've been trying to source one for the last week. All European middle-men are out of stock until September and it seems impossible to deal direct with SW. I've an offer of secondhand from the sgl wanted section. Is there anything I should look out for? Any weaknesses or bits that wear? TIA.
Nothing in particular, just the usual stuff you look at when buying a newt (state of the mirrors) - but dirty mirrors can be cleaned. Check the spider as well, to make sure no vanes are bent.
-
32 minutes ago, dph1nm said:
I don't think the 1000D ever becomes "ISOless". The read noise at ISO1600 is half that at ISO200
NigelM
Sensorgen DR graph for the 1000d:
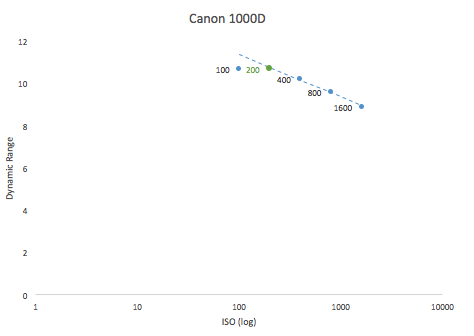
Graphs for all canon cameras here:
http://dslr-astrophotography.com/iso-values-canon-cameras/
Im inclined not to go against the article that Christian wrote, so far its been very accurate and helped retain star colour that otherwise would have been burnt out very quickly at f2:
The read noise is an aside, and is dealt with by proper calibration. What works in real world use and retaining as much dynamic range as possible is what counts I think. Take a moment to read the article, then you can decide for yourself:
http://dslr-astrophotography.com/iso-dslr-astrophotography/
Whether you agree or disagree with it is entirely up to you, as there will always be differences in opinion when it comes to what works best
But, I think we are digressing too much as this thread is about non-eq imaging.
-
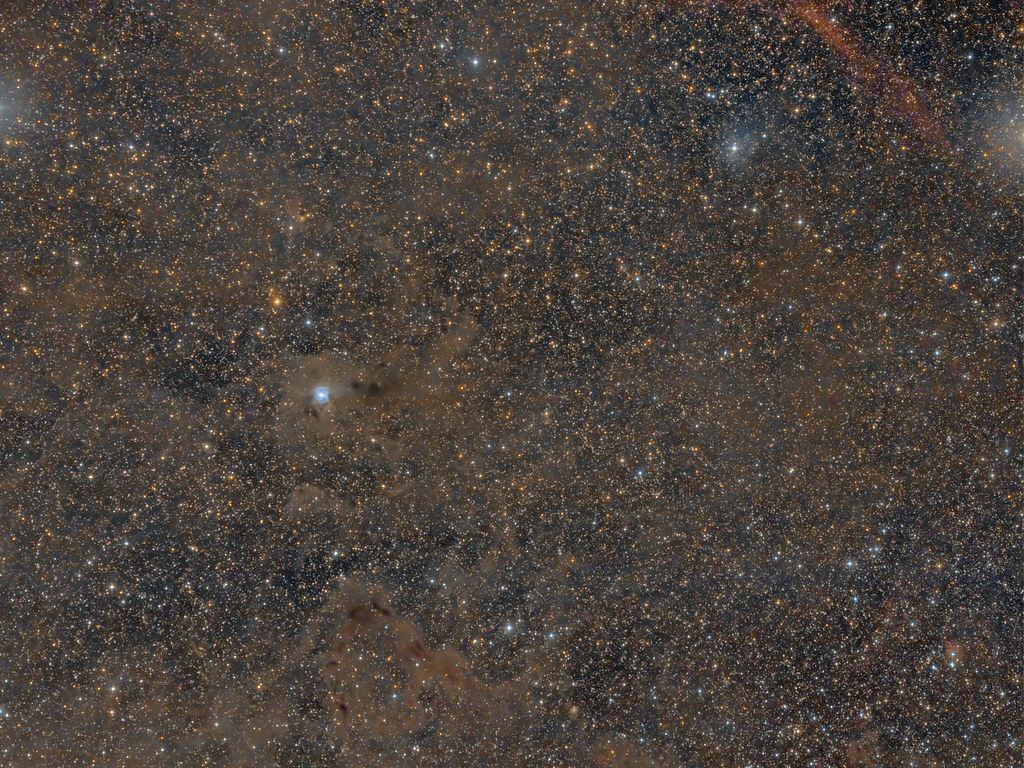
4 minutes ago, rotatux said:
I should explain more precisely: The background was limiting exposure because of the nearby moon and dust. I wanted to use 30s because that was the (theoretical) max in that zone to avoid FoV rotation, then had to severely limit ISO to get an acceptable bg level. But at such iso level I have quite high saturation capacity (I would say too much!), and the sensor could be used IMO more efficiently at higher ISO. Thinking back, higher ISO and shorter subs would have lead to more frames (and less noise) within given time.
You might want to read this very interesting article from Christian Van den Berge :
http://dslr-astrophotography.com/iso-dslr-astrophotography/
I found it rather illuminating (pardon the pun) when it came to choosing the best ISO for a fast lens on a DSLR. Its about finding what point your camera becomes "ISOless", which turned out to be ISO200 for my Canon 1000d... yes, very low but it helped an awful lot when it came to preserving star colour. As long as the data is properly calibrated, read noise should not be much of an issue - unless you are chasing a very weak signal, in which case bump up the ISO a bit (maybe to 400) to reduce the effect read noise has on very weak signals, extend the exposure, then merge the ISO 200&400 sets as an HDR image (so you have colour in every part of the image, including stars).
-
3
-


 .
.


Deep sky imaging showcase 2017
in Imaging - Showcase Threads
Posted
Finally, it's here!") (my apologies for the delayed start of this one)
(my apologies for the delayed start of this one)
Please use this thread to showcase your best images captured during 2017. Just one post per member but you can include up to 5 images if you want.
The thread is for all imagers, both novices and advanced.
Please keep details to a minimum - scope and camera possibly along with a few comments.
The thread needs to be packed with images so please don't respond to the postings