


tekkydave
-
Posts
1,798 -
Joined
-
Last visited
Content Type
Profiles
Forums
Gallery
Events
Blogs
Posts posted by tekkydave
-
-
It will work with or without the temp sensor attached. Make sure you have uninstalled the old version of AAF2 before downloading and installing V2.2 from sourceforge. Also make sure you upload latest arduino sketch to the nano.So what's the answer ?

Don't have temp' sensor
Dave
-
In 200 posts time I may come back and edit all this out and make my posts look spot on
 but I guess between the 2 posts we have an answer.
Would it be possible for the Arduino to sort it's own com port ? I find I have to check and choose every time, com3, com4, com5 etc - windows I suppose.
You can only edit each post for a limited time after posting it I'm afraid. Not sure what the answer to the com port issue is.
-
Phew, you had me worried then.
-
Glad you got it installed so quickly. I'm still waiting for the temperature probe I ordered from China. I am planning to put a standard 1-wire RJ11 connector in my focuser case to connect it all up.Thanks again Dave, I have a waterproof DS18B20 that I have added the resistor and some cables, been playing with the example sketch and Russell's code, had to uninstall AAF2 v2.1.3 before I was allowed to install v2.2. Flashed the sketch on the nano and now know it's 22 degrees in the lounge, more if I pop the probe under my tongue - aah science......
At the moment just have the probe on the nano, need to joint it all up and add another hole in the plastic box.
I also don't have any other software to view the temperature, may try Focusmax over the weekend (was looking at v3 the other day). Would it be worth giving Ivo a nudge ? (I could do that) would be nice to see the temperature in APT at the very least, not sure I begin to understand what's required regarding auto focus including temp change.
-
I have uploaded release 2.2.0 to the SF Site http://sourceforge.net/projects/arduinoascomfocuser/
This implements the Temperature sensor functionality.
A big thanks to russellhq who worked out all the details for me. I have worked most of the code supplied into my project with minor mods.
I will update the circuit diagram on the SF site with the DS18B20 connection details asap but it basically follows the diagram that russellhq posted;

Don't worry if you don't want to fit the temperature sensor - the focuser will continue to work but will return a temperature of 0C to any applications that try to read it. I have added a simple temperature readout to the FocusAAF2 test utility - it should report the temperature 10s after connecting to the focuser and then every 10s until you disconnect.
I don't have any client programs that display the temperature except BYEOS but that seems to have gone a bit flaky on me at the moment.
As ever I would appreciate any feedback.
-
 1
1
-
-
Done a quick test sketch to flash LED which compiles OK and runs, doesn't work and gives error "avrdude: stk500-getsync ():not in sync: resp=0x00
Anyone know what this means ?
Dave
Got it working now, had the wrong board selected under the "tools" drop down menu.
I'd forgotten what fun it was checking all the punctuation in lines of code
Don't ya just love those semi-colons
-
As Mick has suggested I snipped all the pins off the nano to allow it to fit in the small box I used. It is also soldered to a piece of veroboard and the excess pins snipped off. This was so I could use the pcb mounting slots in the box. If you do this make sure you break the veroboard tracks to avoid connecting pins on one side of the nano to the pins opposite.Hi Dave,
Got all the bits now so will make a start today, as an Arduino virgin it will be interesting, on your photo you appear to have jumpers on the pins at the opposite end to the USB plug, are they serving any purpose or just insulating the pins ?
Dave
-
How many posts until I can edit ?
looking at the dll addresses above,
C:\Program Files (x86)\AAF2\AAF2\ASCOM.AAF2.Focuser.dll is more than possibly the 64bit address and
C:\Program Files\AAF2\AAF2\ASCOM.AAF2.Focuser.dll the 32bit
250 posts till you can edit your own posts.
-
Thanks Mick - you beat me to the answer.Install of the driver has been a bit of a problem, pages 3 and 4 of this thread outline the problems, I have just reinstalled windows 7 ultimate 32bit and had to run it all again. I will repeat that I am not comfortable with this code stuff.
Post #57, AAF2 install places the driver dll here: C:\Program Files (x86)\AAF2\AAF2\ASCOM.AAF2.Focuser.dll
Opening cmd as admin using Ctrl-Shift-Enter, I pasted
C:\Windows\Microsoft.NET\Framework\v4.0.30319\RegAsm.exe "C:\Program Files\AAF2\AAF2\ASCOM.AAF2.Focuser.dll"
into the cmd window and installed the driver.
The address for the dll may be slightly different on 64bit. hope this is helpful. Mick
-
Hi Robert and thanks for downloading my project. The driver assembly is installed it just isn't registered so the rest of the system can 'see' it. Unfortunately I haven't worked out how to get the installer to automatically register the driver correctly yet. There is a work-round where you can register it manually using the regasm utility, which is part of the .net framework already installed on your PC.Hi Dave
I ran your installer (Win7 64bit Ultimate) but ASCOM_AAF2Setup.msi only installs the application, it does install the ASCOM focuser driver necessary for the FOCUSAAF2.EXE program to talk to. Thats on my system.
Is it possible to post the ascom focuser driver separately instead of part of the .msi
I have the arduino code running but cannot seem to install the ,msi file properly so am missing the ascom driver
Cheers
robert
The details are in this topic at post #57 (on page 3). I need to find the time to sort this out once and for all but other projects and commitments (like work!) keep getting in the way.
-
I've just searched thorugh all the sketches I have used since I got this desktop several years ago and they all use either ID codes found by running a separate sketch or by searching 1-wire devices within the main sketch. All I can think of is that was mentioned in a post on here - either started by me or in reply to someone else's. That's "a needle in a haystack!"

However, I did come across a reference to an Arduino 1-wire library with the facility to skip the ID selection :-
http://www.pjrc.com/teensy/td_libs_OneWire.html
This doesn't "ring any bells" - I thought I got this from somewhere else but this seems to be one answer
Thanks for trying Gina
-
Oops, sorry I misread who the last message was fromThanks Gina, looks like you will have 2 credits in the sketch

-
Couldn't find how to not use the device address, but found how to get the device quite simply. The following 2 lines of code assigns the address:
oneWire.reset_search();oneWire.search(TempSensor);New sketch attached to post.Thanks Gina, looks like you will have 2 credits in the sketch
-
ah that's great. I the sketch I have is R5 I think dated 13 April 2014. I'll see if there is a later one
The latest on my Sourceforge site is V2.1.3
http://sourceforge.net/projects/arduinoascomfocuser/files/Mark2/Software/V2.1.3/
-
Thats strange - I ordered one of those last night. I thought it would be handy to have a probe to position wherever it was needed to get the correct temperature.
-
That's very useful if you have several 1-wire devices connected and I do the same but with only one device you can use different code that bypasses the device ID. I think it's in the Arduino web page or I could find it if you like.
That would be great Gina
-
No problem adding it to your project, you did all the hard work!
Here's a crude sketch of the layout. Basically what you do is:
- Connect outer pins to ground
- Connect middle pin to a digital pin (my arduino code uses pin 6)
- Connect a pull up resistor of value 4k7ohm between your digital pin and 5v pin
This arrangement is called "parasitic mode", which basically allows you to run 2 wires to the DS18B20 instead of 3. You can find out more about it here:
http://playground.arduino.cc/Learning/OneWire
You will also need to modify the Arduino code I posted to account for the serial number of your own DS18B20. I used the following sketch to find it:
http://www.hacktronics.com/Tutorials/arduino-1-wire-address-finder.html
Thinking about it, it's probably a better idea to incorporate the sketch into the focuser sketch!
Cheers. I'll try to get this built into the project and a new release out at the weekend. It depends what SWMBO has planned for me at the weekend.
I like the idea of getting the sketch to detect the serial number automatically. It will only ever have one DS18B20 attached so it only needs to get one value.
I might be a good idea to have the code detect if the sensor is present and return sensible values to the driver if not. I guess not everyone will want to have the temperature sensor fitted.
-
1
-
And here's a picture of it on the scope:
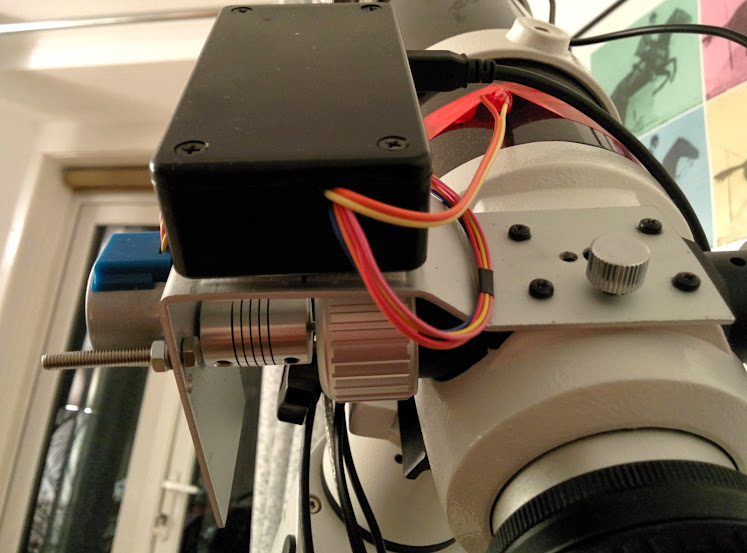
I need to trim down the screws at some point.
Nice job. Now I really am ashamed of my cork mats. Now I have my bench drill set up I might go about making a proper bracket.
-
We have temperature sensing!
Here's a screenshot from focusmax:
And an extract from the log file:
23:04:20.042 AAF2 Constructed23:04:22.079 AAF2.setInitialPosition Sending: I1000#23:04:22.079 AAF2.CommandString ------------------ Start -----------------------23:04:22.079 AAF2.CommandString Command = I1000#23:04:22.079 AAF2.CommandString Clearing Buffers23:04:22.080 AAF2.CommandString Transmitting:I1000#23:04:22.330 AAF2.CommandString Getting Return Message23:04:23.160 AAF2.CommandString Return Message = I1000:OK#23:04:23.161 AAF2.CommandString ------------------ Finish ----------------------23:04:23.161 AAF2.setInitialPosition Received: I1000:OK#23:04:23.161 AAF2.getPosition Sending: P#23:04:23.161 AAF2.CommandString ------------------ Start -----------------------23:04:23.161 AAF2.CommandString Command = P#23:04:23.161 AAF2.CommandString Clearing Buffers23:04:23.162 AAF2.CommandString Transmitting:P#23:04:23.412 AAF2.CommandString Getting Return Message23:04:23.413 AAF2.CommandString Return Message = P1000:OK#23:04:23.414 AAF2.CommandString ------------------ Finish ----------------------23:04:23.414 AAF2.getPosition Received: P1000:OK#23:04:23.414 AAF2.getPosition Position = 100023:04:23.607 AAF2.getTemperature Sending: C#23:04:23.607 AAF2.CommandString ------------------ Start -----------------------23:04:23.607 AAF2.CommandString Command = C#23:04:23.607 AAF2.CommandString Clearing Buffers23:04:23.608 AAF2.CommandString Transmitting:C#23:04:23.858 AAF2.CommandString Getting Return Message23:04:24.393 AAF2.CommandString Return Message = C20.2:OK#23:04:24.393 AAF2.CommandString ------------------ Finish ----------------------23:04:24.393 AAF2.getTemperature Received: C20.2:OK#23:04:24.393 AAF2.getTemperature Temperature = 20.223:04:25.408 AAF2.getTemperature Sending: C#23:04:25.409 AAF2.CommandString ------------------ Start -----------------------23:04:25.409 AAF2.CommandString Command = C#23:04:25.409 AAF2.CommandString Clearing Buffers23:04:25.409 AAF2.CommandString Transmitting:C#23:04:25.660 AAF2.CommandString Getting Return Message23:04:26.199 AAF2.CommandString Return Message = C20.2:OK#23:04:26.199 AAF2.CommandString ------------------ Finish ----------------------23:04:26.199 AAF2.getTemperature Received: C20.2:OK#23:04:26.199 AAF2.getTemperature Temperature = 20.223:04:27.211 AAF2.getTemperature Sending: C#
Also, I've attached the arduino sketch and driver cs files to the post in a zip file.Thanks for that. Are you ok with me putting that into the project? Can you do a simple circuit diagram showing how the DS1820 is connected to the nano and I'll add that too.
That's brilliant - you've saved me some time working it all out, thanks again.
-
hi is there any way to get the ascom driver to start at say position 1000 rather than 1 as it basically means that one can only focus one direction, at lest in focusmax, unless the ascom chooser is opened and the position entered manually.
With the 200mm lens I normally keep it at last focus position (to do flats etc) and don't want to wind the focus in one direction fully.
the focuser is now working a treat with an external 5v driving the stepper, no more stuttering or slipping
It should start at position 1000 with the latest arduino sketch and driver. I also added the option to specify the start position on the chooser dialog. If you don't see the drop-down box when you choose the driver you might be using an earlier release.
-
23/09/2014 - add Steve_Max127<p>Roll of Honour I have just flicked back through this topic and made a list of all the SGL members who have made a focuser based on my design (or have one on the go). I hope this is correct. If I have missed anyone let me know.
- Dave_D
- Baffa
- wuthton
- Mick J
- russellhq
- mindburner
- Davey-T
-
I have added the 'C#' command to the command protocol list on the SF wiki to reserve it for 'C'elcius temperature readings. I'll implement it in the next release.
https://sourceforge.net/p/arduinoascomfocuser/wiki/Communications%20Protocol/
-
Roll of Honour
I have just flicked back through this topic and made a list of all the SGL members who have made a focuser based on my design (or have one on the go).
I hope this is correct. If I have missed anyone let me know.
- Dave_D
- Baffa
- wuthton
- Mick J
- russellhq
- mindburner
- Davey-T
-
1
-
Thanks Dave, got the code last night, took a bit of time to get my head around it but struggled to get it working.
I added the following to the Arduino code to return a default temperature of 21.5 (and the counterpart in the driver code), but get an error in the client program (Focusmax). When I checked the log, it reports that the driver sent the command to the Arduino and the Arduino returned a string, but the sting was only "TT:OK#". Bit of a head scratcher

case 'TT': // Get Current Temperature { Serial.print("TT21.5:OK#"); break; }I think this is because you have used 2 chars ('TT') for the command. The switch statements starts with:
switch(command.charAt(0)) {
command.charAt(0) means the first char of the string command. It only detects the first 'T' and interprets it as the 'Set Target Position' command.
It must be interpreting the second 'T' as the position then echoing it back to confirm giving the 'TT:OK#'.
I decided at the outset to use single character commands for simplicity so we just need to pick a different letter. I suggest 'C' for Celcius.
Try this:
case 'C': // Get Current Temperature
{
Serial.print("C21.5:OK#");
break;
}
I have tested it on a spare nano and it works ok.
-
1
-


Arduino Ascom focuser Mark2
in DIY Astronomer
Posted
I have just reproduced the above problem by running the latest driver & FocusAAF2 applications (V2.2) but with the older (V2.1.3) sketch on the nano. Putting the V2.3 sketch on the nano cures the problem.
For some reason my numbering schemes between the Driver & Arduino sketch have got out of step. From now on they will be numbered the same to avoid confusion.