


Scott
-
Posts
6,671 -
Joined
-
Last visited
-
Days Won
5
Content Type
Profiles
Forums
Gallery
Events
Blogs
Posts posted by Scott
-
-
19 hours ago, faulksy said:
small upate, fitted my dsc today with new improved hardware and new bespoke cables from serge at astrodevices
still going for the christmas tree look then with all them lights?

-
 2
2
-
-
1 hour ago, faulksy said:
very true derek. i was picking it up


I'm just up the road mike. call in for a brew if ya fancy. I'll show ya what a proper (AP) set-up looks like
-
1
-
-
Another 20" @faulksy, ready for sgl12?
-
1
-
-
with the likes of twitter and fb it's no wonder that "likes" are becoming more popular than comments. Back in the day, people had something to add...now its just all too easy to like a post and move on
") . In fact, I seem to recall hearing that in the earlier days of sgl, there was no "like" button so this may go some way to explaining why members with 10k,20k or more posts have a much lower lpr than newer members. When alls said and done, it's just a bit of fun .
. In fact, I seem to recall hearing that in the earlier days of sgl, there was no "like" button so this may go some way to explaining why members with 10k,20k or more posts have a much lower lpr than newer members. When alls said and done, it's just a bit of fun .
Oh, @Stu, I found a 5000+with 1 like although I do wonder if any of these figures have been messed up with software upgrades etc
-
To me, this just highlights the desire for flo to provide as near perfect service as is reasonably possible. I only wish a service such as this was available when I bought my <£1000 triplet
 .
.
possibly the best £75 you could hope to spend :D. Well done flo-
1
-
-
8 hours ago, alacant said:
Ahhgghh! I didn't see this. In one post we have orientation dependence, but now we don't.
Sorry to be a pain. Could I go back to my clouds example? Say I take 3 exposures at 23:00. Then it clouds over. I leave everything as it is; tracking and camera orientation. The sky clears at midnight. I continue with exposure number 4. Question, is snap 4 the same orientation as snap 3?
TIA
Tia,
Yes, the orientation will be the same. as Dave has pointed out, there may be slight rotation due to polar alighnment being off a little but this would also apply to a camera aligned to the RA/DEC.
As you can see, I've deliberately rotated the camera alignment in my planetarium software by 40o and taken two pics 10 hrs apart and there is no rotation at all. Ihope this explains it for you.
As others have said, working with a camera aligned RA/DEC is so much easier when it comes to adjusting the camera and especially when you get to doing mosaics

-
2 hours ago, Thalestris24 said:
Hi
If your camera (sensor) is oriented along RA/DEC the framing won't change over time. You can check for yourself in Stellarium if you set up the framing tool with your scope and sensor data.
Louise
I think you're overcomplicating things louise
. Regardless of orientation on an eq, providing its not altered it stays the same
-
7 minutes ago, steppenwolf said:
Additional Note 22 - I have discovered that my Flat calibration files are over-correcting
I noticed recently that although I was fairly happy with the images that I was capturing with the automated system, something was 'missing'. I tracked this down to my Flats over-correcting resulting in bright corners and a dark patch in the centre of the frame. This was something new as previously I had been really pleased with the Flats that I was getting when I collected them manually. Having tried increasing the flush intensity to no avail (the camera disengages if a flush higher than 'Normal' is used), I re-evaluated some images that I took some time ago and confirmed that the Flats worked perfectly in the past so I started looking for anything that had changed.
Full automation is the biggest change which means that MaxIm DL is now controlled by CCD Commander and therein lay the issue. Not a problem with CCD Commander as such but a simple case of CCD Commander taking its lead from a preset within MaxIm DL.
I have set the exposure presets in MaxIm DL's Readout Mode to download images in 'fast mode' when manually locating stars, manually focusing or when checking the framing of deep sky objects. Unbeknown to me, CCD Commander was taking the readout mode from the first preset in the list and applying it to Light, Bias, Dark and Flat frames so all the frames were suboptimal. The solution was simple - make a new preset called 'Imaging Session' with the readout mode set to 'Image Quality' and place it at the top of the list.
Problem solved.When I win the lottery and build my fully automated obs, you are gonna be one busy man
")
-
2
-
-
12 minutes ago, ollypenrice said:
Because round stars don't indicate good guiding. Random errors will produce round stars - but large round stars.
I don't use Alignmaster and don't know how it works, but there is absolutely no doubt that mounts do not, in principle, need to be level. Try this thought experiment: take a perfectly aligned mount and get Harry Potter to hold it permanently in place by magic. In this situation you can remove the pier or tripod completely and Harry's magic will keep it perfect. Or you could shorten the tripod legs so they no longer touched the ground and then you could use the levelling adjusters to point the pier or tripod wherever you liked. The point is that this will have no effect at all on the polar alignment.
The best fast PA routine bar none is Takahashi's and their tripods have fixed legs.
Olly
Not ideal if you're on the side of a hill, but Iget your point
-
I think I know the video in question and whilst I agree that there is no need for the rat cage, I don't think it's necessarily as detrimental as the vid makes out. It also made me laugh when he started banging on about the welds being part of the tentioning (i'm paraphrasing here). For crying out loud, the distortions due to the welds are unavoidable and there is next to no way of replicating the same "warp" with every pier. I think he's done the diy astronomer a great dis-service insinuating that we are nearly all incapable of building a descent mount. for the money he charges, I could probably build a handful.
-
2
-
-
2015 was the year of starting ccd imaging. Not a lot to choose from but here you are
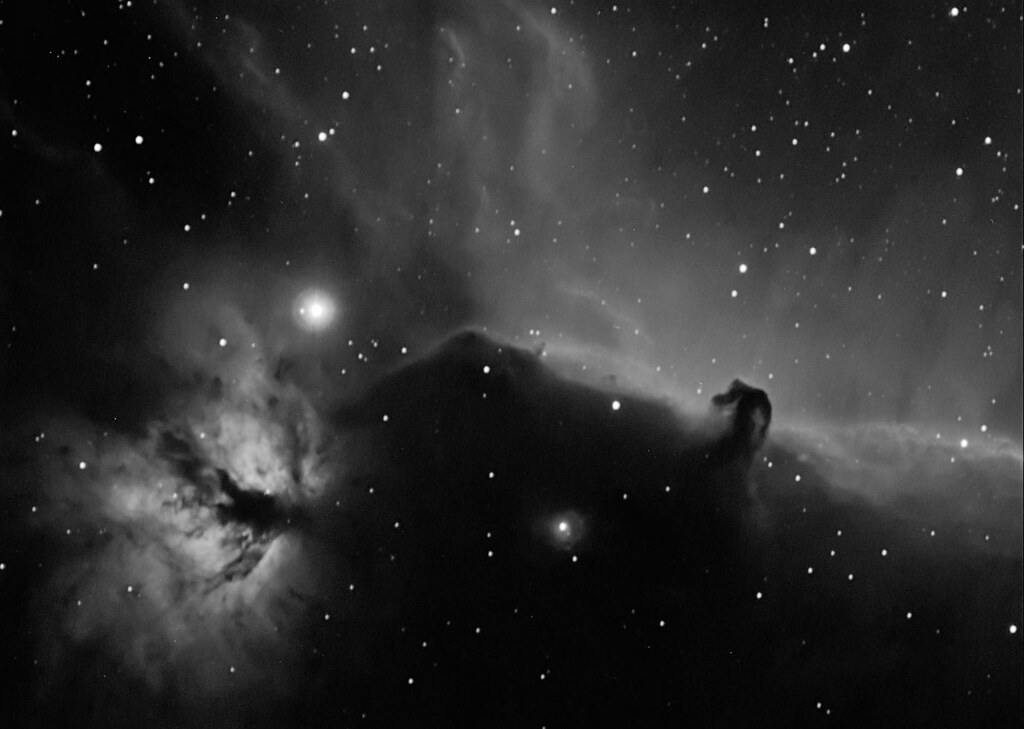 2014-12-12 Horsehead ProcessMask After by Scott Prideaux, on Flickr
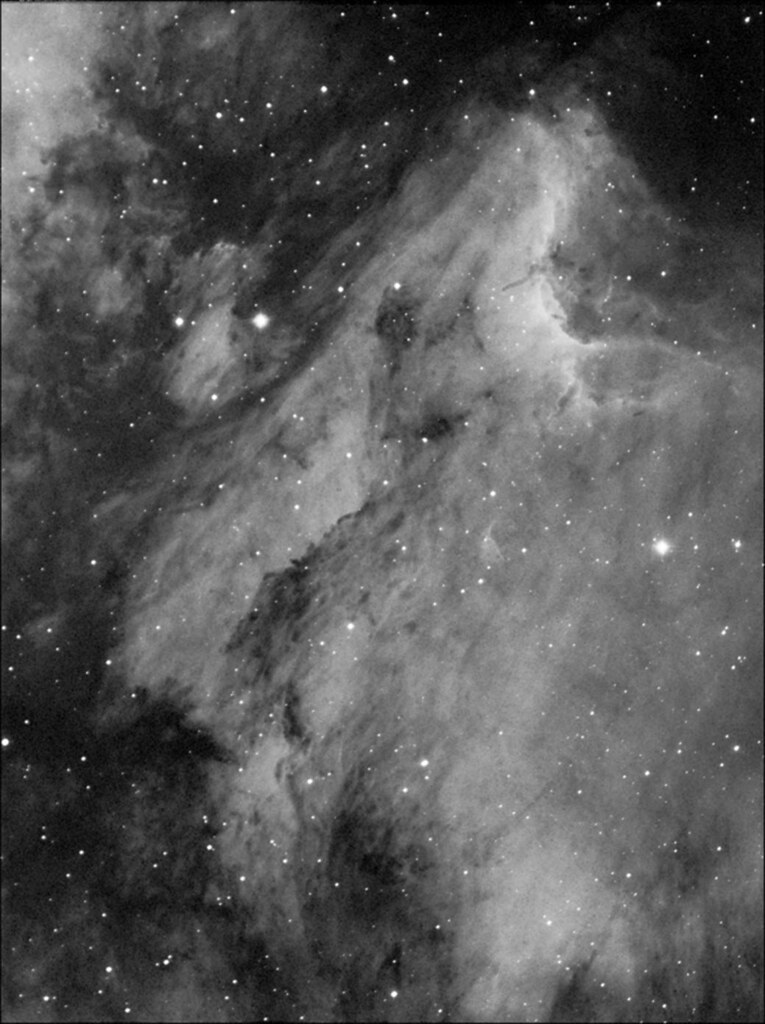 pelican_2nites_TVpro by Scott Prideaux, on Flickr
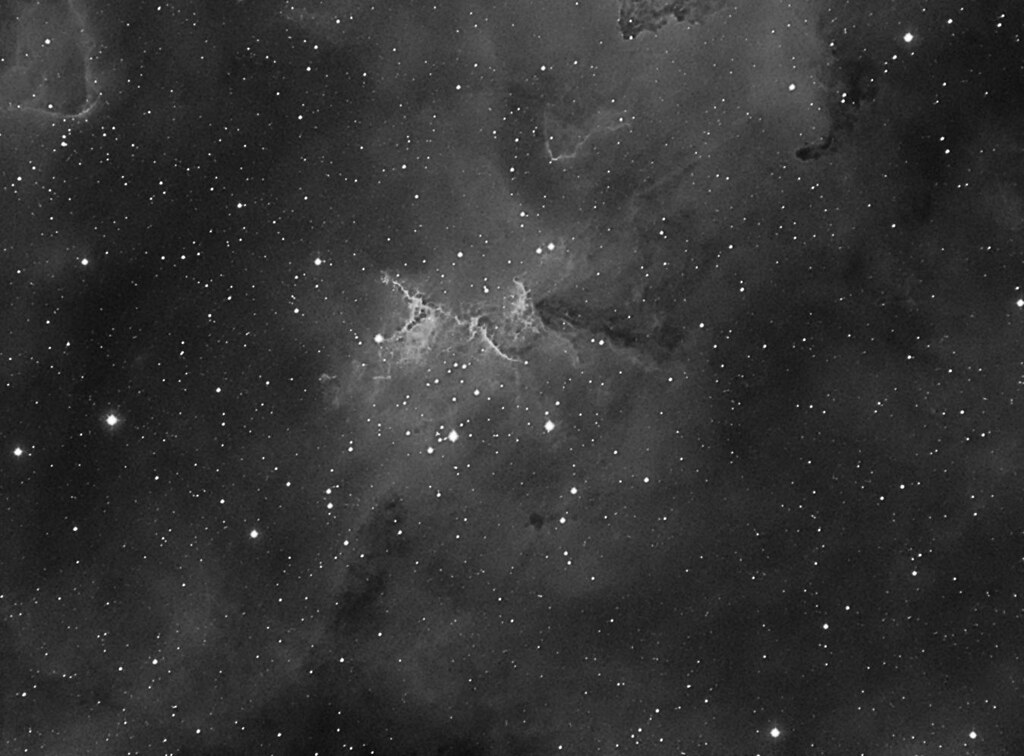 Heart of the heart by Scott Prideaux, on Flickr
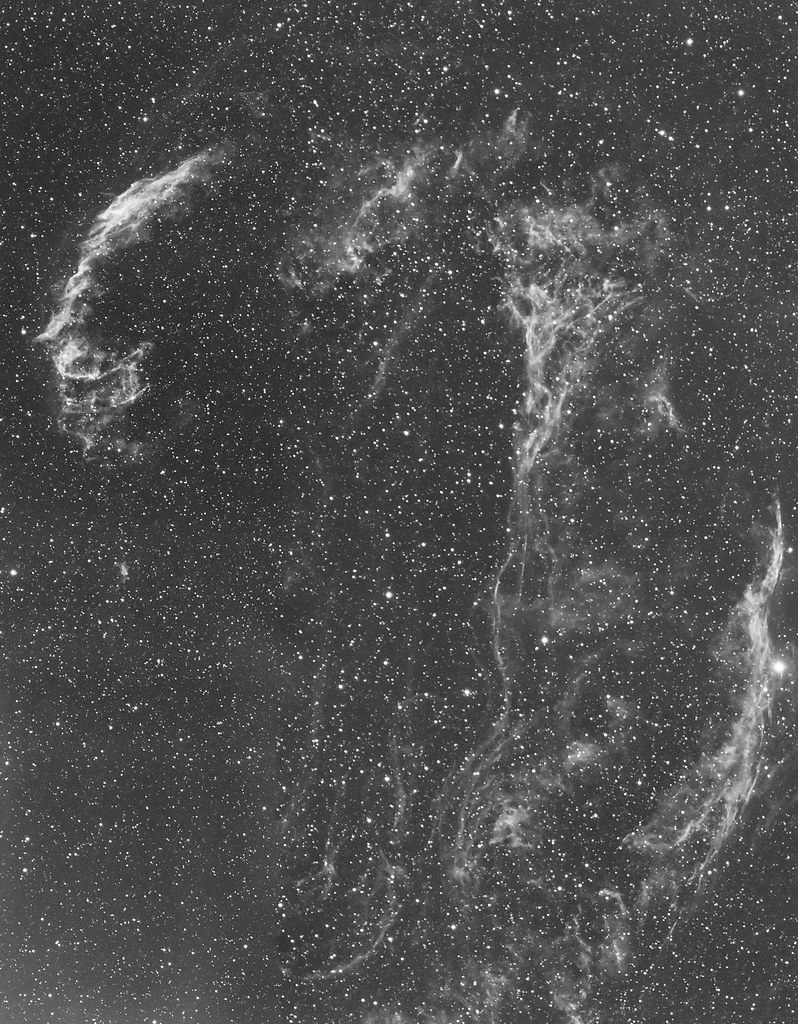 veil complex 2nites by Scott Prideaux, on Flickr
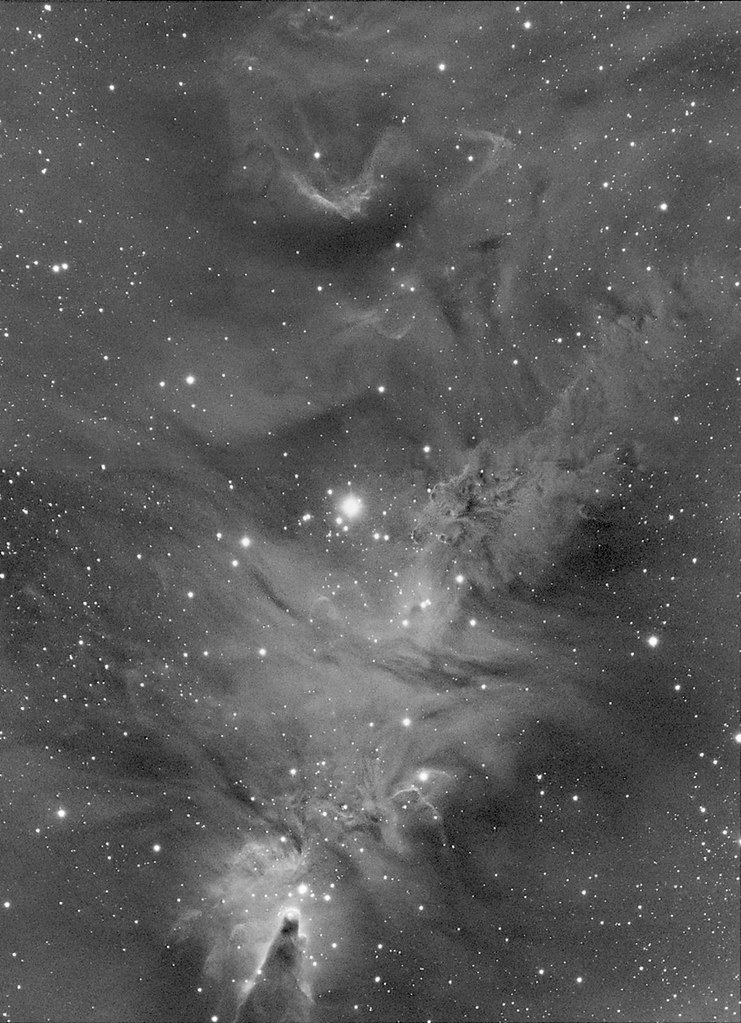 Cone Neb by Scott Prideaux, on Flickr
I'll try for a bit of colour next year

-
14
-
-
First Light Optics have them at £275. In-store Jessops, I noticed the reflector scope was facing the floor, not the sky? who sets them up, what is their knowledge? better support and help from Flo!.
A very good point. if buying new, you want to be confident they will be able to sort out any niggles you may have. I'm unsure you'll get that from a camera store selling scopes
-
Here's my usual "frac"...
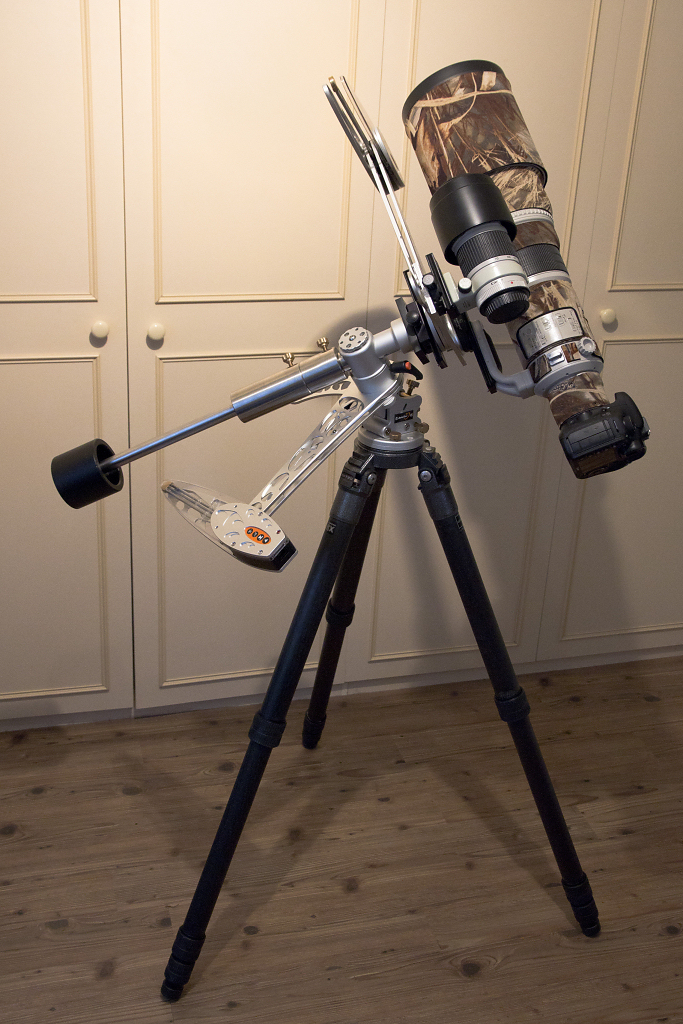
Ok Stuart, I'm baffled... whats with the two AT's?
-
1
-
-
steve used to do it when it was hard Scott!!!!

oh you dob mob really stand up for each other don't you'se

-
2
-
-
Oh I'm sorry.
For imaging purposes you'll be wanting either a newt, or
an old sewer pipe with glass stuck in the enda refractor mounted on an EQ. The key I'm afraid is the EQ mount. This bane of visual observing is unfortunately needed to allow for the long exposures required for astro imaging.blummin eck.... Swamp Thing giving imaging advice

He'll be advising on planetary imaging next
-
4
-
-
-
more wires than my dob lol. looks good mate
Nahh....
-
1
-
-
Although I've seen these regularly in the hands of our guests, I've never had my own... until now that is, because two kind guests, John and Viv, kindly sent me one as a present yesterday. I was thrilled to bits because these devices are so useful, espeically to the imager. Many members will know of them, but for those who don't they look like this;
You simply hold them in this position, pointing to the zenith, and press the button. A sensor on the top measures magnitudes per square arcsecond. If this sounds a bit arcane, don't worry. It appears as a number on the digital scale. The scale is logarithmic so is highly compressed by the time you are in dark sky territory. A value of 21 is roughly where good sites begin and the best reading I've ever heard of was 22.1 in the Australian outback. Sky and Telescope suggest that 22 is generally considered to be the level found under a totally dark site on a moonless night. They discuss the use of the meter here; http://www.skyandtelescope.com/astronomy-resources/rate-your-skyglow/
Last night, with twilight still clearly around, we started at 21.1 and were at 21.6 by midnight. The best anyone has recorded here is 21.9. If I ever see 22 I'll throw a party! (In the morning...)
One use of the meter is to scout around for the darkest site in your area.
For me its usefulness arises from the fact that, when imaging at the PC screen, it is impossible to assess the current sky quality until your eyes are dark adapted - and that takes ten minutes as a bare minimum. With the meter you can check the sky reliably and immediately and so decide whether the clouds have scuppered you or not.
The manufacturer's website is here. http://www.unihedron.com/projects/darksky/
Very highly recommended.
Olly
I hope for your guests sake this never happens.....you'll be kicking them off your rig(s)
-
1
-
-
I do realise this is one exceptional image and Tom is only answering questions but please remember folks that commercial advertising/trading is a no-no on sgl so lets not put Tom and Olly in an awkward position
Thank you for your understanding
Freaking Awesome!! I would love to hang a print of this on my wall. This is the very area of the sky that got me into this hobby and I have gone as far as tattooing the orion nebula on myself. It is nice to have friends to tackle the immense project that had to be.
So now the question....How do I go about getting one to hang on the wall?
Very very nice image.
I'm definitely one for buying a decently sized poster print of this if it becomes available, it'd look pretty above the fireplace!
Any thoughts of submitting a lower res 10k x 6x image (still good enough for fullpage print quality to Sky and Telescope, either for their Gallery or for inclusion in their special issues?
-
words cannot do this justice. truelly inspirational and such commitment to your craft. "well done to you both" hardly covers it but I'll say it anyway. Hope to see it hanging one day
-
Olly has a good point. When I first got my 200P one of the vanes was twisted and visible. Easily fixed though.
How did you fix it Rich? For the benefit of those less knowledgeable (not me of course
) -
Rob, That is an amazing mosaic. I'm just in awe of your dedication. A note to myself, there are no quick fixes...only hard work and perseverence
-
1
-
-
As I suspected, in over my head
. I shall bow out now -
No cables all wi-fi...
I thought kev ment if there was no wifi available, or am I missing something? may well be over my head here


THE FAULKS 20" F4 DOB BUILD
in DIY Astronomer
Posted
haha, fair enough Mike. forget the buzzers, get one of those musical car horns