


Piero
-
Posts
3,930 -
Joined
-
Last visited
-
Days Won
5
Content Type
Profiles
Forums
Gallery
Events
Blogs
Posts posted by Piero
-
-
I bought a copy of IDSA, in order to map the objects described in Burnham's celestial handbook and create observing lists.
The atlas for outdoor work is Sky Safari Pro instead.

-
 4
4
-
-
Star names - their lore and meaning by R.H. Allen is a classic one.
It is mentioned quite a lot by Burnham in his Celestial Handbook, which is another classic.
Both are highly recommended.
-
2
-
-
3 hours ago, Captain Magenta said:
... as a follow-up to this I thought I might post a picture of the inside-cover page to see if by some happy chance the previous owner is on SGL?
Sidgwick's Amateur astronomer's book is excellent in my opinion. Very inspirational and rich of insights. A keeper.
-
1
-
-
2 hours ago, Saganite said:
That will make very interesting reading.
Thanks. Burnham cites that book quite often. That's how I became aware of it.
-
1
-
-
Found in the second hand market:
-
10
-
-
2 hours ago, Louis D said:
I've often wondered, if the secondary is tipped relative to the true optical axis, but the primary is compensatingly tipped so the center dot looks centered in a collimation cap reflection, what affect does this have on the image? Does Suiter discuss this condition? I ask because I'm never quite sure if the secondary is pointing exactly at the center of the primary each night even since I check it infrequently, only performing a quick primary check each night.
By 'tipped' do you mean off-axis towards the primary mirror?
1. A primary mirror axial misalignment will cause coma on axis (coma due to misalignment).
2. A focuser axial misalignment will cause the stars to focus at different points across the focal plane.
3. A secondary mirror (severe) misalignment will cause unequal field illumination.
It's rather obvious that only the first one degrades on-axis, therefore 2 and 3 reveal nothing on a star testing as this is conducted on-axis.
Of the 3, the last one is the less critical for visual astronomy.
Without coma corrector, the first one is the most critical. With coma corrector, also the second becomes rather critical. All of them become more critical in faster newtonians.
There is nothing to fear in this process. If wrong, it can be fixed and rather easily.
-
If collimation of a, let's say, f5 Newtonian telescope without coma corrector is checked with a star test, the star must perfectly be on axis, otherwise the coma-dependent misalignment is also visible. This cannot be really distinguished by optical misalignment.
So, again, to me at least star testing is not the right way to check collimation as it is too sensitive, unless the seeing is very good, the high power eyepiece is good, coma corrector is used, and the mount tracks automatically. Even so, this test doesn't tell you anything about secondary and focuser alignments.
Coming back to the topic, my HG laser and Catseye telecat give the same reading consistently.
-
1
-
-
Not sure what some members above meant by star testing in this thread. Do they mean "checking" or "collimating" with a star test?
In my opinion, I wouldn't suggest the latter, particularly with manual driven mounts. Regarding the former, the procedure can be rather complex as it is easy to get errors due to other factors which don't have anything to do with misalignment. Of course, if one knows how to star test, the feedback given by this tool is incredibly useful in order to understand what does not work properly in a telescope.
Regarding the importance of collimation, well Suiter's book on star testing offers some quantitative data on this subject. Of course, a slightly miscollimated telescope still works. Said this, if one pays for premium optics and is happy to have an "okay-ish" collimation, the same person should reflect that some okay-ish optics with excellent collimation could probably give the same results in terms of view quality.
-
2
-
-
I tend to stand while observing as that's my preferred way. This with both my dobson and refractors.
The refractor mounts have an extensible column which I love as it avoids contortionism or "yoga postures".
-
2
-
-
Yup! Congrats!
-
1
-
-
Last Thursday night the seeing was great with very good transparency.
Observing Aristarchus crater and plateau from 160x to 630x was amazing. In particular, I was impressed by the kind of "river" approaching the crater to the left and how the light played fantastic shades inside.
From Wikipedia: Aristarchus plateau (NASA).
-
2
-
-
Found these books in the second hand market.
")
-
9
-
-
I observed Copernicus past night with my dobson up to 533x without any sign of image degradation. It was wonderful!
-
1
-
-
Last night I had a chance to try the telescope following the last work on the mirror cell.
The sky conditions were clear, windless, and rather stable temperature between 8.20pm and 9.20pm. After that the temperature started dropping. The telescope was left outside with the fan on since 6.30pm. The light shroud was also fixed in order to reduce internal and nearby turbulence.
Both telescope focuser and primary mirror axial alignments were adjusted with my 2" Glatter laser 650nm.
Several stars were used for star testing: Betelgeuse, Procion, Rigel, Pollux, and Aldebaran. This was done in order to have a range of colours and different altitudes.
I could not spot any trace of astigmatism. Spherical aberration was highly corrected too. This was at about 300x.
The rest of the time was spent observing the moon which was outstanding. Copernicus at 533x (zoom plus VIP barlow) was really impressive, showing fine and minute features (e.g. tiny craters inside and ground detail) that I didn't even imagine were possible to see.
Very happy about this result.
From sky and telescope lunar map (at the eyepiece I could see far more detail that this):
-
2
-
-
5 hours ago, John said:
My postie delivered a Celestron RACI illuminated reticule 9x50 finder today. For use on my 12 inch dob I expect.
I thought you already used a RACI finder with your dobson.
Nice finder!
At the moment I have an Antares VS60 with no illuminated field.
-
I worked another bit last night and this morning:
-
replaced temporary nylon pins + 2mm pad on top with a stack of 2 x 5mm thick pads (20mm diam). This raised the mirror 1mm.
- the milk cartoon structure to maintain the triangles in position without affecting their movement was moved underneath
- marked the position of the sling (COG) on four points. These are about equidistant.
-
cut velcro strips in two segments and placed them under and above the COG where the sling will pass. The external border of the velcro strip (which is slightly flat) was placed towards the sling cable. Advantages:
- the velcro strips do not attach to the sling. Therefore they cannot stretch it.
- they remain attached to the mirror. Therefore there is no need to remeasure the correct position of the sling
- removing the sling is much easier
- as the velcro strip do not attach to the sling, it is possible to rotate the mirror when placed on its mirror cell.
- one velcro strip working as a bridge to make sure that the sling remains in position
Here are the photos
Mirror cell:
COG marking (see previous posts for weblink on how to calculate this). The number is the sling position from the bottom of the mirror
Velcro strips and placement:
Make the sling tight, but blocking the mirror position using two felt pads placed opposite to the sling:
Add velcro strip to keep the sling always in position. Note, these attach to the velcro strips on the mirror. The sling can slide through these strips. Therefore the glue on the velcro strips does not cause any issues (e.g. stretches).
Mirror on top of the triangle pads:
Mirror cell put back into the mirror box. Gap between sling and lateral support pad. View from the bottom
Video showing how the mirror goes back to the mirror cell increasing the mirror altitude. There is still a minor gap, but I will leave it as it is. This is probably 0.5mm or so.
-
1
-
replaced temporary nylon pins + 2mm pad on top with a stack of 2 x 5mm thick pads (20mm diam). This raised the mirror 1mm.
-
On 30/01/2020 at 00:35, jetstream said:
You are probably going to do this already, to try. I think that narrow nylon tips triangles need very accurate placement to get the abstract support circles in the right place. I also think furniture pads with a much larger dia are much more forgiving. When the pad is placed on the nylon tip it does not have the same effect as glued directly on the triangle- a flat mounted pad might catch the mirror on its top edge for support during transition.
If I needed more height I would first try a double pad and if it works maybe get a few circular pieces of nylon machined- mount to triangles and then the pads to these.
what is that mounted under the sling in the vid- a pad?
I ordered a set of felt pads of different sizes and 5mm thick. After taking all the measurements, I need to stack two of these in order to replace the pins. Will do the work tonight or tomorrow morning.
What's the diameter of your pads installed by Randy? 1inch, 20mm, or more?
-
1
-
-
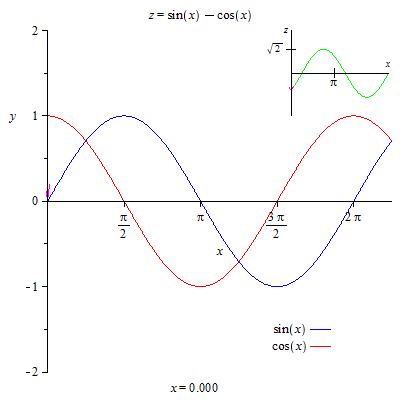
7 hours ago, jetstream said:
Seeing as your good at spread sheets and graphs and I'm good with pictures how about a graph?


Hey Gerry,
Discard the z function (green) as not necessary here.
What we care here is the part of the functions where x is from 0 to pi/2 rad (90 deg). This is the movement of the telescope regarding altitude.
Basically, depending at 0 deg telescope altitude the weight force is all on the sling (see cos function) and this decreases as the altitude grows to 90 deg (pi/2). Follow the sin function for studying how the weight force works on the triangles.
Note that the intersection is not at 0.5 y.
Source: Wikipedia.
-
18 hours ago, jetstream said:
I was always puzzled by and interested in exactly how the transition from full triangle support to increasing sling support worked and the possible 'potato chipping' etc. I'm glad your gonna figure it out and explain it to me lol!
Here we go
You don't need the actual W vector for this, so it can be assured to be the unit vector. What really matters are the sine and cosine functions at different angles alpha. The alpha angle is 90 - telescope_altitude.
Sine and cosine receive angles in radians, so you need to covert: 1deg = pi/180 = 0.01745 rad.
-
2
-
-
7 hours ago, jetstream said:
You are probably going to do this already, to try. I think that narrow nylon tips triangles need very accurate placement to get the abstract support circles in the right place. I also think furniture pads with a much larger dia are much more forgiving. When the pad is placed on the nylon tip it does not have the same effect as glued directly on the triangle- a flat mounted pad might catch the mirror on its top edge for support during transition.
If I needed more height I would first try a double pad and if it works maybe get a few circular pieces of nylon machined- mount to triangles and then the pads to these.
what is that mounted under the sling in the vid- a pad?
Thank you, Gerry. Very helpful.
Placing a pad on top of the pin is not a final solution, but only a quick way to test the idea. I certainly need to consider either taller pins or taller pads, once I get the the measure of the exact height. If this is exact there is no friction caused by pins or pads.
-
Gentlemen, you are too kind!
I haven't come up with new products or design, but just put some information together and been trying to analyse / address some issues which are often ignored.
Hopefully, this thread will become a useful resource for those of us having to deal with these issues or want to improve their telescope performance. That would be great!
I feel the thread title should change. Currently, it is not really informative and this might affect searches.
Probably something like "Lukehurst-Nichol classic dobsonian mods" would be more appropriate? If happy with this, could @John or @Stu change this, please?
-
1
-
-
It's late here Gerry! What's your humblest suggestion? I'm curious!
-
Just now, jetstream said:
what happens when transitioning- is it linear?
I don't think it is linear. I suspect it is sin/cos, but haven't thought about this properly.
-
2
-
-
10 minutes ago, jetstream said:
May I make the humblest of suggestions? just to try?
Yes, please


.png)


What did the postman bring?
in The Astro Lounge
Posted
I also think that it is a good companion to Suiter's. Same for Texereau's how to make a telescope. Same for Burnham's.
👍