


powerlord
-
Posts
2,330 -
Joined
-
Last visited
-
Days Won
16
Content Type
Profiles
Forums
Gallery
Events
Blogs
Posts posted by powerlord
-
-
@Stuart1971150mm lens ? That can't be right surely ?
I just got my cheap hq camera and a few cheap old lens from ebay so gonna have a play with those. Not for allsky, just fun.
-
 1
1
-
-
Sorry..website kept saying wait error so kept trying to post it. 🙄
-
Tip - if using camera 3, try --denoise off rather than the colour denoise.
Yes, it's more noisy, but you can then clearly see milkyway and stuff like plaeides are much better.
-
Tip - if using camera 3, try --denoise off rather than the colour denoise.
Yes, it's more noisy, but you can then clearly see milkyway and stuff like plaeides are much better.
-
Tip - if using camera 3, try --denoise off rather than the colour denoise.
Yes, it's more noisy, but you can then clearly see milkyway and stuff like plaeides are much better.
-
Tip - if using camera 3, try --denoise off rather than the colour denoise.
Yes, it's more noisy, but you can then clearly see milkyway and stuff like plaeides are much better.
-
cool. As it's relevant - I took delivery of an asi678 on monday to do my own sort of 'S50 max' - sticking it on my 200pds - and took the blown out core by just lucky image stacking around 5000 100ms and 1sec images.

-
3
-
-
2 hours ago, Cosmic Geoff said:
From Apple/Seestar page: Seestar on the App Store (apple.com)
Looks like it also works on ipads and apparently on Macs (though this is the first indication I have seen that the app will work on any laptop!)
Information
Provider
SuZhou ZWO Co., Ltd.
Size
681.6 MB
Category
Photo & Video
Compatibility
iPhone
Requires iOS 13.0 or later.
iPod touch
Requires iOS 13.0 or later.
Mac
Requires macOS 13.0 or later and a Mac with Apple M1 chip or later.
Languages
English, French, Japanese, Simplified Chinese, Spanish
All ios apps work on apple silicon macs . It's one of the benefits on apple silicon.
I run asiair on my macs sometimes. What is frustrating is that they only let one instance run. Sometimes I image with 4 asiairs at once. It'd be great to have 4 instances of asiairs running side by side on my mac, but apple don't allow it.
Stu
-
I tried a few experiments last night my my new asi678 on my 200pds.
This is core of M42 using lucky imaging. A combination of 100ms subs and 1000ms subs. I've included a pic showing the area you are looking at as it's not normally that obvious in M42 shots since it's so bright.
-
4
-
-
Asiair video really improved a lot. So this is first time I've done jupiter with it automatically from the comfort of my bed. Usually I'm out there manually focusing, faffing with laptop and eyepieces, etc.
But with new asi678, fov is enough for it to goto it on my 200pds, and get a decent pic. Makes the whole thing a heck of a lot easier.
This is first light for asi678. Well impressed with it.

-
10
-
-
46 minutes ago, LDW1 said:
Here is another question / issue that I might have missed, has anyone found or have a water / moisture proof cover / hood for the SS or D2 scopes ? Something just the right size with a draw string or velcro fastener. Just to protect it before or after a session, I don't mean leaving it out in a rain storm.
plastic bag ? I mean, why over complicate it.
-
2
-
-
12 hours ago, Paul M said:
That's the one I'd be using:
Here is a timelapse I created with the ASI178MC and the included lense. Nice stars and the FOV is fine by me. From home I won't have a view anywhere near the horizon so 180 deg would be wasted.
I'm now wondering whether the Allsky software will be usable from my dark(ish) sky site, where I'd like to base an ASC. There are 2 routers that I'd have to port forward, neither of which I have access to the setting of!
 Not sure if the Web Site that it generates will work from there for me.
The two general survelance cameras I monitor there use a paid for web service via AgentDVR. I could likley make an ASC look like an IP camera and plug it into my RasPi server up there, but I'd loose most of the features of the Allsky software, though AgentDVR would provide a timelapse function amongst other thing.
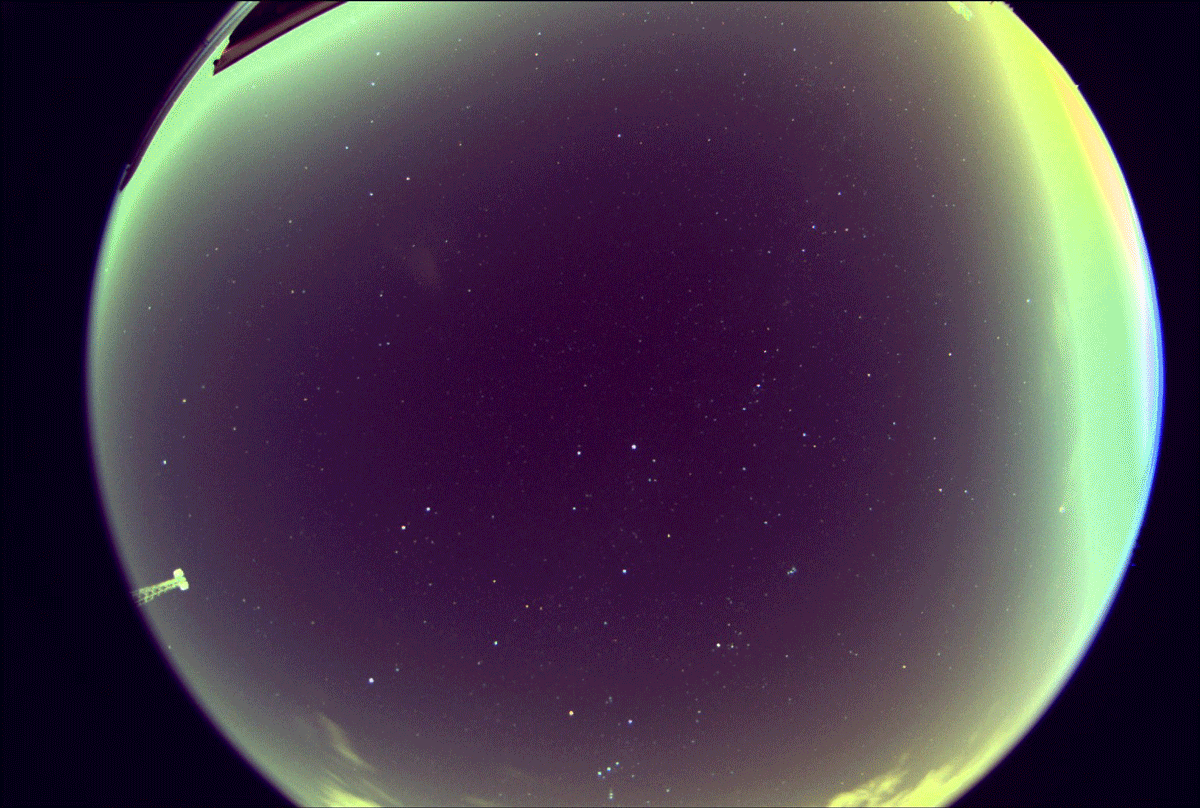
I do like that - can see orion, pleiades, etc. I suppose it also depends on sensor size. my lens on the asi120 doesn't get me a circle fish eye for example - it fills the whole sensor. I they supply the same 2.1mm for all the cameras, the fov is gonna change I suppose depending on sensor size.
-
1
-
-
7 hours ago, Budgie1 said:
So, a wee update from Mr RPi Noob here. 🤓
The package arrived from PiHut containing what I ordered and it was easy to assemble the camera in the enclosure, all nice & neat. The POE HAT just pushes onto four pins on the RPI4 board and just runs, nothing else to be done with this, happy days.
Now, long story short, things didn't quite go to plan but I didn't give up and learned a few things along the way. So, for anyone else who feels like dabbling into this for the first time, here some tips:
- Most important one that will save you wasting a lot of time - AllSky will only run on the Bullseye OS, it hasn't yet been updated to run on the latest Bookworm OS. I installed both of them twice to get mine working. Download Raspberry PI Imager to install the OS on your SD card and you can also pre-set the username & password + LAN/WiFi access details.
- When you boot the RPi for the first time, download PuTTY onto your PC so you can access the RPi once it's booted. You'll need to find it's IP address on your network and use the username & password you setup on Raspberry PI Imager.
-
Once you're logged in, first download the updates & install (upgrade) them using these commands:
sudo apt-get update sudo apt-get upgrade -
Now reboot the RPi and take a test image with the camera. I'm using the Module 3 camera and I needed to take a test image to register the camera with the RPi, to do this use the following command:
libcamera-still -o test.jpg
- At this point you can go to the Allsky website and follow the installation instructions and follow the prompts, then reboot to complete the install.
-
It says to open the Allsky web page in a browser using allsky.local or allsky.localhost, these didn't work for me and I had to use the IP address of to get into the Allsky settings etc. So that is an option if you're having trouble.
")
Now mine is up & running, I just need to install it into an enclosure and put it up on the roof. Something for the weekend me thinks.
Good work.
And just in case you've not worked it out - I didn't originally. There are 2 websites - the admin, and the public:
Http://allsky.local/ admin/secret admin site
Http://allsky.local/allsky fancy public website
-
1
-
10 hours ago, Paul M said:
That's the one I'd be using:
Here is a timelapse I created with the ASI178MC and the included lense. Nice stars and the FOV is fine by me. From home I won't have a view anywhere near the horizon so 180 deg would be wasted.
I'm now wondering whether the Allsky software will be usable from my dark(ish) sky site, where I'd like to base an ASC. There are 2 routers that I'd have to port forward, neither of which I have access to the setting of!
Not sure if the Web Site that it generates will work from there for me.
The two general survelance cameras I monitor there use a paid for web service via AgentDVR. I could likley make an ASC look like an IP camera and plug it into my RasPi server up there, but I'd loose most of the features of the Allsky software, though AgentDVR would provide a timelapse function amongst other thing.
You can set it to ftp the pics to somewhere else. That way just needs outgoing, not incoming. Then host website elsewhere.
Stu
-
1
-
-
7 minutes ago, happy-kat said:
What about the asi wide angle lens that come with most of those cameras that might already have
I think they are 2.1mm 150 FOVs ?
-
14 minutes ago, Paul M said:
Very useful. I've currently got the full kit in a Pi Hut shopping basket, and a shopping basket with the enclosure for ASI cameras at Dew Control.
Trembling finger, but I had been wavering towards the Pi Hut enclosre and therefore the module 3 camera, simply for it's compactness and cuteness.
Now perhaps I'll go with my existing ASI178 in the Dew Control enclosure. The heater element is an attraction to me.
But rather than buy another Pi4, I'm looking at going on the waiting list for a Pi 5 to replace the Pi 4 that is currently overstretched as a IP camera server. So The Pi 4 will be free to use in an ASC. That does delay things, maybe even until next year, though that's the case, wichever route I take.
I seem to remember this forum's late, dear friend, Gina, designed a servo driven focussing mechanism for her ASC lense. But that's complicating things beyond my attention span!
")
I think with an asi camera, you need a dew heater - its a big block of ali, and will get cold. With the cam 3, its just the board, so the small amount of heat that generates goes directly into warming the air - so no need for dew heaters. that's what I think anyway. Plus, there's the heat of the pi4 - in my enclosure it sort of warms the enclosure, therefore the top and lens, etc.
It's probably possible to just stick a mobile wide angle lens on top of the camera 3 I reckon, with a bit of experimenting. it is after all, a mobile phone camera. then you get the wide angle too. you'd just need to get a sort of round mount on the cam 3 - maybe a big o-ring, 3d printed bit or something - wide angle popped on the top - and voila - you should get your 170 degrees or so if desired.
stu
-
1
-
-
1 hour ago, Stuart1971 said:
I just sent the Module 3 back, as the FOV was pretty dire compared to my current HQ camera and lens, and all the faffing to get focus (auto focus no good on stars) was just not worth it, as it does change over time with different temps, so am sticking with the HQ camera and re building version 2 of my AllSky camera..with a RPI4 instead of the Zero version 2…new housing, heater and dome…😀
fair enough. to be fair though I can't see how once set focus would change any more or less than on the HQ and lens ? And I did talk about the 120 degree lens. Good move with the RPI4 though, give you a lot more oomf.
so far anyway mine is keeping focus. I do agree that the 120 degree lens is something you have to be happy with - or don't bother. For me - it's ideal. I suppose it depends what you want it for too - my main purpose is just cloud checking really - while I'm imaging, is it still clear, etc. The timelapses, keograms, etc are all just added bonuses.
for others - focus faffing wise - just install https://github.com/Gordon999/Pi_LIbCamera_GUI
it allows you to live view stars, distance, etc and adjust manually focus to work it out - then you have the value (whatever it is in libcamera divided by 100).
-
Pic. And turns out it's resistive..so can't paint. So I've made so when corrodes and stops working can plug out and plug new one in.
Looks a bit like a rubbish satellite...
-
1
-
-
18 minutes ago, DaveL59 said:
Ahh that's likely because once the phone connects to the WiFi of the SeeStar it no longer sees the internet via your home WiFi network.
Just to be clear, it would see Internet if you'd joined it to yer home WiFi. I assume u mean if you'd not done that and were just connecting direct to seestar hot-spot. Then, yeh depending on phone settings, yer phone may lose Internet at that point. I can't remember how activation works, but it may be that once added seestar, you can flip back to home WiFi to activate app, thrn flip back if yer phone can't use mobile when no WiFi Internet (as I think that was quite a new android thing ?)
-
-
 1
1
-
-
Just added a rain detector. So for info on anyone else who wants to do it - just get summit like:
https://www.ebay.co.uk/itm/354993852102
I use voicemonkey.io to setup a trigger and link voicemonkey to my Alexa.
then in Alexa I can trigger that when my voiceMonkey trigger is called, Alexa shouts out to me that it has started raining.
I want it to only do this if my observatory is active. So basically logic is:
If my observatory (oiii is its name - fyi in code) is active, check for rain, and if raining, alert me. then don't alert me again.
when it stops raining, reset the alert so can be alerted again if starts raining again.
Limitations of Alexa mean I have to manually tell it if my observatory is on even though I turn it on/off with alexa - so I do this via an API call and I have two shortcuts on my phone to call that to effectively arm rain detector or disarm it.
that's it basically. its python v3.9 and just runs on yer Pi, and monitors the digital pin on the rain detector (which you have tuned via the board to detect rain).
Hope that make sense - but in a nutshell again - when I open the observatory roof and decide to image, I click the 'arm rain detector' button on my phone.
if it rains at any time, alexa will shout out and tell me throughout the house so I can run out and close it all up.. but IF.. its just a spot and I decide to leave it as it dries up - it will still alert me later if it rains again.
Whenever I shutdown, either during night or in morning, I press 'disarm rain detector' on my phone, and it won't monitor rain or send alerts anymore.
I've got some testing of the detector yet - it's capacitive so makes sense to protect it with plastic or paint, etc to stop corrosion, then tune it again. And I'll mount it at an angle, and polish with car wax (as I will be doing on allsky lens) to aid water beading off.
attached some code to get you started.
-
1
-
-
2 hours ago, M40 said:
Latest addition landed this morning, so using one of powerlords adapters, I now have my dewshield

It's a clear focusing filter with a 16mm extension. Plan is to stop any dew from getting on the lens plus a small lightshield. Interesting thing is how a clear focusing filter affects the picture...
The picture on the left is without the filter and on the right with. It only takes a few seconds to fit so the way it affected the picture was quite surprising so it will be interesting to compare puctures at night. You might also note the change in the colour of the sky, in the space of about 5 minutes it went from ok ish to get it all indoors quick :D. The latest storm has landed so it's game over for a few days.
Yeh, minus the focusing filter, that's what I do. Just pop a 48mm ext on adapter. Can't hurt. I do it more to avoid stray light from neighbours gardens.
-
2 hours ago, M40 said:
Question on the focusing, I set the software switch to show focusing panel, then I couldn't find the focusing panel, could someone point me in the right direction or does it not work in scenery mode? Ta much
Doesn't do anything in scenery mode I don't think. There you just tap to focus.
-
On 09/08/2022 at 20:29, Alan White said:
I often ponder about IS binoculars, but the cost is always too rich for me.
Having looked at this particular model, perhaps, just perhaps I might be tempted.
Thanks for the post though Jeremy as very much food for thought and very apt as on holiday with Binos in Pembrokeshire at the minute.
Keep yer eye out on ebay. I got my set off there for just over 200 quid. Even my parents were impressed..and that is a rare thing indeed with technology.
-
2
-


New(ish) Cheap all sky camera option!
in Discussions - Cameras
Posted