


MalVeauX
-
Posts
205 -
Joined
-
Last visited
-
Days Won
1
Content Type
Profiles
Forums
Gallery
Events
Blogs
Posts posted by MalVeauX
-
-
Heya,
Finally had a clear day, but seeing was fairly lousy. Was seeing limited even with a 120mm aperture today, plus wind. SSM reported an obvious downward trend as seeing got worse and worse, so I was not anywhere near where I typically would want to be. But, like fishing, even a bad day is a good day out under our star.
Full Discs, Colored:

High Res Faculae in CaK:
Chromosphere Structures in HA:
Seeing (SSM) Data (was poor today, and windy):
Equipment:
150mm F8 Achromat + ED80
150 masked to 120mm F10 + Baader Blue CCD-IR Block + 2x Barlow + Lunt CaK B1200 + ASI290MM (CaK HR)
150 masked to 120mm F10 + Baader Red CCD-IR Block + PST Etalon + ASI290MM (HA)
ED80 masked to 52mm F11 + Baader Blue CCD-IR Block + Lunt CaK B1200 + ASI290MM (CaK Disc Mosaic)
ED80 masked to 52mm F11 + Baader Red CCD-IR Block + PST Etalon + ASI290MM (HA Disc Mosaic)
Very best,
-
 11
11
-
 1
1
-
-
Heya,
Took a stab a Venus in IR & UV (made a synthetic green channel by combining the two at 50% blend) with a C8 Edge HD SCT and ASI290MM.
Very best,
-
8
-
-
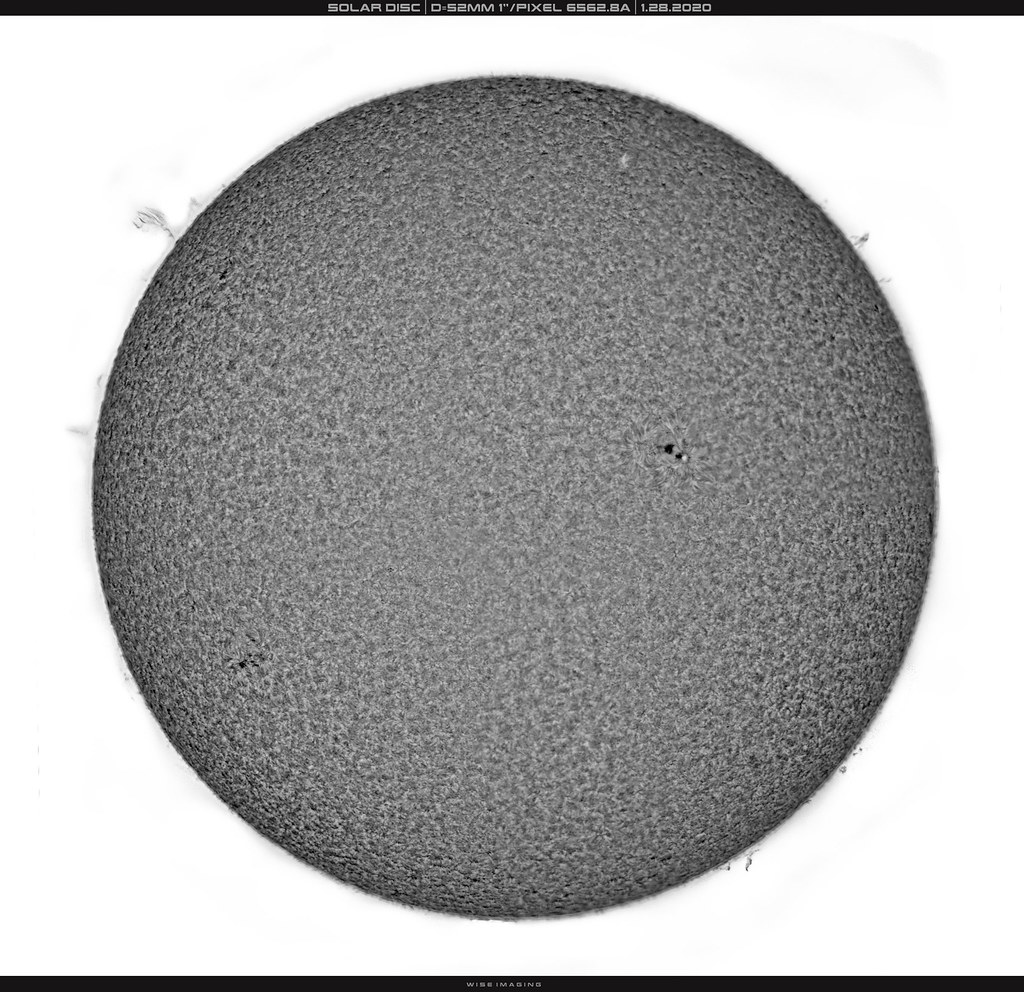
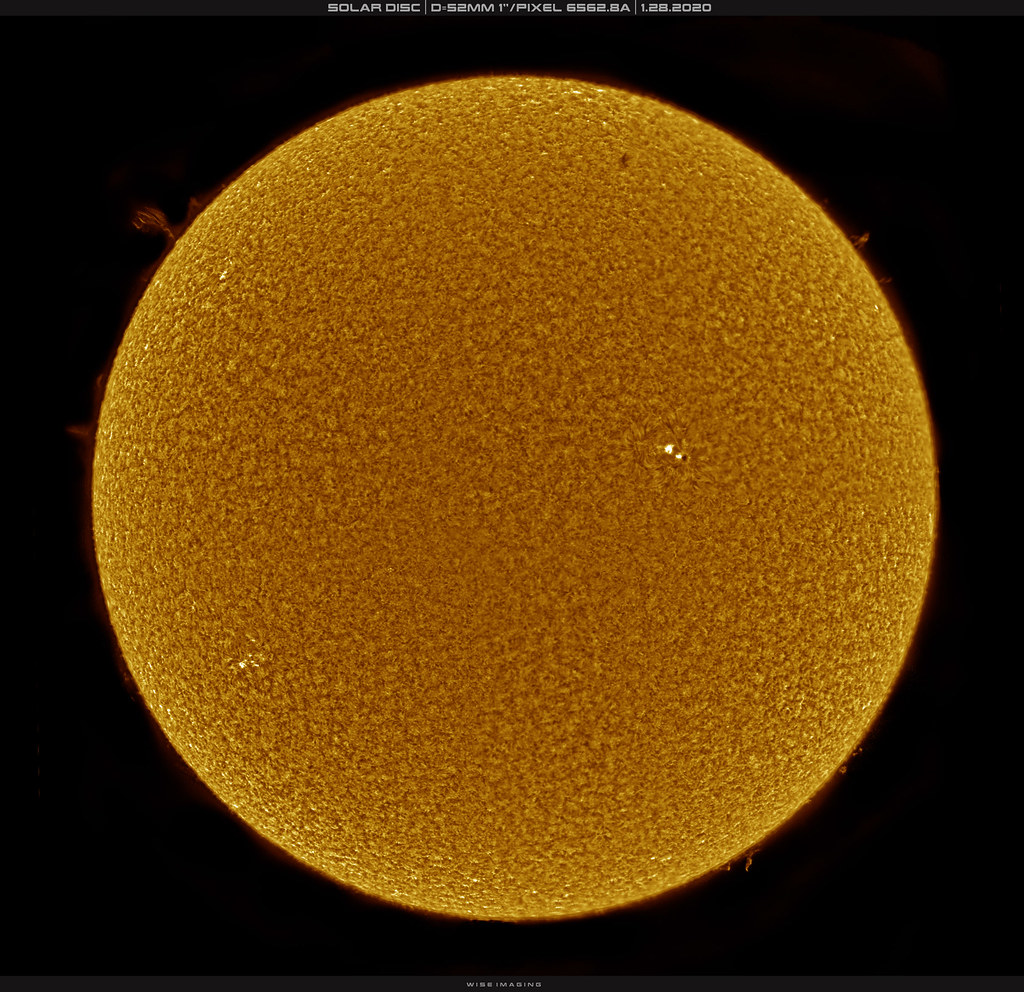
Heya,
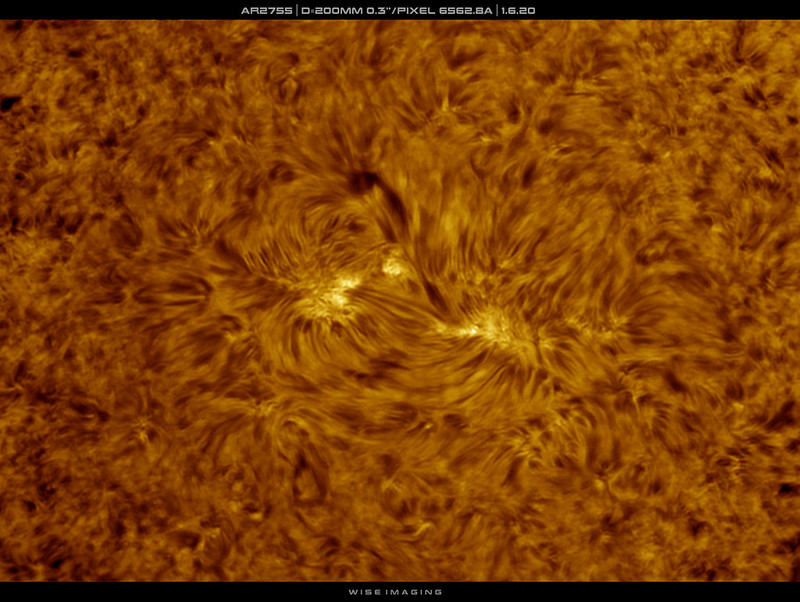
Finally off on a day with some clear weather, Florida has been such a wet cloudy mess lately. Seeing was measuring promising this morning with some sub-arc-second averages over 1 minute, in the 0.7~0.8" sustained range for a second at a time, which is plenty enough time to nab a lot of frames at high speed. AR2757, a cycle 24 region, is decaying but is still interesting with a lovely plage area and mottling around the the poles of the region. The spot is already diminished and rapidly losing its penumbra but still has a fair sized umbra to see in any wavelength. Full discs are at critical sampling level and are mosaics with a mere 52mm aperture. There's some rather interesting large prominences on the North West limb.
Featured on front page of SpaceWeather today.
SSM data:
B&W:
Colored:
Equipment:
C8 Edge + Aries D-ERF + Baader Red CCD-IR Block D-ERF + PST Etalon + BF10mm + ASI290MM (HA High Res)
C8 Edge + Aries D-ERF + Baader Red CCD-IR Block D-ERF + Baader 610nm + ASI290MM (WL High Res)
ED80 (masked to 52mm F11) + Baader Red CCD-IR Bock D-ERF + PST Etalon + BF10mm + ASI290MM (HA Disc Mosaic x 6 panels)
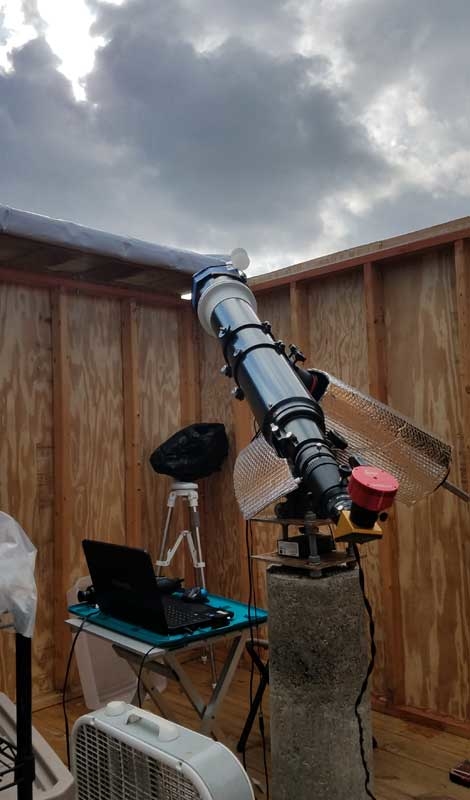
Yard Lion summoning the good seeing
Very best,
-
7
-
-
Hey all,
It rained all day yesterday, but today a cold front came through and its clear so far. I used the time to do a quick video tutorial on my workflow for acquiring data that I process into images later. FireCapture is the software I'm using specifically because it allows real time flat calibration applied to the live feed from your camera and its embedded into the source video upon recording, which is a huge help when making sure you've eliminated newtonian rings, gradients, dust and artifacts, etc, instead of finding out later. It also helps with exposure, seeing WYSIWYG with the flat applied, so you can avoid clipping data. This will cover basic focusing (manual, by hand, nothing special), flat calibration (this is a big part of this, and includes defocus and diffuser methods for full FOV and partial disc FOV flat calibration), and exposure values. I use gamma as a tool to expand and crush shadow tones and mid-tones to change contrast so that it's easier to real time see the output of the camera for focusing and for seeing prominences in data without changing actual exposure. This is a key element that I use a lot, but I do not use gamma when recording, it will always be checked off when recording is happening. Exposure values are totally variable, there's no magic number, we merely look at the histogram and make adjustments based on the histogram.
Please forgive any mistakes in words or terms, it's not my day job (wish it was!) to do this stuff.
Also, sorry for the wobbling and slewing around, it was very windy this morning and I was touching the scope and moving it quickly while trying to make this video.
Key elements to know perhaps before watching the tutorial video:
FireCapture: I'm using FireCapture software specifically for this entire process. Huge thanks to the author of this software and that it's free!
Gamma: I use gamma a lot in FireCapture, it's totally software manipulation. I do not use gamma (its off or neutral, neutral is 50 in FireCapture by the way) when recording however. Gamma stretches values that are useful when using your eyeball to see what's on your live feed from your camera, it's handy to stretch up the shadows and mid-tones (moving the slider to the left towards 0) (less contrast, see faint stuff like prominences); it's also handy to crush the shadows and mid-tones so that perceived contrast is higher on things like spicules, plages, filaments, spots, etc (moving the slider to the right, towards 100). Several times in the tutorial I will set exposure and then use gamma to crush shadows and see surface detail to critically focus, and then open up shadows with gamma to then see the prominences on the limb, again, without changing exposure--the key is that exposure wasn't changed to see the surface or prominences, just software manipulation of gamma, and the point of that is that the data is there, so turn gamma off when recording your video. You can get the faint prominences lifted in post processing and you can increase surface contrast with post processing from the same single exposure capture (my previous tutorial, Rapid Workflow). You don't have to use this, I just find it handy to focus and see prominences to know its in my data, then turn it off to actually capture the data.
Flat Calibration, Defocus Method: Defocus method is commonly used and easy when the solar disc fills the FOV of your camera so that there's only sun in your FOV. One can simply defocus the disc until features are gone, somewhere near the center of the disc ideally. I lower exposure values to achieve about 65% histogram fill. FireCapture recommends between 50~80% if you use the hover tool. Exposure time doesn't matter. I prefer not to use gain if possible doing this, but you can use gain if you need to. FireCapture has a default flat frame tool built in, you simply click it, tell it how many frames you want to capture, it will capture them and apply the flat calibration to your real time video stream from the camera.
Flat Calibration, Diffuser Method (Bag Flats): The Diffuser method is an easy way to create a flat calibration frame when the solar disc does not fill the FOV on your camera sensor, and you can see the limb or void of space around the full disc or partial disc. You need an opaque transluscent bag, I'm using a cereal bag. It should not be completely see through, but opaque. Not all bags are equal, so you have to experiement and find one that does what you need. The key is that it diffuses light, as in, it scatters the light. What this does is illuminates the bag itself so that when its in front of your aperture, the light source is now larger and it will fill your FOV on your sensor so that you can create a flat frame even though the solar disc isn't filling your FOV. This works for full disc FOV with a short scope, and for partial disc FOV. The bag needs to be over the entire aperture into your scope, but also it needs to be farther away from the front of your aperture, not directly touching it, I find it needs 2+ inches of space so that there's no hard edge and the diffuser material will be illuminated farther out than what the solar disc would normally appear as. A lens hood or lens shade is ideal for this to provide that space, ideally, larger than your actual aperture. This is key to not have the bag flat up against your entrance to your aperture of your solar scope (you may need to make a small hood or cardboard holder for dedicated solar scopes that tend to completely lack lens hoods). I again target 65% histogram fill. When performing this method, put the disc in the center or near center of your FOV or sweet spot, we focus first to get critical focus, then don't touch the focuser. Then we put the bag on, and raise exposure to fill the histogram to 65% (or 50~80% per FireCapture's hover tool). Gamma off. Capture your flat frames with the FireCapture tool. It will auto-apply the flat frame. Now remove the bag. You will need to lower exposure values again to your recording exposure values. It will still be in focus, no need to change it. You can however still fine focus if you need to.
Exposure Time: In general I recommend 10ms or shorter exposure times to freeze seeing. This depends on image scale. With fine image scales such as 0.3"/pixel, I tend to try to keep it closer to 2ms, 3ms or 5ms to better freeze the seeing. With course image scales, like 2"/pixel, 1.5"/pixel, 1"/pixel, 0.8"/pixel, 10ms is likely fine as a maximum. Whatever exposure time is needed to best fill your histogram without clipping the data to the right (whites) and short enough exposures to freeze seeing. You may need to use some gain to get the histogram filled if you reach the limits of exposure duration to freeze the seeing. Every imaging system and filter system is different, so there's no magic numbers other than time related to freezing seeing and then the rest is just manipulating it based on the histogram.
Histogram: Lower left, or in case you moved it elsewhere, is your Histogram. You need this to understand your exposure. It shows the shape and spread of your data from the black point on the far left to the white point on the far right. When I refer to histogram fill, I'm referring to putting as much data between those two points as I can without pushing it past the white point, or clipping to the right, which results in lost data (its considered white after that point). There's a % value there to tell you how close you are to filling the entire histogram between the two points. This is where I'm referring to the 65%, 80%'s 90%'s ranges, etc during the tutorial.
Critical Focus: Being in focus is not that easy sometimes. I manually focus. It's even easier if you have a controller and motorized focuser of course. When the seeing is poor, it can be hard to focus critically as you chase the seeing. Ideally, adjust it to highest contrast that you can see and watch it to see moments of good seeing, if you see pencil-drawing like features, you're close. When seeing is dreadful you may never achieve critical focus. When seeing is average with brief moments of good seeing, you can see high contrast features, lines, etc, and know if you're close to focus and adjust from there. I suggest you may adjustments, wait and watch, make adjustments, wait and watch. It's much easier when you have good seeing conditions. It's also much easier with course image scales from small aperture scopes as they are less effected by seeing conditions. It's much more challenging with fine image scales from very large apertures that require excellent seeing conditions.
Bit Rate & Container: Ideally you would want to use 16 bit for bit rate when capturing (especially for prominences), I used 8 bit in these videos because its faster and more accessible to most people and their systems. If you can capture in 16 bit however, I suggest you do that. The container will matter based on the bit rate. Some capture to AVI, but AVI has limits with bit rate. I suggest SER container which will allow the 16 bit rate if you want to use it or can use it. It doesn't matter which one, there's no difference as the data is RAW, the container is just changing what you'll use to preview it mainly, as the stacking software will be happy to look at an AVI or SER container all the same. I'm using SER container. And for preview, I have a SER player that allows me to view the videos independently (free).
How Many Frames? You can preset any number of frames to capture. I capture in bursts of 1,000 frames at a fairly fast frame rate (it's slower in the video due to running all the software, recording this video real time, with the video feed, etc on a laptop). You can capture less. You can capture more. Just know that the more time you spend capturing frames, features can change on the sun, as its super dynamic. I would not capture more than 2~3 minutes of video at course image scales, and at fine image scales I wouldn't go past a minute or so likely, usually less. The apparent movement of things like prominences, filaments, flares, etc, can occur during just minutes of time. So keep your bursts of recording short on time, packed with as many frames as possible (ie, you want fast FPS). This is why we recommend monochrome sensor cameras with fast data rate potential (you can use region of interest to speed up a slower, larger pixel array camera).
The scope, filter system, camera, etc, I'm using do not matter. Nothing will have the same values used above. The intent is just the idea of how to go through the process of this workflow and it will work for small 40mm PST solar scopes and up all the same.
++++++++++++++++++++++++++++++++++++++++++++++++
++++++++++++++++++++++++++++++++++++++++++++++++
++++++++++++++++++++++++++++++++++++++++++++++++
Video Tutorial:
(Please forgive any mistakes, wobbly stuff, incorrect terms or descriptions, this isn't my day job)
++++++++++++++++++++++++++++++++++++++++++++++++
++++++++++++++++++++++++++++++++++++++++++++++++
++++++++++++++++++++++++++++++++++++++++++++++++
Bag Flats are always a difficult one to explain and show, so here's some images and a result from the above method for full or partial disc FOV that is usually difficult to perform flat calibration for:
Very best,
-
3
-
3
-
-
Hey all,
I made an acquisition and processing tutorial a while back (3 years ago? Yikes!) and it is fairly dated in terms of what I'm doing these days. I've been asked for a long time to make a new one showing what I'm doing these days. Specifically how I'm processing a single shot image for both the surface and prominences and how to process them together to show prominences and the surface at once. I've abandoned doing split images and composites and strictly work from one image using layers. Acquisition does not use gamma at all anymore. Nothing terribly fancy, but it's not exactly intuitive so hopefully this new video will illustrate most of the fundamentals to get you started. Instead of an hour, this time it's only 18 minutes. It's real time from start to finish. I'm sorry for the long "waiting periods" where I'm just waiting for the software to finish its routine, it lasts 1.5 minutes and 30 seconds tops typically at first. The first 4 minutes is literally just stacking & alignment in AS!3. I typically will go faster than this, but wanted to slow down enough to try to talk through what I'm doing as I do it. Hopefully you can see each action on the screen. I may have made a few mistakes or said a few incorrect things or terms, forgive me for that, this is not my day job. I really hope it helps folk get more into processing as its not difficult or intimidating when you see a simple process with only a few things that are used. The key is good data to begin with and a good exposure value. Today's data came from a 100mm F10 achromatic refractor and an ASI290MM camera with an HA filter. I used FireCapture to acquire the data with a defocused flat frame. No gamma is used. I target anywhere from 65% to 72% histogram fill. That's it! The processing is fast and simple. I have a few presets that I use, but they are all defaults in Photoshop. A lot of the numbers I use for parameters are based on image scale, so keep that in mind, experiment with your own values. The only preset I use that is not a default is my coloring scheme. I color with levels in Photoshop, and my values are Red: 1.6, Green 0.8, Blue 0.2 (these are mid-point values).
Processing Tutorial Video (18 minutes):
RAW (.TIF) files available here to practice on (the same images you will see below as RAW TIFs):
https://drive.google.com/open?id=1zjeoux7YPZpGjlRGtX6fH7CH2PhB-dzv
Video for Acquisition, Focus, Flat Calibration and Exposure (20 minutes):
(Please let me know if any links do not work)
++++++++++++++++++++++++++++++++++++++
++++++++++++++++++++++++++++++++++++++Results from today using this work flow method.
Colored:
B&W:
SSM data (sampled during 1.5~2 arc-second seeing conditions):
Equipment for today:
100mm F10 Frac (Omni XLT 120mm F8.3 masked to 4")
Baader Red CCD-IR Block Filter (ERF)
PST etalon + BF10mm
ASI290MM
SSM (for fun, no automation)Very best,
-
11
-
5
-
-
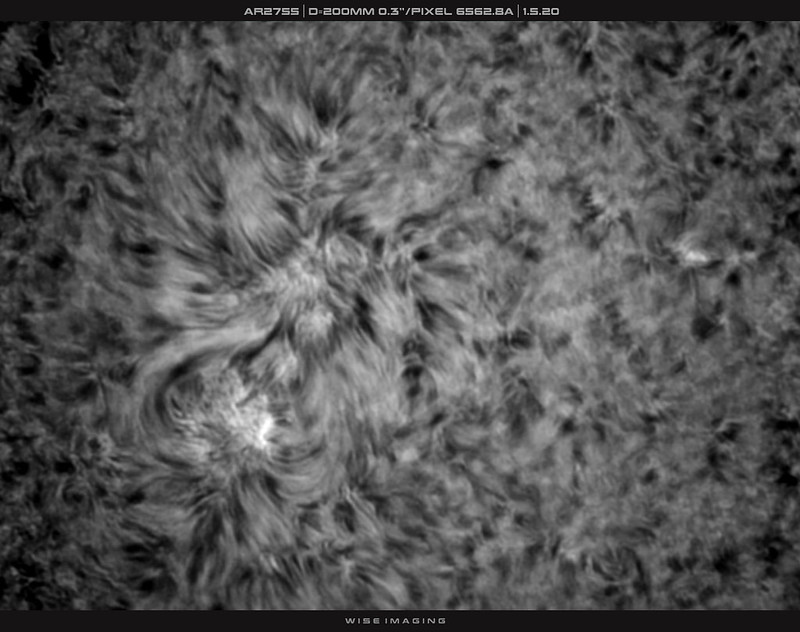
Heya,
Interesting to see three plages after such a stark period of inactivity. There's two Cycle 25 polarity regions and a Cycle 24 polarity region that came around the limb just the other day. The new Cycle 25 region, perhaps soon to be called AR2756 has visible umbra with light bridges, but is already decaying fast and will of course rotate out of view even sooner. Still, plenty to see in HA of course! I had to image in the early afternoon due to clouds, so I was imaging from around noon to 1pm which is typically really bad seeing conditions for me, however today it was not as bad and I was able to get some ok data despite the conditions. Seeing managed to get to around 1.4 arc-seconds a few times. I've provided my SSM graph to show seeing fluctuation, what's interesting is the fluctuation to better seeing conditions almost seemed to have a small spiked pattern today, in that there were moments of good seeing every 7~8 minutes oddly. Full disc is a mosaic.
Colored:
B&W:
SSM Graph:
Full Disc:
Earth Scale:
Equipment:
C8 Edge + Aries D-ERF + Baader CCD-IR Block Filter (ERF #2)
PST Etalon + BF10mm + ASI290MM (HA)
Baader 610nm Filter + ASI290MM (Photosphere)ED80 (masked to 52mm F11) + Baader CCD-IR Block Filter (ERF)
PST Etalon + BF10mm + ASI290mm (HA, full disc, mosaic of 6 panels)Very best,
-
14
-
-
Heya,
AR2755 persists today. I managed to image for a few minutes (20 minutes?!) while working on my observatory (replacing walls, roof, etc, with new exterior ply). Lovely to image with automation and just work on something and let lucky imaging do its thing. Seeing was ok today, not great, but not as bad as the other day. My seeing dipped down around 1.1 arc-seconds today and that is when I grabbed the best lucky image frames apparently, thanks to the Airy Labs SSM and FireCapture's automation software (super thanks to the authors of that software!). AR2755 will probably decay rapidly from this point on, and I have to work, so I won't see it likely on its way out.
Seeing conditions (circle highlighted when I imaged around 1.1 arc-seconds for this data; only imaged for around 20 minutes and only 6 minutes with the SSM, which was apparently enough time):
Equipment:
C8 Edge + Aries D-ERF + Baader Red CCD-IR Block Filter (ERF #2)
PST Etalon + BF10mm + ASI290MMVery best,
-
8
-
-
Heya,
Surprisingly I woke up to a clear sky, a cold snap came through here in Florida right after a really nasty storm cell down South. Seeing was not great, but worked out. Seeing averaged 1.8 arc-secs at best to 2.2 arc-secs when it was best on average, and peaked between 4~5 arc-secs when it was awful. Managed to get some data on what's left of AR2755. She was flaring today a little bit, here and there. The umbra is still visible, but diminished to two little pores basically after the light bridge split it up even more. It'll be gone soon.
Colored:
BW:
Equipment:
C8 Edge + Aries D-ERF
Baader Red CCD-IR Block Filter
PST Etalon + 10mm BF
ASI290MM120mm F10 Frac
Baader Red CCD-IR Block Filter
PST Etalon + 10mm BF
ASI290MMVery best,
-
10
-
-
High Res Lunar Mosaic with Lunar V & X Features | Jan 2nd 2020
43% Illuminated Waxing Crescent with Lunar V & X features at the terminator.
This is 570 meters per pixel resolution.
Full disc mosaic, this is a very large high resolution mosaic, to see the true resolution (0.3"/pixel | 0.570km/pixel) please see my Astrobin link:
Astrobin link to full resolution mosaic:
Flickr link to high resolution mosaic:
Examples of single panels of surface craters at same resolution (26 panels like these made the mosaic of the full disc):
Equipment:
Celestron C8 Edge SCT
ASI290MM camera with a 742nm IR filter to calm the seeing
Seeing conditions were 4/5 this evening around sunsetMy southern sky, the lunar crescent and Venus as the sun set.
Very best,
-
15
-
1
-
-
Heya,
Woke up to a fairly decent sky this morning without rain, been a while since we've not had rain daily, weird storms near Florida lately. Bleh! Anyhow, seeing was average to good at some moments. Took a peak at two noteable features, the new unnamed active region has visible umbra, likely to be named AR2755 I assume, the poles are that of cycle 25, so we are on 3 cycle 25 spots in a row in such a short period which is really interesting activity. The largest umbra shows a light bridge already, so it is already decaying and will not likely get bigger but rather diminish as it progresses I think. Still glad to see it. There is also a filaprom to see on the limb, North West quadrant that is nice!
B&W:
Colored:
Earth Scale:
Equipment:
C8 Edge + Aries D-ERF
Baader Red CCD-IR Block + PST Etalon + 10mm BF (Chromospher)
Baader Red CCD-IR Block + 610nm Long Pass (Photosphere)
ASI290MM52mm F11 (ED80 masked)
Baader Red CCD-IR Block + PST Etalon + 10mm BF (Chromosphere)
Baader Blue CCD-IR Block + E.O 430nm (Photosphere)Very best,
-
11
-
-
Heya,
Woke up to some ok seeing this Christmas morning and a clear sky, despite it raining for days and days. Nice to see two AR's! Both with small but visible umbra!
Merry Christmas Solar Friends!
Colored:
BW:
Very best,
-
7
-
-
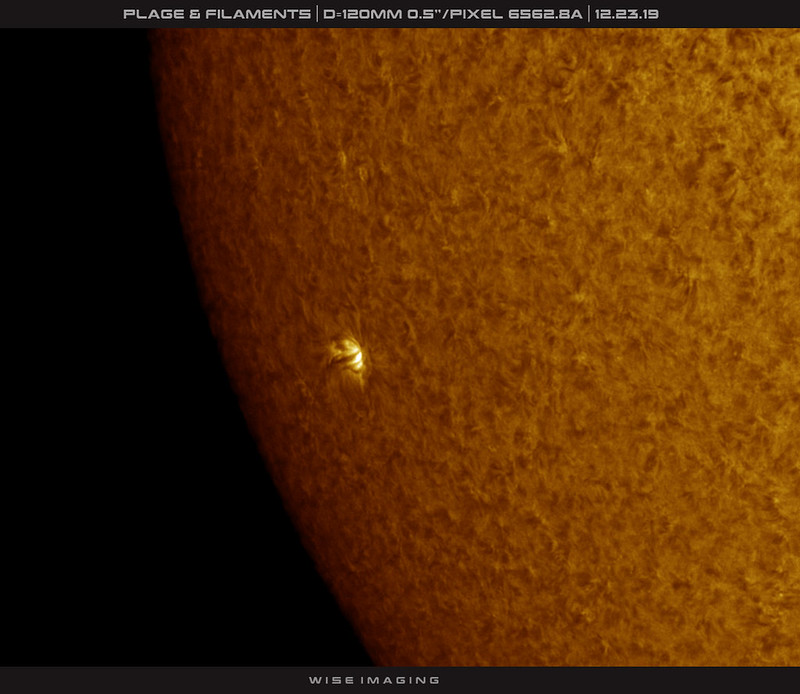
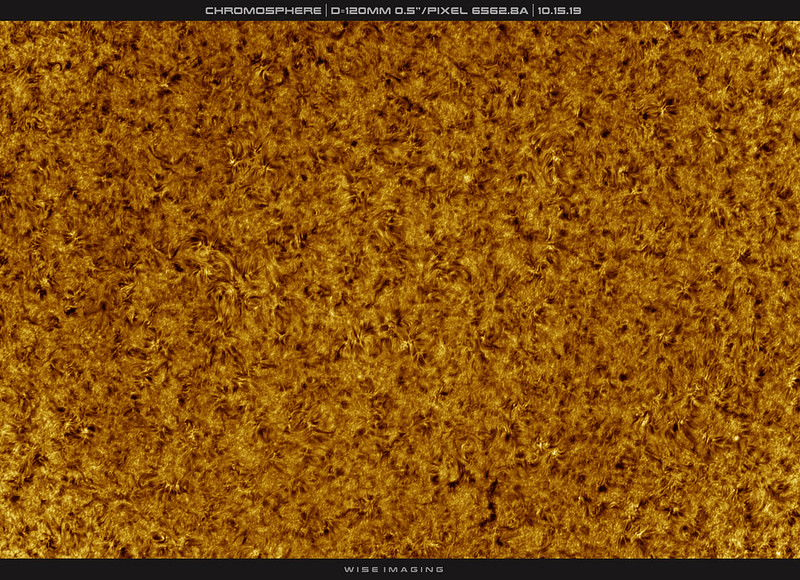
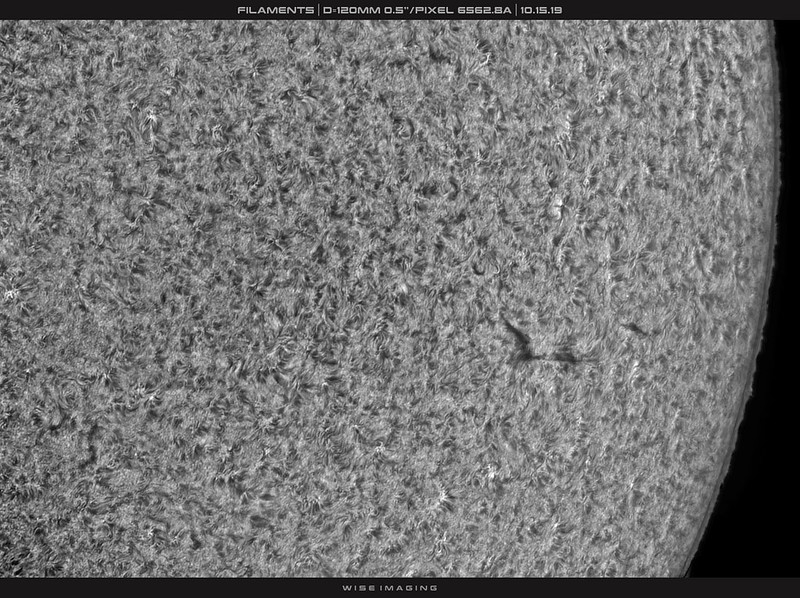
Heya,
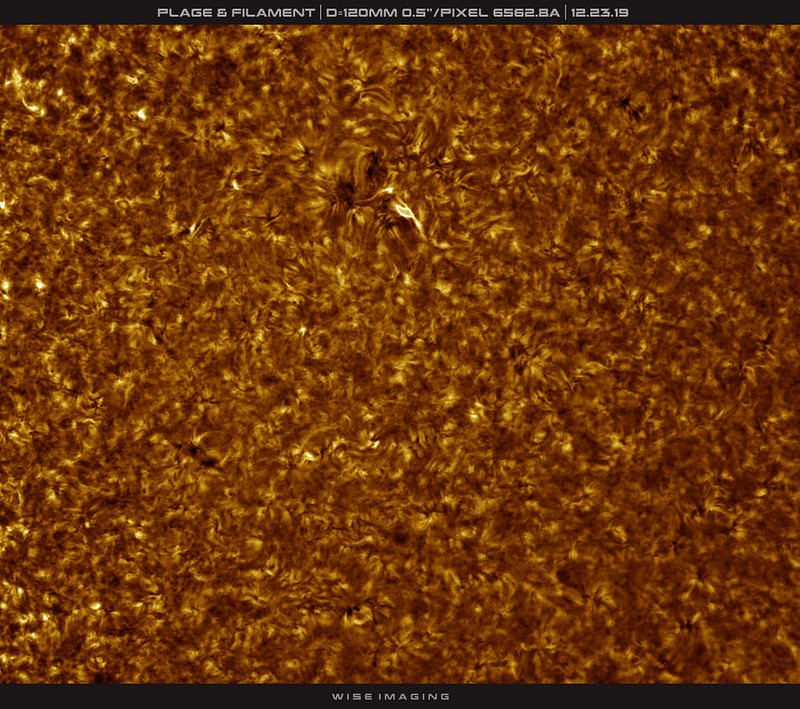
It's been a hot minute, weather has been poor, rained today even. Also there just hasn't been much happening in the chromosphere. Today there's a few interesting plages, I counted around 6 total plages overall in various places, but two were more significant than the others, belching out some filaments around the areas. The one near the limb is particularly bright with some potential minor flaring activity happening, perhaps signs of some activity to come? Seeing was poor, so this was captured at 120mm aperture.
Happy holidays to everyone for another great trip around our local star!
Colored:
B&W:
120mm F10 Refractor
PST Etalon
ASI290MMVery best,
-
11
-
1
-
-
Heya,
70% Waxing Gibbous tonight, so some interesting features near the terminator, including a floating bay around sinus iridum and a nice flat but contrasty view of copernicus and tycho.
Full Disc:
80mm @ F7.5 at 742nm & 2.9um pixels:
LunarDisc_70p_Illum_80mm_290MM_101frames_12062019 by Martin Wise, on Flickr
High resolution results from 200mm F10 at 742nm and 2.9um pixels:
Tycho:
Tycho_200mmF10_290MM_742nm_1001frames_12062019 by Martin Wise, on Flickr
Floating Sinus Iridum near the terminator:
SinusIridum_200mmF10_290MM_742nm_1001frames_12062019 by Martin Wise, on Flickr
Copernicus:
Copernicus_200mmF10_290MM_742nm_1001frames_12062019 by Martin Wise, on Flickr
Craters north of Tycho:
Craters_200mmF10_290MM_742nm_1001frames_12062019 by Martin Wise, on Flickr
Setup;
C8 Edge for the high res
ED80 F7.5 for the disc
ASI290MM camera
742nm Filter (Infrared)Very best,
-
8
-
-
Heya,
Later in the afternoon, it was still clear, so I figured I'd try to do some time lapse animation and grabbed data for an hour. Was mostly interested in the main filament in the active region to see it's plasma flowing around and of course any potential flare activity crackling in the plage area, but not much of that was going on.
Very best,
-
Heya,
It's been raining for days and total cloud cover all through this week, but today it was cleared up for a while. Seeing was poor this morning. But I was able to get a little time on AR2752 which is still persistent. I looked at the photosphere and didn't notice any appreciable sunspot, but the activity in the chromosphere was still nice with a little mottling and a nice filament. If this persists as it approaches the limb, it could be interesting seeing it as a prominence over the active region.
B&W:
Colored:
Earth Scale:
Very best,
-
8
-
-
Thanks all, glad we all got to see it! For some it's our last!
NASA Apod for Nov 13th:
https://apod.nasa.gov/apod/ap191113.html
Very best,
-
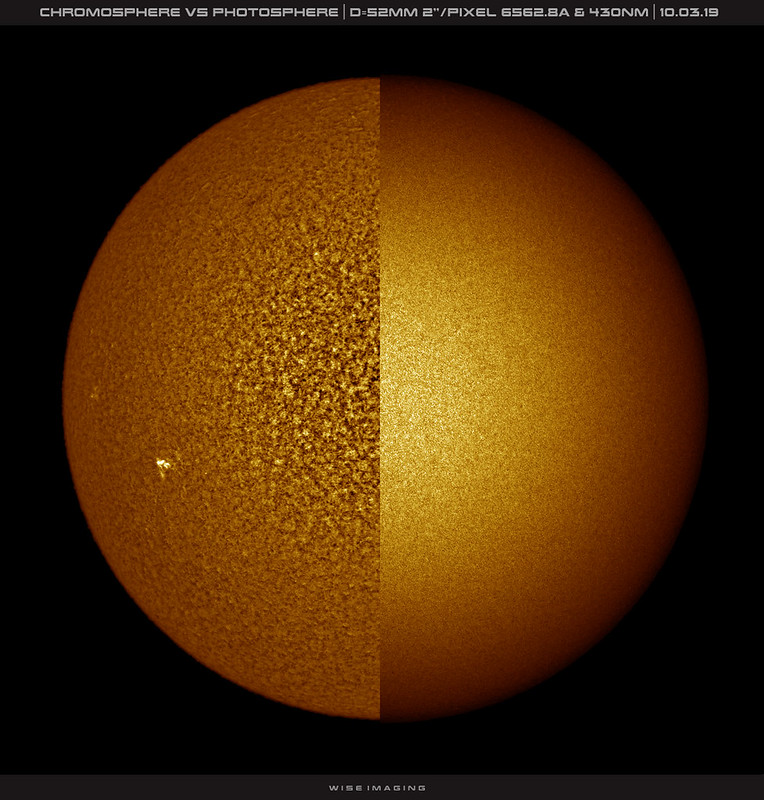
Hey all,
I was lucky to have decent weather all day for once, right up to the end, it clouded up at the end of the transit but I was still able to grab some information there through clouds and poor seeing. But up to that point it was a wonderful day of observing and I imaged a little bit along the way to show the photosphere and chromosphere when the seeing would allow at finer image scales.
Transits are interesting because they are a great thought experiment, centuries old, regarding our placement within the cosmos, solar system, etc. We see other planets, but they never transit, then there's two planets that do transit our star, so logically it allows us to consider our placement in our solar system relative to our star and relative to several other planets. This is huge since there was a time we thought we were the center, before the heliocentric model was thought of. Also transits allow us to better determine distances between the planets and the sun via parallax to get more and more accurate at figuring out real distances (we're already quite good at this, considering we can land things on Mars!). Another interesting bit about Mercury is that it's not the same size anymore and has changed size over time.
I shared the day with my family, they got to see the transit. My daughter of 6 years of age saw her first transit, hopefully more to follow in the future as I have very few left in my time. I was interviewed before and after the transit by NPR (National Public Radio), so thanks to Scott for reaching out to help share this event with others. The best outreach I've managed yet in that sense!
++++++++++++++++++++++++++++++++++++++++++++
++++++++++++++++++++++++++++++++++++++++++++Colored:
B&W:
Time Lapse (last 30 minutes of transit):
Transit Party:
[
Equipment:
C8 Edge HD + Aires Full Aperture D-ERF + Baader Red CCD-IR Block Filter
PST etalon + Coronado 10mm BF + ASI290MM (HA)
Baader 610nm + Baader 3.0 ND + ASi290MM (WL)Orion ED80 + Baader Red CCD-IR Block Filter
PST etalon + Coronado 10mm BF + ASI174MM (HA)
Baader Blue CCD-IR Block Filter + Edmund Optics 430nm Gband Filter + Baader 3.0 ND Filter (WL)C150HD 120mm F10 Refractor + Baader Red CCD-IR Block Filter
PST etalon + Coronado 10mm BF + ASI290MM (HA)Very best,
-
17
-
2
-
-
Heya,
Haven't had clear weather in a while, and then it's a bright lunar phase, not my paritcular favorite thing but I hadn't imaged in a while and wanted to at least get the dust off before tomorrow's solar transit. So look a look at some features with some decent contrast despite the 91% illumination of the disc.
Full disc was made with an ED80 F7.5 with a 500nm green filter and the ASI290MM (three panel mosaic).
Partials made with a C8 Edge with a 742nm IR filter and the ASI290MM.
Very best,
-
11
-
-
Heya,
Woke up to an ok sky, clouds, but had a chance. Got some data later in the afternoon, so seeing was poor, but managed. The new plage is interesting and there are some proms in the quadrants on the limbs. Took at look at the plage in two scales and both from the chromosphere & photosphere perspective.
Colored:
B&W:
Equipment:
C8 Edge + Aires D-ERF + Baader Red CCD-IR Block Filter
120mm F10 Frac
PST Module
ASI290MMVery best,
-
10
-
-
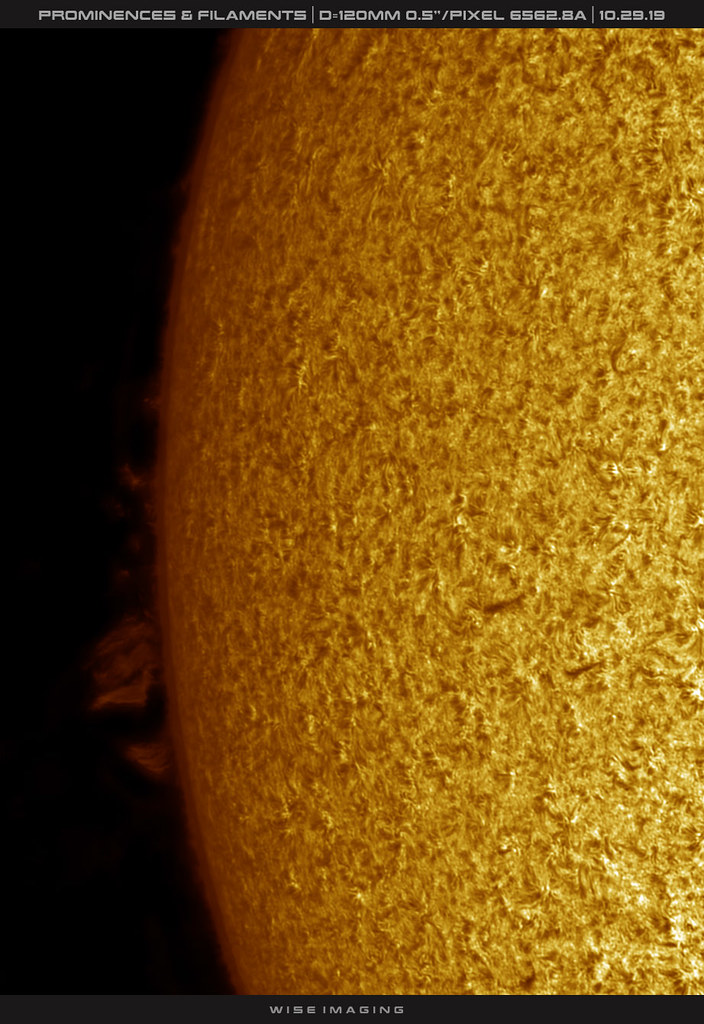
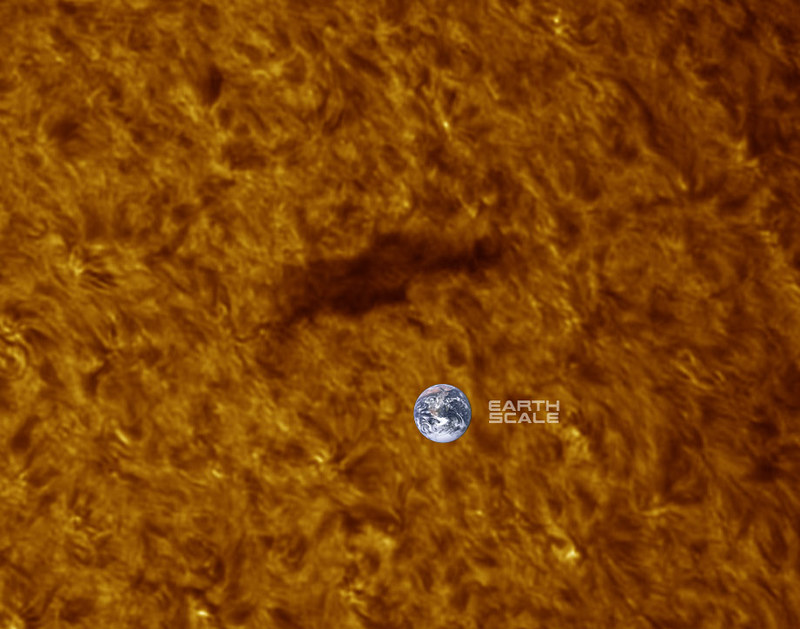
Heya,
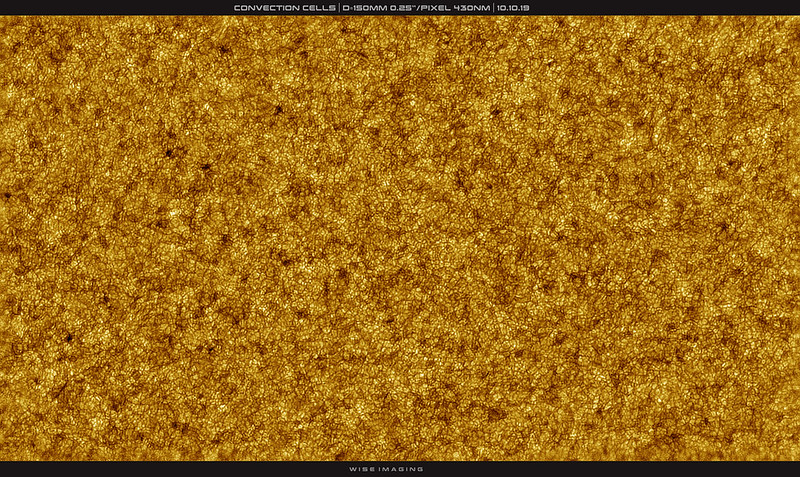
Woke up to a fairly clear sky, it's been storming for days with the remnants of the tropical storm that just finished up in the Gulf of Mexico. Not much going on today on our star, but a fairly interesting and dark filament, doesn't look like much at course scale, but at fine scale it reveals interesting little structural details and a wispy little tail even. Found a wee spot with some polarity throwing up a little filament near the center of the disc in the chromosphere network too, very tiny. No major prominences. Grabbed some convection cells to round it out to see some high resolution examples of our deep solar minimum.
Colored:
Earth Scale:
B&W:
Equipment:
C8 Edge + Aires D-ERF + ASI290MM camera
ED80 (masked to 52mm F11) + ASI174MM camera
PST Module + Baader Red CCD-IR Block internal ERF for chromosphere
Baader 610nm for photosphereVery best,
-
8
-
-
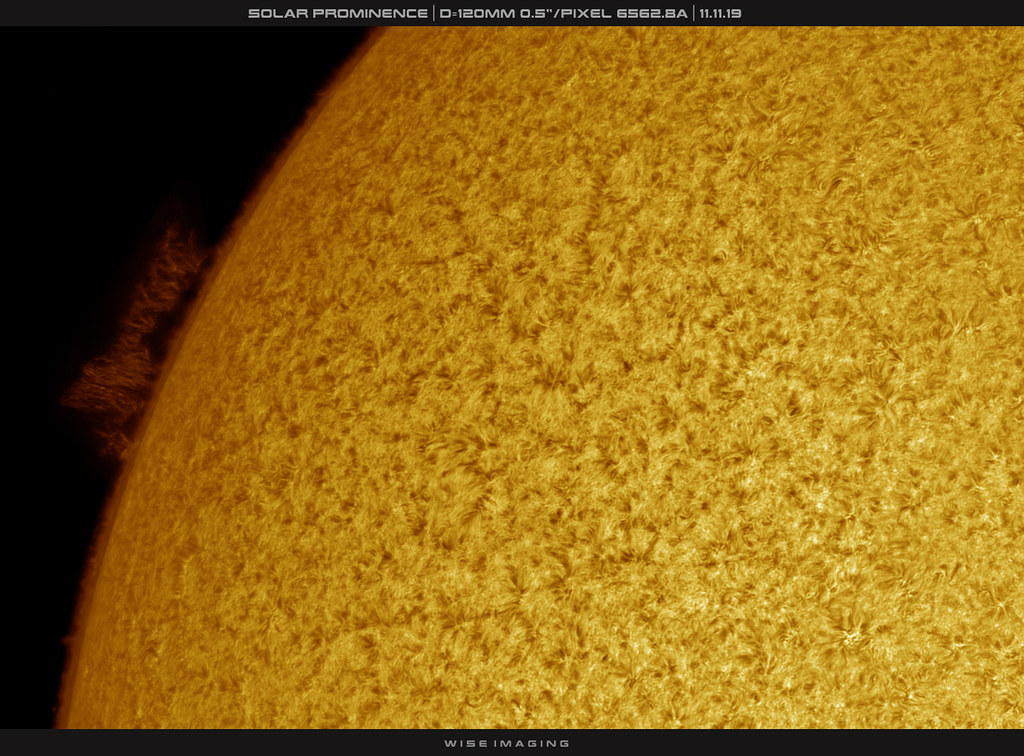
Heya,
It was cloudy and not nice outside this morning so I missed the window to use finer scales, but later in the afternoon the sky cleared up, but I was greeted with lousy seeing. Still, 120mm aperture at 656nm tends to work out even when my seeing is poor. So I managed to get some data on two very interesting prominences. One is a hedgerow morphology and the other is very faint and long and seems kind of like a detached fan morphology perhaps? There's a few dark little filaments that were the gorgeous prominences from before that have rounded the limb. Earth scales provided for reference.
Colored:
B&W:
Animation Time Lapse of that Prom:
Equipment:
120mm F10 (150mm F8 masked Celestron C150HD) Refractor
PST Etalon, 10mm BF, internal 50mm ERF
ASI290MMVery best,
-
9
-
-
Heya,
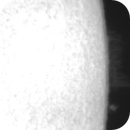
It's rained the past few days, lots of storms, a weird wet October so far here in Florida. But this morning was improved, had a clear sky this morning around 10am and pretty good seeing, so I was able to get some high resolution data of a few features, despite there being very little going on, there's a rather big and bright prominence group that seems to be a morphology similar to either a hedgerow or curtain. Despite that, I also took a look at spicules at the limb without any major features as this can be done any day with good enough seeing, and an interesting comparison of convection cells in g-band at 80mm and 150mm apertures to show the difference in resolution when imaging at near critical sampling level. While imaging, I accidently caught a jet transit at the big prominence this morning which is really cool.
Color:
B&W:
Earth Scale:
Convection Cell Resolution Comparison 80mm vs 150mm when critically sampled at 430nm with 2.9um pixels:
Jet Transit through Prominence:
Full resolution animation on my Astrobin (10Mb):
Very best,
-
15
-
-
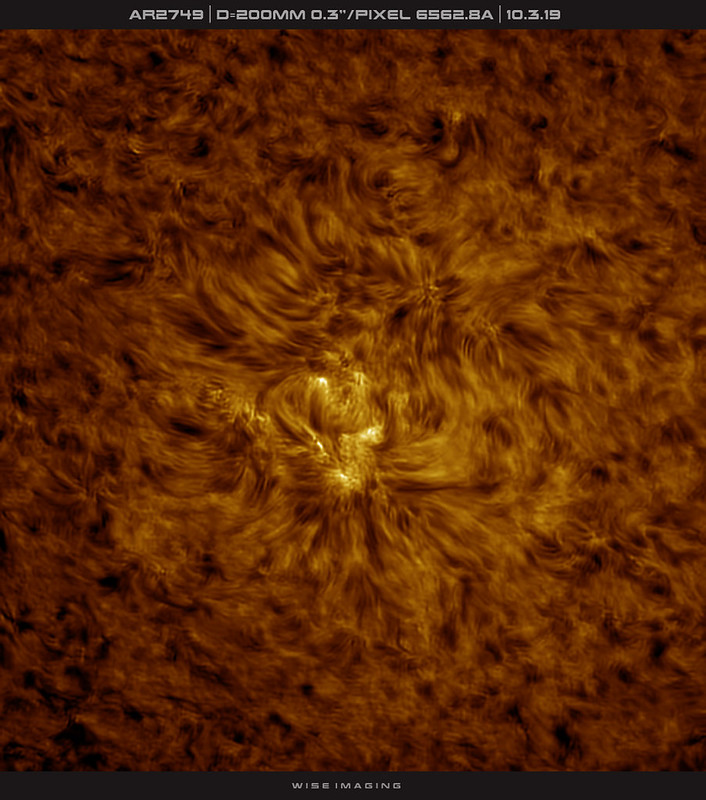
Heya,
A clear sky and some ok seeing this morning. Was able to take a look in fine image scale at AR2749, which is already decaying away with barely a visible umbra in the photosphere and really only remarkable in the chromosphere with the plage and mottling around it. There's also a fairly nice bright large prominence on the limb.
Colored:
B&W:
Earth Scales:
Equipment:
C8Edge + Aires D-ERF + Baader Red CCD-IR Block Filter + PST Etalon + 10mm BF + ASI290MM (fine scale)
120mmF10 Frac + Baader Red CCD IR Block Filter + PST Etalon + 10mm BF + ASI290MM (course scale partial disc)
52mmF11 Frac + Baader Red CCD IR Block Filter + PST Etalon + 10mm BF + ASI174MM (full disc)Very best,
-
4
-
-
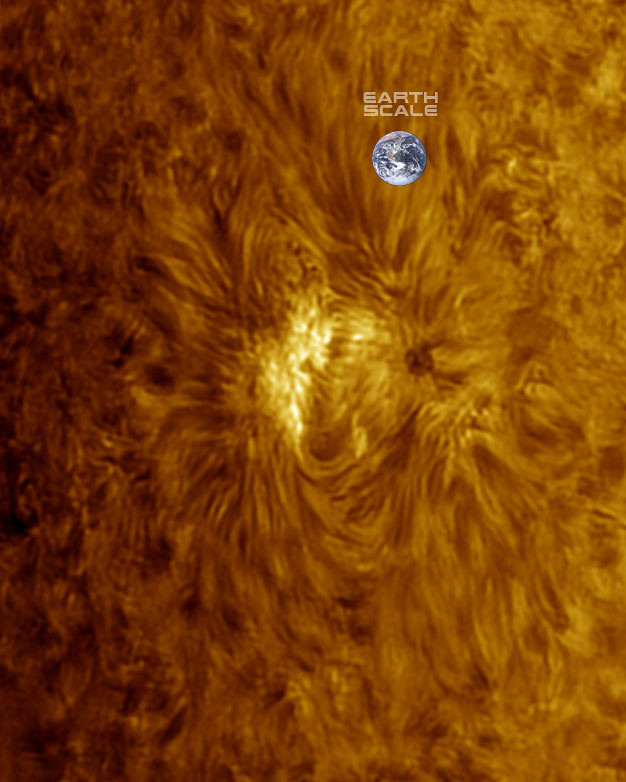
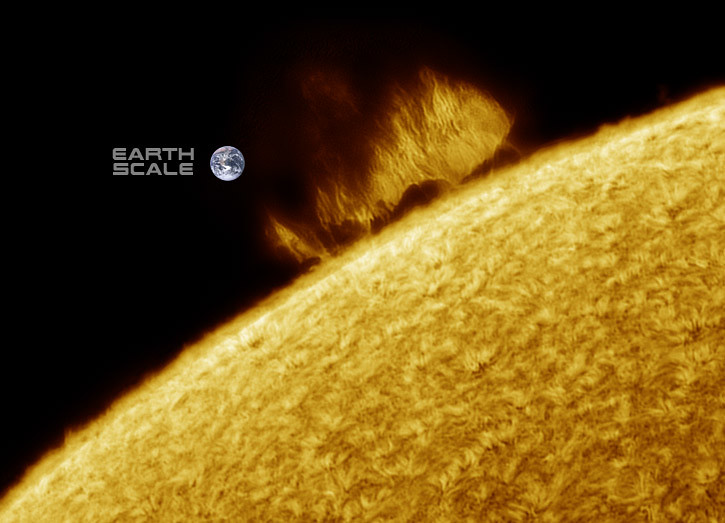
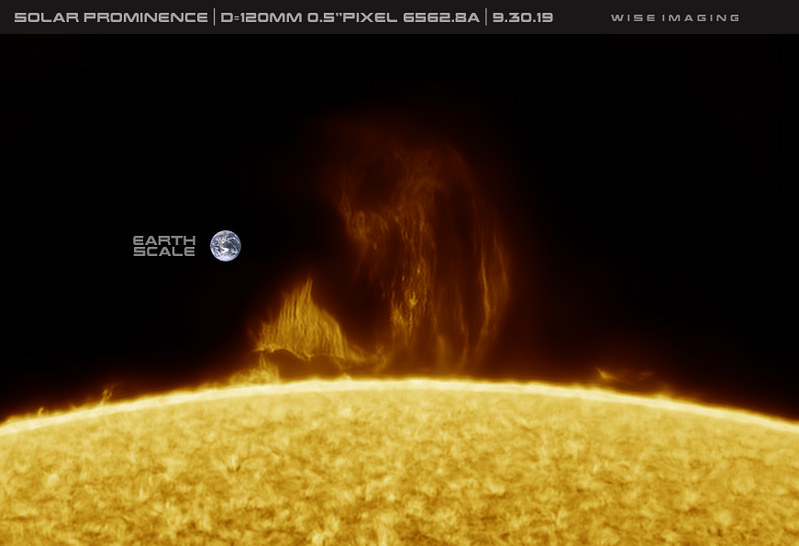
Heya,
Late this evening the small bright prominence on the West limb lifted off and became enormous (1730 Eastern Time). It's still present even now but it has spread out and gotten fainter. I managed to get some tolerable data in poor seeing late evening after a few attempts. Lovely huge prominence with lots of interesting raining detail. Earth scale provided, it truly is a monster.
Very best,
-
18
-


Lunar Disc, 54% Illumination | Feb 2nd 2020
in Imaging - Lunar
Posted
Heya,
Lunar mosaic:
Panels:
C8 Edge HD
742nm Filter
ASI290MM
Very best,