


upahill
-
Posts
890 -
Joined
-
Last visited
Content Type
Profiles
Forums
Gallery
Events
Blogs
Posts posted by upahill
-
-
Cracking shots, love seeing all the pics of Jupiter here and these are fantastic.
Cant get over the apparent rotation in just half an hour. Need to research if that is jupiters speed, or our change in position relative to it as its blowing my mind up. Best view i've had so far i've only barely been able to make out a couple of lines and never isolated the GRS visually - need a barlow I guess.
Thanks for sharing
")
-
No calipers handy but just slid a 13mm spanner over the nut on the wheel, that would indicate an M8 bolt I believe.
The only option I have found so far outside of china are these - https://www.bilcastors.co.uk/product/bzl50wvgrbjm828/
50mm OD / 8mm Bore / Ball Bearing.
Of course, im assuming these have ball bearings but they could be plain bores under the plate which would make life simpler.
-
@Paddy Herbert ah that makes sense then. Yeah file it is
Although you may have that extra half mm in the bolt holes themselves - I know I did, and if you can loosen them, whilst simultaneously lifting the dome, pulling the bracket and re-tightening it might do it.
-
2 minutes ago, pmlogg said:
They look right, will need to take some measurements. Would want the same size so I dont have to redrill all the mounts.
-
2 minutes ago, JeremyS said:
I'm also looking for replacement rollers for my 7ft Pulsar dome (also a single piece dome - not the newer bolted together dome). I asked Pulsar, but they haven't been able to suggest replacements yet as the newer models use different rollers it seems.
Do let me know if you find a source, @upahill
Will do, I suspect the bearings are standard and cheap, may even find a suitable material for the roller and try cutting it on the CNC
-
 1
1
-
-
2 hours ago, Alan White said:
Oh and one item missing from the list of to do:
- Convince the long suffering Mrs W. that an observatory would be a great idea!
I find its better to ask for forgiveness rather than permission in cases such as this 😂
Cracking job, hope your hand heals fully and you are observing in no time!
-
 1
1
-
Actually that makes no sense, forget what I said. I cant work out where the flanges are unless you have a wheel directly in line with one I cant see how they are rubbing on anything. My pic above if looked at upside down could still be relevant.
-
-
Ah, my dome is a slightly earlier one I think, all in one piece. I wish it unbolted but its solid.
If you have no adjustment in the bolts, and its only the flanges that are rubbing I would say a few minutes with a file would probably be all it takes. A few mm off the edge shouldnt affect anything and will stop the rubbing.
Im actually looking for replacement rollers for mine, if you ever do the same and find they have worn you may need to create additional clearance anyway.
The plate that is attached to the dome itself I never removed, nor did I remove the top wheels at all - so im unsure if they are chemically attached, but if not its possible perhaps that there is some play available to adjust - do all wheels foul on the flange? Could it be alignment of the dome pieces setting one edge ever so slightly lower than the other?
Ill try doing a pic to illustrate what I mean.
-

This is how mine was assembled, and how I put it back. Seems the same as your left design.
I cant see the part that your drawing is indicating its rubbing on.
Also, im sure its just the drawing, but would opt for the dome head on the bolts to be out the exterior of the dome for asthetics.
-
24 minutes ago, Alan White said:
Nice purchase,
I watched that dome on eBay out of interest, glad it's found a good home and will be used.
When I first read about cutting it up I was horrified, now you have it assembled it looks good.
Were these made as one piece in the past then?
Clear skies and good luck with the remainder of the project.
I have restarted an observing area project with dreams of an observatory one day.I was horified to do it to be honest, but the largest van I could get was a luton, and it was pouring down so couldnt even set up for nice straight cuts. Next time its dismantled it will get fibreglass lips installed for bolting.
If it had been 20cm smaller in diameter we could have got it in, but there was no way (I even made a cardboard model of the van, dome and rear door to try!
Originally these were supplied in one peice from what I gather, and later editions were as seperate panels. The cuts I made were along what looked like factory joined seams.
-
 1
1
-
-
22 minutes ago, sloz1664 said:
I have the same Pulsar Dome, which I collected, on a flat back lorry, from a fellow astronomer in Wales and can appreciate the physical effort moving & installing it.
I have automated my dome and hopefully will attempt to automate the shutter this summer.
Steve
Just read the thread, thanks, that video is amazing and shows such a smooth rotation.
You have gone for a solution similar to what I was thinking, a shelf attached to the inside of the dome above the base ring, I was looking at epoxying bike chain around the outside and using a sprocket to drive but your belt system has irradicated the fears I had of that having a poor mesh. So I may just have to shamelessly copy it

What's the saying ... imitation is the sincerest form of flattery 😆
Trimming it with the router is genius, im not sure how much horizontal movement I have in the dome itself but as someone said on your thread i suppose an idler on the other side of the dome would reduce that issue if it came up.
The other idea I had was a friction roller wheel on the shelf itself, with tension wheels underneath it, but never really liked that idea as it would be tricky to guarantee constant contact.
Is your shutter as much of a PITA to open? Maybe I just don't have the knack of it yet....
-
The dome is on!
Four of us just about managed to carry the dome through the barn, across the field and over the fence to get it into place. Im already not looking forward to getting this out of here in the future.
My rejoining method has a slight bit of unevenness in each of the three panels which was painfully obvious once the dome was on, but I have since managed to compensate for that. With the weight of the dome on the deck structure is clearly starting to strain a little, im not too bothered as it wont be for visual use, but more as a remote obsy and the vibration in the deck will be isolated from the pier anyway. Providing you dont bounce up and down on the deck when you are visually observing its not too bad and some concrete pavers and bottle jacks underneath may mitigate this if it becomes more of an issue.
Got the meade in there for a bit of fun (and to appease the wife who has been tripping over it in the hallway, had some cracking views of the lunar eclipse, saturn and jupiter that night. The LX10 is fast becoming my favourite scope ¬_¬
There are 8 rollers which site on the fibreglass ring, at any one time about 6 actually touch it. It may be worth me considering building adjustable brackets - but generally it was quite smooth if a little noisy.
The 3 sections are bolted together along that fibreglass ring, and agin about 2/3rds of the way down the ring with fixing plates. This is hopefully going to be enough and whilst the joints are taped over at the moment I will likely come back with either a plastic plate to cover them entirely or just re-fibreglass the joins.
Underneath the dome are the remaining rollers, these help to centre the dome on the lower ring and have smoothed out the operation of the dome significantly.
The biggest bug-bear I have right now is the aperture opening, it is far from smooth, or elegant. I would love to automate this eventually but right now the mechanics of it are appauling and it just doesnt like to open/close.
There are two thin rods, attached the base of the dome, and then to the aperture, with just some electrical glands as runners - there must be a better solution but cant think of one....

It's quite roomy inside really for the small dome.
The electrical centre will become a table for the tablet that runs the scope to sit, with some shelves adjacent to it. Im hoping to go from this tablet to a hub on the scope with a single USB-C lead, and 12v power.
Fairly happy with how its going, no idea how to motorise the shutter or dome yet but hopefully someone has some good ideas for me
Going to have to scrub it clean soon....

-
1
-
-
UPS man just dropped off a box of rocking horse ....
Thanks to @michael8554 for spotting it and thinking of me! All that remains is to hopefully install, configure and fix the bolts that almost let the scope slide off the wedge last night
Should be fun!
-
1
-
-
Love watching some of Thomas's build videos and livestreams - you kind of get lost in them a little and then poof! 5 hours gone.
That rocket is going to be seriously cool at 2m high. I just had to look up its size in comparison to others and suprised its as tall as BFR. How will you be finishing surfaces or just going with as is?
-
2 minutes ago, JamesF said:
You're going to get some terrible diffraction effects off that washing line, you know
Going to add another washing line at 90 degrees to get even diffraction spikes
Haven't given much thought to the wiring, those 6 black splodges of silicone are bolts that hold a board with a consumer unit and sockets, very tempted to just put a caravan power socket on the outside and run an extension when in use. I use similar leads as can be seen for the current mount as I cant really tunnel out with proper wiring underground. The big connectors mean I can unplug for mowing etc too.
I wanted to run cat5 buts its messy so just going to improve the wireless in the garden I think.
-
Well it fits, and have bought some hardware to bolt the sections back together. Going to need one heck of a good scrubbing.
-
2
-
-
Didn't think it would ever stop raining and then the hottest weekend in ages happens. Managed to put aside the myriad of other projects for the two days and get started on the deck.
The gradient was a little worst than I had imagined in my head. Almost 20" on one corner to level up the rear. Since its higher than I planned I splurged on some larger wood so I wouldn't need to prop up underneath as much. This is all temporary and as such there is no major construction going on - just whatever works and is cheap. In this case, 4 bags of postcrete ;)
Somewhat askew...
That's better...
Everyone else was at work this weekend so was left to levelling on myself with what were suprisingly heavy lengths of timber. If anyone asks the slight slant is for rain to run off ;)
So you might be thinking it would have made sense to put the pier in first whilst there wasn't a honking deck in the way..... you would be right.
I have a plan though. There is only about 2-5" of soil above giant boulders anyway to I can actually dig out via the hatch, shutter up and bury some bolts into the boulder before concreting.
All done and tidied up, we spent ages arguing about colour and ended up with a colour called "£10 a tub" - I think it looks pretty good though.
Got a couple of braces to add, some weed mat to feed through (i know), and some cladding to tidy up the exposed edges but its basically ready for the dome to be bolted too. Then onto pier base construction, I have a nice metal pier to go in now but may keep the todmorden up as visual scope pier for when im imaging and either put the 10" newt on it, or the LX10.
Once the pier is in and mounted the central square will have a filler piece dropped in to seal off the outside and prevent the trip hazard.
Stability is a 8/10 - and it can be removed in minutes which meets my main criteria.
I have however given myself 3rd degree sun tan burns though, so typing in agony. :(
-
4
-
-
So its a pre-fab dome but im planning some pretty hefty mods so this may well fit here. Just wanted to document it as I go but it will be a long project so no daily updates!
After a horrendous drive we arrived to pick up the dome, and started dismantling. The dome would just fit in the luton van on its back if it went in at angle. But the base was too wide for the doors and too tall to go in at angle. Originally the base ring was manufactured in 3 parts and joined so with an angle grinder in the pouring rain I put some quick cuts in and got loaded.
Im going to create 3 panels with a rubber seal to allow these three cuts to be rejoined and bolted - but wont repair the fibreglass. As I will likely need to move the dome at some point in the next few years it makes no sense to repair fully and the parts are a lot more manageable as 3.In the back of the van:
At the moment we are in rented accomodation so I have a couple of considerations to make.
- Maintain ability to transport the dome easily in the future (keep seperate)
- No large concrete slabs in the garden
- Removeable base with nothing left behind
- Shielded somewhat from view of neighbours without obstructing my views.
We have a great view to the south which I dont want to obstruct by placing the obsy at the bottom of the garden, which would be its best location for sky access, so instead it will be at the north end of the garden. This presents some terain challenges as the ground is dipped and a few inches down are large rocks (several tonnes).
This restricts my view to the east/south east but gives me pretty good south, west and semi-good northern views (once the hedge on the north edge has been cut down slightly. Large ferns to the immediate east of the dome will need to be trimmed significantly.
My plan for the base is to dig 5 holes, since at best ill get a foot down before hitting rock and the levels are so different ill use a hardcore sub-base, followed by a breeze block pillar in each corner. The pier will be breeze blocks with threaded bar, then the blocks will be back filled with concrete. It's not going to be super sturdy but better than what I have and can be easily pulled out and put in a skip whilst hopefully maintaining the wooden frame that will sit on top.
The sleepers will create a square frame that can be decked - isolated from the pier
Motorising the dome may proove a bit trickier. An upper and lower set of rollers run along the rim, but I would like to come up with a solution for motorising it without putting the motor in the roof so thats my next design hurdle. The shutter isn't overly smooth on its current rails but could probably be opened and closed using a simple pulley/motor system, that will have to wait until assembly to design.
-
4
-
1
-
1 minute ago, JamesF said:
Wahey! There's another project under way then
James
Into the barn in the morning for a few weeks probably before I can get started, I got the biggest van I could but there was no way the base was going in whole, so its in three sections now ready to be bolted together and reglassed (or I might find a way to make it unboltable again in the future)
Didn't have to cut the dome though so im glad about that. Still in rented right now so the plan is a temporary deck with pillar through it. 👍
-
1
-
-
6 minutes ago, JamesF said:
There'll be one for each pier, so three, plus one (perhaps a laptop) in the warm room. I have an HP EliteDesk mini for one of the piers, but the other two may well end up being RPi boxes or something similar.
Irritatingly, most of the switches I could find that have four connections (including this one) only support USB1 for the keyboard and mouse. Fortunately since I don't use a "clever" keyboard or mouse I think I should be ok.
James
Cant imagine what keyboard would need better than USB1
Mines a mechanical with LED etc and functions on USB1 fine 🙄Not sure if it counts as postman, but after a 14 hour round trip with non stop rain, and some angle grinding I just delivered myself this..... bit of a jigsaw now though!
I probably need to curb my impulse control........
-
5
-
-
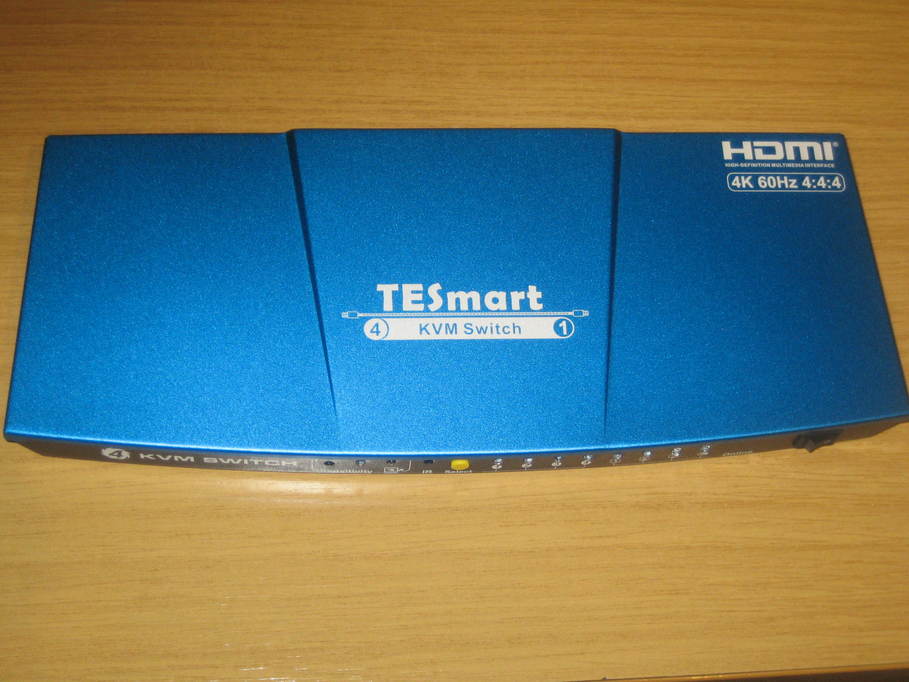
16 minutes ago, JamesF said:
This is to go in the observatory to allow me to switch between the PCs. It's a bit of a gamble as I've not used a KVM switch for probably twenty years when it was all VGA and PS/2 rather than HDMI and USB. We'll see how it goes though.
One nice feature it has is that it's remotely switchable, so I don't necessarily have to have it where I can reach the buttons. One con is that it isn't wall-mountable. If I want that I'll probably just 3d print some brackets for it.
James
Looks like a nice bit of kit!
How many PC's do you run? I remember those old KVM switches, having to try and recall the top secret key combination to switch systems - trickier with several different brand KVM's in the rack 😆-
1
-
-
2 hours ago, michael8554 said:
Very DIY, but dave eks made a board you hook up to US Digital encoders on each axis, I think you used a Palm or Compaq Pocket PC..?
https://eksfiles.net/digital-setting-circles/
Michael
Thanks for that, I may have to have a go at some stage. Part of me wants to learn my way around better without adding any sort of push to - but then I get out there look up and I’m lost lol
this project looks like it should give me the basics and help me learn where I’m pointing at least as well as find some of the harder stuff
-
I realised yesterday that after almost 18 months of imaging I haven’t actually looked through a telescope
My 65mm is a bit awkwardly mounted to be useful so wanted something i could quickly put together and use whilst the imaging rig does its thang.
I found an LX10 ending soon on eBay, it was local, a few hours later it’s in the garden. Which leads me to my questions:
the previous owner said you can get a computer handset for it. I have looked into a bit more and it seems this would be the Magellan 1 unit with additional encoders. Rather than hens teeth. Are there any other 3rd party devices I can integrate with the scope to achieve push to or relay position info to Cartes/Stellarium?
would Baader Hyperion lenses suit this scope? I only have the cheapest lenses right now.
-
1
-


.JPG.faa896f3ab07a0e02cb6681310b53da5.JPG)


Semi DIY Temporary Obsy & Motorising Project
in DIY Observatories
Posted
I have been reluctant to dig the hole out for the pier in this weather for obvious reasons but might make a trip to T.P tomorrow to pick up some blocks and pavers.
Since im re-using the metal pier my current plan is to dig a 450x450 hole as deep as it will let me until I hit rock (probably 8-12 inches) then build my height back up to the level of the deck using two side by side hollow blocks in alternating directions per level.
Will either glue or mortar each level - I drew out the existing hole pattern from the base and pending any major mis-measuring I should be able to fill the cavities with wet concrete before lowering a 450mm paving slab onto the top with the 4 studs sticking out the bottom with bends in.
When that sets im hoping for a level slab with 4 embedded bolts at roughly the height of the deck + a few mm for a floor.
Is it best to backfill with soil around the blocks once buried, or use something else to fill the gap and add a little extra vibration damping?
Im going to end up with horse stall mats in the obsy I think, cut to semi circles and just a few mm off the pier itself, there will be an extension of the deck to fill the rest of the gap first whilst not touching the pier.