


Budgie1
-
Posts
1,346 -
Joined
-
Last visited
Content Type
Profiles
Forums
Gallery
Events
Blogs
Posts posted by Budgie1
-
-
It's up and running!

I got an enclosure for the RPI this morning and put it all together, replacing my old IP Skycam with the AllSkyCam. I'm still tweaking things and I have issues getting AllSky to FTP the images to my website, but that was a certificate issue and is all sorted.
Tonights Top Tip: If you're having issues getting the RPI to work with Windows 10 Remote Desktop, create another username & password, then log in with those details and the Remote Desktop works. It has something to do with Bullseye OS not liking the Root Username, or something like that.
I still can't access http://allsky.local on browser, I have to use the IP address instead. It's not really an issue as I've not found anything I can't do yet.
@powerlord could you share your nighttime settings for the Module 3 camera? As it's either really dark here or there's something wrong with my settings as I have the auto-exposure set to a max of 80s & auto-gain to a max of 16. Both are currently maxing out to produce the image below at night. So a comparison would be handy, even if our LP levels are different, mine's Bortle 2 for here, well, when it's not cloudy!


-
 2
2
-
-
So, a wee update from Mr RPi Noob here. 🤓
The package arrived from PiHut containing what I ordered and it was easy to assemble the camera in the enclosure, all nice & neat. The POE HAT just pushes onto four pins on the RPI4 board and just runs, nothing else to be done with this, happy days.
Now, long story short, things didn't quite go to plan but I didn't give up and learned a few things along the way. So, for anyone else who feels like dabbling into this for the first time, here some tips:
- Most important one that will save you wasting a lot of time - AllSky will only run on the Bullseye OS, it hasn't yet been updated to run on the latest Bookworm OS. I installed both of them twice to get mine working. Download Raspberry PI Imager to install the OS on your SD card and you can also pre-set the username & password + LAN/WiFi access details.
- When you boot the RPi for the first time, download PuTTY onto your PC so you can access the RPi once it's booted. You'll need to find it's IP address on your network and use the username & password you setup on Raspberry PI Imager.
-
Once you're logged in, first download the updates & install (upgrade) them using these commands:
sudo apt-get update sudo apt-get upgrade -
Now reboot the RPi and take a test image with the camera. I'm using the Module 3 camera and I needed to take a test image to register the camera with the RPi, to do this use the following command:
libcamera-still -o test.jpg
- At this point you can go to the Allsky website and follow the installation instructions and follow the prompts, then reboot to complete the install.
-
It says to open the Allsky web page in a browser using allsky.local or allsky.localhost, these didn't work for me and I had to use the IP address of to get into the Allsky settings etc. So that is an option if you're having trouble.
")
Now mine is up & running, I just need to install it into an enclosure and put it up on the roof. Something for the weekend me thinks.
-
4
-
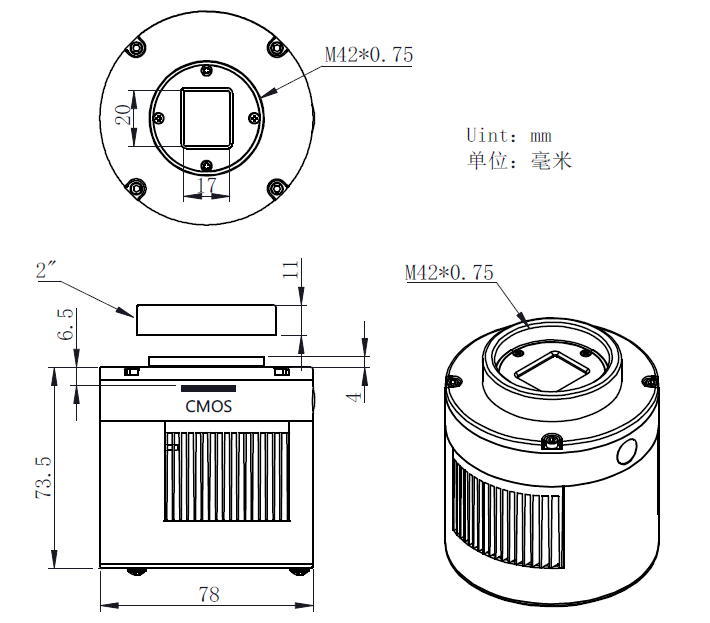
The measurement is taken from the face of the sensor to the rear of the lens on the field flattener/reducer.
On most ZWO ASI cameras, there is 6.5mm from the sensor face to the front face of the camera body. Add this to the 11mm, 16.5mm & 21mm spacers supplied makes your 55mm backfocus.
If you're using filters in the imaging train then add an extra third of the thickness of the filter lens to your backspacing. So, if a filter is, say 3mm thick, you add another 1mm to your backspacing to compensate for it.
-
I've been looking at getting an All Sky Cam for a while and finally took the plunge after reading this thread, so thanks Stu!

So, I've ordered the RPI 4 with 4GB RAM, the wide angle Module 3 camera, waterproof enclosure and POE HAT type D. I can get an enclosure locally and already have a suitable SD card.
I wanted to run it using POE as I don't have good WiFi in the Obsy, not good enough to connect to this anyway, but I do have an IP SkyCam on the house which is powered using POE. So I'm going to replace that camera with the All Sky Cam, so it's accessible from in side the house.
It was ordered today, so it should arrive sometime this week and I'll hopefully be in a position to put it up next weekend. Although it'll be a learning curve as I've no experience with RPI's or Linux, so it could be interesting.
-
2
-
-
2 hours ago, vlaiv said:
Good point. I forgot to say that. My HEQ5 is very far from stock mount. Had it tuned, replaced all bearings for SKF ones, belt modded, changed saddle plate clamp, put it on Berlebach planet tripod
Likewise, out of the box my HEQ5 had a lot of play in the motor gears, which was quite easy to tune out and has now been replaced with the belt mod. Over this summer I took the mount apart, cleaned it and replaced all the bearings with better quality ones. After reassembly I adjusted the RA & DEC backlash and then rechecked it again once the mount was back on the pier and had a scope on top of it.
I'm now seeing 0.6 to 0.9 RMS regularly, although I really need to recalibrate PHD2 as I've changed scope & camera since it was last done.

-
1
-
-
1 hour ago, vlaiv said:
Are you using UV/IR cut filter with that sensor?
Most of these astronomy OSC cameras come with just AR (Anti-reflex) coatings so they need additional filtration in UV and IR especially if one is using refractive optics with them.
What you are seeing in images might be poor correction in UV/IR part of spectrum.
I'm wondering if the back focus also needs to be extended slightly. The direction of the halos from the larger stars in the second image may indicate the sensor is slightly too close to the reducer lens?
I know @PeterC65 says the back focus is set to 55mm, but if a UV/IR filter is being use then this may require an extra mm or so, due to the thickness of the filter glass.
-
1
-
-
The ASIAir Mini, and the other versions, don't have an internet connection.
They produce their own WiFi connection for your tablet or phone to connect too. Once connected it always say "no internet", just acknowledge and continue, it'll be fine.
-
Following on from my HOO image of the Lion Nebula, on the 24th October I managed to get 3h20m of Sii data (I would have liked to taken more Ha at the time, but I had to get up in the morning
).
So I added the Sii data to the Ha & Oiii I already had and re-stacked the lot in PI's WBPP. I then processed it this evening and came up with this.
This image was taken between the 14th & 24th October using the ZWO ASI1600MM Pro set to -10°C, Gain 139, Offset 50, using the WO Z73 III with adjustable flattener, on a HEQ5 with belt mod.
It consists of:
- Baader 3.5nm Ha - 3h35m
- Baader 4nm Oiii - 3h20m
- Baader 8nm Sii - 3h20m
Processed in PI and only the Ha stars have been used for this image. I made it quite light to show the background dust around this nebula, so the centre is a bit bright, but I'm quite pleased with it.
Do the clicky thing for full res.
-
7
-
You get a wider FOV and a slightly faster f ratio on the scope, but your trade off is that the objects appear smaller, further away and less detailed, because of that increased FOV.
To see what you would get, put you scope and camera or EP details into the FOV calculator in Astronomy Tools.
-
1
-
-
+1 for fitting a SSD drive to replace the older disc hard drive.
When I fitted one to my desktop, it went from 3-4 minutes to boot up down to just 25 seconds from pushing the ON button to Windows being up & running.
Whether it'll make DSS faster, I don't know, but fetching & storing files is much much faster.
-
Well, it's take a while to get this far but it's coming on. This is work in progress as I've only managed to get Ha & Oiii data so far because the clouds just won't stay away long enough. It's taken 4 nights to get 43 x 300s Ha subs because I see it's clear, roll the roof off the obsy, start everything up, swing on to target, get a couple of subs and the clouds roll over the target!

Still, I persevered with 3 subs on the 14th, 5 on the 16th, 9 on the 20th and 65 last night!
So that's enough to be getting on with on the Ha & Oiii side, I just need another clear night to capture some Sii data, but I figured I'd stack & process what I have to date and it's coming on.
This is a total of 6h 55m of integration, 3h35m Ha & 3h20m Oiii, captured with my new (to me) ZWO ASI1600MM Pro, Baader 3.5nm Ha & 4nm Oiii filters, connected to a WO Z73 III. Captured with APT, stacked & a very quick process with PI.
Do the clicky thing for full res'
-
6
-
-
What other software are you using, apart from PHD2?
I use APT and after the meridian flip is doesn't automatically restart PHD2 guiding unless the "Control Guiding" box is ticked in the APT Guiding Settings.
-
After trying out a mono setup with the Atik 428EX camera earlier this year, I decided to get one with a larger sensor and manage to obtain the ASI1600MM Pro from a fellow SGL member about a month ago. Last night was my real first light with the camera, EFW and Baader 3.5nm Ha filter & Baader 4nm Oiii filter.
Between showers (it's the West Coast of Scotland
 ) I managed a couple of hours before the clouds moved in for the night. So this is 10x 300s Ha & 10x 300s Oiii at gain 139, offset 50 and -10°C, with Darks, Flats & Flat-Darks. Stacked & processed in PI. The scope is the WO Z73 III with the adjustable flattener.
Overall, for the short integration, I'm pleased with the results. There's a slight back focus issue, looking at the corners, which I've hopefully sorted by adding another 1.5mm to the adjustable flattener.
Comments welcomed and do the clicky thing for full resolution.
-
7
-
-
If you have the standard 80ED DS Pro focuser then they can slip because they only use friction to connect between the focuser tube and the adjusted rod. You should be able to adjust the focuser to tighten things up a bit and stop the slippage but sometimes the the flat on the focuser tube is slightly bevelled in the middle of the flat and only makes contact on the edges of the flat.
Although this video is 12 years old and for a Newtonian focuser, it's still the same issue.
-
As I have an ASI294MC Pro and have used it for the last 3 years, I can say that it's a very capable camera and you won't find another 4/3 sensor at the price.
Yes, it can have issues with the flats, but this is mainly when using the dual-band filters. I use a gain setting of 200 & 30 offset with no issues when using the L-eNhance or Askar Duo-Band filters. You do have use flat calibration frames which are longer than other sensors, 2-5 seconds is recommended, and these do work.
I dug out this thread which I posted, last year to show what this camera can do:
Having said this, the more modern sensors in the likes of the ASI533MC Pro & ASI2600MC Pro are more hassle-free when it comes to the calibration frames required. Also, if you check the Astronomy Tools CCD Suitability Calculator, the ASI294MC Pro is better suited sensor for you 9.25 Edge HD, but you may want to look at the 0.7x reducer to lessen the over-sampling.
These cameras are a big outlay, so don't rush in, make sure the one you get is the one you need.
-
1
-
-
5 hours ago, david_taurus83 said:
You can set the updates to happen during your PC inactive period which you can choose. For example, I have set me imaging PC's active period as 18.00 to 07.00 so any updates occur during the day when it's not in use (it is left running 24/7)
+1 for David's suggestion on my imaging laptop. Then, even if it decides to do an update by itself, it won't be during an imaging session.
-
The pixel size, focal length etc should be in the FITS Header, assuming you use the FITS files from the downloads. The ImageSolver script should pick up that info directly from the header.
-
20 minutes ago, maw lod qan said:
Faith in the force one must have!!
And it will come.....!
On May 31st 2003 we had the same sort of forecast but I still got out of bed at 3am and drove for an hour to the Northern most point of the Isle of Lewis in the Outer Hebrides, a place called The Butt of Lewis, in the hope of seeing the only Annular Eclipse I'm likely to see in my lifetime.
As dawn broke, there were a couple of hundred people there and we all knew the eclipse had started and we were clouded in.
But we waited, and the Force was strong that morning, for as we watched in hope, it appeared through the cloud, only about 20° above the horizon, but it was visible and there was a audible gasp from those assembled.
And as we watched, the clouds parted, just long enough for us to witness a spectacle that will live with me for the rest of my days.
We were the only place in the UK to have clear enough skies to be able to see the eclipse that morning and I captured the event with my old 35mm Pentax P30T camera, on a tripod, with no solar film over the lens.
I hope you get to witness the sight and enjoy it.
And I want to see the photos!
-
7
-
 2
2
-
-
Assuming you want to take photos of Deep Sky Objects (galaxies & nebula), has the Canon 60D been modified for astrophotography? If not then the camera is already fitted with UV/IR block filters on the sensor and these will also be blocking a lot of the Ha waveband of light, the red stuff in nebulas etc. So think about what filters you want to use and will they work with this camera?
There's no point spending money on a fitlerwheel & filters if you're not going to see any benefit from them.
-
I'm just going to leave this image of the last 24 hour figures from my weather station here with a big
icon and maybe some 😭🤿
............and it's still raining!
-
 2
2
-
-
36 minutes ago, Clarkey said:
Normally I would agree, but it does seem odd that it is only on two stars. There are hundreds of other red stars in the full image, but only these give the halo. I guess it is possible that these particular stars have a slightly unusual spectrum which is causing the effect. I have had halos on the filter (l-extreme in this case), but on the FMA180 the filter is on the dew shield, not in front of the camera. Previously these reflections have been on bright stars when the filter was near the camera.
I do not think these are any amazing new phenomenon, but they just struck me as odd.
I'm sure there's a scientific reason for the halo's these filters produce but they do seem to be on random stars and different numbers of stars on each image.
If the filter is in dew shield then it's halo producing caricaturists maybe diluted by the other optics between it and the sensor?
-
They look very much like the halo's created by a dual band filter, like L-eXtreme, L-eNhance or Askar Duo-Band. The only thing I'm not sure about is why the stars are red.
If they are a filter remnant, when you do star removal the halo's are normally left on the background image and can be removed using CloneStamp in PI.
-
39 minutes ago, Clarkey said:
Thanks - I'll certainly have a look. I have paid for the Adam Block Fundamentals videos - I'm about halfway through. Very informative if a little slow going.
Adam's videos are excellent and I don't claim to know or understand anywhere near as much as he does.
Mine are very much in the "get you going" category at the moment and I've just uploaded a Basics of OSC processing video, which is currently processing the HD version and will be ready in a couple of hours.
55 minutes ago, Clarkey said:This was not the specific problem - but looking at it again, the lower sky does seem to have a bit of a green tint. What I am really struggling with is getting anything other than red in the NB images.
You can remove some of the green cast using SCNR, select Green and use the slider to adjust the amount you want to remove. Just use the Undo button until you're happy with it.
When using a NB filter, in the SPCC process, remember to tick "narrowband filters mode" and set the midpoint for each colour, as well as the band width. For the likes of the L-eXtreme you would use HOO combination:
- Red = 656.30 @ 7nm
- Green = 500.70 @ 7nm
- Blue = 500.70 @ 7nm
-
2
-
I've been putting together some PI tutorials to help people get to grips with the basics, I've yet to make one for the workflow I use with an OSC image (next on the list
) but there may be something that'll help in what I've already put together: https://www.youtube.com/@lochaberastro9752/videos
If there's anything specific that your struggling with, then let me know and I'll see if I can put something together.
I'm no PI expert but I know it can be a difficult app to get to grips with, so if I can help with that then it's worth the time.
-
1
-
1
-


New(ish) Cheap all sky camera option!
in Discussions - Cameras
Posted
I helps quite a lot to turn on the auto-stretch in the config.sh file!

