


vlaiv
-
Posts
13,107 -
Joined
-
Last visited
-
Days Won
12
Content Type
Profiles
Forums
Gallery
Events
Blogs
Posts posted by vlaiv
-
-
9 minutes ago, HAlfie said:
Hello and thanks a lot for your answer!
you're totally right, a Roddier on 3 channels would give me the answer :)! I'll look into it!! That's very interesting especially to see which channel is the strongest suit and which isn't.
Yes the Strehl of 0,95 was on 550nm...! The fact that I'm à F/5 (which is quite fast) could be a part of the explanation.
The difference of focus quality between colors channel isn't really catastrophic but I may be flirting with my optics's limits :). Cannot trying to be a Takahashi when you're not ;).
Have a nice day and clear skies!!
There is a simpler test to perform rather than doing Roddier test - not that it is complicated, but will require a bit more processing.
Try imaging without field flattener. Maybe optics of the scope is fine, and field flattener is poorly corrected at red part of the spectrum. You will have smaller usable field for your test, but stars close to optical axis should be a good indication - they will be sharp.
-
10 minutes ago, prusling said:
Hi, I saw this old topic referenced in a current thread and wanted to ask how you conduct a Roddier test. I also have a TS 80/480 - of 2011 vintage - and I seem to get a spread of colours within stars - with red more prominent in one segment. I'd like to determine whether it's the scope or another part of the optical train.
Here is a brief overview of how it is done, but there is much nicer explanation in document accompanying the software that is used:
It would be best if you have access to NB filters - that way you can do exact measurement in certain wavelengths. I have OIII, Ha and also Baader solar continuum filter that is around 530nm or so, but have not done measurement with those. You can also do it with regular RGB filters but results will not be as precise - you will get a sort of "integrated" strehl ratio over respective bands. Same happens with OSC cameras.
You will need WinRoddier 3.0 software (or any more recent version, last time I did this, it was with version 3.0). You will also need some sort of application for fast capture - like planetary imaging. Sharpcap will serve this purpose. Last you will need planetary stacking software - AS!3 for example.
Measurement is done by recording defocused star pattern in particular wavelength (or filter). You should select fairly bright star - like mag 2-3, and high up in the sky to minimize seeing effects. Night of good seeing will give you more precision in your results (similar to planetary imaging). If you have OSC - you record all three bands at the same time, then split channels later and examine each R, G and B recordings. You proceed by doing short videos of about 1 to 2 minutes. You need one of in focus pattern and one of out focus pattern. There is method to calculate what diameter of defocused star pattern needs to be in pixels - depending on focal length of scope and size of pixels on camera, it is included as separate small piece of software and it is described in how to document / manual.
When you finish your movies and calibrate them - you stack them in AS!3. It is important that you don't change intensity of image in any way, so avoid auto scaling of intensity and such. Also - no sharpening must be applied to image. Once you have your stacked images prepared you load them in WinRoddier, set wavelength (for NB filters - pick proper wavelength, and for RGB use wavelength in center of the band for each color).
Software does the rest and prepares wavefront images, Zernike polynomials / coefficients and calculates strehl / star profile - look at images that I attached it is screen capture from WinRoddier software.
This is process in the nutshell, for more detailed instructions - read the "manual" (or rather document describing workflow).
All needed files (both program executables and manuals) can be obtained via Roddier yahoo group. You need to join the group (it might need permission from group maintainer/admin if I remember correctly - it took a day for me if I remember correctly).
https://groups.yahoo.com/neo/groups/roddier/info
Once you have joined the group look under Files / WinRoddier Ver. 3.0 (Latest)--Apps and User Manuals folder for pretty much everything you need.
If you want to check out manuals and "how to" before joining the group - it looks like these are available on different urls on the net, so here are some to get you started:
http://www.compubuild.com/astro/download/Roddier_Ver.3.0_Quick-Start_Guide.pdf
http://www.compubuild.com/astro/download/New_WinRoddier_User_Manual.pdf
-
 2
2
-
-
Ah yes - if filter causes blur when in front of focal point (converging light beam close to focus point) but not when placed between eye and eyepiece - than it is very poor quality filter in terms of parallelism of surfaces and polish (general optical quality).
In front of your eye, image is already amplified and small aberrations on amplified image will not be resolved by your eye. In converging light cone before eyepiece any aberrations will be amplified by eyepiece (same as image) - and things will go blurry if you don't have decent optical quality filters.
-
1
-
-
32 minutes ago, HAlfie said:
3. Regarding your point N°3, my ESPRIT 80ED comes from Teleskop austria and was "perfectly" collimated by Tommy :
QuoteI am ready with Esprit 80/400 Nr. 1801057 - it reads 95% Strehl now and has a smooth star halo. The colors are very well balanced and no lateral color shift exists. The residual errors aste a trace of undercorrection and astigmatism, both in small digestable dose (95% Strehl without any subtractions)". The lens buffer ring has been exchanged, and lenses collimated one by one. The lens cell has been centered to the focuser (to have the optical axis at center of your picture)
Ususally I was expecting to have a cleaner Halpha channel than OIII, but it's the opposite. I also know that asiderom the optical color correction, in green, you get a better resolution and even better in blue than in red.
I'm not going to question how good collimation is on this particular scope, but there might be an issue with correction. Although from your quote we can see that "The colors are very well balanced" - I'm not sure what it means.
Triplets are tricky beasts with regards to collimation and proper lens spacing - and I for sure, have no clue about how it is properly done. What I do know is that there is no single strehl ratio for such a scope. If single strehl is quoted - then it is probably in single wavelength - usually around 550nm (or similar - peak of visual sensitivity in scotopic vision I think). Corrections in other wavelengths might and usually are different. Here is an example of strehl vs wavelength graph:

This is result for a doublet scope, and while around 580nm it approaches respectable 98% strehl, at Ha this particular scope is going to have strehl around 65% or so.
I "tested" my own TS80mm F/6 triplet with Roddier analysis - nothing fancy, RGB image split, and I for example got following results per "band": Blue was around 80% (let's say average), Green around 94% while Red was at around 98%. Such scope would have opposite characteristics - very sharp Ha, while OIII would be softer.
Have a look at this post to see results of test:
However, not sure if this is the cause of your issues with star bloat in Ha.
1 hour ago, HAlfie said:If you look at the circle with the 2 small stars. You'll probably find that the best focuser position seems to be 32434 or 32407.
Now if you look at the "big stars" with HFR value, the best focuser position seems to be 32353 which was chosen by SGP but the small stars seems slightly out of focus.
It's like I can"t get a perfect focus with both big and small stars. How is that even possible 🙄? Do you see the same pattern as me?No, actually, I'm not seeing it. I'm seeing what you are seeing and thinking that best focus position for small stars is as you said somewhere around 32407, but this is just a visual thing. You have no HFR for these stars, and because they are so dim - when not in perfect focus they will be even more dim and their "wings" (wings of star profile) will be below read noise. If you look carefully, you will actually be able to tell that it is spread around. it is very faint, but can be seen. I'll make a screen shot to point it out. Here it is - focus position 32407:
Now the same image - ridiculous level of stretch - just look at noise distribution:
Noise is more dense in rather large circle around central "tight" points - and this is also light from those stars but very low in intensity due to less than perfect focus, and being at the level of surrounding noise or below it, so it can't be easily spotted.
Also compare how much the size of disk of large star increased (it is already stretched) and how much of those two tiny stars.
-
Not sure what you are finding to be an issue with this?
Subs are certainly not over cooked, and stack looks just fine with regards to this (and pretty much everything else). There are some issues with the image, but nothing to do with camera or data - there is quite a bit of aberrations, like you said probably issues with focusing and spacing, maybe a bit of tilt - nothing that can't be sorted out. There is some scatter, and again this is not down to camera or the data - probably transparency issues, a bit more moisture in the air that creates scatter and glow around bright stars (at least with M31 that I examined).
Here is quick & dirty stretch on M31 without any soft of additional processing:
-
Yes, for dark optimization to work - you need to have proper bias, and CMOS sensors don't have proper bias, so it's best to avoid dark optimization as it will cause issues - like you've shown.
-
 2
2
-
-
Could be many reasons, but let's list a few:
1. changing seeing conditions between OIII, Ha/SII - you could analyze this maybe by examining what time of the night did you do each set, was it on same or successive nights and what was guiding like for each session. If OIII was first or last in single night - it is more likely that seeing had something to do with it, if it is in the middle of the night - it is still possible but less likely. If each was taken on a separate night - highly likely that it was the seeing. Poorer guide RMS often means that it was either the seeing or maybe wind?
2. Different signal levels will cause different level of "auto stretch" / "auto develop". If you want to see if stars are similar in size (or different), you should check actual FWHM of respective stars to see change in "bloat".
3. It might be that optics + flattener is better corrected in green than it is in red. I doubt that you would see this from scope alone, but with flattener - it might be an issue.
4. In principle it could also be due to filters, but I don't think Baader filters are to blame here. Many people use them and no one (including me) reported this. In general it is other way around - Ha/SII tends to be sharper than OIII because longer wavelengths are less impacted by seeing than shorter ones.
-
9 hours ago, msacco said:
So if I understand correctly, it simply charges at a rate low enough to just power the laptop without charging it? And Is there any way I can check it myself? I do have a spare step up I can use.
")
Maybe simplest way to try it is - to try it

Read voltage from your mains adapter, and see how much amperage it is supposed to give (mine is something like 19.5V and 4.8A). You don't need as much amperage - can be a bit less, because these mains adapters are designed to both power laptop in work and charge at the same time - hopefully it won't do charging of the battery, just powering laptop. See if your step up converter can deliver enough power and set it to proper voltage that you read off mains adapter. Do be very careful about plug polarity - measure it on your current mains adapter. Get another plug like that and make a lead with it from step up (of course, again minding correct polarity).
Then plug laptop into battery instead of mains and see if it will work.
9 minutes ago, Cosmic Geoff said:I have wondered about this myself - my Dell laptop went low a couple of nights ago and I had to take it indoors for a recharge. I'd rather use a 12v to 240vAC converter and the standard charger and not mess with the Dell charger control system, but 60 watts or so (+losses) is going to be demanding of any battery. One can feel the waste heat coming out of the laptop. Perhaps a laptop with long battery endurance would be a smarter option for field use.
An option I have used is a very long mains extension lead. 🙁
You can do it via 12V DC - > 240V AC and then use regular adapter. This way it will try to recharge your battery when it drops, so maybe remove laptop battery, or tell laptop in power management not to recharge battery (I don't even know if there is option for that)
Total losses are unlikely to be better than something like 15% and can be as bad as 40% - depends on efficiency of converters. But let's use 20% losses. Mind you that using step up and doing 12V -> ~18V (or what ever lap top needs) will have similar performance, but might be smaller in size and easier for DIY.
Laptop won't draw max current all the time, but it will certainly need something like 35-40W in normal working mode (no heavy processing or such). This in turn means about 50W load on battery, and at 12V it is about 4A. 4A from 75Ah battery in principle should be able to power laptop alone for about a 18h..
On the other hand, we can look at it like this:
- mount power - 2A?
- camera cooling - 2A?
- laptop - 4A?
- gadgets (flat panel, motor focuser, .... anything that uses just a bit of power - and not continuously) - this we won't count as others won't have continuous draw at max rating so there will be plenty of power to spare for these devices
So we have something like 8A of draw (although not continuously).
We want to be able to run 8hours in the field (should be enough for complete session together with setup and everything) - that is total of 64Ah - anything above 70Ah should be enough (providing it is deep cycle).
-
1
-
-
1 minute ago, msacco said:
Interesting! I didn't even thought about it this far...So what are you using at the moment?
At the moment - just mains power
Still don't have portable rig. However, I've found that for Dell laptops, if you provide needed voltage and current on adapter plug - it will work but will not charge (which is good - don't need to drain current from main battery to recharge laptop).
I've found very cheap step up/step down DC/DC transformer - just need to try it out. It provides around 3A of current (my current charger is something like 4.8A - but it needs more power in order to charge laptop). I'm fairly confident that laptop will run on 19.5V / 3A (that is almost 60W of power - should be enough for just running computer). And need 7.4mm laptop power plug - don't want to cut into laptop mains adapter that I already have.
-
Here is some info on this barlow:
- focal length of this barlow is 62.9mm
- for magnification factor of x2.7 you need to place it 105mm "from the center of the last lens", or another way to put it - from "highest" point on the surface of the last lens (that being the center of lens of course).
You can actually calculate required distance by using barlow formula:
Magnification = 1 + D/F
Where D is distance from the lens and F is focal length of the lens. If you plug in the numbers - you can work out distance from the "center" of the lens assembly (principal point)- not to be confused with center of last lens - it is "middle" of the lens assembly rather than point on surface of the lens.
2.7 = 1+D/F => 1.7 = D/F => D = 1.7*F
1.7 * 62.9 = 106.93mm
This agrees well, so principal point to focal point is 106.93mm - that puts principal point about 1.93mm "inside" last lens.
Anyway - here you have it. It should be about 104.1mm from shoulder because it is about 1.1mm "in front of the last lens".
If you place your sensor further or closer - you will get different magnification - handy for adjusting sampling rate, however nothing to do with sensor size.
-
Wondered the same myself for my dell laptop.
Ideally I'd like something like a car charger but without charging capability - just powering laptop after battery is low. Issue with dell is that it won't boot if charger is not "genuine" (there is some sort of identification protocol between laptop and charger).
Another option that I considered is "dummy" battery - just empty battery slot without actual battery inside - connection to external power tank and appropriate voltage, but then again - battery is sort of "smart" battery - it reports level of charge and what not and I don't think simple connection to proper voltage will work.
-
For smaller sensors you don't need flattener. You might want one for APS-C sized sensor (I'm not sure). RCs have rather flat field, but not fully flat - for large sensors they need flattener.
I use RC8" with ASI1600 without flattener and field is good on that size (21mm or so diagonal).
This scope has 1370mm FL and with 460ex this will give you 0.68"/px - and that is rather high sampling rate and you will be oversampling natively. There are two things that you can do - add FF/FR, or bin.
I think that you should bin x2 - that will give you 1.37"/px - and that should be rather good for HEQ5 and regular guiding results (something like 0.8" RMS).
When you bin x2 it's like having twice shorter focal length so you will effectively have "F/4.5" scope - which will be fast enough (F/ratio and "speed" of scope is not measure of how fast you will take images - it's aperture at resolution, and in this case you will be using 6" at 1.37"/px - which will be quite fast).
Here is an example for you - this is two hours of lum in rather heavy LP (mag 18.5 skies) - 8" scope (F/8 natively - also RC but 8") at ~1"/px:
I would not call that slow ...
You can "speed up your scope" with use of FF/FR, and a good one would be Riccardi x0.75 FF/FR - but that would give you 0.91"/px - and I think you will still oversample on this resolution. Binning with FF/FR will give you 1.82"/px - and that is going to be rather low resolution - comparable with 80ED - so you will gain nothing (apart from speed, because of almost x4 light gathering for same sampling rate).
-
-
Ah sorry
I thought you were asking about IR pass filter (did not read what you've written properly).
No, IR cut will not be much of a use for guiding. Even if stars are a bit bloated it does not matter for guiding.
Anyway, you can use one of those adapters if you still want to try some sort of filtering on your guide scope (either IR/UV cut or IR pass filter).
-
1
-
-
In principle it might. Longer the wavelength of light - less bending there is, so in IR you should be affected by seeing the least. You will loose some of camera sensitivity, but that should not be an issue with longer guide exposures.
You don't need any special T2 size filter - regular 1.25" filter is enough, you only need an adapter like this:
https://www.firstlightoptics.com/zwo-filters/zwo-t2-to-125-filter-holder.html
In fact, you might have received one with your camera already (I know I did for one of my ZWO cameras).
-
55 minutes ago, Fieldsy said:
60 -120 subs ok with non cooled cam?
Depends on a cam. I did some 60s exposures with ASI185 and it worked to some extent. I don't remember going longer than that.
-
21 hours ago, fwm891 said:
An STF on the dark master and same on a single sub...
Yes, there is residual amp glow.
Could you upload this light and set of darks that you used to calibrate it for inspection?
There might be something that is causing this that could be solved?
-
Fancy an open cluster? M29 is nicely positioned and quite compact - framed nicely in your FOV.
Globular - M15.
Nebula - Maybe Crescent nebula? It is nicely framed. Cocoon is also good fit
Galaxy - NGC7331 is always a nice target.
-
2
-
-
I did read once a review of this unit, and author did get tighter stars by using it, but can't remember what mount it was on.
Will try to find it again and post a link
12 hours ago, pete_l said:Why? If a €1500 device can give a €4000 EQ8 the same level of tracking performance as a €13000 GM2000 then it would be worth looking at
")
I cannot say that it would, but the concept is there. The question is whether an Active Optics unit can actually deliver?
That is what nobody seems to be able to say definitively: either yes or no.There are plenty of opinions, but very little practical experience.
Yes, you are right that some mounts are rather expensive, but why consider GM2000 and not something like Mesu 200?
EQ8 + AO device will place you in Mesu 200 price range, and I have sneaky suspicion that Mesu 200 will deliver at least as good performance if not better without complexity of running an AO unit.
-
In my view - completely useless thing.
It won't correct for seeing for different reasons:
- it only corrects for first order aberration - tilt
- seeing aberrations, or specifically tilt is very local phenomena - seeing happens in higher in atmosphere at at least couple of kilometers of altitude. It is enough to move couple of arc seconds away from a guide star and that translates to significant length at that distance (for example 20 arc seconds at 5km is already about half a meter - seeing cells tend to be less than that). Any sort of wider field will be distorted by different amount of tilt - you can easily see this effect if you look at planetary recording or maybe Lunar recording - distortions (jumping around of the features - mostly due to tilt) is different at different places. Correcting for tilt at location of guide star will do nothing for rest of the image and probably cause more harm then help.
- it does corrections on time scales that are most of the time above time scales of seeing changes. It does something like 30hz max if I'm not mistaken, and seeing often goes as fast as 100hz or more.
It does have one use, and it is at best limited at that - correcting for a rough mount. If you want good guide performance but your mount is rough and it has small time scale error large enough (like 0.5"-1.0" or similar jitter) that can't be corrected with guiding because guide exposure is longer and mount is not as responsive enough - this will catch it and react provided that seeing is good enough that any guide star deviation from true position is due to mount and roughness rather than being "masked" by seeing.
On the other hand - why buy such expensive unit that might not perform as expected when you can instead sell current mount + invest that money into purchasing a new better mount that will be smoother and guide better.
-
Don't use bias in regular workflow - you don't need them and they can cause issues (maybe even issues that you are seeing).
Since you did not take flat darks (or dark flats - whichever way you prefer) - use bias that you captured instead of those.
Btw offset of only 15 looks suspiciously low. Since you have bias subs - you can check if offset 15 is indeed adequate. Could you do following:
Make a stack of bias subs only but use simple minimum stacking method, then run stats on it (min,max, average, stddev and such) and histogram and post those?
-
I don't know any company that does such a thing, but why not enlist help of fellow SGL members?
Many people enjoy processing data, and all you should do is create a post with a link to your data and ask people to process it - I'm sure you'll get many different renditions of your target and you can select one to your liking.
-
2
-
-
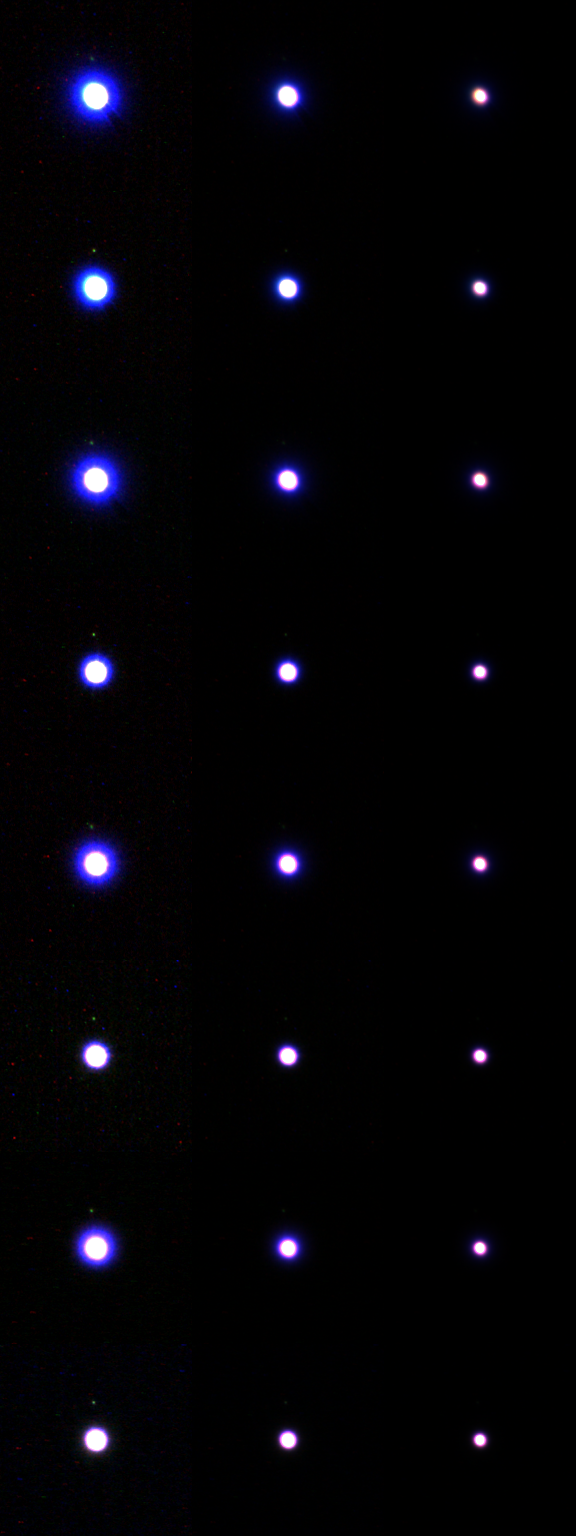
Yes, and it works well. I've done it on short & fast ST102 F/5. I made couple of aperture masks, and did some testing. Even managed to take a decent deep sky photo without any blue bloat around stars - by using 66mm aperture mask and yellow #8 filter.
Just be aware that putting aperture mask on will reduce maximal attainable magnification - good rule as always is aperture in mm x2. 80mm scope will be good for up to x160. Of course image will be dimmer.
Btw, I've now got Evostar 102 F/10 and Baader contrast booster filter removes almost all CA while keeping things almost natural looking (there is small color shift). If you go for something like 70-75mm aperture mask, you will in principle eliminate chromatic aberration pretty much completely (CA index >5).
Btw, here is "a study" for photographic purposes I did at a time with ST102:
Rows contain same image, but stretched to different level (first one the most obviously as hot pixels / noise start to show). From top to bottom - no mask, no mask+#8, 80mm, 80mm+#8, 66mm, 66mm+#8, 50mm, 50mm+#8. Exposure times were scaled appropriately.
-
2
-
1
-
-
Just to throw in a wrench or two ...
Since OP almost decided to go for Mak180, I'm wondering if this could be something worth considering:
As far as I know, Australia has a dealer of GSO equipment as well, so worth checking there for availability as it would certainly be more affordable then shipping it half way across the globe.
Quick comparison:
200mm vs 180mm - more resolution and sharper image at lower magnifications (given same optical quality).
Price about the same - slight edge for 8" Cass in TS pricing.
Slight weight advantage for 8" Cass (7.5 vs 7.8kg).
Much less of a dew magnet since no front corrector plate.
Cool down time is consequently less in 8" Cass
Probably better focuser as it has 10:1 reduction and does not cause mirror shift when focusing.
CO size - Mak180 probably wins - I've seen figures around 30% quoted online - 33% for 8" Cass
F/ratio and focal length - again +Mak180 as it is F/15 vs F/12 and 300mm additional FL - easier on EPs, easier to reach high magnifications.
8" Cass - diffraction spikes - might detract some people, better baffling of the tube - probably very small boost in contrast because of this.


Deer Lick odd colour balance
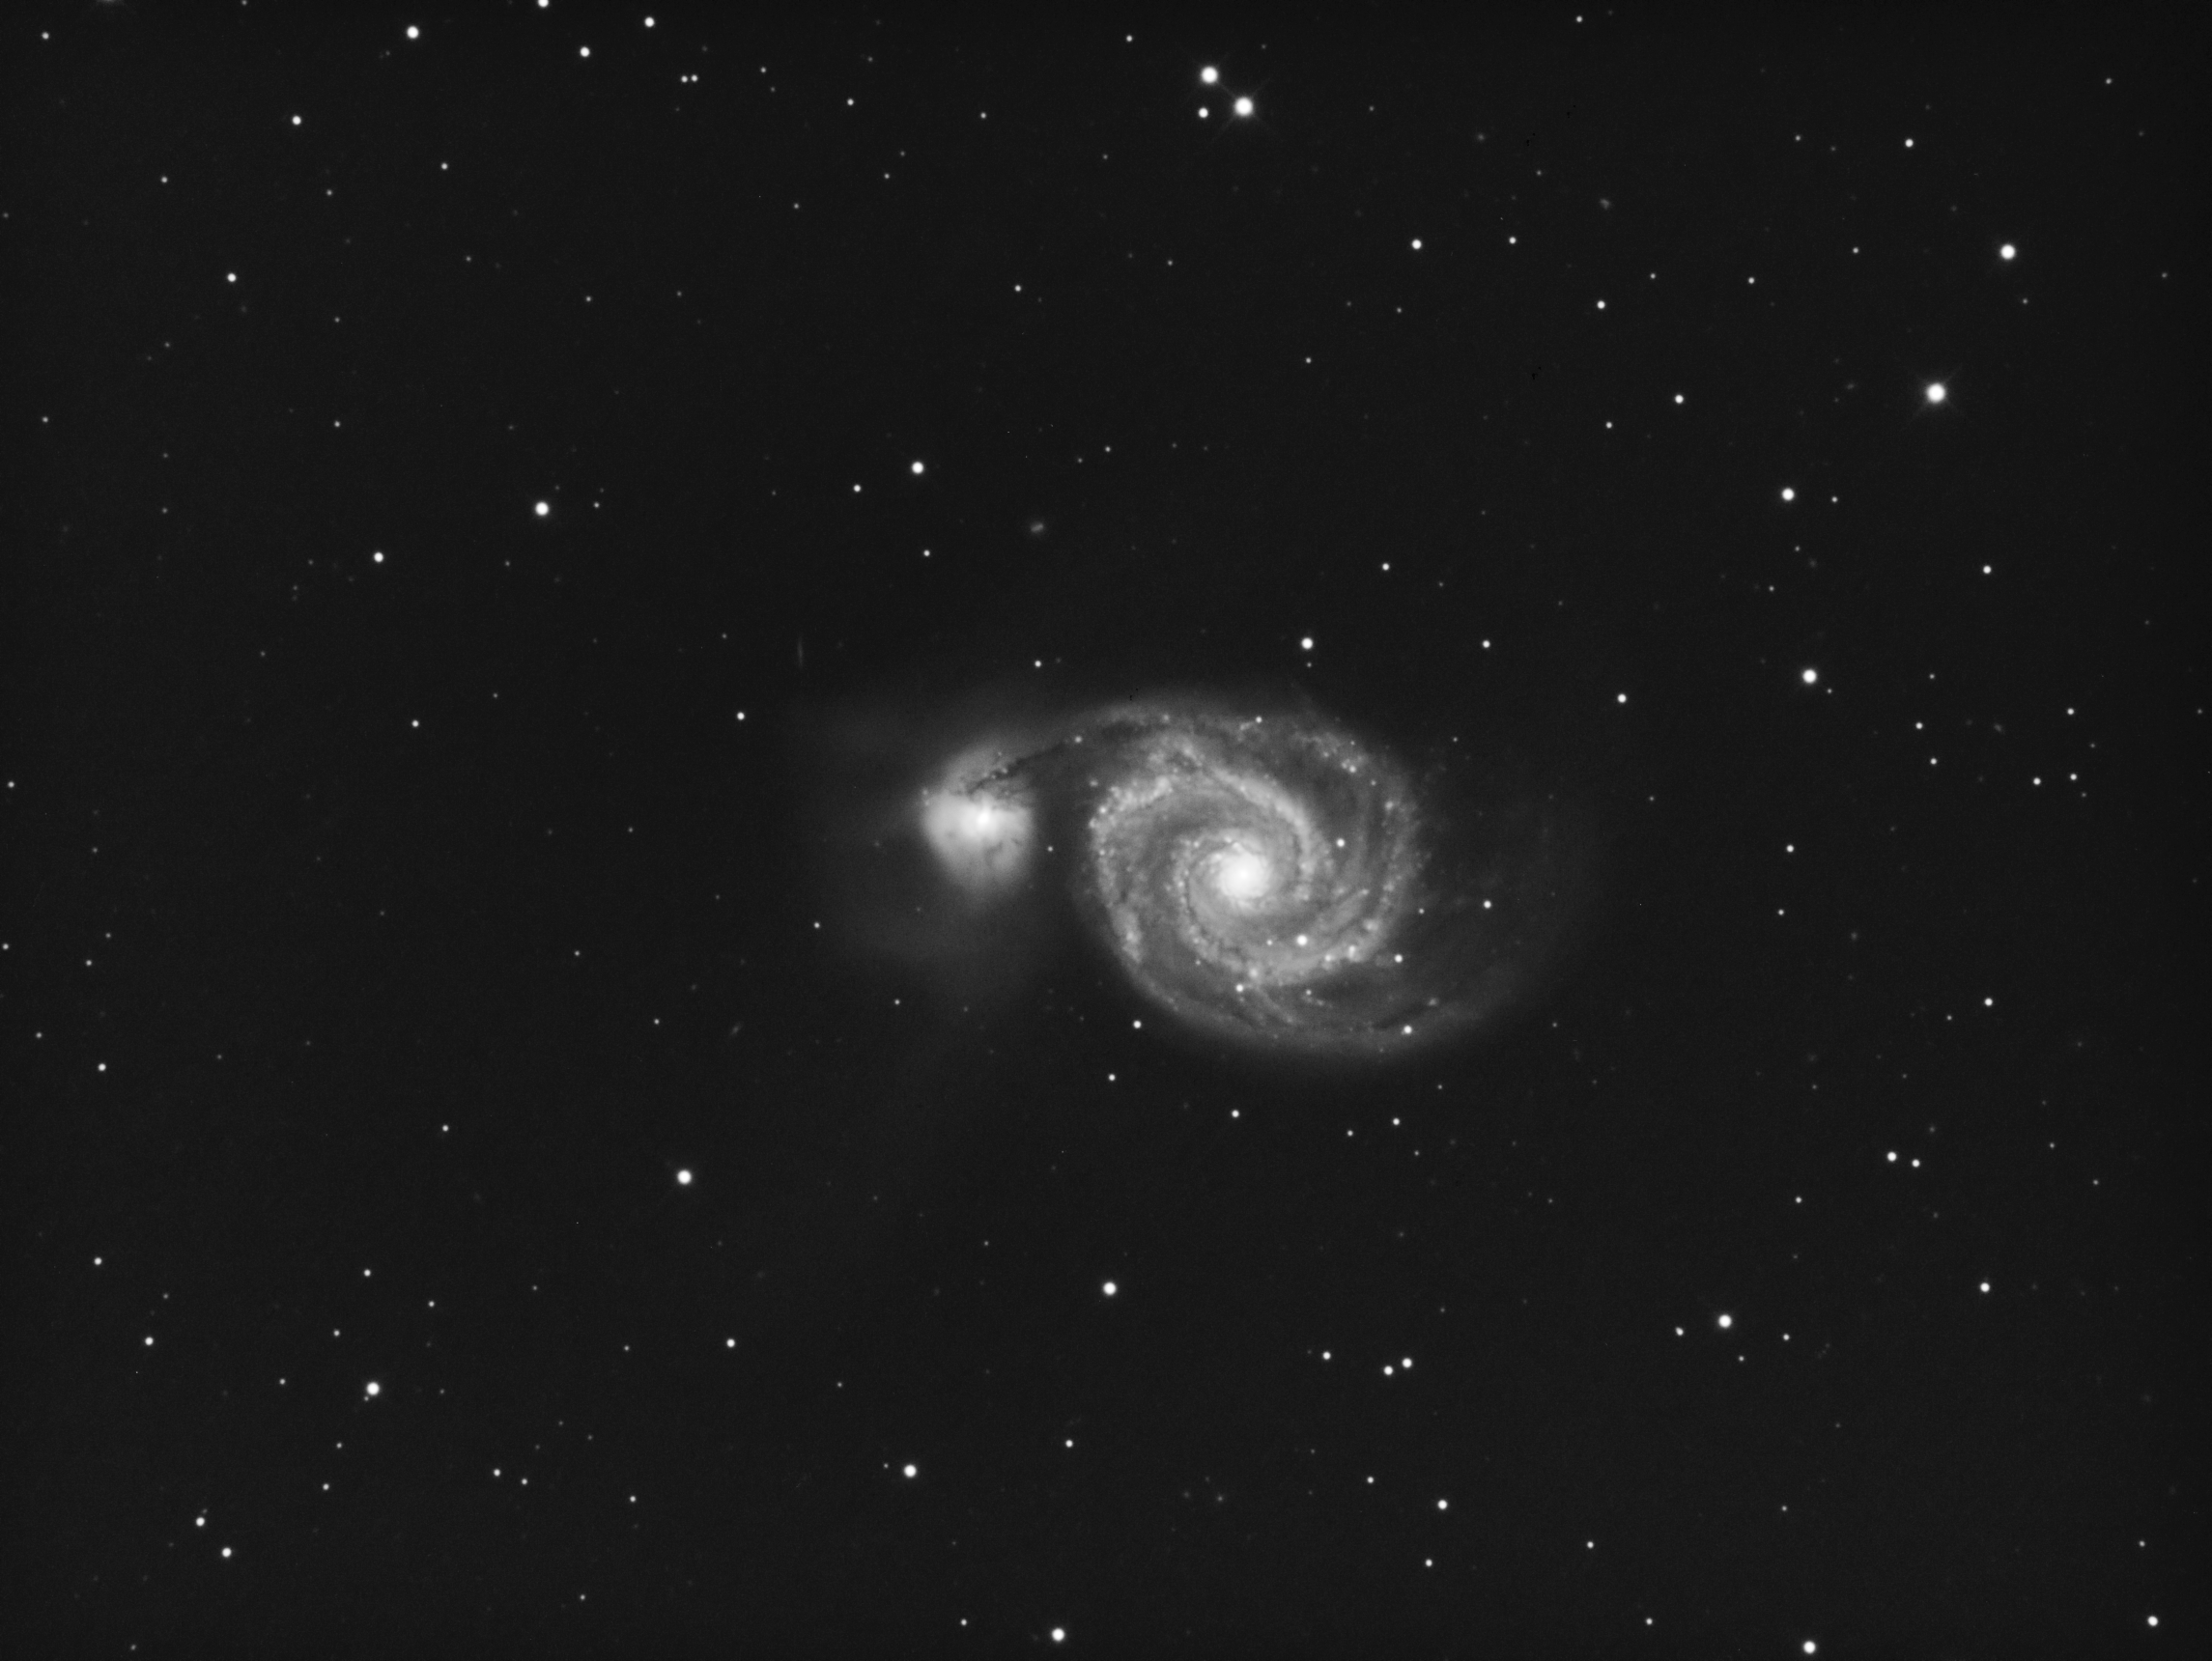
in Imaging - Deep Sky
Posted
You are not far off ...
Colors are a bit washed out due to the way you processed the image, but in principle it is fairly close to what it should look like.
Don't be swayed by majority of renditions of this galaxy found online - most are just too saturated and generally not quite correct.
Color renditions like these:
are overly saturated and blue is pushed far more then it should be.
On the other hand, renditions like these are closer to the real thing:
Look at Hubble rendition of central part of this galaxy:
Blue is rather scarce in outer arms, and mixed with Ha regions so its more "purplish" than pure blue, core is deep yellow / orange surrounded by ring of gas and Ha regions - which have deep red / brown look.
Here is one of mine images where I was playing with getting correct color for this target: