-
Posts
440 -
Joined
-
Last visited
Content Type
Profiles
Forums
Gallery
Events
Blogs
Posts posted by kookoo_gr
-
-
Today my photographic ronchi arrived and it seems i have no adapter for my cameras. The eyepiece has a female T2 thread and a male M52 thread. So i will need a male T2 to T2 adaptor in order to connect the eyepiece to my camera and a female M52 adaptor to T2 in order to connect to eyepiece to what i want. A head scratcher is do i connect the eyepiece to my scope or to lens in my camera and then to my scope? I include some options below for the connection of the ronchie eyepiece
camera -> male T2 to T2 adaptor -> Ronchie eyepiece -> M52 female to T2 adaptor -> telescope
camera -> male T2 to T2 adaptor -> Ronchie eyepiece -> M52 female to camera lens -> telescope
-
it could be a number of things. Fisrt of all you should guide your mount in order to remove tracking errors as much as possible in order to get longer exposures. Other things that cause problems are bad polar alignment, flexure, bad collimation. Start with your polar alnignment, make sure it is ok, a good check is to do a drift alignment with your camera or use phd2 drift alignment. Then use guiding and see if the images are improved, then look for flexure, it may be at the dovetail of the scope and the saddle, the scope rings, the focuser may need some tightening. Also make sure the mount is on sturdy ground that doesn't conduct vibrations and everything is tightnened.
Also it would be good if you can show us some images with said problem and figure it out.
-
Hmmm here's an idea what if i shine the stars on a mirror and aim my telescope on the mirror wouldn't that increase the distance even when indoors?
-
dang it, i'll need at least 16m my house doesn't have 16m
-
Yesterday the Ronchie eyepiece arrived but they made an error and sent me the visual one instead of the photographic. While i wait to sort this out i did some tests with the visual eyepiece and here is my experience.
1. The whole process with the visual eyepiece is very tedious and i couldn't make out very well the lines this could be from my inexperience as well as the others i will state below
2. While using it i could clearly see the central obstruction from the secondary mirror and the lines were almost covered by it and i could barely make out if the lines were curved or straight
3. Collimation plays a very big part in this whole process if you change the distance of the the secondary you need to recollimate the scope, the lines after the adjustment were more fat down in my FOV than in the upper part of the FOV. I used my Glatter laser and after each adjustment the collimation was faster.
4. By adjusting the focus you increase or decrease the lines you see in the eyepiece i went for five lines, first you focus on a star and the then you use the Ronchie eyepiece and adjust the focus to see the desired lines
Right now the FL of my scope is at 1618 from 1605 but the whole process was exhausting doing it outside in the night and i had to call it off. If i use an artificial star at which distance should i place it in order to have good results?
-
So you rotate (screw - unscrew) the mirror and you use the ring to lock it into place, but with rotating the secondary wouldn't that change the flatness of the images? or am i wrong about that?
-
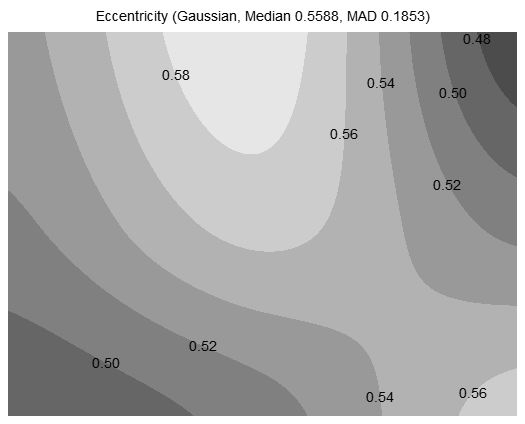
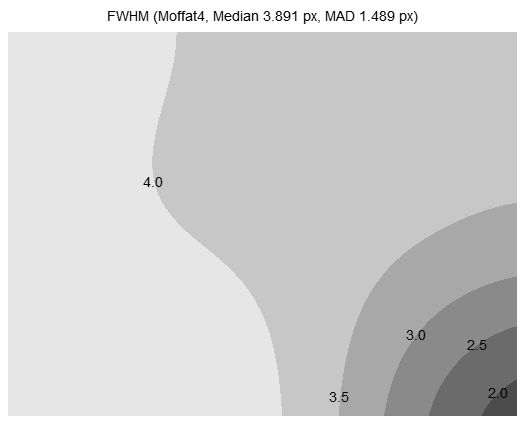
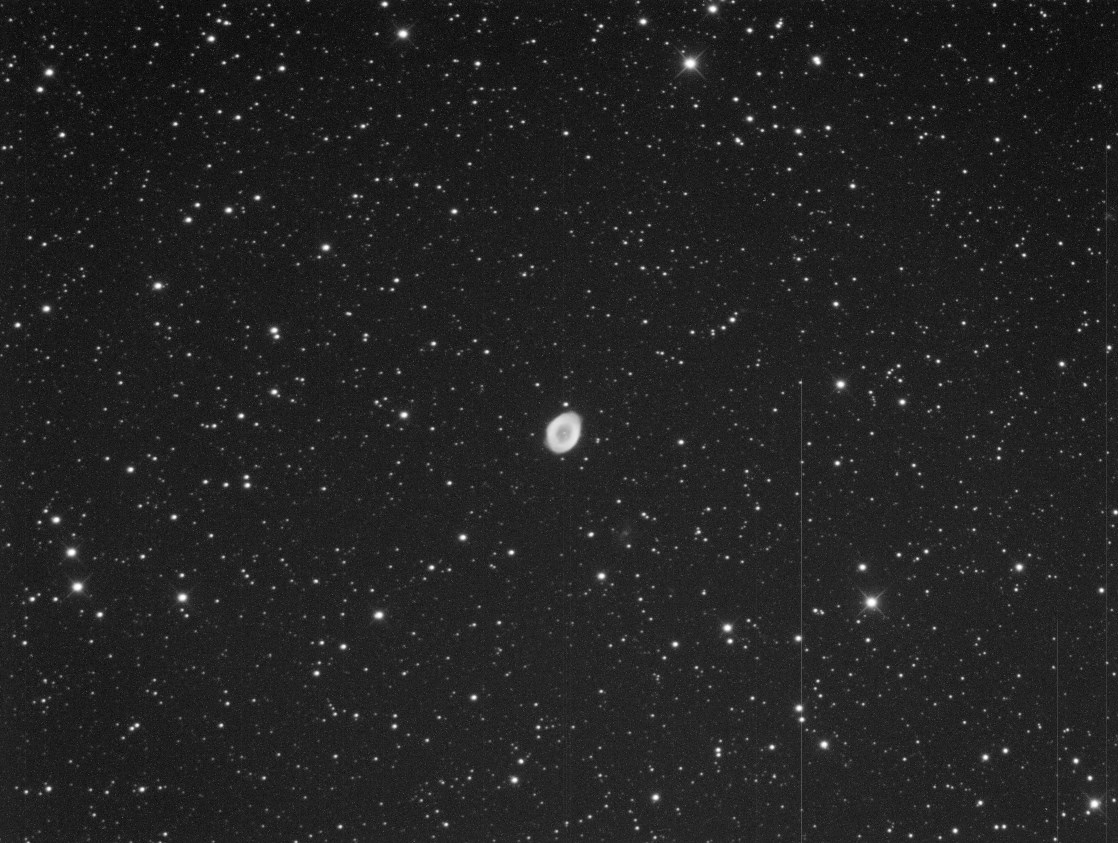
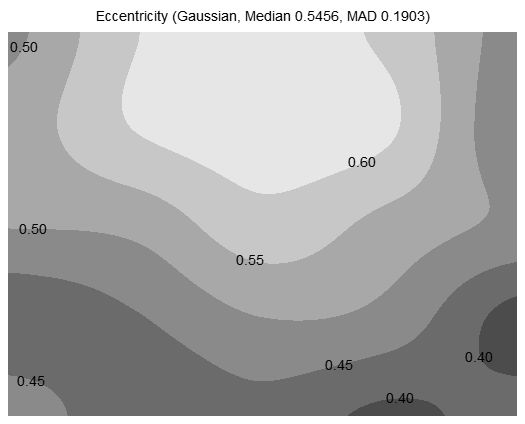
I redid my collimation with the howie glatter but this time i pointed my scope vertically down, needless to say everything were off and i had to redo everything form the start. Last night i did a star test and things were improved i include some photos form m13 and the ring nebula along with some FWHM and eccentricity tests for these images obviously the collimation and the corrected focal length since i measure it at 1605 mm needs work and i will get to them once i get my Ronchi eyepiece. Now if possible could you help me interpret the FWHM and eccentricity diagrams?

-
10 hours ago, davies07 said:
I imagine the difficulties of using it on the sky are that the quality of the lines you see will depend on the quality of your focus and the seeing. If you need to adjust the secondary to change the focal length, then your scope will be out of collimation for the rest of the exercise. I found using Es's kit that by rocking focus back and fore you could see the pinched and barrel shapes well. At the point of correct focal length, the zooming in and out of straight parallel lines, indicating a correct focal length, was clear.
While i wait for my Ronchi eyepiece, and i don't have experience with these tests, i would like to know that how a bad collimation will affect this test? Also for making this test do i need a star or can i use a bright light during the day?
-
5 hours ago, Fellside said:
To check the focal length I upload to Astrometry.net and then plate solve an image in Prism as a check. I don't own Pixinsight so I cant comment on it accuracy.
I checked both with astrometry.net and pix and they give the same results
For starters i will try to set the FL at 1624mm and then go from there, i may have to go to near 1660 or not, i ordered the Ronchi eyepiece and see what results i'll get
-
20 minutes ago, davies07 said:
Hi,
Should you align the focuser? Good question. Your focuser has a facility for alignment, so I think you should check where it is pointing. Assuming that you have aligned the primary and secondary mirrors using my 'disc with a hole' method, then your primary and secondary mirrors should be aligned. I would now fit the extension tubes and focuser and fit a laser to enable you to adjust the focuser to point at the centre of the secondary mirror. Don't touch the primary or secondary collimation screws.
However, before that I think you should look at your focal length. Your focal length of 1607mm is close to what mine was (1604mm) when I first started my investigations. At that focal length my scope was very 'over-corrected' - the mirrors were too far apart. Es Reid checked my scope with a Ronchi grating but over the past month I've been helping someone collimate his scope including checking the focal length. You'll need a Ronchi eyepiece; Gerd Neumann makes one. Focus on a bright star and rack the focus in and out; more and more lines appear as you move away from focus. My guess is that as you go inside focus, you will see this pattern:
A barrel-shaped Ronchi pattern inside focus = overcorrected scope, too short focal length, mirrors too far apart.
Outside focus, I think you will see this:
a pinched pattern outside focus, again overcorrected.
As a first guess, let us assume your scope will be properly corrected at the specified focal length of 1624mm. So you are 17mm too short. Look at the chart I gave plotting focal length vs. number of turns of the centre screw of the secondary (page 1 of this thread), you'll see that about 3/4 of a turn of the centre screw should bring you to 1624mm. So unscrew each of the three secondary collimation screws one turn, and then unscrew the centre screw 3/4 turn. This pushes the secondary mirror towards the primary by about 3/4mm. Now tighten the three collimation screws by an equal amount and check on the star again with the Ronchi eyepiece. The lines should be parallel inside and outside focus. If so, your scope is working fully corrected. If you do not get parallel lines, you'll need to keep adjusting.
The Gerd Neumann eyepiece come with a manual which you can download from the Teleskop Service website.
Note that if the patterns are the other way around - pinched pattern inside focus and barrel pattern outside - you've gone too far and the scope is now under-corrected and the mirrors are too close together.
(I had to move my secondary by four full turns of the centre screw and adjust the primary mirror up the tube until I got a corrected image. My corrected focal length is 1660mm. I'm not far off not being able to focus without another extension tube.)
I use Pixinsight to tell me the focal length of the scope. Take a single image of a star field, say an open cluster, and use Script/Image analysis/Image solver.
Once you are at the correct focal length you will need to recollimated the scope, hopefully by only adjusting the secondary.
David
thank you very much for your reply (i also posted this question on CN so you don't have to answer me there) i think i'll look into a Ronchi eyeiece. Should i go for the Ronchi Okular Photographisch 10L/mm? https://www.gerdneumann.net/english/ronchi-okular-ronchi-eyepiece/photographic-ronchi.html
-
Thanks for the reply, your videos were the ones that made me invest into a howie glatter laser. But the last year the collimation always seems a bit off, i have no idea what might be wrong since the laser method shows me no variation in my checks and i have no idea what might be wrong, so i am looking into different methods.
-
I am having some trouble the past months in collimating my rc8 and i found this topic and i have some questions about davies07's method. After i align the optics of the scope shouldn't i align the focuser, i have a moonlight focuser which i can adjust from its own flange (and i have adjusted it over the years) note that if i mount the focuser on the scope withount any extension rings i don't have access to the collimating screws of the primary mirror. Also davies07 mentions the focal distance of the scope not being the proper one and he had a corrected image at 1663mm. How do i find the correct focal distance of my scope, currently my FL is 1607mm
-
I am trying to set up an FOV for my guide camera with stellarium and it needs the prism dimensions of the OAG. Since i have my camera rig mounted on my scope and i don't want to ruin the rotation of the camera for my next imaging session can someone provide me with the dimensions of the prism of the ATIK OAG?
-
So tonight i got a clear night and i went out with the mount for testing,
For polar alignment with the polar scope i did the following, using an app i saw that polaris should be at 7 o'clock so having 0 down i turned it into 6 and did my polar alignment, i checked and refined the results with polemaster so i am good on that front.
As for the voltage i use 13.5 for my equipment, i believe it's just a matter of getting used to a new mount and its sounds.
I did not manage to do any guiding since the collimation on my scope was waaaay off thus making off axis guiding problematic (even checking my polar alignment with phd was impossible) and i had problems with my focuser cable, i had to gather my things recollimate the scope and then repair the focuser cable (two pins were broken and needed resoldering, cold soldering)
Also is there a way to dim or turn off the polar scope light either from the hand controller or eqmod?
-
Today my new eq6-r arrived and i am waiting for the mandatory two moth bad weather spell to pass in order to go out and play. It's a considerable step up from my 11 year old and trusty belt modded HEQ5-Pro but it was at its limit as i am adding more weight at my RC8'' scope. But i have a couple of questions
1) when i have the clutches released the axes are a bit stiff when balancing, does anyone else have this?
2) i usually polar align with my polar scope before drift aligning and i see that at the home position of the mount the reticle of the polar scope is upside down (6 is up 0 is down) from my experience form these polar scopes i need to have the 6 down and then polar allign, this is going to be an issue, since i will have to rotate the RA 180 degrees and the scope will be down in order to start the polar alignment and i want to avoid this. I would like to know if it is posiblle to rotate the reticle of the polar scope
3) after slewing and the mount stops i have the dreadful sound that the old eq-6s and heq5s have, again this is only when the mount stops and not when slewing, does anyone have this sound? It's not bad and only for a second but i believe i can survive it and i want to know if anyone else has this.
-
Problem solved.
It seems something bugged at the profile i had for my imaging system, i deleted it and created a new one, i did a test with a dark frame and after the capture SGP stretched the image as expected, when i did tests with dark frames with the bugged profile the stretch was problematic. I came to the conclusion after capturing a test dark frame with the artemis capture software (atik’s software) and i had no issues with it, also when i captured dark frames with sgp with no equipment profile selected, at the sequencer i selected atik cameras, connected to the camera and i had no issues, when the weather permits i will do a star test. -
I installed a nuc pc for my setup in order to replace my intel-stick mini pc. I installed the latest version of SGP and went out for some tests and setting up the new pc. I use an Atik 383l+ and when downloading i notice that the images are darker than when i used my intel-stick. Furthermore it is impossible to use the autofocus procedure as the software at the nuc does not locate any stars no matter how long the exposure is despite the fact that i use the same settings for the atofocus. Does anybody have any idea what might be the cause of this, i tried using other usb ports but i had no success. I include two photos of the Pleiades, a 5sec bin 2x2 image, the image from the nuc has less noise but has no detail whereas the image from the intel-stick is noiser but you can make out some nebulosity.
Also a question that i though of now, when setting up my equipment at sgp (on the nuc) i did not enter a value for the readout noise, i don't remember i have done the same thing at the intel-stick, does this affect the images?
-
I have been thinking in upgrading my heq5-pro for quite some time and i am leaning towards the Avalon m-uno for my RC8'' and ed80 scope. I have browsed avalon's site, read a few reviews which are a few years old, even though they are praising the mount but nothing new (eg 1 or 2 years ago). But before i ask avalon i would like if anyone can give me an on-hands experience with the mount and answer me a couple of questions.
1. For my equipment i use 13.5V/5A, would this voltage be enough for the mount?
2. What integration does the mount have with other software? I use eqmod (duh), Cartes du ciel and SGPro with future thought of using Indilib/Ekos.
3. I use a mini pc which i connect via wifi hotspot to my samsung tablet, i know there two versions a wifi and a bluetooth one, one with use with android and the other with ios, what are the connection options to a pc? And for that matter how do you operate the mount?
4. I image with an atik 383l+, atik efw2, sx-lodestar will i need any extensions for the scopes i have (from what i saw i may need for the ed80) or any extra counterweights for my rc8''?
Sorry if my questions are a bit basic or don't make sense but i haven't found any other operational information for this mount or any manual for that matter in order to have a more compete picture
-
i read your other topics to have a better picture of your problems. When it comes to tune your equipment here's a link of tuning my mount hope it helps. as for the belt mod it improves guiding but it does not remove the backlash. the backlash needs to be adjusted, see astrobaby's guide
-
The factory tripod of the heq5 pro is problematic for astrophotography in my opinion. I upgraded mine to a used berlebach planet tripod last summer and the guide graph improved exponentially. The main problem of the tripod is that it has no leg spreader or better yet it has a very small one (the eyepiece tray) which doesn't give much stability when the mount is loaded. Also the metal legs are prone to vibrations. Finally once the mount head is tightened at the tripod it is very difficult to adjust the azimuth which might damage the threads of the head. Since money is always an issue and everybody can't buy a quality tripod at the following videos you can see how to improve the tripod
At 24:30 is the most interesting bit if you don't have a pier extension
-
i would check the cable leads since bad contact can cause eratic behaviour to the mout. ie when i purchased my synscan hand controller for my heq5 pro when i used the handset sometimes the mount would either power off and restart or when i was slewing the slew motion would freeze and the mount would kept going until i turned it off. The problem was that the cable lead that connected to the mount had some play and i had this eratic behaviour. The solution was to buy an extenstion cord along with an adapter and the mount works flawlesly. Also recenlty i upgraded the firmware of the handset and when i used the mount with the hand controller the handset would give me a caution message about the alt/dec motors not found. Again with my extension cable i solved this issue. The benefit with the extention is that i can move freeley around the mount when i use the handset
-
 1
1
-
-
Very nive mod. Since it interests me how well does it behave during astrophotography, asuming you have tested it. If it works better that the stock gears is it possible to place some kind of an order for an extra?
-
can you be a bit more specific about fixing the issue of your primary colimation? didi you use this guide? http://deepspaceplace.com/gso8rcpointing.php
-
 1
1
-
-
i agree with chris's steps but i also want to add that the quality of the service of your mount will affect the goto accuracy
as for finding the home position here is what i do when i setup my equipment
1. level mount, and polar align it
2. without any eqipment on i load the counterweights and slacken the RA clutch, gravity will rotate the mout vertical to the ground whicj is what we want, the RA axis vertical to the ground, then i tighten the clutch.
3. using a level i rotate the dec axis until it is level to the gorund and then i rotate the dec ring until i have it at 0. then i rotate the dec axis until it is at 90. and that is the home position
i have done these steps at my house during acloudy night and i have marked these positions with a marker.
-
 1
1
-


Help please! Collimating an RC with a Howie Glatter
in Discussions - Scopes / Whole setups
Posted
I've been looking for adapters and this is what i suggest. First of all i use the camera which can be either my ZWO ASI 120MC camera or my Atik camera that have a female T2 thread. I use either this adaptor https://www.firstlightoptics.com/adapters/zwo_t2-t2.html or this one https://www.firstlightoptics.com/adapters/baader-t2-t2-inverter-ring.html so i can connect the ronchi eyepiece to the camera and then use the https://www.teleskop-express.de/shop/product_info.php/language/en/info/p11819_TS-Optics-Adapter-from-SP52-M52x0-75-filter-thread-to-T2-photo-thread.html in order to connect the whole setup of ronchi eyepiece/camera to a T2 thread extension so i can place it at my scope. Is this setup correct?