-
Posts
1,045 -
Joined
-
Last visited
Content Type
Profiles
Forums
Gallery
Events
Blogs
Posts posted by BrendanC
-
-
Thanks. In my case the scope seems so far out of alignment that, after using Sharpcap, Polaris is barely within the FOV. Which is why I'm so keen to determine exactly what's going on.
-
2 minutes ago, andrew s said:
You mainly get drift if your just tracking and mainly rotation if guiding if the polar alignment is out.
Regards Andrew
Ah, that appeared just after my last post. Interesting. So low angle of rotation might not necessarily suggest good polar alignment then? In which case it would be better to compare the first and last frames and see whether there's drift rather than rotation?
-
Sure, and I agree that Sharpcap is great, and of the two I should believe Sharpcap over my polar scope.
But I was wondering whether the evidence is in the stacking stats ie does a very low angle of rotation throughout the entire stack, from first to last, imply good polar alignment? Because if it does, then it answers the question - Sharpcap worked. In which case, yes, I agree, the polar scope needs adjusting. But I'd just like people's opinions here first, based on these results!
-
I've been struggling with polar alignment recently, but started using Sharpcap Pro. It's great - but totally does not agree with my polar scope.
The weather in the UK has been so bad recently that I haven't had the chance to try out any other technique to verify whether Sharpcap is right, or my scope is right, such as AstroTortilla, PHD2, NINA, drift align etc etc
However, I just stacked 270 images from my most recent session (which was seven weeks ago - yes, I really have not had a decent night since!), and DSS tells me there was not an angle of rotation about the reference frame that was greater than +/- 0.1 degree.
In that session, I used Sharpcap for polar alignment.
So, given that I'm just tracking, not guiding, does this imply that Sharpcap did indeed do the business? Does a very low angle of rotation imply good polar alignment? I think it should, I'm just wondering.
-
Thanks, very interesting, I didn't realise that about their numbering system.
I'm not on the lookout for a new camera however, just looking to insure my current rig, and wanted to get an idea of what how to cost the camera under the 'new for old' policy.
-
Thanks. I'm still struggling with it, truth be told. It's very slow and uses massive amounts of storage.
-
As far as I can tell the 4000 isn't part of the evolutionary chain, it's direct from 1000 to 2000.
A thought: does that mean it's not canonical?
-
 1
1
-
-
Ah, got it. I hit upon the right search term 'canon eos 1000d successor' and the chain of succession is 1000, 1100, 1200,1300 and now the 2000D.
-
Already have, but not really getting anywhere. Different sites flatly contradict each other. There must be an equivalent in their modern day line up, much as there must be a modern day equivalent of, say, Tyrannosaurus Rex or sabre-toothed tigers or Beethoven or something.
-
I need to sort out my insurance, so I need to know what would be the modern equivalent of my EOS1000D, given that it's no longer in production. I've tried looking but really cannot find a definitive answer. Any suggestions?
-
I think I just found the answer: using all calibration frames is the most accurate method - http://www.covingtoninnovations.com/dslr/newdslr/#Calibration
Seeing as I already have a full Bias library, I may as well use it.
OK, so I learned something new today (again) which may hopefully have helped me along the way.

-
 1
1
-
-
I've been doing (even more!) research and according to this site, I should be using Manual mode: 'Set your camera to MANUAL mode, just like you would with light frames.' - see https://photographingspace.com/how-to-create-dslr-and-ccd-flat-frames-for-astrophotography/
So, you can see how confusing this all is.
Really appreciate that you've identified just the AV setting for dark flats being incorrect. So, is the correction that I should see what the AV exposure time was for the flats, and then use that time for the dark flats? For example, the last set of flats I took, timed at 1/100s. So, that implies I need to be in manual mode for my dark flats, set at 1/100s. Right?
In which case, the table now looks like this (apologies for formatting but despite having hard-coded html back in the day I cannot figure out how to make it work):
Frames ISO Exp Bias 50 800 1/4000 Darks 50 800 0:00:30 Dark flats
25
800
Manual, at whatever AV mode chooses for flats Flats 25 800 AV Oh, and one more question that has always bugged me: do I even need bias frames if I have dark flats (and the other way around: do I need dark flats if I have bias)? I've read a whole ton of stuff about this too and never seem able to get a clear answer!
-
Interesting - because APT's flats plan requires the AV setting, which I assumed meant dark flats as well as lights.
In fact, a while ago, on this very forum, I asked about calibration files, and asked if this made sense, assuming I was shooting at ISO800 for 30 second exposures, and the consensus was that broadly speaking, it was right (I tried looking for the original post but can't find it):
Frames ISO Exp Bias 50 800 1/4000 Darks 50 800 0:00:30 Dark flats 25 800 AV Flats 25 800 AV As AstroBackyard says: "Luckily for DSLR astrophotography shooters, there is a mode on the camera that is ideal for shooting flats. This mode is called “AV“, or Aperture Priority mode. This means that the camera will decide on the correct shutter speed to properly expose the image." - see https://astrobackyard.com/how-to-take-flat-frames/
So, is my summary table wrong? If so, how would I correct it? Because it has rather major implications for, well, everything I've done really. Seriously, if you can suggest a correction, I'd very much appreciate it. Is it a case, for example, of not relying on AV, being more mindful of the histogram, and ensuring that my flats and dark flats have the same exposure time?
I have to say, calibration files drive me nuts. I've never been able to nail down exactly what's required, after literally months of research.
-
They were made in DSS and I've since read that masters produced in DSS don't get along well with APP.
Interesting that you got a similar message.
I guess I'll just keep trying with APP and if I don't get anywhere I'll continue with DSS. It's always worth checking new things out from time to time though.
Thanks for the help.

-
I'm getting a message I don't understand when calibrating frames:
CRITICAL WARNING: flat-field calibration can not be performed correctly!
To be able to perform accurate flat-field calibration, the provided flats need to be calibrated by either
- a MasterBias, of the same ISO/gain value as the flat frame, or
- a MasterDarkFlat of the same ISO/gain value and the same exposure time as the flat frame, or
- bothMy lights and flats are definitely at the same ISO and exposure time.
However, I'm using a master bias, master dark and master dark flat from my library, for the ISO setting at which I took my lights and flats. My understanding is (or was!) that the bias should be taken at the shortest possible exposure; and that the dark and dark flat should be taken using my EOS1000D's AV setting (which Astrophotography Tool's plans actually suggest), which means auto-exposure.
So, my master bias, dark and dark flat will never have the same exposure time as my lights and flats. So, I don't understand why APP is telling me they should be, for the master dark flat. I've tried just using the master bias, and I get the same error.
Deep Sky Stacker doesn't alert me to this, so I'm not sure why APP is (which I'm trialling, which much frustration and scratching of head).
Please could someone suggest what's going wrong here? I'm probably doing something really dumb but I don't understand what.
-
-
Thanks all. Looks like APP, if it's primarily pre- and not post-processing, isn't really what I'm after.
However, if it really does offer something over and above what DSS does regarding stacking, then I'll give it a go.
I'm kind of stuck in a gap. I have Photoshop CS2 (very old, but capable) which doesn't quite cut the mustard with my images. I also have StarTools which, although it gets more out of them, try as I might, I just don't quite seem able to get along with. PI is far too expensive/complicated. And so I thought APP might be what I need.
Thanks for the help. Lots to think about!
-
I've only seen one mention of Chrome Remote Desktop in this thread but it's absolutely brilliant. I used to use TeamViewer but it starts throttling back free sessions, presumably to encourage people to pay for licenses. Chrome Remote Desktop just works, really well, and it's free, and should work on a Mac too (I checked).
-
Hi all,
So this is my second time around with the trial of APP. I gave up pretty quickly last time because I found the interface so confusing. However, I'm giving it another go, and I'm stuck again.
Basically, how do you open a FITS or TIF image just for post-processing? One that has already been stacked, either in APP or another package such as DSS? Because there will be times I'll want to stack subs during one session, then go away, come back and load up the stacked image for post processing during another session.
I've selected a working directory and can open Lights, Darks etc, but for the life of me cannot figure out how to open a TIF or FITS just as an image that I can then stretch, process, enhance, etc. No tutorials I've seen seem to cover this. I'm obviously missing something really basic here, and it's driving me nuts. Or perhaps I'm just wrong about what APP can, and cannot, do?
I should add I'm pretty computer-literate and comfortable with many other packages eg DSS, Registax, APT, StarTools, Photoshop (which I've been using for over 20 years) and so on.
Any advice appreciated!
-
Ah, not 21 degrees centigrade then!

-
2 hours ago, andrew s said:
Nice work Brendan the 21 C sight tube. Regards Andrew
Thanks! Although I don't know what you mean about the 21C but I'll just go with it.
 2 hours ago, CraigT82 said:
Its a good technique, I've done the same in the past using a planetary camera with a meteor lens. Haven't seen it done with a phone though, didn't know about linking phone screen to team viewer so will look into that... nice one 👍
Yes, it was the sudden realisation that the phone screen could then link to the laptop screen, and Mire de Collimation looks after getting the circle right, which made this whole thing viable.
2 hours ago, johninderby said:Basicly the same idea as the Concentre collimator but using a smartphone instead of a dedicated collimator that has an etched screen with circles on it.
I have considered getting the Concentre for exactly that reason - the etched circles - but figured spending £10 on the bracket was less expensive! Also, I'm hoping I can get my camera app to focus better on the primary clips in future, so this method should eventually help with that too. Also, you're still kind of bent over using the Concentre, and believe me, using the laptop next to the scope was so very much less bothersome.
-
Hi all,
I recently watched this interesting video about collimation: https://www.youtube.com/watch?v=8ROvNH5uwDo
I really liked the way it used the overlay to achieve a perfectly round secondary mirror. This has always been a difficulty for me. I just could not get the hang of looking through the collimation cap while twiddling the tilt screws.
However, I don't have the webcam used in that video, nor would I want to modify one. So, I then realised I do actually have a camera: in my mobile phone!
So I've done something similar to that video. You need a laptop or PC, a collimation cap, a mounting bracket for your phone, TeamViewer (the free version is fine), and the image overlay utility called Mire de Collimation which you can get here: http://sweiller.free.fr/collimation.html.
You also need a means of blanking out the primary, and some coloured card to put behind the secondary (which is quite a common technique for helping discern the secondary).
First, blank out the primary (I use some card) and put the coloured card behind the secondary, as explained in that video.
Then put the collimation cap on the eyepiece, and position your mobile phone over it that so you can see the secondary clearly on the phone's camera. Expand the secondary image as large as it will go on the phone's screen. Then log in remotely from a laptop or PC to that camera using TeamViewer, and then run Mire de Collimation and position the overlay circle over that. Now you can play around with the secondary tilt screws and central screw to your heart's content without peering into the cap, guessing at whether it's a circle or central or not, and (if you're anything like me) getting more and more frustrated with the whole process.
I was able to get pretty much a perfect circle for the secondary, and whereas it didn't work quite so well when looking for the primary clips because the camera's auto focus kept changing, I'm sure I could find a way around that (the FV-5 app looks promising in that regard). In the event I just did that by looking through the collimation cap in the 'traditional' way! I also tried putting a pinhole in some tape over the collimation cap to REALLY get the camera central, but it was very difficult to get a good picture, but there might be ways to do that too.
Anyway, this method worked for me. It was so very much easier doing this while looking at the laptop screen (I also got some replacement tilt thumbscrews which really helped too: https://www.365astronomy.com/set-of-m4-thumbscrews-for-secondary-mirror-collimation-45mm-long-set-of-3-screws.html). A star test later showed me perfectly concentric circles as a result.
If it helps, here are some photos showing how I did this.
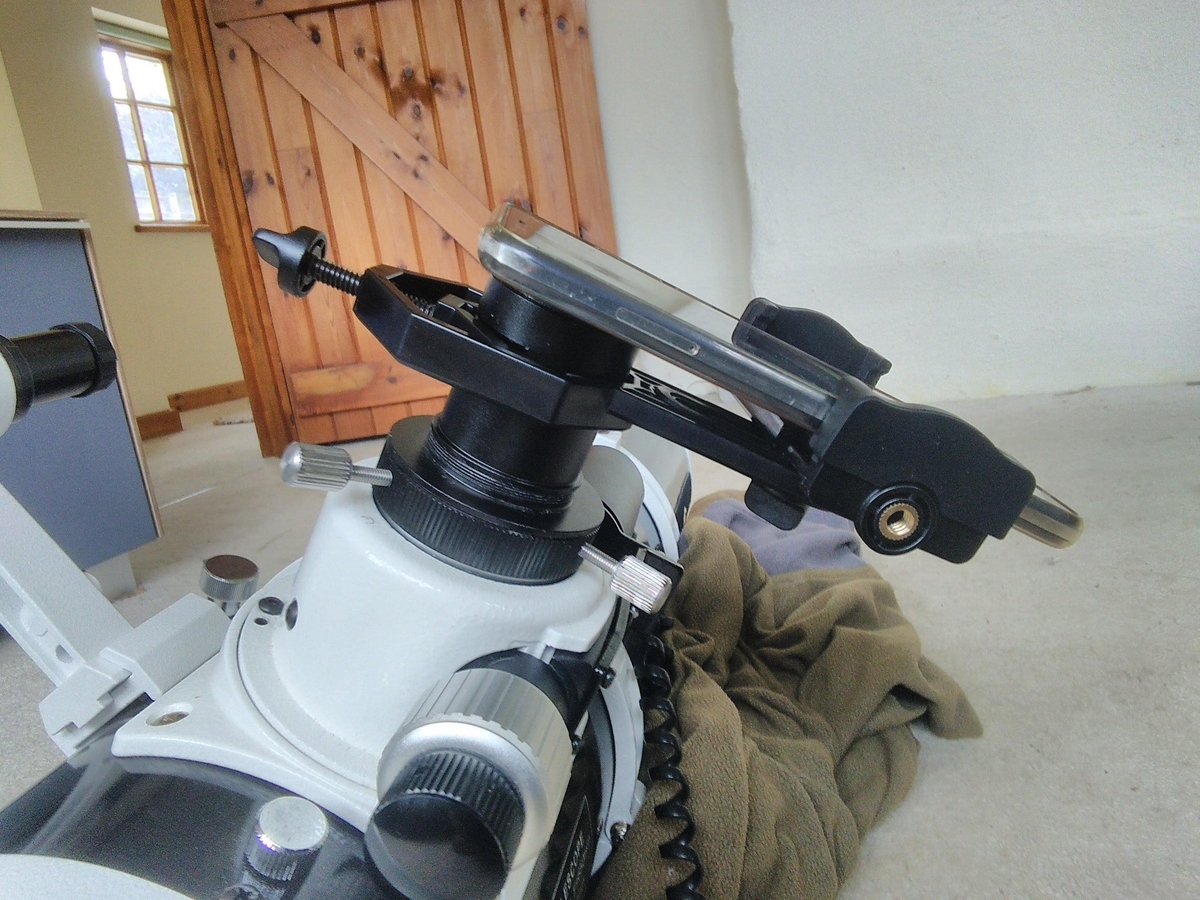
Phone secured in bracket against collimation cap (you need to be careful and make sure the phone is as parallel to the cap and tube as possible):
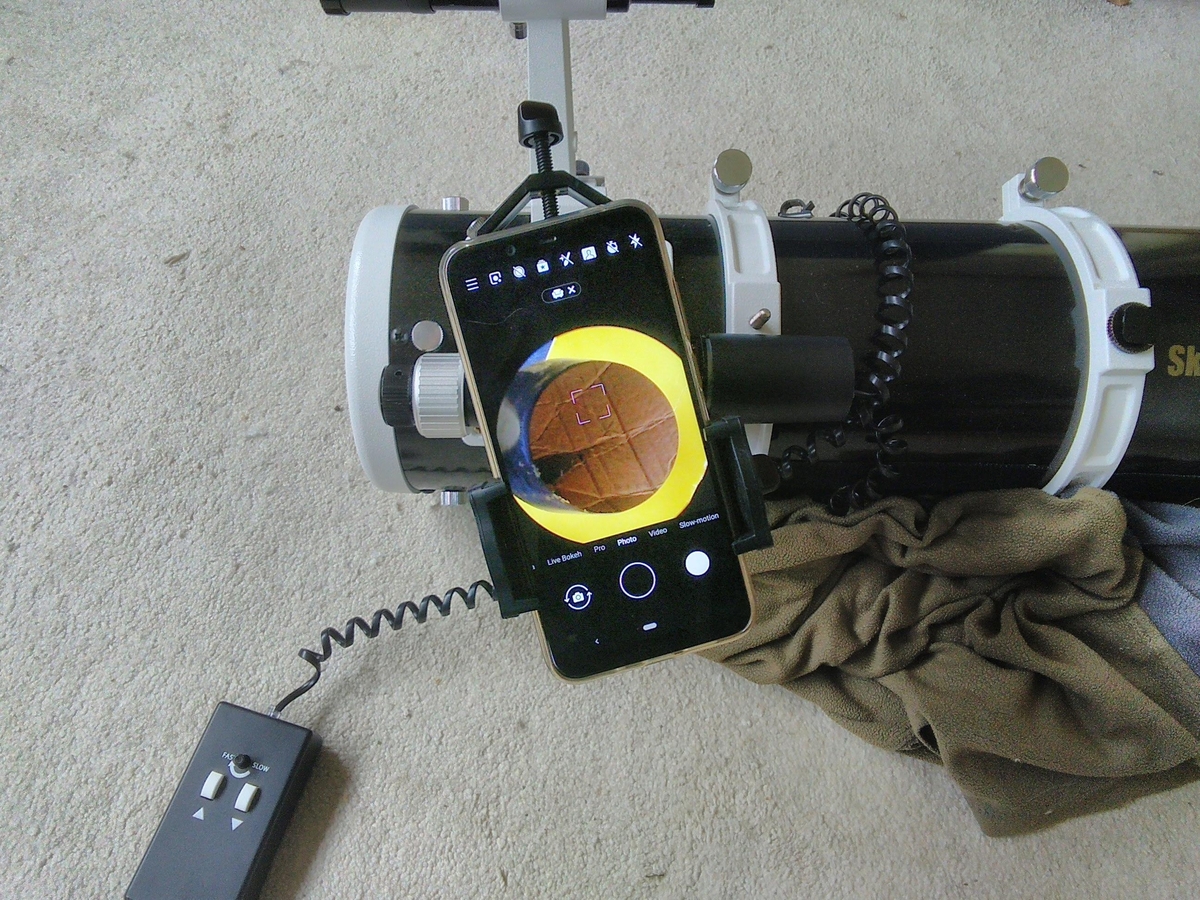
OTA with phone in place showing photo of secondary with coloured card behind it:
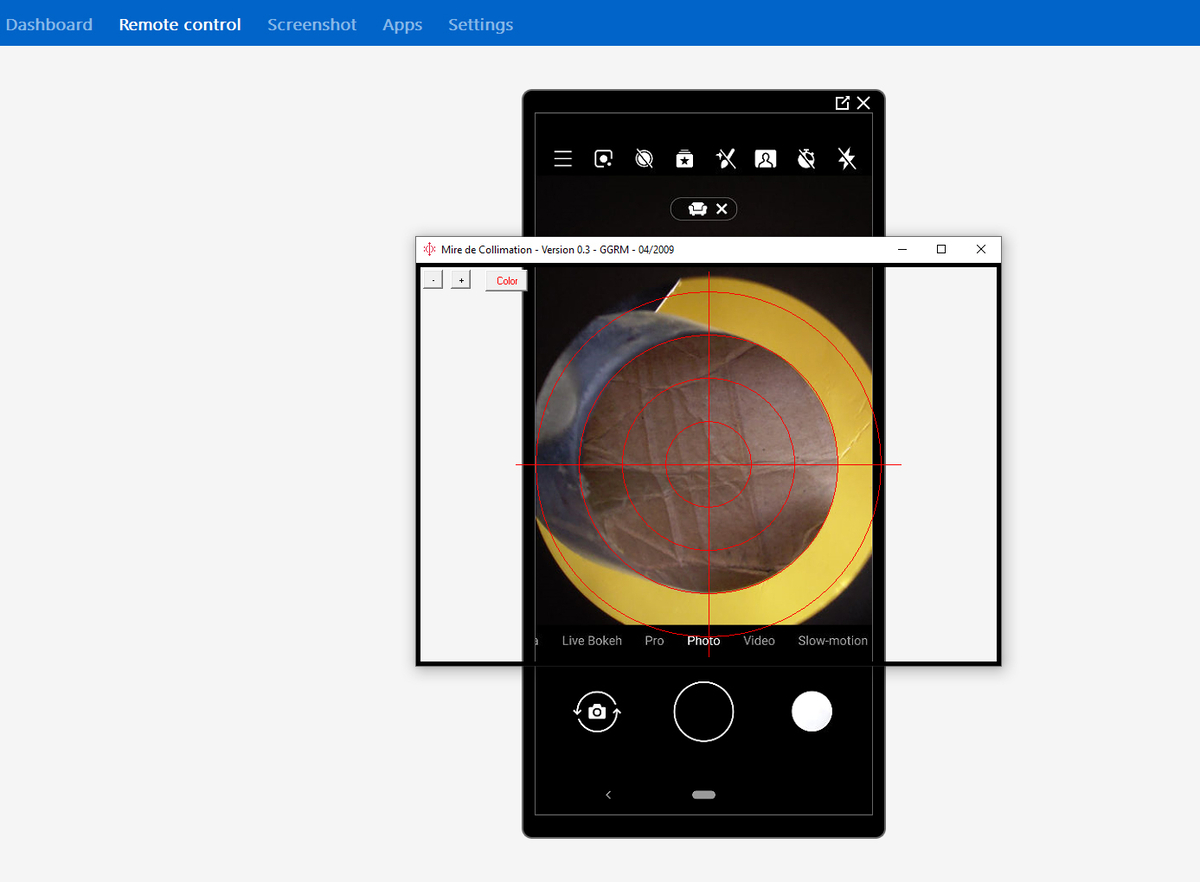
TeamViewer screenshot showing remote session with Mire de Collimation circle overlay:
I'd be very interested to know if anyone uses any similar technique, or whether anyone tries this method out and with what degree of success.

Cheers, Brendan
-
 7
7
-
-
Thanks for the advice everyone. I've identified a set of problems which I hope to address in order over the next few days, so no need for me to hijack this thread any more!
-
@Stub Mandrel Yes, I am using a coma corrector. Thanks for posting those images, but I'm not sure what they're telling me?


Near zero angle rotation=good polar alignment?
in Discussions - Scopes / Whole setups
Posted
It could be, and that's the next thing I'm going to check - when I get any clear weather!
Nice suggestion though. I'm going to continue believing Sharpcap is right because everyone loves it (and it is so very easy to use - what a killer feature!), but I would like to get the polar scope at least kind of pointing in the right direction, just because, well, I want to. So yes, cone error probably comes into this too.
In the meantime I'm going to analyse what DSS is telling me about any drift as well as rotation.
Thanks again everyone, great suggestions that help me move forward again!