


SnakeyJ
-
Posts
4,806 -
Joined
-
Last visited
-
Days Won
8
Content Type
Profiles
Forums
Gallery
Events
Blogs
Posts posted by SnakeyJ
-
-
I've lost count of how many times my phone has alerted me of updates to this thread today! Great work and support Dave

-
 1
1
-
-
All the great people on SGL who have built the focuser so far:
Thanks guys :-)
It's us lot that owe you the thanks for the hard work on design and the ascom driver - take a bow

-
Compelling reading and much food for thought here. I will follow with closely!
-
Thanks Gina - all in now, bar the lathe, washing machine and tumble drier! I have some work to do at the old house, but taken a week off to sort! Might even get internet tonight if the router arrives from bt :-)Hope you get your new house sorted out soon Jake
 This is not a good time to be without heating
The grass has kept growing here James but the goats are keeping it short
We used to have goats, white saracen? And Anglo nubians - or anglo neurotics as Dad affectionately called them :-) We used to sell goats milk for asthma sufferers and eat the billy goats.
They were good company and affectionate animals, but more intent on escaping and eating the trees and flowers, or climbing on to the farmhouse roof. The sheep were better grazers, but much harder work!
-
1
-
-
It was very cold and damp down here last night, made worse with no idea of how the heating works (first night in new house). All sorted now, but took a while to work off the chill this morning!This project will be on hold until the weather improves
 Where's spring got to???
Springs definitely coming - the buds are breaking on the magnolias and the grass is growing again :-)
-
Design looks good Gina - are you intending to 3d print the hinge brackets? Hope the weather holds and you manage to get this all completed soon and can get back in to the imaging business again. Having now packed up my obs, I'm feeling quite jealous - but should be back in business with a modest temporary build in the not too distant future, once the settling in and unpacking is finished
-
1
-
-
Motionco are pretty good for mxl belts and sprockets.your instructions are perfect i just didn't read them properly lol now what i need is some 5mm id pulleys any idea where i can get some
mark
-
For what it's worth, I have found it very hard to differentiate true point of focus over about 6-7 steps driving my single speed OC1. Doubtless in really good seeing it will be easier to refine, but then how often are we blessed with that in UK? For my rig driving a 10:1 microfocuser would be overkill.Does anyone else have an opinion on this? At the moment it looks like I might as well scrap the idea.
-
That's a great idea Dave, to keep tension and allow the belt to be easily removed for manual focuser user.
-
1
-
-
Only 12 days from China and £3.38 for both incl p&p!

No complaints!
The 5v motor was working with the OC1, SX FW, TV x3 and QHY5L-II, but I think this should be a better solution and will all run from my 12v obs supply.
-
1
-
-
Jake,
I am eventually interested in 12V steppers version.
I didn't found so many information about it.
Only one good tutorial for this stepper : http://42bots.com/tutorials/28byj-48-stepper-motor-with-uln2003-driver-and-arduino-uno/
And maybe an other well known article on Focus : http://www.astrodon.com/Orphan/parfocal_and_critical_focus_zone/
Didier S-C
I sourced mine on ebay, via the slow boat from China http://www.ebay.co.uk/itm/12V-4-phase-5-wire-Stepper-Motor-Gear-Motor-28BYJ-48-12V-for-DIY-Project-XN-/271475220977?pt=UK_BOI_Electrical_Components_Supplies_ET&hash=item3f352f21f1
Should be a lot quicker to Beijing.
The directions in this thread are excellent, even for a relative Arduino newbie like myself.
-
As suspected the problem was the RJ45 sockets. Although the old ITT-Cannon cat5 modules were small and neat, they were not properly crimping the motor wires, even after some gentle persuasion. I have replaced both with TE cat6 modules and the whole unit now works perfectly.
I quite like the idea of data modules for the motor and one wire connections, as they are light and I can easilly swap around and choose patch lead length to suit. Though it would make for a neater project if I could find some modules that soldered directly to 0.1" pitch veroboard. Otherwise DB9 plugs and sockets are the usual way to go, but heavier, bulkier and not so neat to my mind.
-
Up and running tonight - the one wire is returning sensible temps (19.5C) in the house and responds to warmth if I hold it. I've taken the power (9V) direct to the ULN2003 and this seems to flash away on focus commands, but the 5V motor isn't turning at the end of the Cat5e cable. I suspect this is simply the motor wires being a little too thick and not crimping well in the IDC's but will confirm tomorrow. The bracket just needs a minor tweak to get the belt length and tension right - a little work with a file to allow some tension adjustment.
No sign of the 12V motors yet - wishing I had ordered these from the UK now, but hope to iron out the glitches and give this a try with the 9V supply and 5V motors, as Friday night is looking promising.
-
1
-
-
Thanks Gina and Dave for your confirmation on this, I will leave the Nano to derive it's power from the USB bus and power the ULN2003 directly via 13.8V.
I had previously noted an issue with the 5V motors in that I had to connect USB connect the arduino first and then connect the battery to get this to work correctly and drive the motor.
I've just completed the new bracket for the OO OC1 focuser and will complete the wiring for the temp probe tomorrow, now that I have a supply of 4K7 Ohm resistors. The one wire and motor will be mounted at the bracket and connected back to my project box via a Cat 5e lead. The project box will velcro to a power board on the pier, adjacent to the USB hub and DC power.
Pics to follow on completion - once the motor(s) arrive
-
1
-
-
Thanks Gina - reassurance much appreciated :-)
-
I'm using the 12v version of the 28BYJ-48 running off the 13.8v supply.
Gina - I've orded a couple of the 12v 28BYJ-48's (now currently on the slow boat from PRC), but wonder if you have varied the circuit diagram to give a direct supply to the motors. Dave's circuit diagram below:

Shows the power supply to the motor as common with 9V supplied to the Arduino GND 29 and VIN 30. Will I fry the nano by putting 13.8V across this? Or have you modified the circuit to just supply the 13.8V to the ULN2003?
There should be sufficient juice from my Startech hub to provide the 5V DC for the nano's logic.
-
They would all have different comm ports so should be okay. Though 3 cheap laptops might be a whole lot simpler and more stable [emoji3]I was kinda wondering if the ASCOM focuser could be extended to work with more than one scope at a time but I think this is probably asking too much

-
Dave - many thanks for providing the ascom driver and this great resource and tutorial. After finally borrowing a replacement soldering iron, I finally completed this last night and now have it working via Ascom with Firecapture. I still need to do another revision of the mount to fit my OO OC1 focuser and will probably upgrade to the 12V version of the 28BYJ48 to cope with the weight of the imaging train.
I'll need to find a 4K7 resistor to complete the 1wire temp enhancement, but otherwise ready to roll when the clouds part
-
1
-
-
Couldn't swim at the same time as the kids tonight because on Fridays the club takes the entire pool, so instead I took the laptop and QHY5LII, sat in the sports centre cafe and ironed out most of the remaining issues with the camera. I need to sort out reading the temperature and do some tidying up, but I think the hard work for supporting this camera is all done now
James
Great news James - I know that Torsten gave up on the temperature reading in Firecapture due to problems with the SDK, so think you have done well to get this. Looking forward to the new release in the not too distant future, but hope the weather clears and you get a few nights out under the stars before hand.
-
That's excellent news
I don't tend to use unpowered USB hubs myself as I've found them to be unreliable in the past. I have to admit that I completely forgot to try even one out.James
I do have one of the Startech Industrial USB3 powered hubs, but it kinda looks silly up against the PI at almost twice the size - I'm hoping I can run WLAN and camera directly from the 500MA USB power allowance, using the 1000MA supply - and then write the video directly back to a small NAS in the house. Once setup I can dispense with the keyboard/mouse and remotely access the Pi if needed, then again will depend on the power consumption of the final camera as I don't think the xbox live cam is sensitive enough to make a useful all sky cam.
I will have a tinker around some more to see what I can get.
-
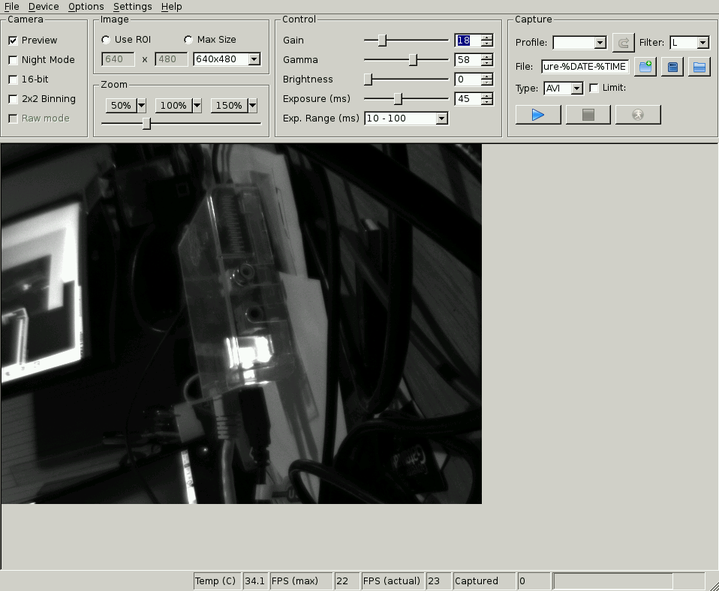
All working - I just swapped the Pi's USB Power adaptor for a 5V 1000MA rated USB adaptor. Not quite enough power on the USB bus for the wireless as well, but works fine with the wlan dongle removed. The VL42 device was immediately recognised and worked without tweaks, at least for AVI's at full res and ROI of 640 x 480. I'll post my Pi selfie later once I can get the PC running to take a single frame from the 24MB, 20 sec AVI on the laptop.
I was expecting a bit more trouble with this - thanks for making it all work so easily!
And here's the selfie:

60 Frames recorded at 640x480 in 20s, so 3FPS achieved writing to the SDHC card.
-
Almost James, but not quite enough power on the USB bus to run the camera with keyboard and mouse (even with wifi adaptor removed) - the camera fails to initialise fully and I loose keyboard and mouse. Just need to find a powered USB hub.

Great documentation and easy install with the script - just needed the last dependency with my new Raspbian install.
The U/I is great and very responsive, despite the limited system resources available on the Pi.
-
Very impressive though James - Stirling work on this project. Might cause a bit of a buzz around the Rasperry Pi community.
-
Monitor problem solved. It appears RPi had decided it would prefer to use the composite video output rather than HDMI. Easily fixed. And to celebrate here's a Raspberry PI "selfie":
James
That made a difference to your frame rates - very respectable performance here at 640x480x8bit? Though not sure the SD card will keep up at these sort of rates, though probably sufficient for time lapse and all sky cam use - could you push these off to a small NAS or would the additional network processing overhead kill performance?


Arduino Ascom focuser Mark2
in DIY Astronomer
Posted
Very interesting development of this project - I'm continually slipping the belt of my motor to change focus position for EP's (star test), different barlow's and extensions. I like the idea of having everything connected to the computer under Ascom, but still being able to control this from a project box with the rotary encoder and/or push buttons. Any chance of a heads up on your sketch and wiring mods for this?