


Stargazer33
-
Posts
2,995 -
Joined
-
Last visited
-
Days Won
1
Content Type
Profiles
Forums
Gallery
Events
Blogs
Posts posted by Stargazer33
-
-
It was a bit. Spread out over a few days though. I have been keeping an eye out for a spare focuser tube. I thought Astroboot might have one, but I've only ever seen a 0.965" focuser tube offered on there, so I decided to just bite the bullet and make the rack myself. At least I can use my scope again.
-
Having suffered for some while with broken teeth on my Tracelscope 70s plastic focuser rack; I finally got around to doing something about it.
First of all I cut a piece of aluminium (aluminum for our friends across the Pond 🇺🇸) the same size and dimensions as the plastic one on the focuser tube. Using the damaged one on the tube as a template, I marked out the replacement and began to file it down to size. Once this was done I copied across the positions of the valleys between the teeth onto the aluminium replacement. Using a manual mitre saw with a blade suitable for metal I cut the valleys. Some rough filing and the rack was almost complete. A hole was drilled at each end to receive a screw. I then cut off the plastic rack from the focuser tube, filed the cut flat and the glued and screwed the replacement into position.
Due to the rough hand marking, cutting and filing it is not 100% smooth running, but at least it gives me full travel.
A couple of pics:

Broken plastic rack (removed). New aluminium rack glued & screwed in place
-
 1
1
-
-
7 minutes ago, Freddie said:
This is not correct. The reference frame is the frame against which all other stacked frames will align. It is used so that you can use a single reference frame from a set of R,G and B images to ensure the individual stacks are aligned to each other. The reference frame is not used as the standard against which other frames are scored.
Ah, thank you! (please see tag line) 🤔
-
A reference frame is one that you select from your set which is the best; clearest; sharpest image. All other frames are then compared to this 'reference frame' and graded from best to worst.
HTH
-
That is some very fine detail. Stunning!
-
Way beyond my capabilities. I was just wondering about adding a small fan to the heatsink! 😁
-
Lovely detail, especially in the outer part of the nebula. I've not noticed that scalloped edge down the right hand edge before! Your image of M27 has a real three dimensional feel to it.
-
1
-
-
On 02/08/2019 at 18:43, -Joe_ said:
4. After getting it all going and retiring indoors, notice the guiding is going crazy & star trails everywhere... go outside to find the cat using the tripod accessories tray to sit on and play with cables..
😽😸😂
-
Would it be worth getting 3 or 4 and setting them in a pyramid shape so that all directions are covered? Or would the cost be prohibitive?
-
 1
1
-
-
That's really good considering the low altitude of the planets at the moment and your seeing conditions! The Cassini Division is very clear and there is definite cloud banding showing too. Well done.
-
1
-
-
Hi Gina, could you not put a ring on the window rope and then attach the hook to that, keeping the block upright, so not allowing the rope to pull out sideways?
A more elaborate fix might be to fix the block to a track which kept it in the vertical plane but allowed it to move back and forth.
-
Whilst looking for something else the other day I found an old PC CPU heatsink. So I decided to make a quick down & dirty passive heat exchanger for my new ZWO ASI385MC camera. Luckily I found an old aluminium bracket that I straightened; shaped; drilled a few holes in and then screwed the heatsink to. I had a bunch of raised head M4 machine screws that I used to secure the heatsink to the back plate of the camera. Great design feature of the ZWO brand to keep the back of the housing clear.
A few photos of another Heath Robinson project.
-
1
-
-
On board QM2 sailing back from New York. Not until September though. Only taking my Barr & Stroud Sierra 8 x 42 bins.
-
1
-
-
19 hours ago, Startinez said:
I have an IR filter (not sure if they're the same thing?) but I think I couldn't find a good focus with that on, so I took it off. As for the RGB align I did choose that in Registax which took the overall colour from a murky green to the grey/blue that it is now. I did post process the curves and levels in GIMP after that though, could that have flared up the poles?
No, an IR cut filter will cut out the red end of the spectrum going into the infra red. As apposed to an IR pass filter which will only pass the electromagnetic spectrum above red visible light (infra red).
An ADC looks a bit like a barlow lens with a couple of levers sticking out of the side. It is used to re-focus the light that has been split by our atmosphere.
Sounds like you did an RGB balance rather than an RGB align. If you click on the RGB align button and then click the estimate button, the program will do it for you. Sometimes is does get it wrong and you have to play with the red and blue up/down & left/right controls, which is quite easy. Zoom in to make things easier for yourself.
Playing with GIMP(!) shouldn't effect the RGB alignment unless you split the channels into red, green and blue and then nudged the red image up and the blue image down; and then merged them back together.
You Tube is a great source of 'How To' video tutorials for Photoshop and GIMP is very similar, so techniques used for Photoshop should transfer across. Things might be called by slightly different names or be in a different place, but they basically do the same thing.
Good luck with your imaging and keep posting the results.
-
Looks pretty good to me. I don't have experience of your 'scope or camera so can't comment there. It looks like you have a bit of dispersion - red fringing at top of Jupiter and blue at the bottom. Try an RGB alignment in Registax or GIMP. It should clean that up a bit. For the planets an ADC - atmospheric dispersion corrector is almost essential in the UK, especially with our damp weather and the planets being so low at the moment (seen through more atmosphere).
-
Agree about the collimation knobs and the electronic focuser. I made my own focuser for my Revelation 2" R&P focuser.
Focusing is so much easier when you're not having to battle 'scope wobble!
-
1
-
-
Well done on your first solar image. The Sun is very quiet at the moment but hopefully cycle 25 has started and the activity should slowly increase.
-
1
-
-
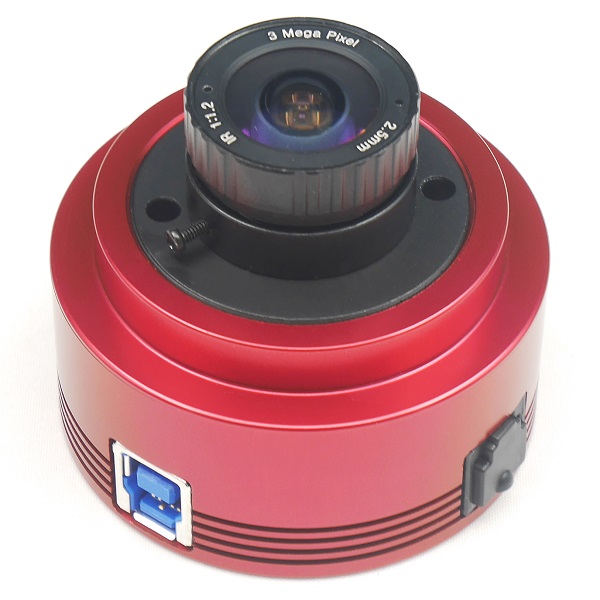
Hi, camera arrived today. A little over 3 weeks from order. I paid £297.35 for the camera; I had to pay £24.00 import duty/tax and I had to pay £12.00 to Royal Mail for a 'handling fee'!!!
So a total of £332.35! I saved myself a grand total of £2.65 and have had to wait 3 weeks and have worried all that time about the authenticity of the site, delivery etc.
Conclusion: in future I will buy from Flo; get it next day or the day after and have full peace of mind that if there is anything wrong then I can return it easily.
-
Arrived today from China via a £12.00 handling fee from Royal Mail! With duty of £24.00 and a 3 week wait from order date, I would have been better off spending a few quid more and getting it from Flo! There be another lesson.
Zwo ASI385MC from Zwo via Ali(not so)express.
Bring on the clouds!
-
1
-
-
They are dust particles in the optical train. Probably on the camera lens or filter. Flats are used to remove these, as well as gradients in the image, such as vignetting.
-
1
-
-
Hi Andrew, welcome to SGL.
Yes ascom is still a thing, so is carte du ceil. A lot of people who guild, use PHD2. Can't help with nebulosity as I don't use it, but I have seen it mentioned on here numerous times.
GIMP is a freeware program that is very similar to PS for processing.
Good luck with getting into the swing of things again.😀
-
Hi, still waiting on the camera. I have to say that the tracking information from AliExpress is pretty poor. It doesn't update for days! The last information I have is that it is awaiting customs clearance; which was posted on 25th - now 29th!!! Not sure if I'll have to pay import duty or not, or how much it might be. I will post more when I receive it.
-
Just got confirmation of dispatch of a Zwo ASI385MC from Zwos Ali Express web site! 😬😱
It's $369.00 or about £294.00 so just under my upper limit. Here come the clouds! 😉☁🌩🌧
-
1
-
-
Hi, no the cameras mentioned are not cooled, but as stated in my original post, I only have about £300 to spend. A cooled camera would be considerably over my budget.
I have got a modified Canon 1100D which I have made a coolbox for. Again, as stated in my OP, I am unhappy with my current high frame rate camera and I'm looking to upgrade that as I mainly do planetary/luna imaging, but also want to try imaging some of the brighter DSOs.


The effect of ISO
in Getting Started With Imaging
Posted
I believe this video has been linked to before but I can't find it!