


RAC
-
Posts
688 -
Joined
-
Last visited
-
Days Won
4
Content Type
Profiles
Forums
Gallery
Events
Blogs
Posts posted by RAC
-
-
Might be time to make a mask and take some foucault measurements and enter them into Figure XP. On the inside of ROC image there doesn't look like a lot of turned edge and on the outside images there is correction getting added in the outer zones. When you take some measurements you will know how turned the edge is as if it's still turned the ROC for that very outer zone will be much longer.
-
 1
1
-
-
I would like to see what would happen to the edge if you were to fix the center by doing long straight stokes from one side to the other with a 1/2 inch or so offset from the center and an overhang of NO more that an inch either side over the edge. You may need to work just the center with no offset for some time to get the bulk of the hill down.
To me you must be making this turned edge as fast as you are trying to fix it.
-
1
-
-
Very good Tim.
-
That's why i use a brass brush. And also make sure nothing is left in the pitch.
-
One thing that may help things go faster is scrubbing all that old cerium off the pitch lap with a fine brass brush. You want it to be black not brown. I brush mine after every session and cold press for a few minutes.
-
1
-
-
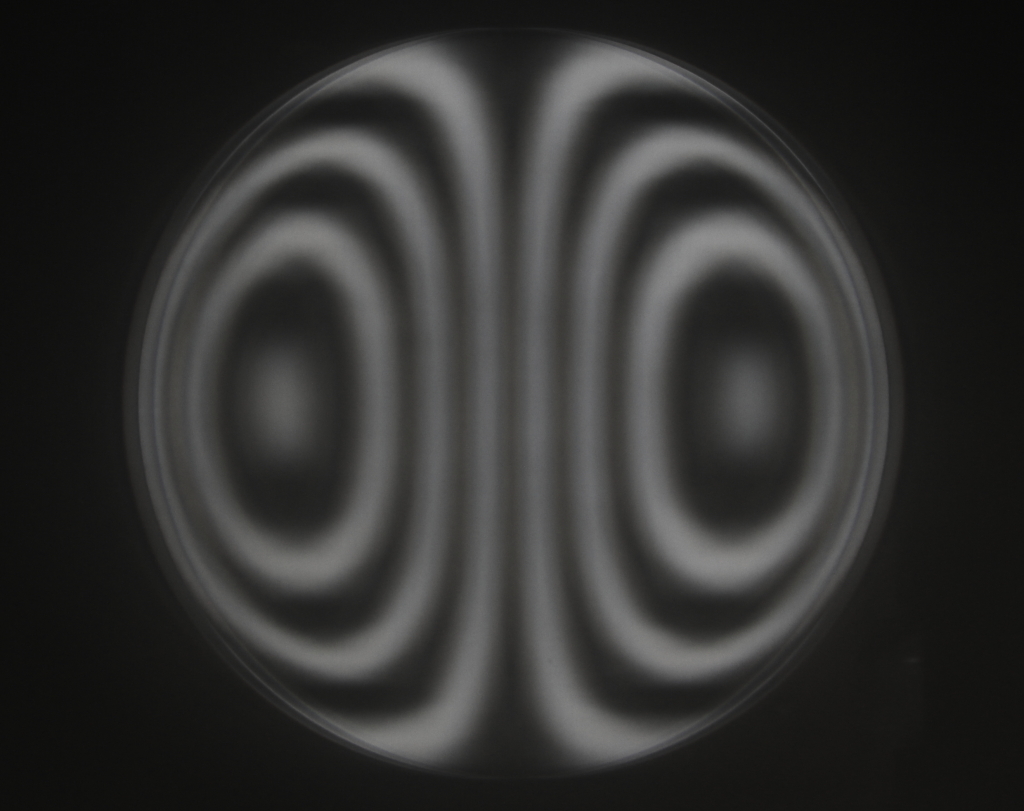
Regarding the ronchi test. One of the most confusing things is that a turned edge looks just like too much correction. Your brain would tell you that a turned edge would kink the lines the other way not the same way.
-
1
-
-
I would try some w strokes across the whole mirror with no more than an inch over hang using that same lap. Don't worry if it deepens the mirror more than a sphere because you have alot of glass to remove anyway. When I had about the same amount of turned edge this is what removed it the fastest for me and it also it also gets some of the next phase of the job done also so it could save you hours and hit two birds with one stone.
-
1
-
-
That look's very nice Raymond and a pleasure to behold, certainly inspirational
On a testing point did you use a matched Ronchi test for it to start with? and obviously other test's? Could you explain your testing as it's obviously produced a very nice mirror as can be seen from your image. I one day hope to be in the same position of being able to say been there done that and I have the picture's and test image's to prove it.
Well done and thank you for sharing it with us, can we also see a pic when you get it coated.
Damian
I used the Ronchi test to a point, i would say that point was when the mirror was about 1-2 waves under corrected then i used Figure XP from there on but every time i tested the mirror i would first have a look the Ronchi grating and then measure it and enter the numbers into Figure XP. Zones and roughness shows up well with the Rronchi grating so you must always use it. It's too easy to charge away and do what Figure xp say only to find you're making a mess of things.
Also rotate the mirror in 45deg steps to check for astigmatism and make sure you have as little as possible before you start figuring!
I returned to a sphere two time before i found what figuring method worked well for me and that was using a small lap (4inch) with tight W strokes working only the middle out to say 30% then after 5min out to 40-50% then 70-80% then the full mirror and back to the middle. I found the mirror deepend very smoothly like this rather than using strokes across the mirror and offsetting them from the center to push the correcting out more.
My measuring setup is just a focuser with a dial gauge measuring its travel. I can say for sure that i can get very consistent results.
-
3
-
-
Here's some motivation for you. I just finished off my 18" f3.3 mirror last night.
18inch f3.3 Done! by Raymond Collecutt, on Flickr
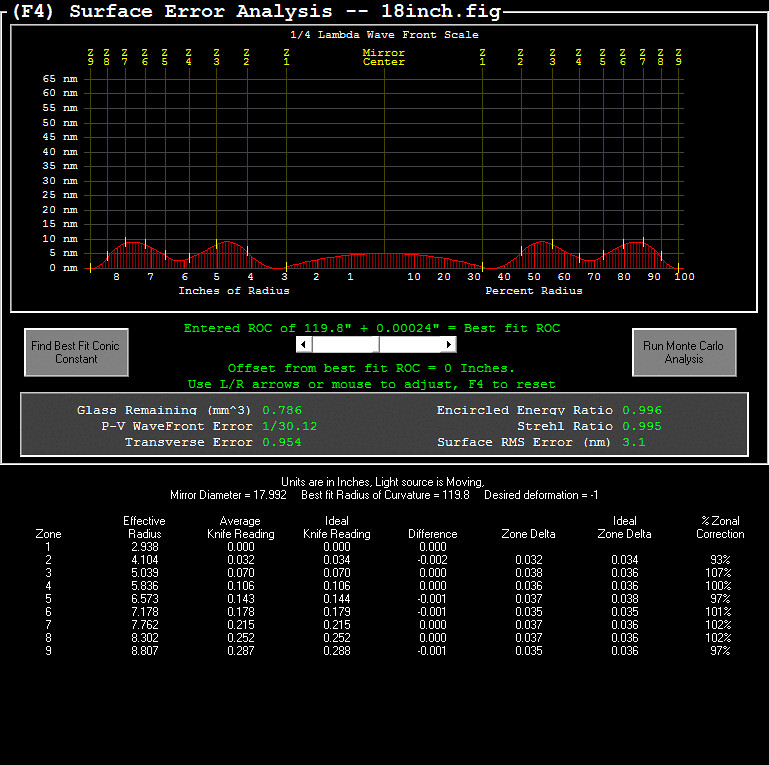
18inch_Surface by Raymond Collecutt, on Flickr
-
4
-
-
I'll be looking forward to the figuring stage to see how you get on. These big fast mirrors are fun untill it gets frustrating when the glass dosn't do what you want.
-
Getting there. Looking better.
-
1
-
-
Gordons videos are what helped me the most. One thing that maks life easy is a powered turn table. I was' t going to make a mirror without one.
-
That's starting to look a little better now. I've been in the same boat with my 18" f3.3. I couldn't get the last bit out but it totaly went away when figuring it with a small 4" lap althoght I did git the edge better than yours is currently before I started deepening it.
-
1
-
-
I'll be watching this with interest. I have my own little tough mirror project going on right now too and it's having its challenges but that's to be expected with with an 18" f3.3!
-
1
-
-
Its kind of funny looking back at this thread. It seems I started something and I ended up being one of the largest killers of DSLR's on the planet. Before this thread there was nothing on the net about this subject and now there is heaps.
-
It would be neat if that method worked!
-
Looking very good conehead. Wow you read the hole thread!
-
I also would like to apologise about the comment I made about avoiding the dremel to the OP, I didn't mean to offend. The dremel will work and is much faster than the hand methods, it's just very difficult to get a flat surface using a cylindrical tool. Especially as it is so quick to remove the bayer. Although doing the first 90% with the dremel and finishing by hand could offer the best of both worlds. We also tried the dremel way before we figured out to protect the gold wires, which ended badly for the sensors
 With them protected by epoxy you can also get right up to the edges too.
Haha no need to apologise, don't worry I never took it that way at all.
I love the look of that scope you guys are making, I liked your facebook page a long time ago so have been watching with interest all the cool things you have been upto.
-
1
-
-
I must say its good to see JTW comment on this thread. Thanks.
My dermal method may not have been the best but It got people thinking and it did get a basic first result haha.
Gina you crack me up don't you have enough cameras

-
2
-
-
Well done. Just for fun I went and had a play scrapping the cfa layer off and it was very easy so this seems the best way by far.
-
Its good to see you guys still having a go with this. I still have a few 1000d's but have not used them after getting an Atik 383.
Keep going its fun watching.
-
Well i can thankfully say that this problem does not happen with baader 1.25in LRGB filters. The results are as good as perefect. But is does mean using narrow band with my scope will be a pain in the but untill i can solve this.
I am VERY surprised this problem has not come up on here before. I see a thread on CN forum about the same problem inculding the reflections when using FR's or FF's with narrow band filters but it went nowhere sadly!
-
I downloaded a trial of ccd inspector.
Whats your thougts on this?
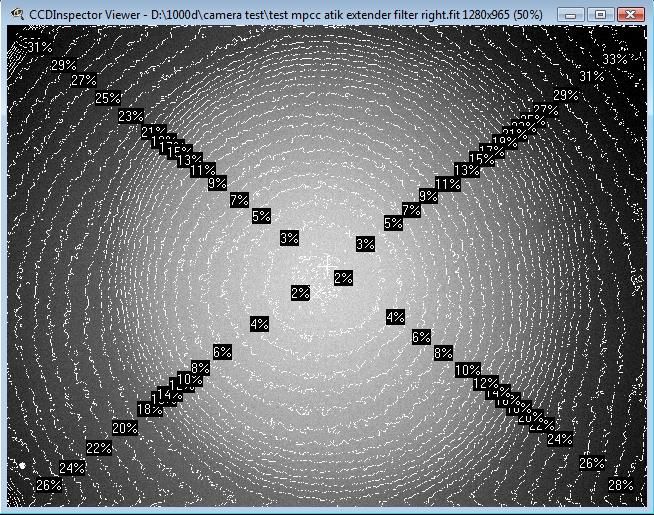
This is with an ha filter and no MPCC.
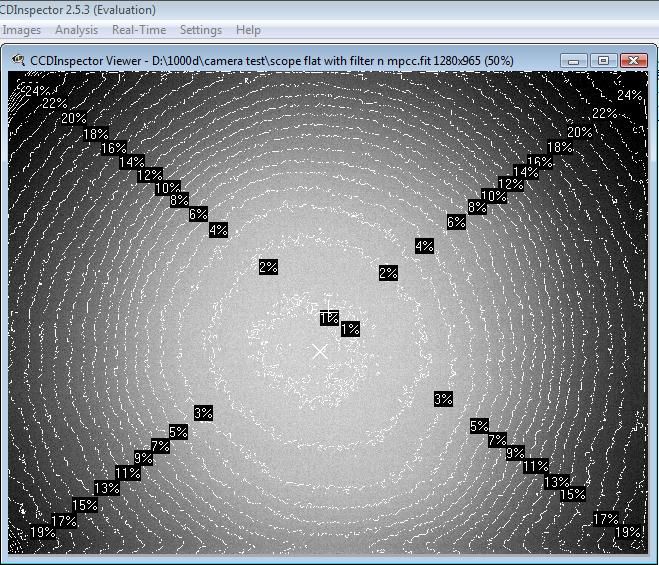
This is with filter and with MPCC.
-
Baader seem to think there is no other way to use an mpcc other than using 2in filters in front of it. Well thats a pain in the but!
I have some lrgb filters on there way so i hope these will work as they dont have that shiny reflective coating. I can borrow a set of 2in nb filters if i have to. I wont be buying a full set anytime soon.

The 22" mapstar mirror
in DIY Astronomer
Posted
I'm by no means an expert at mirror making but between the Ronch and Foucault(with Couder mask and Figure XP) you can create a very good mirror, no other form of testing is needed if those two are used to the fullness of their abilities, fast f3 mirrors included.