


RAC
-
Posts
688 -
Joined
-
Last visited
-
Days Won
4
Content Type
Profiles
Forums
Gallery
Events
Blogs
Posts posted by RAC
-
-
The knife edge was moved off center in my image so I could see the near entire mirror just for that pic. I wanted a full image I could process to check for roughness.
-
 1
1
-
-
Looks like it's moving along nicely.
-
2
-
-
You are going to test every half hour or so Damian but how long are you going to figure for each time between testing Damian? 15mins? Or is that too long?
The time spent figuring will get shorter and shorter the closer you get. To start with you could test every hour but when you get down to within 500nm you will want to spend no more 5min figuring before retesting. Within 100nm you will want to do no more that 1-2min before checking what your next plan will be.
Rest time for the mirror when your close need to be maybe 1/2 hour or so. I always pick the mirror up with a bunch of paper towels to stop my hand heating up the edges.
With this 20" I just did my goal was to not need a super small lap for tricky corrective work as that creates roughness so as the mirror got closer I tried my best to only work what was needed but I still ran over the complete mirror at the end of each session to smooth thing up.
Number one will be to get a good testing setup and use Figure XP, make a couder mask and start measuring the mirror from about the half way point.
-
2
-
-
Well done Raymond
Looks really nice and as you say smooth which is what is needed.
I will be using a 10" lap and testing regularly so as to not overshoot.
Did you slow down with your strokes towards the end as they look quite quick in your video.
Off to get sorted around then make a start tomorrow and this weekend.
Damian
Yes the last few sessions were taken slow and a more watery mix of cerium used. You can go fast so long as the lap stays silky smooth to push. I never saw any roughness when rough parabolizing.
I only used 50grams of cerium to polish out and figure this mirror!
-
1
-
-
Well I finished me 20" f3.8 two nights ago. It turned out really nice with a very smooth figure and surface. No lap smaller than 8" was needed not like my 18" that needed a 1" lap just in from the edge so this one is a bit smoother.
I fully recommend the w stoke with an 8" lap for this and your sized mirror with constant checking to know what diameter to work out to most as you get deeper and closer to the end.


-
5
-
-
I don't think having the mirror not spinning will effect it too much, just more work walking around. I don't try and make every stroke perfect as there are so many strokes it all averages out and a bit of random may be a good thing.
It sure is nice having a spinning table.
-
1
-
-
Also here's a pic to show how smoothly it applies correction. No sharp zones just nice curves. This is the only method I have used with this mirror so far ever since finishing spin polishing and cleaning up the center.

-
1
-
-
I've made a little video for you showing what I'm talking about. You can see I work out to one diameter for a bit then move further out in steps.
You can see how this works if you look a a Figure XP graph of the mirror. I made this data part way through today. The first pic is what the minimum amount of glass removal would look like but it's not realistic as trying to scrub glass off the edge could cause problems as you know. So it's the second pic that we are trying to flatten out with this method. When getting close to a flat line you can modify the method as you go.


-
2
-
-
Yeah the mirror is spinning but only slow like 2-3 rpm. I do W's in 3-4 steps working my way out till lastly covering the full mirror. Each step lasting about 10 rotations. So in effect working only the center out to about the 50% mark then make the W larger to cover out to the 70% mark then 80% then the full mirror and back to the start again. I'm using an 8" lap with the very edge pitch squares pointed to help blend the laps action on the mirror. This is producing a very VERY smooth zone free deepening of the mirror making its way to a rough parabola before fine figuring using Figure XP and a couder mask.
I tried a lot of methods with my 18" and this one I sort of ended up stumbling on myself after doing it for a bit and seeing a nice outcome so I never stopped.
-
1
-
-
I've just started parabolizing my 20" f3.8 using the same method I found best with my 18" and it's working great !!!
-
1
-
-
Now the fun part can be begin

-
1
-
-
Looking good. That's just how my 20" looked after spin polishing a few days ago.
-
1
-
-
As the years go by I'm starting to think this thread I started may be the third largest cause of dead DSLR's, Gravity and water being first and second lol.
-
4
-
-
What's the depth of the mirror currently?
-
Good work for the first attempt.
-
No I thought you had polished it out with the 10" lap.
-
1
-
-
Did John say anything about polishing out with a larger lap?
-
1
-
-
Ok, I stripped the first 350D to experiment down to the sensor. I got it up to this level for this evening:

Should I also take the metal frame of to remove the glass?
Not sure about the 350d but the 1000d doesn't need that removing to take the glass off. As you will see in my photos of the very first post in this very long thread.
-
I would think that is just some part of the sensor circuit. The light metering is done by another sensor at the bottom of the camera.
I'm not keen on the epoxy idea anyway as it could cause the gold wires to fail. When ever I see glue even on even large solder joints on circuits boards in the automotive field I always find cracked solder under the glue.
-
I figured my 18" plate glass mirror with no more than 30min between figuring and testing, most of the time it was closer to 10-15min or a cup of coffee. At this stage there will be no chance of over shooting because of a temp change if you were to give it 15min.
-
1
-
-
I've ordered a 20" blank for my second mirror. It's going to be an f3.8 and in a visual only dob. It'll be interesting the second time around.
-
1
-
-
Here's my two. Both DIY, the small one is a carbon fiber serrurier truss with a Royce 10" f4 conical mirror made for deep sky imaging and the big one is my visual/planatry imaging scope, the mirror is an 18" f3.3 that I made myself.
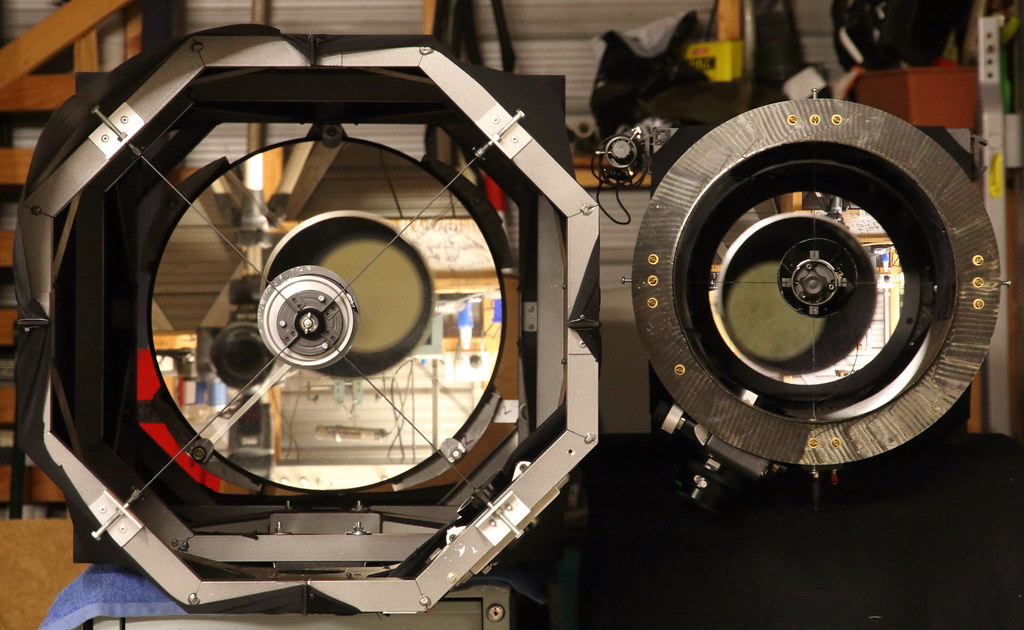
Two telescopes by Raymond Collecutt, on Flickr
-
23
-
-
Looks good. Keep going on the center. There looks to be lots of correction in the outer zones. I would start taking some measurments.
-
1
-
-
I watch that video and its a very rough way to figure a mirror. The Foucault test is not hard or complicated. Use an led on the same knife edge as you look past and have the lot moving.
It doesn't need to be over complicated.
-
1
-


The 22" mapstar mirror
in DIY Astronomer
Posted
It wasn't so the camera could see the entire mirror it was to get a nice shading across the mirror. I'll take some pics tonight.