


Dark Raven
-
Posts
221 -
Joined
-
Last visited
-
Days Won
2
Content Type
Profiles
Forums
Gallery
Events
Blogs
Posts posted by Dark Raven
-
-
On 18/08/2022 at 15:32, CraigT82 said:
Would any 585mc owners be so kind as to share a sharpcap sensor analysis report?
Here you go:

-
 1
1
-
-
Last night I drove to dark site and it was first light for my ZWO ASI585MC.
I did not cool it as I wanted to establish the baseline performance. If you are interested how to cool planetary camera check my smartphone coolers for AP review on this forum.
I will test with the cooler next time on the same target and report back in the above thread, Given current schedule and weather permitting, probably towards the end of September.
Equipment:
Mount: ZWO AM5
Tripod: ZWO TC40
Optics: RedCat51
Guider: ZWO ASI120MM
Imager: ZWOASI585MC
Control: ASI AIR+
Focuser: ZWO 5V EAF
Filter: Optolong L-ProSequence:
100 Lights
180 sec
Gain 254
Calibration:Darks ( yes i am aware it is back illuminated... )
Flats
BiasConditions:
For reference purposes NO processing beyond DSS (v4.2.6) stacking and basic stretch. Single light and full stack (.fit) below
Final result (.png):
Stacking mode: Intersection
Alignment method: Automatic
Cosmetic applied to hot pixels (Filter = 1 px, Detection Threshold = 50.0%)
Cosmetic applied to cold pixels (Filter = 1 px, Detection Threshold = 50.0%)
Stacking step 1 ->91 frames (Gain: 254) - total exposure: 4 hr 33 mn 0 s
RGB Channels Background Calibration: Yes
Per Channel Background Calibration: No
Method: Auto Adaptive Weighted Average (Iterations = 5)
-> Offset: 60 frames (Gain: 254) exposure: 1/31250 s
Method: Median Kappa-Sigma (Kappa = 2.00, Iterations = 5)
-> Dark: 25 frames (Gain : 254) exposure: 3 mn 0 s
Method: Median Kappa-Sigma (Kappa = 2.00, Iterations = 5)
-> Flat: 60 frames (Gain: 254) exposure: 1/33 s
Method: Median Kappa-Sigma (Kappa = 2.00, Iterations = 5)
Autosave001.fit
Light_M31_180.0s_Bin1_585MC_gain254_20220827-224108_0002.fit-
 7
7
-
-
-
1
-
-
@bomberbaz Thank you for posting your findings. I would love to see how it turns out in the end.
8 hours ago, bomberbaz said:I think the higher the ambient, the more effective the cooler is. I don't think I was making the minus 10C of ambient as in @Dark Raven bench test.
I would fully agree regarding the ambient. My subsequent field test achieved only ΔT of 7.2 °C. Starting point does make a difference. I was suppressed it pulled that much in the first place given it has 5.8 W ( 3.5 W ) compared to dedicated AP camera cooler of 36 W. It makes sense from physics standpoint as well.
-
1
-
-
On 08/07/2022 at 13:19, michael8554 said:
And a USB from the PC to the Go2Nova 8401 USB, to allow PHD2 to guide the mount.
If only that would work many people would be happy. However, it does not.
I have looked for over a year for iOptron HBX to ST4 adapter without any success. It would be great if iOptron would open-source the design and firmware of the adapter so people could build themselves.@rjsc2001 You could try asking for help at your local electronics or TV repair shop, although they are a dying breed as well.
Hope it works out and do let us know if you manage to sort it out. Best of luck.
-
1
-
-
Just in time before the vacation. Drove two hours one way yesterday to the distributer and then back just to pick it up in person. Did not want to risk delivery delay.
Rest of the photos coming up soon. ZWO AM5 in full setup.
Best of all, it fits in a back-pack! 😀
Looking forward to first "light"...
-
8
-
-
Looking forward to your test results.
3 minutes ago, bomberbaz said:My bench test results copied yours exactly.
👍
-
I had the chance to grab some subs last night and did a small field test with the cooler on the back of ASI120MM-S. I was quite tired at 4 AM and did not have patience to wait beyond 15 min.
Initial camera temp was 16.7 °C and achieved temp was 9.5 °C giving ΔT of 7.2 °C. Please note and ignore the focus as the guide camera is deliberately defocused.
I will assume there are two reasons for lower ΔT than achieved in the initial bench test above.
- Limited timeframe of only 15 min.
- The cooler was hung from below (on bench test it was sitting on top), thus having lesser adhesion to the back of the camera.
Therefore I would fully support addition of thermal pads that should improve adhesion and heat transfer.
I will test Phone Cooler further as I acquire the pads or paste and Magnetic Cooler when I get new camera (might take some time). -
8 minutes ago, Elp said:
Interesting test. Wonder if you could apply thermal paste either metal on metal contact or via thermal pads, arctic silver compound works wonders with CPU cooling.
I ordered the Icy Box M.2, 3.2 W/mK Thermal Pads but shipment got delayed, and looks like it will not make it before I leave on vacation. If I manage to get them or any other while there, I'll update the review.
-
22 hours ago, bomberbaz said:
Also don't even bother if the ambient temperature exceeds 15c, the background noise of the camera goes off scale beyond this apparently.
You could control thermal noise of uncooled AP cameras with smartphone cooler. I just did a small test on ASI120MM-s guider and repurposing smartphone coolers for planetary cameras delivers approx. -10°C compared to ambient temperature in reversible and non-destructive manner.
My test is here on forum.
DR
-
2
-
-
Patriot Astro has several videos on testing hardware and configuring AP software on MiniPCs (Quieter2/3) from MeLE
-
Before we start, yes, I am aware this is astronomy and not a smartphone accessories forum.
Then why a smartphone accessory review?
Well, I had a brain-fart, bear with me.Why a review and not DIY forum?
Because I used off the shelf products without any modification and tested them.Why such poor testing methodology?
Proof of concept, also brain-fart remember?So, what is this all about then?
What if we repurpose a smartphone cooler for planetary or DSLR/Mirrorless camera? Interested in detail? Then read on…TL / DR
Repurposing smartphone coolers for planetary or DSLR/Mirrorless cameras delivers approx. -10°C compared to ambient temperature in reversible and non-destructive manner. At least in my tests.Introduction and how did this come about?
For quite some time I wanted to cool my Canon DSLR camera especially in the summer and all I found were quite destructive, irreversible and/or inconvenient bulky solutions I really didn’t like. Some found on this forum or in this video.
I wanted something bit more elegant and something that will allow camera’s regular daytime non-astronomy use. Then, some tima ago I saw announcement for Canon EOS R5 C with built in cooler,
and asked myself is there something for retrofitting regular DSLR / Mirrorless camera? After some searching, I found Tilta’s Canon EOS R5, R6 cooling fan.
Peltier cooling, external power plug so it doesn’t drain camera battery, dual fan speed with on/off switch. Thought it was pretty cool, especially as I am contemplating purchase of Canon R6 in near future. But for now, I wanted to get something that could be a bit more universal and versatile. Possibly used on planetary camera as well.
What I found were smartphone coolers. Out of all that are mobile gamer oriented and full RGB LED lighted I found two that were astronomy friendly. Black Shark Magnetic Cooler and Black Shark Phone Cooler. Best thing of all were the prices. Although they wildly vary from one online retailer to another.
That was too good not to get them both and few days later the boxes were on my desk ready for testing.
Magnetic cooler is interesting as it sticks to all MagSafe compatible products and any ferro-metallic surface.
For the rest there is a magnetic sticker.
Gaming Cooler uses clamps to hold itself to the camera.
Dimensions
Dimensions were one of the key features in choosing these two coolers as they would have to fit on top of planetary camera and in the DSLR/Mirrorless flip screen recess.
ZWO ASI planetary camera with diameter of 62 mm
Black Shark Magnetic Cooler Dimensions
The magnetic sticker that comes with this cooler is used to enable connection on magnetically inert surfaces. This will come in handy on planetary cameras as they are usually aluminium based. While I am in the market for new camera, I chose not to use it on the ASI120MM-S guider, but rather test the cooler simply placed on top without the sticker. One should be mindful where and how this sticker is applied as only one is supplied.
Cut-outs seem to fit perfectly except for the middle screw hole.
Magnetic sticker will be useful on DSLRs as they often have Magnesium alloy, Aluminium alloy, and polycarbonate resin with glass fibre, or some such combination bodies. The size of magnetic sticker is just over half a mm, and it will have minor impact on closing the lid on DSLRs as will be seen later.
Black Shark Phone Cooler Dimensions
Clamps are 60 mm apart which makes it hold the Ø 62 mm ASI120MM-s and they stretch to max 80 mm.
Bench test
I tested both coolers on my ASI120MM-S guide camera, indoors at ambient temperature of 25°C.
I opted for internal temperature sensor of the camera rather than measuring outside temp of the housing because that is what is recorded in all our FITS files during imaging sessions. For measuring I used ASIStudio ASICap. Not perfect but sufficient for proof of concept.
First thing I did is recorded the temperature of the connected camera without the cooling. While taking subs I recorded temp of 26.7°C and while idling it was 26.0 °C.
[ZWO ASI120MM-S]
Auto Exp Max Exp = 30000ms
Auto Exp Max Gain = 50
Auto Exp Target Brightness = 100
Bin = 1
Brightness = 0
Capture Area Size = 1280 * 960
Colour Format = RAW16
Debayer Type = GRBG
Exposure = 8.30989s
Flip = None
Gain = 50
Hardware Bin = OFF
High Speed Mode = OFF
OverClock = 0%
StartX = 0
StartY = 0
Temperature = 26.7 C
Timestamp Frames = OFF
USB Limit = 86
USB Port = 2.0Resulting uncooled .fits file looks like this:
Now it was time turn on the cooling with Black Shark Magnetic Cooler. Gradual temperature decrease can be seen below. Not surprising, we can observe that each subsequent degree of temperature reduction takes a bit longer.
Finally, we achieve minimum temperature of 17 °C.
Capture data:
[ZWO ASI120MM-S]
Auto Exp Max Exp = 30000ms
Auto Exp Max Gain = 50
Auto Exp Target Brightness = 100
Bin = 1
Brightness = 0
Capture Area Size = 1280 * 960
Colour Format = RAW16
Debayer Type = GRBG
Exposure = 30s
Flip = None
Gain = 50
Hardware Bin = OFF
High Speed Mode = OFF
OverClock = 0%
StartX = 0
StartY = 0
Temperature = 17.0 C
Timestamp Frames = OFF
USB Limit = 86
USB Port = 2.0Resulting cooled .fits file looks like this:
After turning the Magnetic Cooler off and letting the camera warm back to ambient temperature, it was turn for Black Shark Phone Cooler.
Finally, we achieve stable minimum temperature of 17.7 °C with drops down to 17.0 °C.
Capture data:
[ZWO ASI120MM-S]
Auto Exp Max Exp = 30000ms
Auto Exp Max Gain = 50
Auto Exp Target Brightness = 100
Bin = 1
Brightness = 0
Capture Area Size = 1280 * 960
Colour Format = RAW16
Debayer Type = GRBG
Exposure = 8.30989s
Flip = None
Gain = 50
Hardware Bin = OFF
High Speed Mode = OFF
OverClock = 0%
StartX = 0
StartY = 0
Temperature = 17.7 C
Timestamp Frames = OFF
USB Limit = 86
USB Port = 2.0Resulting cooled .fits file looks like this:
Consumption.
For Black Shark Magnetic Cooler we have: 4.54 V and 1.27 A, giving us just a bit shy of 5.8 W.
For Black Shark Phone Cooler we have: 4.69 V and 0.74 A, giving us just a bit shy of 3.5 W.
With 40% lower energy consumption and half of the price for only 0.7 °C difference it appears that Black Shark Phone Cooler performs better. Given the small cost, especially compared to the rest of astronomy gear and manner in which you power that gear (battery or grid) this should not be a big impact. One thing I was not able to test is the impact of fan vibrations on the camera stability during sub-exposures. For this I would need to do a field test.
Given the above proof of concept test and that others have successfully tested concepts of Peltier cooling on DSLRs, side position of the charging port, non-removable cooler clamps combined with the lip on the bottom of my Canon DSLR I decided to postpone temperature test until I get new DSLR / Mirrorless camera.
Slim L shaped USB-C cable was also protruding a bit out of the flip screen recess.
What I did do, is tested the concept on few other cameras in local electronics store. Given it was general electronics store they had only few entry level cameras on display. Nevertheless, they served the purpose to give general idea and understanding.
Canon 90D like my DSLR has a flip screen recess bottom lip, which makes it unsuitable for non-destructive application of considered coolers.
Canon 850D does not have a flip screen recess bottom lip, which makes it suitable.
Canon EOS 250D fits the cooler with a bit of overhang but it should not be of consequence.
Sony A7 II is not suitable due to its screen not clearing the back of the camera.
Nikon Z50 barely fits.
Nikon D5600 works fine.
Another thing to consider regarding the magnetic sticker on all DSLRs / Mirrorless cameras is that it somewhat hinders proper closing of the flip out screen. Not by much, but still to be aware of.
Closing
DSLRs and these smartphone coolers will never be able to produce results anywhere near dedicated AP cooled cameras will. However, with the introduction of backlit planetary cameras like ZWO ASI585MC and Player One Uranus-C based on IMX585, new possibilities are coming to amateur entry AP. Just look at what Luke Newbould managed to capture in his YT video: Mono VS OSC?
Now suppose adding cooling of -10°C below the ambient temperature. I imagine it could only get better.
This review was not detailed or scientific. Intention was to test the concept of repurposing smartphone coolers to AP and share the idea with community. I hope it will help during the upcoming summer.
CS,
Dark Raven
-
13
-
2
-
-
Hi Geoff,
I've seen your post ( iOptron SmartStar CubePro AZ Mount ) prior to purchase, and you exposing metal gears in your review gave me the confidence to proceed with Cube Pro. Thank you for your effort. Much appreciated.
DR
-
iOptron Cube Pro Go-To Mount with GPS in EQ configuration, 8408 Go2Nova HC and double saddle. Not often seen in the wild.
Official iOptron video:
Mount head weighs only 1.4 kg. Mount, internal batteries, HC and tripod weigh 6.2 kg and fit nicely in single backpack together with collapsible SW Heritage 150P OTA. Taking it to the dark site with E-Scooter during the holidays last summer was a blast.
Unfortunately it is left (?) mounted so the focuser of the 150P is facing downwards. This could be solved by reorienting the expandable rods of the OTA, but I opted for original secondary dovetail kit. I did not find any reference to the possibility of changing mounting orientation in the HC configuration or firmware. I've heard some mounts allow for that. That would have been nice feature.
In dual visual ( SW Heritage 150P ) / light AP ( Canon DSLR, EF 75-300 ) use. It is amazing that it can carry SW Heritage 150P with Celestron NexYZ Smartphone Adapter and smartphone on Baader Hyperion Eyepiece, if properly balanced. As to visual performance of the mount, it tracks well in AA mode if properly aligned. Turning the south indication on the opposite side from the bubble level southwards and doing two star alignment is usually good enough to place the planet in 25 mm eyepiece. Using compass and three star alignment will usually put it in the center of 13 mm eyepiece on SW Heritage 150P and track it for over half an hour. Probably even more but never stayed on one target for visual longer than that.
Single smartphone shoot of the Moon through an eyepiece looks decent.
Full AP setup, WO RedCat 51, ZWO EAF, ASIAIR Plus, homemade 12V / 4.9 Ah battery (1.2V in 10S2P configuration) as part of counterweight. Off topic, why are counterweight batteries not a thing? This totally made sense to me, so I made myself one. I plan to expand the capacity in near future.
Imaging sessions in the wild can be fun with curious visitors.
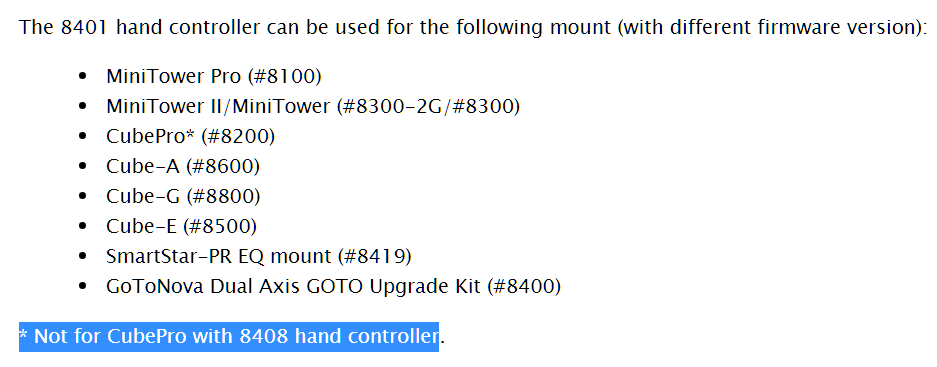
As to the pulse auto guiding in general it is not supported in newer models with 8408 HC. Older Cube Pro models with 8401 HC had higher load capacity and with ( discontinued ) ST4 adapter were capable of pulse guiding.
Instruction Manual for CubePro with 8401 HC has auto guide paragraph that is not in Manual for 8408 HC.
This post ( https://www.cloudynights.com/topic/574608-my-ioptron-cube-based-portable-wide-field-imaging-rig/ ) thrilled me and it was a reason I went for Cube Pro in the first place. I do understand the differentiation of products and manufacturers push towards the higher end products, nevertheless it is somewhat frustrating when the new version of the product has less features (no pulse guiding) and can carry less load than the old one (3.6 kg vs 5 kg).Unfortunately, #8401 HC is not compatible.
Windows PHD2 with ASCOM driver straight forward declares mount not capable of pulse guiding and PHD2 does not even connect or start calibration.
ASIAIR Plus will start calibration and fail.
StellarMate EKOS with INDI driver tries to calibrate and sometimes succeeds, well sort of and only sometimes...In one case it will just track the guide star with mount not reacting to guide pulses and than readjust the position of the green guide square while letting the mount drift as seen below:
In other cases if you play with drivers it will appear to actually guide:
And produce somewhat decent photos stacked in DSS and stretched in PS.
- 195 Lights X 30 sec at ISO 800
- 30 Darks
- 30 Bias
- 30 Flats
Advantages over SW AZ-GTi:
- Native AZ and EQ modes
- Comes with HC
- GPS
- Native dual saddle
- Comes with counterweight
Disadvantages over SW AZ GTi
- Lower load capacity of only 3.6 kg ( AZ-GTi has 5 kg )
- No native guiding, only tracking (Celestial, Solar, Lunar, King and User defined)
- No RA Clutch (makes balancing cumbersome in EQ mode due to friction between the loaded mount and the tripod)
- No native WiFi ( optional StarFi adapter ) and no mobile app
Somewhat capable and extremely portable little mount for Grab ‘N Go action, has it's moods, but as long as not overloaded ( 3.6 kg max ) it performs reasonably well within it's (entry GoTo) price category. The mount shows its age but in persistent hands it is more than usable, for visual and AP.
-
2
-
iOptron Cube Pro Go-To Mount with GPS, 8408 Go2Nova HC and double saddle. Not often seen in the wild.
-
4
-
-
18 hours ago, tompato said:
Has anyone tried the Omegon Deluxe Wedge? It looks pretty solid, but I've not seen anyone using it or any reviews. I was tempted for my Az-Gti setup. (But off topic I know).
It looks like it has a fixed dovetail bar on the bottom of the Skyhunter so I don't see why you wouldn't be able to use another brand wedge. Only question would be if it has enough clearance I guess as the one supplied has quite a long clamp that extends above the wedge somewhat.
If I ever get this I will go with different wedge. I've only found a short demo video on YT ( /watch?v=YYQCyTg-Qv0&t=340s ). Not sure it's appropriate to post full off-topic video for FLO competition, hence just the abbreviated link. Sorry FLO...
Back on topic, the iOptron long clamp is needed due to their poorly designed short wedge and battery compartment ( I assume ) behind the RA gear. This might be actually a good thing as the SW AZ-GTi has battery compartment above the RA gear and the RA gear clutch is on a small pin to the side. This often wears out. iOptron has opted to go with full RA gear clutch directly on the gear and that, together with a belt drive is a good design choice.
Portability and those two good design choices is what is driving me towards the SkyHunter. I believe it will outperform the SW AZ-GTi and probably the SW SA-GTi as both are worm gear driven. My speculation for now until both are tested.
Only one USB port for computer control and for 5V charging together with mini USB in 2022 is what is putting me off because I would like to use it with ASIAIR Plus as ultra portable imaging setup.On the other hand mini USB is step forward from HBX ports on the iOptron Cube Pro. Perhaps I am overexaggerating my concern and it will have enough power for full winter night of slewing and guiding/tracking and WiFi control will be just fine like it most often is for SW AZ-GTi. Remains to be patient and see.
-
21 hours ago, Doversole said:
Has anyone find out whether it would be possible to reuse the WO wedge designed for the SkyguiderPro?
It's a much better wedge for PA.
Thanks!
That would be great. Even Omegon Deluxe Polar Wedge at half price of the WO wedge might be interesting.
-
Hi All!
I guess a short intro is in order. I've been moving around quite a lot and been in and out of the hobby since the high-school, and some 25 years later, the dark part of the day is still alluring. Given that I like to dabble with tech, astrophotography came natural but I also bring binoculars or small DOB to keep me entertained while collecting subs. I particularly prefer easy mobile setups that allow for quick grab 'n' go shooting. WO RedCat 51 with Canon DSLR on iOptron Cube Pro controlled by ASIAir+ allow just for that. Need to upgrade camera and mount...
All in all looking forward to hanging around.Best regards,
DR
-
1
-
-
I love the concept of this mount and find it a significant improvement (Belt drive) over the old SW AZ-GTi and more compact / portable (also Belt drive) with same capacity than the new SW SA-GTi.
However, iOptron is making it hard to love it… 🤔
Wedge / EQ base is different. I have the original wedge and it is hard (time consuming due to overshooting) to adjust altitude for polar alignment. With entire mass of the mount and the OTA sitting on elongated lever this will be even harder.
Longer dovetail bar could be potential solution but it looks like the battery cover might be in the way.
Latitude Scale indicator seems beyond flimsy and looks like an afterthought.
Can the internal battery be removed /replaced? I find Li-Poly potentially volatile in certain scenarios (hot car during summer).
Other head scratching thing is the decision to go with one mini-USB for charging (5V not 12V) and computer control. I am aware there is WiFi but prefer cable due to stability and battery consumption. How will this work in wintertime with long nights and sub-zero temperatures when the internal battery is depleted? Will the splitter cable work? Why mini-USB and not USB-C for a mount in 2022?
Scenario where the Locking Lever is undone by DEC rotations and the scope slides out of the Vixen clamp.
I do like option of a low latitude use, where the CW shaft can be threaded into the DEC Clutch Locking Knob to avoid CW hitting the tripod.
I would love to get this, but it just rubs me the wrong way. 😕


.jpg.0e4553137657818c51e27746edff00ff.jpg)


.jpg.e2a6e8872f94b20a501145f77240b59c.jpg)
.jpg.db01bef51a66084e3cfc6f4404f9ba81.jpg)


.jpg.41d4eb0f8904bcf8e2b3b0950d217598.jpg)


ZWO/Player One IMX 585 Sensor Image Showcase
in Discussions - Cameras
Posted
Not sure where that comes from but I just checked their product page and it states 252. I can not guarantee but if my memory serves me right that was like that from the beginning.