


.png.a39c632c22ff4fbfecec3ba85cb9c5f5.png)
SECSIO
-
Posts
22 -
Joined
-
Last visited
Content Type
Profiles
Forums
Gallery
Events
Blogs
Posts posted by SECSIO
-
-
7 minutes ago, Davey-T said:
The N / S slide switch is only for timelapse photography so the camera rotates then stops.
Dave
I feel like a complete dummy... thank you for tour reply!
-
Hi!
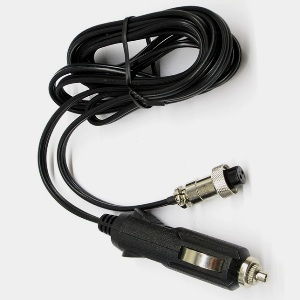
I received this new mount yesterday in the afternoon and today I am learning to set it up. When I select "Sideral track" mode and N switch, the mount starts tracking correctly (I can check it in live camera view), however, after a whlile it suddenly stops and the mode selector LED stays on. I am powering it up with 6 AA batteries, "App" mode tells me that the voltage is 5,8 V, so I am not sure if that is the problem. If a restart the mount, it behaves in the same way, I hear the engine at the beginning but after 20s it just stops. I thought it wa a payload issue so I removed my scope from the mount with the same result... I have tried to power up the mount with a Celestron Power Bank (5V OUTPUT) but the LED starts blinking so finally I decided to use 6 AA batteries. The mount is balanced correctly so the only thing comes to my mind is a power-up issue... Testing manual control from "App" mode, I have cheked that the engine stops moving after 3 degress of rotation but it let me rotate it in the opposite direction until again after the same number of degress it just stops... I leave some pictures of my mount, scope and powertank.
Thank you for your time.

-
32 minutes ago, david_taurus83 said:
Have you selected On-Camera in the mount selection tab? Tried a different pc/laptop/cables?
Yes, I selected On-Camera in the mount settings, I will try with other laptop, thank you for your reply
-
Hi
Last night I gave a try for autoguiding for my first time. I used a ZWO ASI 120 MM Mini + Skywatcher Finder Scope 9x50. When I starded PHD2, everything seemed ok, I focused the camera, autoselected a star and finally when I pressed "Auto-guide" button, PHD2 crashed... It happens every time I start autoguiding when PHD2 tries to place the selected start in the center of the drawn pattern in the screen. I think it must be a communication problem whith my mount, I use ST4 communication port of the camera.
-
Hi everyone!
Since I improved my polar align I started to take longer exposure images, however I realized that the wind is other factor to be concerned before imaging... Last night I tried to take some photos of Iris Nebula. Firstly I started with 120s exposure time, not bad, after 2 photos the weather got windy, so I had to reduce the exposure time in a half, 60 seconds, in order to fix the vibrations... I have found out that there are some available solutions, observatory tends for example.
I am looking for something easy portable and affordable. My setup is SkyWatcher 10" Black Diamond 254/1000 + EQR6 PRO. I saw this tend but I think its height is not suitable for my reflector.
I am opened to other solutions, even homemade projects. Despite of the bad weather, I could take some decent images of Iris nebula to stack ^^

-
 1
1
-
-
-
33 minutes ago, alacant said:
Sorry. I meant in the photo you sent. At which point on the circumference would it be found?
Cheers.
Sorry, I was in a hurry, now I understand what you meant. The focuser is in the top of the picture, here you are other picture from a better angle.
On the other hand, I have a GSO laser collimator which I recently collimated, but in this case I think a passive collimation is better to place back my secondary mirror.
-
45 minutes ago, alacant said:
Hi
Where is the focuser? The secondary isn't offering a circular appearance and may need to go further toward the primary.
Looks like a good staring point though and may well be fine if you're just observing, but for anything else, probably better to adjust it.
The easiest way is a to use a Cheshire sight tube. One with cross hairs, even better.
HTH
My scope is a reflector, so the focused in in the top of the tube. Its relief to know that the second mirror at least looks well faced to the focuser.
-
Hi everyone!
First of all, my scope is a SkyWatcher Black Diamond 254/1000 (3.9f), this information may be helpful.
Last night I tried to collimate my scope in the darkness, I usually use a torch, but that time I forgot to bring it, I got confident and despite of collimating the scope I ended unscrewing the main screw of the secondary mirror by scewing too much the collimating screws... Yeah, a complete disaster. I was able to turn the whole secondary mirror with my hands, but I did not have a proper screwdriver to place it again in its correct position. Once I got the correct tools, I could place the secondary mirror in front of the focuser and I screwed it to fix it. I do not know what is the correct way to check if I placed the secondary mirror in the center of the focuser, I attach a picture from the inside of my focuser, I think it is placed correctly but as I said I did not perform any kind of measurment, I just used my eyes looking through the center of the focuser.
-
Hi
I have purchased this useful camera to achieve a better polar alignment. I was reading its documentation and something caught my attention:
"6. Three star alignment no longer needed: Once you are polar aligned, you will only need to perform one star alignment - a real time saver."
I think this statement is only true if I achieve an almost perfect polar alignment. However, I think that, if you do not care about spending 3-4 more minutes, 3-star and 2-star alignment is always a good choice to make sure that you achieve a good accuracy.
-
1 hour ago, endlessky said:
For astrophotography, the only required thing is a correct polar alignment. You don't need any star alignments, they don't have any influence in the tracking/guiding capability of your mount.
What I usually do is this:
- polar align with the polar scope, using an app on my phone, to roughly eyeball the position of Polaris in the polar scope (I found this is plenty good enough for my 1-2 minutes exposures, at 300mm focal length)
- slew to a bright star to focus, plate-solve if it is not in the frame of the camera, until the mount pretty much centers it (I also sync the mount to the star position, once centered - so this technically counts also as a 1-star alignment)
- slew to the object I am interested in capturing and plate-solve until it is framed exactly as I want (I also rotate the camera, in this step, to frame the object to my liking)
- start my imaging sequence
No star alignment required, only plate-solving for focusing and for framing.
Then star alignment is just a way to correct the error made while polar alignment?
-
Hi
I have always taken photos using my DSLR in prime, 30s exposures. I got a new CCD camera (ZWO ASI 533 MC Pro) and testing it for the first time tonight I noticed that if I want to take advantage of long exposure times, I would need a better calibration. I always use 3 star alignment, I think it is the most accurate for my EQ6R PRO mount. However, reading some posts, an user suggested that before star alignment and after polar allignment you should set Polaris in the center of your scope. I always put my telescope at home position after polar alignment but I never check if Polaris is in the center of the field of view of my telescope. Is this really necessary?
Some tips to improve the calibration are welcome too ^^
-
16 minutes ago, Adam J said:
No that's just the max current so long as you supply 12volts the device will take the amps it needs.
Perfect, thank you for everything!
-
4 hours ago, Adam J said:
https://www.firstlightoptics.com/batteries-powerpacks/celestron-lithium-lifepo4-powertank-pro.html
You can buy a cable for it.
I found this information in its documentation:
Battery Chemistry: Lithium Iron Phosphate (LiFePO4)
Battery Capacity: 158.74 Wh
Input: 16V DC, 2000 mA
Charge time: 6 hours
Output current for telescope: 12V DC @ 5A
Output current for car battery port: 12V DC @ 10ACurrently, I power up my mount with this car battery cable so I would like to use the 12V DC 10A output for the telescope, and the 12V DC 5A for the camera. I think this configuration might not be a problem for both devices...
-
15 hours ago, Adam J said:
In general it will draw about an 1-2 amps to cool the camera. So the camera on its own would deplete a 7ah battery in between 3.5 - 7hours dependent on cooling temperature and ambient. As you are in Spain I personally I think that you will want a bigger battery.
Adam
Thank your for your reply!
I have found this one Celestron 18771-CGL Powertank , do you know if the supplied power cord is compatiable with my SkyWatcher EQR6 Pro mount?
Edit: Well, I have just realized that it is not compatible, however I could use it to power up the camera.
-
Hi,
I purchased a celestron powertank 7ah when I got my equatorial mount. At the beginning, I thought that it would last for 7 hours aprox, however, it did not run out until more than 8 hours passed. This time is long enough to lend me enjoy of one full night. Rencently, I have purchased a ZWO ASI 533 MC Proc, and I would like to use the same powertank to power up its cooler. I do not know if this is the best way or there are better ones, but I am afraid to run out of battery in the middle of the night.
-
16 hours ago, michael8554 said:
Take a single image of a dense star field in the milky way, high ISO and fast shutter to minimise tracking errors, then examine the star focus in the corners.
Before originally removing the sensor you measure how high is the sensor, or the head of the Torx screws, above the camera chassis at the three mounting points.
Using a micrometer, to an accuracy of 0.05mm (the size of the thinnest shim that Canon sells for the older shimmed cameras).
After removing the filter(s) you return the sensor to the same height.
You will never be able to return the sensor to the correct height after the fact, as the three settings are unique to each camera.
Unless you measured accurately as above and kept the figures.
Michael
Thank you for your reply!
-
Hi
I recently modified my Canon EOS 700D with BCF-1 Baader. I think I put the sensor in its factory position, but I am not 100% sure, is there a way to test this?
I exposed the sensor to a bright white screen to take a flat frame. After that, I edited the frame in Pohotshop applying a threshold filter and this is the result:
I realized of this problem when I was taking test photos to Orion arm with new lenses and I found some vignetting while post processing. I thought it was lens fault but it happens too with the bare sensor. You can check this in the bottom left corner of this picture.
In case my assumption is true, could you let me know what measurements must screws have to return the sensor to its original position?
-
Hi everyone!
I would like to share with you this image of the famous comet taken on 19/07/2020 23:15 from my town.
Setup:
- Canon EOS 700D
- Sky-Watcher Black Diamond 250/1000
-
11
-
-
Hi everyone!
I bought my first computerized mount 2 months ago and since then I have been playing around with many of its features. Last weekend I tried to track the ISS to take some photos with my DSLR camera. I connected SynScan hand controller to Stelarium and pressed Ctrl+1 to start tracking, however, my telescope just aimed to the initial position of the object, it was not tracking it! This do not happen with other objetcts as C/2020 F3 NEOWISE, which I can track it correctly, so I think that the problem could be that ISS moves so fast that my mount cannot track it.
I know, it is not necessary to track the ISS for imaging, but this got my curiosity.
My setup: SkyWatcher Black Diamond 250/1000 EQ6R PRO
-
Hi!
I have been in this hobby for 2 years, but recently I was able to afford a nice equipment to start in astrophotography so... here I am, I hope we can learn all together!
Greetings from Albacete, Spain.
-
3
-


Star Adventurer 2i Sideral tracking issue
in Discussions - Mounts
Posted
I have just read the manual and you are right,it sets the direction of the tracking. I have tried the astrophotography option using App Mode and it tracks correctly in this way, I will try to update the firmware.