-
Posts
411 -
Joined
-
Last visited
Content Type
Profiles
Forums
Gallery
Events
Blogs
Posts posted by Jamgood
-
-
Ok thanks, that makes sense. That other image is confusing to me. (Too many circles) I'll give that a go in a short while and post results.
-
 1
1
-
-
This is where I'm very confused about what I'm looking at. The image above, I assume is looking through the focuser? So I need to move the image of my primary to the left? and round off that flat edge?
-
12 minutes ago, Pixies said:
Hi.
It looks great. Have you got the shot with the paper removed?
Don't try and tighten the centre screw - you make things secure by tightening up the 3 adjuster screws GENTLY. Be careful and don't go too far. I learnt the hard way - they can actually dig holes into the secondary holder and make rotation impossible.
It does look like there is a 'flat' edge on the mirror (top right in the above picture) - do you see what I mean? Now, your secondary is pretty large, so you aren't worrying about losing part of the image of the primary. I assume the focuser isn't fully in as there was no shadow of it in last night's images.
As per the article by Gary Seronik - as long as you have an image of the whole of the primary and it is correctly centred, that's all you need to worry about for visual astronomy. Any further improvement trying to get the secondary located EXACTLY won't provide any visual improvement. But as you are busy getting the secondary adjusted, you might as well get it as close as possible.
Here's a shot with the paper removed. I've left the yellow in as it makes it easier for me to see.
I haven't tightened the screw. I did a little turn earlier to bring the mirror up a bit but I loosened the 3 adjusters first. Nothing is tight, just finger tight. A little pinch.
I can see the flat edge. Is that a defect in the mirror or due to the rotation? It's hard to see in there. How it was set before, you could see that flat edge in a zoomed out star. I don't know if it will alter the image in any way.
I'm planning on using this scope mainly for photography, so I'm guessing I need to get it as bang on as possible. I'm close in the image below. Just needs some fine tuning, to my eye anyway.
-
-
11 minutes ago, Moonshane said:
Just to be clear on star tests, what you have above is a defocused image of the view. A star text is a slightly defocused star at high magnification. e.g. https://astunit.com/astunit_tutorial.php?topic=startest
Thank you. I'll have a good read of that.
-
13 hours ago, Pixies said:
I do have a suspicion that the secondary might need some more rotating to get it perfect. Looking at the shadow of the secondary, the offset isn't quite in line with the focuser.
You are right. It's not spot on yet but with some gentle tinkering, hopefully, I should be able to get it bang on. I have a Cheshire arriving from FLO tomorrow so that will help. Should have bough a collimation cap as well really.
Here's a star focus test from last night. I was decent enough for viewing. I'll have another go at it later and report back.
Thanks again for your help yesterday. Made everything nice and clear. 😀
-
Brilliant. Thank you. I shall give that a go and report back.
Thank you for all your help. Very clear and straight forward. 😀
-
 1
1
-
-
-
1 minute ago, Pixies said:
Yep - well done! You are better at this than me - and I like the teal/yellow ochre colour scheme too!
That's the first stage done. You won't have to do that again unless your are doing some maintenance.
Check the three secondary adjusters aren't slack. Also, remove the paper (don't touch the mirror). Now we can move on to the 2nd stage and adjust the tilt of the secondary and align it to the primary mirror. Your secondary is nice and large, so we don't have to be too exact. Just try your best to get the image of the primary concentric with the edge of the secondary and the focuser.
This is "Collimation Step 3" in the Astro baby guide. You adjust the 3 secondary adjusters by small amounts until the primary image is concentric (ignore the reflections in it for now).
You only need to make small adjustments, and be careful not to start tightening things up. For example: back off on adjuster 1/8th of a turn and tighten another by an 1/8th. Or - back off one by 1/8th of a turn and tighten the other 2 by 1/16th of a turn each. You are trying to tilt the base of the secondary mirror holder around the central screw, without tightening or loosening the whole shebang. You'll eventually see how the adjustments move the image of the primary.
Let us know when you think you have the secondary aligned.
Gotcha. This bit I've read about a lot. More confidence here.
I'll make you a thank you card in that colour scheme. 👍
-
Just now, bomberbaz said:
Next a picture through a cheshire or similar down the drawtube.
I don't have a cheshire yet. It's in the post.
-
-
-
The secondary mirror is starting to turn as I turn the screw now. I'm trying to correct it.
-
-
-
Yeah. Lefty Loosey. It doesn't feel like it wants to budge.
-
-
-
36 minutes ago, Pixies said:
HI. What is the 'cheshire' you made? Is it a collimation cap? If you are sure that the hole is completely central, that's good. We need to be certain that picture is dead centre of the focuser tube.
If yes to the above, it looks like the secondary is out. Can you re-do the Mire de Collimation circles, so that they are concentric with the focuser tube (the large black outer circle).
Hi Pixies. Thank you for your reply. I did indeed mean collimation cap, not cheshire. It's just a simple piece of cardboard to sit on the eyepiece hole. Nothing fancy. I believe it is as central as I could get it. I measured twice and cut once. I didn't want to go drilling a hole in the eyepiece cover just in case I'm sending this back.
Here's the edited image you asked for and the original.
-
Hi Guys & Gals.
I seriously need some help. I got my second 130PDS a couple of weeks ago (first one came damaged, not sure of this one!) and the weather being what it is in the UK, haven't had much of a play with it.
Having read loads of different info in on collimation, I'm now at the point where I'm more confused than when I started. In my amateur knowledge, I mistakenly used a laser collimator until I realised that that was drawing circles when I tried to collimate it. That is impossible to to get a centre beam and has quickly become an expensive toy for the cats.
So today I made a simple collimation cap, (edited) (I've ordered a proper one today) just to have a look at what is going on in there and this is what I see. (see attached photo) Does this look anything near right? Every photo I see shows the secondary in the centre of the focuser and the primary filling the secondary. Mine how looks nothing like what I can see anywhere, hence my confusion.
Last night I did a start focus test (See second photo) and the result was just plain strange and wonky. Nothing like I have seen or expected.
Can someone please give me a bit of advice on where to go from here.
Thanks in advance
J
Edit. Forgot to add. As things currently stand, I can get a pretty decent star in the centre of the image but all the other look like arrows pointing to the centre.
-
-
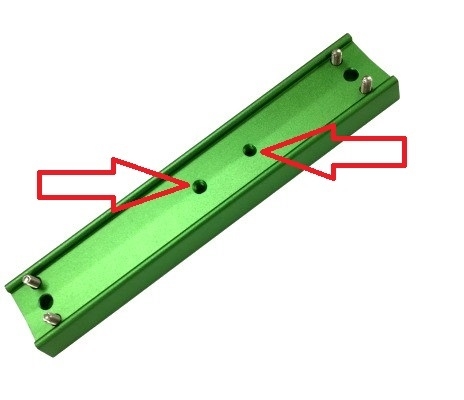
The threads in the centre of the dovetail bar (first picture) are definitely 1/4-20 UNC. I've used them to attach my camera to it.
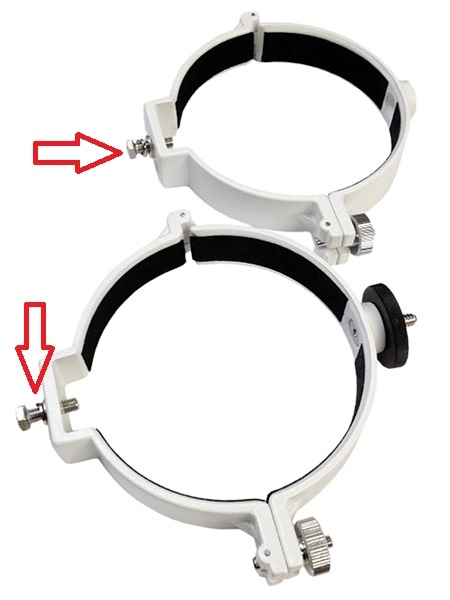
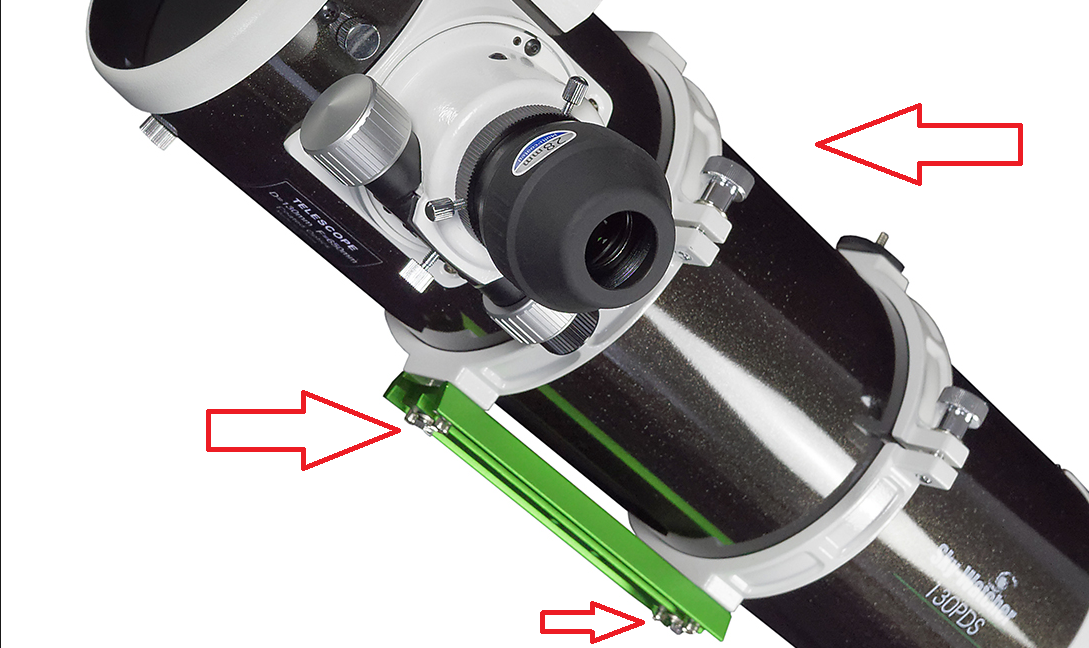
It's the bolts in the second image I'm concerned for. I'm not sure if they also are 1/4-20 UNC or M6. The holes at the end of the dovetail aren't threaded. I've emailed FLO, I'm sure they'll know the answer. Probably been asked a thousand times.
I don't have the scope at hand to try any bolts as the Scope I received today is boxed up ready to go back. (Damaged item) I just want to get the bolts ready for when the replacement arrives so I can attach the second dovetail.
Thanks for all the replies guys. Appreciated. If anyone knows the answer for sure, shout it out
-
Hi
Can someone tell me which bolts are needed to fit a second dovetail to the top of a Skywatcher 130PDS. I have a second dovetail which has 4 smaller Allen bolts in the ends but what size are the ones in the middle that attach the to the tube ring. From what I can fathom they are M6 bolts but I want to make sure I get the correct ones/size etc.
Hope the image helps explain it. TIA
-
17 minutes ago, Peter Drew said:
I'm usually quite relaxed about such things.
Me too but I wasn't sure on this one.


Sky Watcher 130PDS Collimation
in Getting Started General Help and Advice
Posted
I think I've progressively made it worse tonight. Right now my brain, my eyes and my back aches. Time to quit for today. If I carry on tonight the thing will probably end up in the bin!
I actually believe me and 130PDS are never destined to get along. First one I ordered never made it as it was damaged in store. Second came to and was damaged and this one. ARRRRGGGGHHHH!!!! I should've just bought a lens for my camera.