


Chriske
-
Posts
1,419 -
Joined
-
Last visited
-
Days Won
1
Content Type
Profiles
Forums
Gallery
Events
Blogs
Posts posted by Chriske
-
-
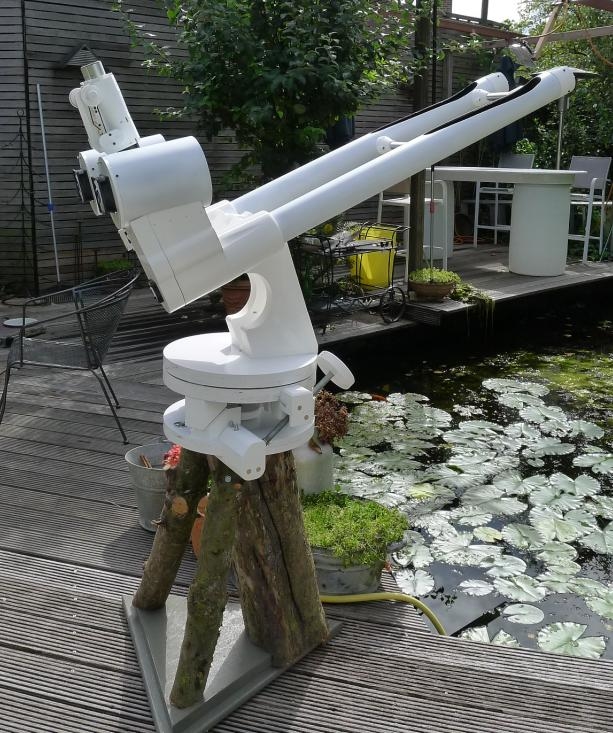
This is my latest 'boxmount' it differs a lot compared to my original design. It action is very smooth btw.
Needles to say, the tripod is very sturdy..:-))For those who are not familiar with the boxmount ; lots of drawings and pictures on this page.
There are lots of (white)printed parts involved btw
-
 3
3
-
-
The idea btw is not mine. I read about it in 'Astronomy' magazine(late '70, if I'm not mistaken).
Prof Greame White(Univ. Australia) suggested that a mount like that 'Boxmount' could solve many problems. He actually never built one himself. In that article were he wrote about his idea, he added a drawing. Noting more then a few lines, not even a real drawing in fact. I immediately started building 'my' version of 'his' Boxmount and wrote a letter + a few pictures of that built and sent it to Mr White. The man had asked in that same article to sent him the result and possibly pictures of his idea, 'to see whether his idea could be build and would do the job' if someone should build that mount.
The man was very pleased with my letter and told me to send that same message to Sky&Telescope.
After that first built lots of amateurs did copy that build and even improved it. Some amateurs did built a 'nested' boxmount.
Anyway, I still use boxmounts for larger telescopes. The Boxmounts I build nowadays are about 15 to 20 cm high, depending on the version.
And yes I always install a pneumatic lift arm assist system to compensate for the weight of the dob it'll support.Leave as is Alex, no need to edit that post.
So in the end, credit should go to Mr White also. He's the one with that 'silly' idea to mount a telescope on top of a wooden box with a hinge, to track the stars...😂 -
1 hour ago, Peter Drew said:
I have built several using Skywatcher 150mm F8 and F5 objectives and never had a problem with mismatched focal lengths. 🙂
Do you have pictures of these bino's..?
-
Yet again as always, I plan to add a IPD unit starting from 55 to 70mm
-
Nice...!!!
Thanks Peter...!...
-
I could do that John , but there's an additional problem.
A need in fact two of these lenses. And on top of that they need to have exactly the same focal length.
Now you surely know what I'm planning to do with these lenses...😉-
 1
1
-
-
Thanks John, but I don't think these people are selling in my budget range...😳
-
1
-
-
All these links, they’re all mine.
But absolutely out of date. -
Hi,
Does anyone know a good source to buy a 150mm achromat, airspaced.
I already found this one, is not to expensive.
Thanks
-
To be clear :
The name of that file has been changed.
The drawing is mine.
The mount as is, is my idea.
I made a couple of these mount, I call these mounts Boxmount.
Published an article in Sky&Telescope in 1983(if I remember well).
A variant of that mount I did use again to mount my Bino-Kutter I made last year(posted here on SGL).
Posted that boxmount on CN years ago.
And yes it would be most polite to mention the source/original poster where ever it has been posted before. -
AlexK,
Do you have permission to post this image.
And if so why not post the creator of this mount's name...? -
There are lots of printed objects in our garden. The first object I started to 'expose' to the sun was as early as 2013. No deterioration so far. The very first objects I printed using PLA, in different colours btw, exposed to the elements I stored them in a black open container. The idea was to see what would happen with these objects in that kind of environment. The coloured objects de-coloured after a few years, but still are very strong. These objects are wheels for model trains (Gauge1).
I buy my PLA here, maybe you could buy from them and test for yourself...
What's more, I do buy their 'Economy PLA', so nothing fancy.
Test it and we'll talk again in a few years...😉Before and after lots of sun. Not perfect prints, I know. But nowadays I would do better...😃
And 212 of these wheels were needed for this project. All 50 carriages were also printed in PLA. Each carriage weigh 14gram.
-
2
-
-
Yep...😉
-
This is one of my many projects printed in white PLA.
As I said before there are some metal parts involved in this binocular, as in all my other projects.
Length of this bino about 1.2m.
Pay attention to the special tripod...😁-
2
-
-
What about this test I did years ago now. Different materials. nGen, ABS, PLA.
FYI the white ring is PLA. All these rings are very thin and hollow. Diameter about 150mm.
These rings hung for a almost a full year in my garden in full sun all day long. During that year there was even a heatwave..!
On each ring a weight of 1kg.
Winner of this 'contest'. White PLA.
Don't believe it : just try it for yourself.
Do not print PLA objects to be used in your car, not even white PLA. That will not work. It's a completely different story.I have different objects in my garden, all printed in PLA-white. Yet again a new project will be installed in my garden next week. A set of covers is ready to be installed on top of thin aluminium poles around our garden. Purpose is to screw insulators in these covers. These insulators will lead electric wires around are garden. These covers, again printed in PLA... WHITE PLA...! No other colour will survive the backing heat of the sun.
Because there was hardly deformation I filled the bottles up to 1 litre instead of 0.5 litre
And at the end of the summer the white ring hardly deformed. To be clear, when removing the weight it jumped almost back to it's original shape. The other three did not...!
And yes I know, when I would have chosen white ABS and white nGen the result would have been different. But I wanted to make a point here : To be safe, use white filament for outside projects.
-
1
-
-
In the past I've printed a few telescopes. The first one was a 10" Dob, the second was small Kutter, next a Cass, in fact a Gregorian, and the last one I've built is a large Bino-Kutter. There are all posted on this forum.
Many people looking at these scope during open door do frown, making remarks, questioning the stability, strength, etc of these printed scopes.
After explaining and have a closer look, almost all visitors do agree these 'plastic' telescope will work.
All the printed scopes I made so fare are not 100% fully printed of course. There's always a metal frame(aluminium) to start with. That 'frame' makes the base on which I start adding printed parts. I never allow a printed part to support the scope. I also never allow printed parts ending up stressed, meaning, not one single parts will have to deal with tension. That is my golden rule.
Respect that rule, and you can build whatever you possibly can think of.
These scopes I made, it's always a well thought over concept, a combination of different materials, ending up with a very sturdy telescope.
And there are two more rules you need to take into account :1- N-e-v-e-r draw/print slim-line parts. Slim-line parts look very nice, but that's all you can say about them.
2- Using a telescope in the heat of the sun, ALWAYS print your parts pristine white, even PLA..!-
3
-
-
I use PLA all the time to make outdoor projects.
BUT exclusively white because it reflects the heat of the sun. Some of these projects stay outside all day long, winter/summer.
And no, it does not degrade or deform at all during these very hot summers/heat wave. Some of these projects are already seven years old.
Still, PLA cannot be used for projects inside your car. They will deform when the inside of your car get to hot during a heat wave. -
Printingspeed does not affect layer-bonding at all -- as long as you're raising print temp. together with speed. + partscooling. For partscooling I use a 50mm radial fan. In the near future I'll even use a 70mm radial partscooling fan to be used when printing with even larger nozzles then 1.5mm.
I do print at 100+mm/s using print temp of 245 and even 255°C(PLA). To do this I use a Volcano hotend. With short 'standard' hotends this would not be possible at all.
Using a 1.5mm nozzle I need to lower the speed to about 50-60mm/s. And I can assure you, my parts have all perfect layer bonds.-
1
-
-
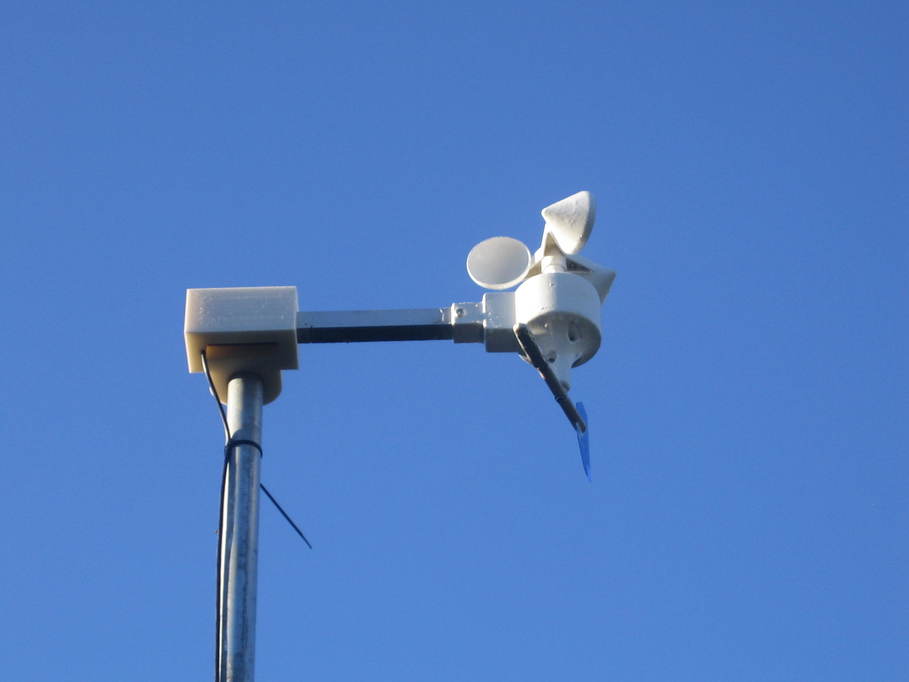
On 21/10/2020 at 23:12, JamesF said:
I printed a PLA mounting for the anemometer and wind vane of my weather station that has been outside since December and it's still looking fine. It is a bit "over-engineered" perhaps, but I really wasn't sure how strong it needed to be. It's not solid: 30% infill, as far as I recall.
James
As long as you print in white colour there's nothing that will happen with these parts, even in PLA. Sunrays are reflected and do not warm up the parts at all.
Good job..! -
Using a bigger nozzle, say 2.5mm this could be printed in one go as 'SpiralVase'.
I actually do have a nozzle that size, and the printer that goes with it is almost finished.
Did a simulation and ended up with a printing time of 19 minutes using a layer height of a whopping 1.8mm.
Using a layer height of 'only' 1mm, printing-time raises to about 34m...😳😃
Cost 2.86€. -
How thick is the wall btw..?
-
I see now you're using 0.2 layer hight, why not 0.3..(0.4mm nozzle I presume)?
Also try higher speed, most of the time I'll go to about 100mm/s
Remove infill, and replace it with extra perimeters, way faster. -
Oops, there must be another way...
-
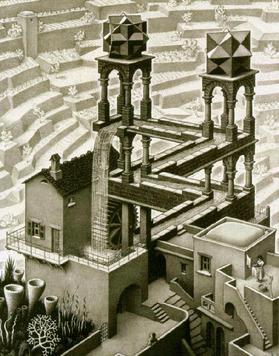
14 minutes ago, MrFreeze said:
If only that were true :
Print that!
Sorry - couldn't resist.
David
No problem at all. The only thing that will be difficult is the railing around the house : to thin.
But this is not a real situation, it is an optical illusion, so this one doesn't count and is not feasible indeed, sorry David...;-)


Equatorial Platform - New Build
in DIY Astronomer
Posted
But I think it"s time to leave this thread. Although it is a eq. platform, it has nothing to do with the original post.
Sorry Neil...🥴