


Stub Mandrel
-
Posts
10,662 -
Joined
-
Last visited
-
Days Won
32
Content Type
Profiles
Forums
Gallery
Events
Blogs
Posts posted by Stub Mandrel
-
-
I'm usually sceptical of these things, but the Orrery looks quite impressive, to be honest.
-
True confession, I had a 2" reflector. Managed to find the moon and either Jupiter or Mars and got very frustrated at how fast they disappeared.
Saw PM on telly saying don't bother with anything less than 3", so I didn't, I just used to see if I could make out cars across the Bristol channel on Weston seafront and even use it as a 'bazooka' from time to time.
Will have to see if it is still in my dad's loft...
-
 1
1
-
-
This was my first one, M42 - surprise surprise! Just done with a bridge camera:
 And my first DSO with a scope - M57:
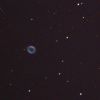
-
2
-
-
OK this is probably done in far too much of a hurry but here's my previous best M27:
 And here's a quick try at LRGB (combining 20 30s pictures from three nights worth, having deleted more than that number of ones with star trailing). The L layer is just a monochrome conversion of the stacked but unprocessed 48-bit RGB, the RGB is processed by splitting into the three layers and adjusting for best contrast on each one. Recombined there was a strong magenta cast, corrected by shifting colour balance towards green.
 Still not sure what I'm doing or how to highlight the red outer 'shell' without giving a red cast to the background. Somewhat hampered by lack of flats. Might have done better by upping yellow instead of shifting towards green, so I didn't kill the red?
-
1
-
-
I'm going to go back to some of my RAWs and give this a try.
-
1
-
-
When I split an RGB of the dumbell nebula, the G & B layers showed much better detail than the red layer, but boosting them just turned the red bits grey :-(
It's hard stuff this image processing!
-
1
-
-
Here are a couple of charts that may help. Try opening them and splitting them into LAB RGB or CMYK and see how different the splits are!
Desaturating them before you do the split may also help understand the role of the different channels.
RGB:
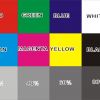 CMYK
CMYK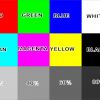 It's also interesting how (on my monitor at least) the CMYK (not the RGB) version seems to have the colours more as I would expect to see them.There's also a LAB - where L is lightness, A is green (-) to red (+) and B is yellow to blue, but tyeh system won't let me upload a TIFF version (you can't save a LAB jpg)(I'm only pretending to understand this, you know...)
-
2
-
-
> This excellent mirror, now located in the Centre of the Universe, was replaced by a ceramic mirror that was affected less by temperature changes.
I'm curious as to why such a mirror would be 'archived'. I would have thought a university somewhere would snap it up - half the cost of a big observatory must be the mirror!
<edit> Ah! I see it is still (just) in use - once the second largest in the world, glass made in Germany, ground three times in Pittsburgh (partly due to the 'mystery scratch' incident!)
https://en.wikipedia.org/wiki/Dominion_Astrophysical_Observatory#Centre_of_the_Universe
-
1
-
-
The professional mirror makers features in an old video posted recently were using polishing machines made entirely out of wood! The laps appeared to be wooden too.
One interesting bit shows them using two laps of different sizes at different diameters.
-
1
-
-
It's easiest to clamp a calliper if you haven't got a drill that will touch it. For the modest forces here you could even epoxy it in place, then when you are done, peel it off.
If you want an accurate but cheap way to move anything, get a long M6 screw ('bolt') and force it into the central hole of a plastic 'fixit block'. The block can be attached to anything and the screw used to move it in and out quite accurately. The pitch of the screw is 1mm so a knob or dial attached to it with 40 divisions will move it almost exactly 1 thou per division or 50 divisions will move it 0.02mm. You can use an allen key superglued or epoxied into a cap head screw and the key acts as a 'pointer' that is easily aligned with a printed off dial 50-100mm in diameter.
The reason for using the fixit block instead of a nut is you will get zero backlash.
-
1
-
-
It might be worth using a cheap digital calliper instead of a micrometer head to measure movement.
-
1
-
-
Is there a difference in that most cameras have a much bigger aperture than the eye's pupil?
-
Looks like a quarter to a third of the 'hill' gone to my eyes?
I'm already getting nervous, don't know what you must be like!
-
1
-
-
It might be the file type. Try converting to JPG if it's something else.
-
From the sublime to the ... ? Seems to work quite well with standard issue Skywatcher EPs instead of the supplied ones.
It was good enough to get me to want a bigger scope but that's a newt...
-
1
-
-
That video would have made a fine 'interlude' back in the day.
-
1
-
-
Exciting times!
-
1
-
-
Try some buttercups, you may need to stop down but the UV pattern should be quite striking.
-
If it gets you where you want to be, it's the right decision.
-
1
-
-
Now don't let's be hasty. Think of all teh hard work you need to put in, wouldn't you be better off binning it? I can provide a suitable bin....
-
Afraid I jumped to the end at page 17, sort of glad I did...
I wear glasses and find that the anti-scratch coating crazes terribly after 18-months or so. I ruined one pair trying to buff it off with a dremel, but for the pair I'm wearing now I used 'armor-etch' a flouride based glass etching cream. Obviously no use on glass, but it may be useful for removing mineralized/inorganic coatings on non-glass substrates.
YMMV
Neil
-
You've pretty much sorted out the edges and in doing so left a lump in the middle?
I know absolutely zilch about this but it seems like progress to me! The very regular shape of the 'hill' suggests to me that you must be working pretty symmetrically which is surely half the battle?
This makes scraping a surface plate seem like child's play!
Hang on in there.
-
1
-
-
Ahem, that's a lizard...
Why is that telescope so small? Because it is my newt.
> I've already got my coat on......
I'll join you.
-
3
-
-

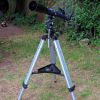
Moderators - please delete if felt inappropriate, but I guess most people here already know what a Skywatcher 150PL looks like...
-
15
-

Build a solar system magazine
in The Astro Lounge
Posted
There's another thread on this (which looks better than many such things) and it includes a link to the manufacturers although the price is similar without the magazines!