


hdutton
-
Posts
68 -
Joined
-
Last visited
Content Type
Profiles
Forums
Gallery
Events
Blogs
Posts posted by hdutton
-
-
That looks good, are you ok with me placing it on GitHub?
Do you want a "cloudiness" indication in the ASCOM driver based on temperatures as described in this file?
-
Indeed the Sequence program that works a bit different, it changes status first when i activate a imaging plan, so it seems to be working after all.
I will post a comment to perhaps change this in the upcoming version of Sequence, that it changes status even when a plan is not active.
Does the driver send commands to the sequence programs or is the Sequence programs requesting status?
/Daniel
That's good to know, thanks for hunting down the problem. It's the sequence program that requests the status through the ASCOM driver's IsSafe() property.
I've started adding the rain sensor threshold setting support to the driver, still a few odds and ends to tie up though. Busy working around the house over the weekend, soon.
Take it easy,
Howard
-
Not quite (bad at explaining)
When i first open up my sequence program, i choose your ASCOM driver and check the settings in the dialog, all values are correct (higher delta than 21 degrees and not raining) - Is Safe, i then press ok and closes ASCOM chooser box.
The sequence program indicates Safe - everything is in order.
I then open up the ASCOM chooser and setup dialog and maybe here is what is wrong (that i am opening it again) - when i do this, i cannot see the values in the setup dialog from the Hardware, it display N/A at all values.
This is what i came up with during som more tests;
Assumed sensor values (can't check them) Sequence programDry - Safe, i than applied water (read next line)Rain - Still reports SafeDelta lower than 21 - Not Safe, i than applied heat to the sensor making it (next line)Delta higher than 21 - Still reports Not safe, even after 10minutes with heat present to make a high deltaIn conclusion;Applied water before choosing ASCOM driver, opened setup dialog, that said Not safe,pressed ok and now the sequence program sais Not OK - as it shouldI than dried off the rain sensor, the sequence program still sais Not ok. I cannot now open the setup dialog because itcan't display the values (N/A)I don´t know if it is the sequence program that is not updating the values or the driver :// D
Wish I could test this "sequence" software here. Below is how I expect this to work...
Open the sequence software, open the ASCOM Safety Monitor chooser.
Select my ASCOM driver, select [Configure], my setup dialog opens, set the serial port, see that the readings are ok and all is working.
Then, select [Ok] in setup dialog. Then, select [Ok] in the chooser. Then, select [Connect] in the sequence software.
The sequence software should then connect and start polling the IsSafe() function which talks to the Arduino and returns true or false.
Disconnect manually or, normally, automatically on exit from sequence software (which closes the port.)
The ASCOM install has a "Device Connection Tester" that's able to do all of the above instead of the sequence software. This is what I've been testing on.
Howard
-
Sorry,, forgot to specify, the setup dialog sais raining and declares a "Not safe" but my sequence program does not get updated with "not safe" but instead sais OK.
The firmware seems to work because the setup dialog box gets updated as it should, it semms to be the communication between the driver and my sequence program...
That info from the link is spot on, exactly what i was looking for, nice seeing also :-D
I've actually measured 0,9 Arcseconds in my hometown once :-)
/Daniel
So... you select my ASCOM driver in the sequence program, connect to my ASCOM driver (setup dialog not open,) and the sequence program only indicates safe when the rain sensor is set to wet?
Does the sequence program indicate un-safe if the cloud sensor exceeds the threshold?
-
Meanwhile searching for realiable sources of cloud temp etc. i have tested the rain sensor a bit more, it seems that it is far less sensitive that is has to be.
- When placing one droplet of water on the sensor, it reports damp, that is fine, but even after seven drops of water it reports "Damp", I woul'd rather have it report "Raining" after fewer drops. Parhaps one could implement a sensitivity slider for the rain sensor as well?
- Even when the driver sais "Raining", the safety monitor reports OK... I do not know if this has to do with my Sequence program or if there is som miss-comminucation with the driver though :/
/Daniel
Testing the driver/firmware Rain detection:
I forced the value returned by :GR# command to both 1 and 3 and all functions in the ASCOM driver and it's setup dialog worked as expected. Not sure what's going wrong for you. The "driver" is ? the ASCOM driver setup dialog? The ASCOM driver IsSafe() function? The Firmware?
I'll add a slider for the min/maxSensitivity and change the :GR# command to return the value read from the Analog pin. It'll be a day or two.
Howard
- When placing one droplet of water on the sensor, it reports damp, that is fine, but even after seven drops of water it reports "Damp", I woul'd rather have it report "Raining" after fewer drops. Parhaps one could implement a sensitivity slider for the rain sensor as well?
-
Yea i think so too.
All seems to work pretty good, except one thing, if i choose the right driver and sets the right properties, press ok, it runs good.
But if i open up the "choose ascot driver" dialog and choose CloudSensorEvoPlus - properties, it is as it can't read the values. But if i close down the dialog box, it seems that my sequence program keeps on getting "SafeMon: OK".
You can't configure/access properties while it's connected too, each mode of operation takes over the serial port so the other can't access it at the same time. I'm not even sure it's a good idea to overcome this behaviour.
I think your one reading every two seconds is a good estimate.
Did you see this? Somewhat dated but some useful info:
http://www.atnf.csiro.au/pasa/15_3/clay/paper.pdf
Howard
-
Think it'll be ok...
abs(ds18b20_celsius - MLX90614_celsius);
abs(-20 - (-50))
abs(-20 + 50)
delta_celsius = abs(30) = 30
if <=21 is cloudy, than it's not cloudy
-
Keep us posted on your testing and how it works for you. Take care, Howard
-
Here's what (I think) you need. It's on GitHub now. Remember to get the latest Command.ino too, otherwise my ASCOM driver can't correctly read the "avg_delta_celsius" value.
/*** This sketch reads three sensors:* DS18B20 - Connected to D10* MLX90614 - Connected to SCL-A5, SDA-A4* Rain sensor conected to A0* It calculates the temperatures (DS18B20 and MLX90614)* DS18B20: http://playground.arduino.cc/Learning/OneWire* MLX90614: http://bildr.org/2011/02/mlx90614-arduino/*/#define DEBUG_MODE_OFF#ifdef DEBUG_MODE_OFF//get it here: http://www.pjrc.com/teensy/td_libs_OneWire.html#include <OneWire.h>//get it here: http://jump.to/fleury#include <i2cmaster.h>#include <SPI.h>#endif// lowest and highest rain sensor readings:const int sensorMin = 0; // sensor minimumconst int sensorMax = 1024; // sensor maximum// misc#define FirmwareName "CloudSensorEvoPlus"#define FirmwareNumber "0.1"#define invalid -999#define CHKSUM0_OFF// last rain sensor readingint rainSensorReading = invalid;// last cloud sensor readingfloat ds18b20_celsius = invalid;float MLX90614_celsius = invalid;float delta_celsius = invalid;float avg_delta_celsius = 21.5;#ifdef DEBUG_MODE_OFFOneWire ds(10); // DS18B20 on Arduino pin 10#endifbyte ds18b20_addr[8];void setup(void) { Serial.begin(9600); init_DS18B20(); init_MLX90614();}void init_DS18B20(){// Serial.println("Initializing DS18B20 sensor...");#ifdef DEBUG_MODE_OFF while( !ds.search(ds18b20_addr)) { ds.reset_search(); delay(250); }#endif}void init_MLX90614(){// Serial.println("Initializing MLX90614 sensor...");#ifdef DEBUG_MODE_OFF i2c_init(); //Initialise the i2c bus#endif // PORTC = (1 << PORTC4) | (1 << PORTC5);//enable pullups if you use 5V sensors and don't have external pullups in the circuit}long last = 0;void loop(void) { long now=millis(); // gather data from sensors once a second if ((now%1000==0) && (last!=now)) { last=now; // blocks calling more than once during the same ms // Cloud sensor ------------------------------------------------------------ // it might be a good idea to add some error checking and force the values to invalid if something is wrong #ifdef DEBUG_MODE_OFF ds18b20_celsius = read_DS18B20(); MLX90614_celsius = read_MLX90614(); delta_celsius = abs(ds18b20_celsius - MLX90614_celsius); avg_delta_celsius = ((avg_delta_celsius*299.0) + delta_celsius)/300.0; #endif // End cloud sensor // Rain sensor ------------------------------------------------------------- // it might be a good idea to add some error checking and force the values to invalid if something is wrong // read the sensor on analog A0: int sensorReading = analogRead(A0); // map the sensor range (four options): // ex: 'long int map(long int, long int, long int, long int, long int)' rainSensorReading = map(sensorReading, sensorMin, sensorMax, 0, 3); // End rain sensor } processCommands();}#ifdef DEBUG_MODE_OFFfloat read_DS18B20(){ byte i; byte present = 0; byte type_s; byte data[12]; float celsius; if (OneWire::crc8(ds18b20_addr, 7) != ds18b20_addr[7]) { Serial.println("CRC is not valid!"); return -300.0f; } // the first ROM byte indicates which chip switch (ds18b20_addr[0]) { case 0x10: type_s = 1; break; case 0x28: type_s = 0; break; case 0x22: type_s = 0; break; default: return -301.0f; } ds.reset(); ds.select(ds18b20_addr); ds.write(0x44, 1); // start conversion, with parasite power on at the end delay(1000); // maybe 750ms is enough, maybe not // we might do a ds.depower() here, but the reset will take care of it. present = ds.reset(); ds.select(ds18b20_addr); ds.write(0xBE); // Read Scratchpad //read 9 data bytes for ( i = 0; i < 9; i++) { data[i] = ds.read(); } // Convert the data to actual temperature int16_t raw = (data[1] << 8) | data[0]; if (type_s) { raw = raw << 3; // 9 bit resolution default if (data[7] == 0x10) { // "count remain" gives full 12 bit resolution raw = (raw & 0xFFF0) + 12 - data[6]; } } else { byte cfg = (data[4] & 0x60); // at lower res, the low bits are undefined, so let's zero them if (cfg == 0x00) raw = raw & ~7; // 9 bit resolution, 93.75 ms else if (cfg == 0x20) raw = raw & ~3; // 10 bit res, 187.5 ms else if (cfg == 0x40) raw = raw & ~1; // 11 bit res, 375 ms //// default is 12 bit resolution, 750 ms conversion time } celsius = (float)raw / 16.0; return celsius;}float read_MLX90614(){ int dev = 0x5A<<1; int data_low = 0; int data_high = 0; int pec = 0; i2c_start_wait(dev+I2C_WRITE); i2c_write(0x07); // read i2c_rep_start(dev+I2C_READ); data_low = i2c_readAck(); //Read 1 byte and then send ack data_high = i2c_readAck(); //Read 1 byte and then send ack pec = i2c_readNak(); i2c_stop(); //This converts high and low bytes together and processes temperature, MSB is a error bit and is ignored for temps double tempFactor = 0.02; // 0.02 degrees per LSB (measurement resolution of the MLX90614) double tempData = 0x0000; // zero out the data int frac; // data past the decimal point // This masks off the error bit of the high byte, then moves it left 8 bits and adds the low byte. tempData = (double)(((data_high & 0x007F) << 8) + data_low); tempData = (tempData * tempFactor)-0.01; float celcius = tempData - 273.15; return celcius;}#endif
IsSafe in the ASCOM Driver is implemented as follows:
public bool IsSafe { get { if (!IsConnected) { tl.LogMessage("IsSafe Get", "false (not connected)"); return false; } string reply = CommandString(":GS#", true); double cloud=Convert.ToDouble(reply, CultureInfo.GetCultureInfo("en-us")); reply = CommandString(":GR#", true); int rain = Convert.ToInt16(reply, CultureInfo.GetCultureInfo("en-us")); if ((rain <= 0) || (cloud < -200)) { tl.LogMessage("IsSafe Get", "false (rain or cloud value invalid)"); return false; } if ((rain == 1) || (cloud <= threshold)) { tl.LogMessage("IsSafe Get", "false (rain or cloud threshold exceeded)"); return false; } tl.LogMessage("IsSafe Get", "true"); return true; } } -
Is perhaps to CPU heavy to use a float?
No the Arduino is plenty fast.
i am currently modifying your CloudSensorEvoPlus.ino instead of mine code, but i am out on deep water here, a lot of new type of coding for me

Good
I will experiment with 15 average readings instead of 300 to speed it up a bit.
Not a bad idea
I put the average formula at the top-ish but i do not understand where the print is...
Not the whole formula, just declare the variable and assign a value. This is already done on my current GitHub firmware.
So you just need to leave the formula where it was, right after delta_celsius is calculated, it should look like:
avg_delta_celsius = (avg_delta_celsius*14.0+delta_celsius)/15.0;
The Command.ino file has a function named processCommands() which gets called over and over again in your main loop. It takes input from the serial port, waits for an entire command to arrive, and then processes it (which often leads to a print.)
-
Ok an updated driver is on my GitHub
-
I have the driver's serial timeout at 1 second, works fine here, but a bet the sensors hold things up the way your firmware is designed. I've changed the driver serial timeout to 3 seconds. Also added a way to control the threshold. Will upload soon.
Also be sure to update your firmware.
-
You need to declare the "avg_delta_celsius" up near the start of the program, so that it persists and the value isn't thrown away over and over (so accumulates the average.)
Probably want to assign it a starting value to get it into the expected range too.
I don't really understand the purpose of this line:
delta_celsius = abs(ds18b20_celsius - MLX90614_celsius);
I just read that the MLX's returns the "object" temperature - it already knows the ambient temperature and calculates it in. Which is unlike someone trying to use a peliter (thermopile)
type sensor who needs to know the ambient temperature to find the true temperature (and even then, I'd think that one would simply add the two measurements.)
Reading up on this... I see that it is the delta (between the ambient and sky temperature) that is used, that code looks good carry on!
-
The ASCOM driver is up on GitHub https://github.com/hjd1964/CloudSensorEvoPlus, let me know if it works for you.
-
You need to declare the "avg_delta_celsius" up near the start of the program, so that it persists and the value isn't thrown away over and over (so accumulates the average.)
Probably want to assign it a starting value to get it into the expected range too.
I don't really understand the purpose of this line:
delta_celsius = abs(ds18b20_celsius - MLX90614_celsius);
I just read that the MLX's returns the "object" temperature - it already knows the ambient temperature and calculates it in. Which is unlike someone trying to use a peliter (thermopile)
type sensor who needs to know the ambient temperature to find the true temperature (and even then, I'd think that one would simply add the two measurements.)
-
That should be a float.
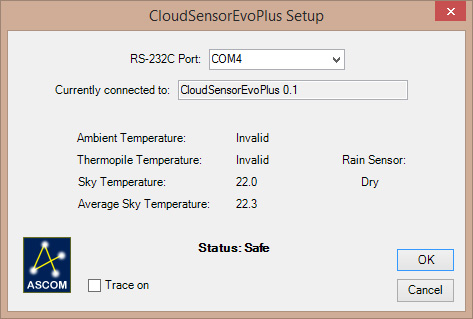
I added some monitoring code to the setup dialog so you can debug and reporting of that new average you're working on. I'll throw together an installer tomorrow and give you a copy.
Here's what the setup dialog looks like now, this was live, connected to an Arduino Mega2560:
-
Daniel,
And enjoy the clear skies!
Howard
-
I loaded the new firmware, but when i try to compile, it get this;
CloudSensorEvoPlus.ino: In function 'void loop()':
CloudSensorEvoPlus:110: error: 'processCommands' was not declared in this scopeDo i have to run it together with the driver?---------------The compiler can't find the processCommands function, which is in the Command.ino file. This file needs be in the same directory as the CloudSensorEvoPlus.ino file and should then be automatically found. You might need to close and re-open the Arduino environment for it to be recognized though. -
... actually I'd make that:
avg_delta_celsius=(avg_delta_celsius*299.0+delta_celsius)/300.0;
Why do I never see these things until after I post?

-
Hmm, I am stuck in my coding, the problem is that i want to take continuous readings from the MLX90614 (ir/cloud sensor) and want to know the value for debugging etc. BUT to be able to average the calculations between the IR-sensor and the temp sensor (not the actual readings from the sensors) i have to take for instance 300 calculations (1 calculation per second is 5 minutes) This is to not trigger the roof being closed as soon a small little cirrus cloud sweeps pass, but if there is cloud adding up for about 5 minutes...
I don't know how to write this code...
excuse my bad english... hard to explain but i hope you get a hang of what i mean.
I don't want to average readings but the calculation below;
delta_celsius = abs(ds18b20_celsius - MLX90614_celsius)
and then print out the result, something like this (horrible code, but i think you know what i mean;
Serial.print("Ascom Safety monitor status: "); if ((delta_celsius 300/300 >21 ) && (range>1)) // 300 calculations divided by 300 to get the average { Serial.println("IsSafe");If the sensor is read 1 time a second (or is it just the serial.print that is once a second?)
It does sound like you want to average the delta (sky temperature) readings over a period of time.
You could do either a true average or a moving average... the true average is memory and processor intensive. The moving average much is easier and lighter weight:
avg_delta_celsius=(avg_delta_celsius*300.0+delta_celsius)/300.0;
This way, the current measurement only contributes 1/300th of the average, you'll need to experiment with exact values to get the behaviour you want.
-
Don't worry, I have an automated observatory and cloud sensor hardware in the works here too... I'll need something very similar to this one of these days.
The modified firmware is here:
https://github.com/hjd1964/CloudSensorEvoPlus
Let me know if it works, note that the serial interface is set for 9600baud.
Commands must be sent to see the sensor values. The Arduino serial monitor works fine for this.
:IN#
Firmware version
:IP#
Firmware name
:G1#
Get first temperature
:G2#
Get 2nd temperature
:G3#
Get differental
:GR#
Get rain sensor
-
I'll look that over in a little while... kind of burned out now. I have a working ASCOM safety monitor (in C#) talking to a modified version of your firmware....
That <i2cmaster.h> library is very squirmy. Naturally, I can't really test the hardware attached and had to fake the readings from sensors.
Do you want me to add this stuff to my GitHub for easy download and collaboration?
-
So... you're ok with nothing else connecting to the Arduino, just my ASCOM driver.
First thing I'd do is change the firmware over to a command/response system so the ASCOM driver and your firmware can have a simple conversation to hand the data over.
Howard
-
I've done a bunch of ASCOM drivers over the years, and on the surface this one seems trivila to implement.
Perhaps I'm missing something...
Do you really you just want to just connect to an Arduino over its USB/serial interface, ask for the cloud sensor/rain-sensor data, get the reply, make a decision based on a few user configurable thresholds, then set IsSafe() to return true/false? If you need nothing else talking to the device (at the same time) it should be easy.

DIY cloud and rain sensor with ascom support?
in DIY Astronomer
Posted
The updated ASCOM driver and firmware is on GitHub, I also added your readme. The firmware needed to be updated since a new command (:Gr#) was added to return the rain sensor reading (as a floating point value between 0.0 to 1.0) Let me know if it works alright.
Howard