


Jules Tohpipi
-
Posts
194 -
Joined
-
Last visited
Content Type
Profiles
Forums
Gallery
Events
Blogs
Posts posted by Jules Tohpipi
-
-
On 26/11/2023 at 16:56, jjohnson3803 said:
Possibly covered somewhere above, but:
If I took a GTi outside, leveled it, pointed it to a random star, and hit sidereal tracking on the app, will it track the target? In other words, is any kind of alignment aside from leveling the tripod necessary to use sidereal tracking?
I ask because I'm more interested in an altaz version of a tracking mount and less interested in goto capabilities right now.
Just to be 100% clear, you can use the ‘Point and Track’ feature in the app to achieve this. It is not necessary to perform any alignment nor point the scope north and horizontal to begin with. The only requirement is that mount must be levelled.
From page 15 of the SynScan manual (link at the bottom):
To perform Point And Track, ensure that the mount tripod is level, as indicated by its bubble level. Next, choose the object to track from the catalog and select Point And Track. If you then manually (motor- driven and/or push-to) center the object in the telescope field of view, the mount will keep it there.
https://inter-static.skywatcher.com/downloads/synscan_app_manual_en_20201008.pdf
-
 1
1
-
 1
1
-
-
Thank you Lee that's incredibly helpful - especially with the photos
")
I've got some 3/8" adapters lying around already. So I'll double check the slot width on the WO dovetail bar and can now go from there.
-
1
-
-
7 hours ago, AstroNebulee said:
Hi
Your ED80 will be to much really for the az gti in eq mode, along with the length aswell as the weight. The 127 mak would be ok but with the focal length with the zwo 120 attached wouldn't be worth it for dso imaging. Best stick to az mode for the 127 and do planetary and lunar imaging with your zwo120.
I don't think you include the cw when working out the payload capacity of the mount.
Though I happily run a sw 72ed with zwo asi294mc pro for imaging, zwo asi120mc-s and guidescope, with asiair pro for imaging. This is slightly over the 5kg but I can guide at around 0.7 rms. All on a sw 1.75inch steel tripod as this makes it much studier.
Lee

Was admiring your setup and got the most minor and daftest of questions please! The bolt that holds your AZ-GTi onto the black dovetail, what size and style is that? And where did you get it from?
Background being I've got an AZ-GTi currently running in AZ mode on the steel tripod with extension pillar - same as yourself. I've bought the bits to try EQ now. A WO wedge, WO dovetail (looks fairly similar to your black dovetail) and a counterweight and bar. However, of all the things to be stumped on, struggling on being certain about what very shallow fixing bolt to go through the dovetail to the 3/8" socket on the mount. 🙃
-
1
-
-
2 minutes ago, badhex said:
Yes! Actually, it's barely been run. I bought it just before I moved countries, so it has sat unused for 8 years. It will only be used as a lightweight file server so should still have a few years left in it!
Excellent! Mine has been used everyday since buying during that mega cash back deal they ran. I also run it mostly as a simple file server/back up. Just wanted it to work with as little intervention as possible. Which it has admirably.
-
1
-
-
On 07/10/2023 at 14:10, badhex said:
A non-astro purchase; was looking at small comms racks for some home network bits and bobs and then this Excel 20U rack came up second hand and in excellent condition for £50, worth about ten times that new! Probably (quite) a bit bigger than what I currently need but I'm future proofing myself for when we buy somewhere and end up building a home office, and was also cheaper than the smaller, new racks I was looking at.
I've already filled it with vintage/retro computing stuff 😂
Is that an N40L micro server in there? Mine's still going strong after all these years, too. [Touch wood] 😂
-
 1
1
-
-
I'm keen to get out there because trying some basic EAA (after years of visual only) has really sparked my interest. But my word, there's no let up with the clouds.
However, with any outdoor pursuit, the most difficult step is the first one out of the door. Once outside it changes your mindset and things flow from there.
So my simple tip for when in a lull is: stand up and step out the door. You'll be in a much better mood for grabbing the kit then.
-
2
-
-
The really significant factor in predicting this is the dew point figure rather than the relative humidity figure (albeit they are linked). But it's not an entirely intuitive concept to understand the mechanics of, so most weather forecast services don't bother quoting it to the public. Nor are most of the usual online references very good at explaining the dew point concept in a correct or understandable manner. The overall upshot being if the humidity levels are medium/high with the dew point relatively close to the actual temperature, then taking out a large metal tube will result in dew forming sooner and particularly later (where it will cool at a faster rate than the ambient temperature, plunging it down to the dew point).
In these more extreme situations, the only real solution is to get the temperature of the equipment up beyond the dew point - or stop it cooling too much. Personally I don't bother if it's bad as I'm trying to de-clutter the set-up process these days.
Of course, risk of dew is considerably higher when it's been a warm and wet day, then the air temp drops if the skies have cleared. The warm day allows the air to hold more moisture but the same air can't hold all that moisture if the temperature drops - generating lots of dew. As has been the case the last few days in some parts of the UK.
-
Just now, Olli said:
Hi , thanks for the reply. I will give this a go tomorrow sounds like a good idea. I am pretty sure that I am missing something completely obvious…
Good luck.
I always get the jitters when updating its firmware and do it only when absolutely necessary. One time it hung when updating and no option other than to switch it off. Then I couldn’t connect back to it at all. Aargh!!
Luckily I had the Sky-Watcher Wi-Fi adapter around (for my Dob) and read that connecting that to the AZ-GTi allowed you to start communicating with it again (via the adapter’s network). Thankfully that worked and was able to reload the firmware….
-
1
-
-
This is a long shot, but it might be worth trying to change the Wi-Fi channel that the AZ-GTi is operating on. I think you find that by connecting to it with your phone then going Settings>SynScan Wi-Fi. I think the channel is set to 6 or 12 by default. Whatever it is I changed them vice-versa. (I’m away from the mount at the moment)
On the face of it shouldn’t make any difference given your phone is connecting. However, inside the house, when doing a firmware upgrade, my PC wasn’t seeing the mount at all - even though my phone would. After changing the channel my PC connects fine inside the house.
-
I’ve been loosely following the SeeStar story and it seems like they’ve nailed it. Early reports saying it’s a total doddle to use and the gear you get for the money is incredible. I mean, it’s not that much more expensive than just a camera.
It’s not for me because I prefer some extra flexibility. But it’s a massive achievement being such an easy and user-friendly package. Or a quick grab and go for the more experienced.
-
1
-
-
Thanks Peter, I was interested to know your set-up/workflow in more detail.
During the early days after getting the AZ-GTi, I had flirted with the idea of using SkySafari to control it (but never pursued it to its conclusion). There were several discussions on SGL I read through where members had success from tablets, albeit it wasn't that intuitive to initiate the connection and there was a process to follow. Could have sworn I bookmarked one particularly useful post detailing it step by step; however, I can't find it now after much searching this morning. Sorry that's not more specific information but it's definitely possible it seems. At the time I was searching on SkySafari and AZ-GTi - the process of which I believe will be the same for your mount with the [potential new] Wi-Fi adapter.
-
1
-
-
Yes it’s correct that the AZ-GTi has separate clutches for alt and az. The alt clutch is much wider diameter than the az but still easy to operate.
The AZ-GTi is also very easy to interface with Stellarium wirelessly on a PC (the same would probably apply if Peter added the WI-Fi dongle to his mount). There’s two different ways of doing it. The simplest is to first connect wirelessly to the mount using a mobile device and align the mount with the SynScan Pro app (basically same procedure as if you were only going to control the mount with the app). Next it’s then easy to tell Stellarium on a PC to control the mount wirelessly and Stellarium will indicate where the scope is pointing also. Alternatively you can interface with Stellarium using ASCOM. I found this video very helpful to understanding all the options. Note it doesn’t seem possible to use the Stellarium sync mount feature when in AZ mode.
What has remained a frustration though is using the app ‘buttons” to makes minor adjustments to the mount. Sure they work but are not as convenient as the physical buttons on a handset. Nor can you use the SynScan app and a SynScan handset simultaneously with an AZ-GTI unfortunately. It’s an either/or choice. Used simultaneously they clash with each other and the mount starts behaving erratically. I discovered this when trying it with the AZ SynScan handset of my GOTO Dob (the two fight against each other) and tried it with the smaller and simpler tracking-only handset (which the AZ-GTi won’t respond to at all).
I use the Sky-Watcher Wi-Fi dongle on my Sky-Watcher GOTO Dob (it pre-dates Wi-Fi) and it works very well with the SynScan app. It essentially makes the old Dob behave exactly the same as the AZ-GTI when inside the app.
-
1
-
-
Excellent summary thank you. I'll start experimenting based on that.
-
I can't help but feel that the Maks are getting an overly harsh ride here.
They're excellent value for money, extremely compact, and don't suffer the distortions of cheaper refractors. They complement a fast, high quality, small-aperture, refractor as a second scope very well. Plus kids generally like to see things big not small. Hence why I've got all three: a frac, Mak and Dob.
Nothing is perfect and putting a bare Mak outside unmounted to cool is no big deal with 30 mins forethought. 100mm+ refractors with ED glass are lovely - but heck just look at the prices.
I got the Mak 127 because of my back these days not managing the 10" Dob very well. Looking at Jupiter and Saturn I don't feel that short-changed looking through the Mak in comparison. Nor does it suffer from any visual nasties once cooled.
There's a lot of positives to mention and at a very keen price - especially if bought used. I set both up together and we can switch between them when out observing together for some variety.
-
4
-
-
Thank you for the kind comments!
While I've still got a lot to learn, I hope my sharing of beginner's attempts adds to all the existing encouragement for those thinking of giving EAA a go and what can be achieved even in the early days. While also running easily as a good visual set-up too.
Thanks for the heads-up on usage of a UV/IR filter. I've got the ZWO UV/IR filter but didn't use it on this occasion and was wondering what had made M31 so white! Another thing I'm not fully clued up on about when best to use or not. Please keep the tips coming.
All I can say is that seeking and observing faint fuzzies through a dob is a good sport and has its virtues. But running some simple EAA is proving great for bringing even more of the universe to the back garden when out under the night skies
-
3
-
-
So this is only my third EAA imaging run after getting the camera and SharpCap. It's been a very long wait to point the telescope at the sky again! Last night was the 5th Sept. Only downside was most objects of interest were in the wrong place...
I'm using a cheap refractor ST102 on an AZ-GTi in Alt-az mode with a ZWO ASI585MC and SharpCap Pro.
Below is M31 Andromeda galaxy - or at least part of it. Initial attempts at shorter exposure times weren't revealing much, so I pushed the boat out and upped the exposure time to 30 seconds to see how my setup would cope. Quite pleased with the result at this earliest of stages in the learning curve. 20 frames live stacked in SharpCap each exposure 30 seconds with camera at 270 gain. Directly underneath the image is a screenshot showing M31 orientation in SkySafari at the exact same time and blue borders are the camera frame. Only processing is black and mid points in the histogram. It was a nice surprise to see vague hints of dust lanes and other bits.
Next was M57 the Ring nebula. This time dropped down to 10 seconds exposures, 30 of them at camera gain 500. I tweeked the dark end of the histogram in SharpCap - probably too much.
I'm still trying to get to grips with things. But aside from the pleasure of actually getting some images, last night marked a first - I got SharpCap and ASTAP plate-solving to work and re-centre my scope. Well sometimes it worked. In another post I might have some follow-up questions about that!
-
6
-
-
11 hours ago, WolfieGlos said:
So like you say, a long usb3 cable like this https://www.firstlightoptics.com/astronomy-cables-leads-accessories/lindy-cromo-usb30-a-to-b-cable.html could work from there.
I've recently purchased the 585MC and that 5m Lindy cable from FLO. Chris at FLO recommended the cable. It's working fine with zero issues going from the camera direct to my Lenovo T460S laptop and SharpCap.
To give you an idea of how well the 5m Lindy cable is working.... one of my first tests of the 585MC was to take a short AVI video of the moon with SharpCap. But I forgot to limit the max frame rate in SC. As a result, given the fast shutter speed, the moon video was 32 secs long and totalled 7GB 🤣
The 5m cable didn't bat an eyelid
-
1
-
-
You’re welcome and welcome to SGL!
-
Perfect, thanks. That's great info. In which case....
1. When putting the Parallizer directly into the focuser
Rotate the brass ring in the focuser and use one screw to tighten directly onto the Parallizer (i.e. not via the ring). Leave the other screw loose. Orientate the Parallizer such that its angled gold screw is at 6 o'clock relative to the focuser screw that's doing the tightening. This is basically the exact recommendation of the Howie Glatter diagram.2. When using the focus extension tube
Put the extension tube into the focuser - it doesn't matter how the focuser clamps the tube. Use one or both focuser screws if you wish (because it won't affect how the Parallizer seats in the extension tube). Next insert the Parallizer into extension tube. Rotate the extension tube's brass ring and use one screw to tighten directly onto the Parallizer (i.e. not via the ring). Leave the other screw loose (the one that could tighten the ring). Orientate the Parallizer such that its angled gold screw is at 6 o'clock relative to the extension tube screw doing the tightening.It's excellent that you can rotate the brass compression rings out of the way. It means you clamp the Parallizer exactly the way it was intended.
-
1
-
-
Great, OK thanks.
Apologies - have edited and removed my reply to ask one further question please.
The two screws on the extension tube and focuser. Is one a clamp only and the other tightens the brass compression ring (similar principle to the Howie Glatter instruction diagrams above)? Or do both screws have an affect on tightening the brass compression ring?
It's hard to tell from the FLO photos unfortunately.
-
I'm not too au fait with brass split rings on focusers but I suppose this part of the HGP instructions points the way. I've added extra words in brackets to clarify what components the instructions are referring to:
"If the focuser has a brass split ring in the top, make certain that brass split ring is centered on the [Focuser's] thumb screw used to tighten down the [HGP], with equal lengths of brass ring on either side."
By focus extender do you mean a Barlow type item (but the focal extender variant) or a focus tube extension? Are the items 2 inch or 1.25"?
-
1 hour ago, Bullet said:
After reading other threads, I think I've got the idea. The compression of the focuser to HGP, and HGP to eyepiece should be opposite, which makes sense. However, what if you use/ need a focuser extender?. Then you would have 3 seperate clamp directions. Maybe have them at 120 degrees apart?
The key fundamental point about the HGP is that it's deliberately not perfectly round (both on its outside and inside). The purpose of the machining is to create two contact lines/shoulders both on the inside and outside (shown as contact points in the 2D diagram). Basically he was designing a single item that acted as a V-block for when sitting inside a focuser and a V-block for the inserted eyepiece. Very clever.
Therefore, the correct installation procedure is to ensure the clamping forces are applied ONLY down the centre lines of those two shouldered contact points (lines in the 3D world). Hence the instructions advising only to use one of the focuser's screw clamps.
To help visualise this, I've added to the diagram solid circles to show what direction the clamping forces should come from, and empty circles to show how the intended contact points should be orientated. Or more simply, the gold Parallizer set screw should be at the 6 o'clock position compared the single screw you use to clamp it in the focuser. If that makes sense.
-
6 hours ago, Bullet said:
Thread resurrection. If the HGP screw is to be opposite the focuser screw or screws, what if your focuser uses a split brass ring. Would the HGP screw go where the split in the ring is? ie still opposite the screw ( or in my case 2 screws). Thanks
I've had a HGP for a good few years. I searched my hard drive for archive stuff on it and found the below. I think the text and diagram was saved direct from the HG website - but I'm not 100% sure. It reads like from the site, though. What to do for a brass split ring is mentioned in the text.
How to Use:
Insert the adapter in the focuser with the slight undercut section of the outside diameter of the adapter opposite to the focuser’s thumb screw to be tightened on it. Use one, and only one, thumb-screw to tighten the adapter in the focuser. If the focuser has a brass split ring in the top, make certain that brass split ring is centered on the thumb screw used to tighten down the adapter, with equal lengths of brass ring on either side.
[Note: It is not recommended to use the Parallizer with a Click-lock binder, as these may not tighten down correctly on the outside of the adapter and may defeat the self-alignment feature of the Parallizer.]
Then, insert the eyepiece and tighten the eyepiece down with the single thumb screw in the Parallizer. This will push the eyepiece against the two edges of the undercut section opposite the thumb screw, registering the eyepiece perfectly in the focuser and reversing the offset in the focuser created by tightening down the adapter.
Just remember to always place the Parallizer thumb screw opposite to the thumb screw in the focuser for proper alignment (registration) within the focuser.
-
On 14/10/2021 at 01:18, Icesheet said:
So to the product itself. Let me preface this by saying I’m no technical expert. You’ve probably guessed that already! Where I can I’ll link to info from people who seem to know more than me. Also, some images used here have been taken directly from ZWO’s website for reference.
First Impressions
My first impressions of the ASIAir Plus are similar to that of the Pro version. It’s a well built and thought out product. The outer shell is composed of CNC machined aluminium which has been anodised and sports the classic ZWO red. It’s light, compact and has a multitude of mounting options and has ample data ports. It looks and feels a quality product.
Plus vs. Pro
Aside from negligible differences in size the main changes are that the Plus model uses eMMC and a dedicated WiFi antenna to increase useable range. For those who don’t know (and I didn’t), eMMC is an onboard storage chip that allows faster I/O giving much faster read/write times for downloading and transferring data. Given image files we are downloading are getting bigger and bigger this seems a wise move. For my part I didn’t notice any significant increase in download times but that is just subjective and I used a new camera which has larger files than usual. I found a nice review online that’s suggests that the onboard eMMC does indeed significantly improve read/ write times compared to a standard microSD (https://joeytroy.com/asiair-pro-vs-asiair-plus/ ). The eMMC now also stores the OS so no need worry about backing up your OS. It also frees up the microSD slot purely for storage and there’s now also USB C port for data transfer directly to your PC.
Initial Setup
Setup is a breeze. Download the Android or IOS app, plug your devices in, turn the unit on and connect. No worrying about searching for new ASCOM compliant drivers etc. It just works. You will be prompted to input some information e.g imaging camera and guide camera focal length but nothing too taxing. I use it on my phone and it also seems to use the phone’s GPS to determine my location. The user interface is intuitive and easy to navigate and is even comfortable to use on a phone which is particularly useful if you will be mobile. One downside is if you want to connect via PC as there is no native Windows or Mac software. You can use an Android emulator for PC but the experience is not quite as good as the native app on a Pad or phone in my opinion.
The following is just a summary of my first light with the Plus. I hope to cover specific aspects of the device in more detail as I use it more and I’m happy to answer any specific questions anyone might has as best I can. This was also first light with a new ASI2600MC, OAG and EAF autofocuser. In the past this would have spelled disaster for me. I was expecting issues so I was pleasantly surprised when I ended the night with 3hrs worth of data. It wasn’t all plain sailing but none of that was to do with the Plus.
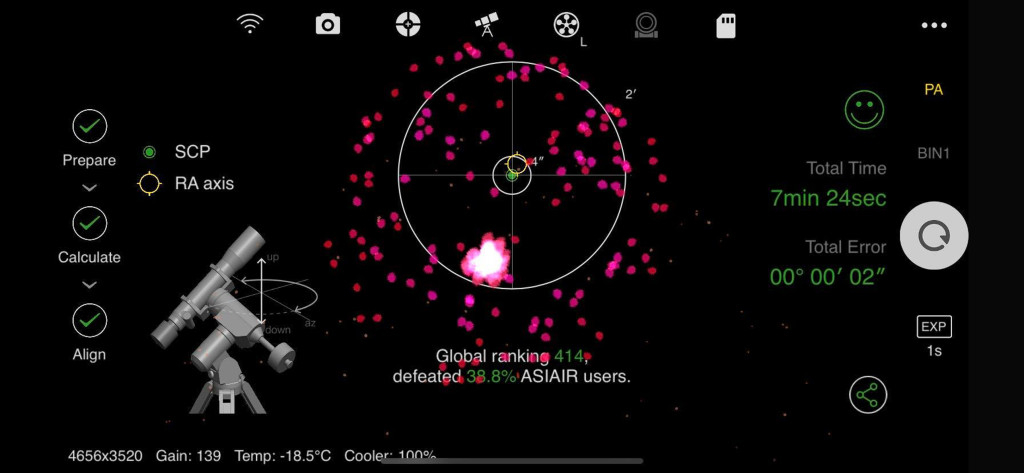
Polar Alignment
I mentioned before that Polar alignment is not a favourite of mine. I have done it manually with a polar scope, I’ve used PoleMaster, iPolar and the ASIAIR routine. The ASIAir routine is my go to. It’s not only more convenient given it’s built into the software but it’s also the easiest to use. It first takes an image and plate solves your location. It then rotates the mount in RA, takes another image and displays how far away you are from the pole in hours and minutes and using a simple target display with concentric rings to show which direction you need to move. From here you use your Alt/ Azi bolts to refine your alignment refreshing the image after each adjustment until you have an alignment you’re happy with. Generally I’m polar aligned within minutes these days.
Target Selection
Next you’re ready to image! If you’re like me and haven’t planned ahead with an imaging target, the software has a pretty nice search functionality which includes a ‘tonight’s best’ based on your location. For first light I decided to slew to a classic and familiar target in M31. Click the button and off the mount goes. The plate solving functionality in my experience has been spot on and generally needs no more than a few secs and a couple plate solves. I’ve never not had the target in the centre of my FOV. It was no different with M31 here. You can also manually input your own RA and DEC coordinates here to slew to a predefined location if you wish. Surprisingly,the search function does not work with named targets e.g you have to search M31 not Andromeda. I have no idea why and also can’t see why this wouldn’t be anything other than a quick fix.
Focusing
Next it was time to focus. In the past this has always been a source of frustration and cold fingers for me! The ASIAir has a focusing aid for manual focusing which I have found very helpful but it still involves a lot of trial and error and I’ve never been completely satisfied. It was for this reason I made the plunge for the EAF. I honestly didn’t have high expectations given this was the first run. The EAF section in the software gives you the option to input any backlash you may have and the focusing step size. I had no clue what to put in here so I just left the defaults and hit start and let the software do it’s thing. It started to construct a V curve based on the EAF position and calculated star size (fwhm). I could see that I clearly had some backlash as the motor was working but the focuser did not move at certain points. Despite this the software was able to create a satisfactory curve and seemingly find the best focus. I have no idea if it was the very best focus but star sizes were ~1.7 fwhm and that’s up there with the best I normally see. Of course this will vary based on your set up and seeing conditions. Clearly, I have to refine things with regards to backlash and step size but considering I just hit the button (and hoped) I was delighted with the outcome. I can only assume the software must be compensating somehow.Guiding
If there’s anything I’ve felt was a weak point with the ASIAir it was with the guiding. It has always worked and was always satisfactory but it wasn’t always straight forward. I know many say this is because the stripped down version of PHD2 ZWO employ doesn’t offer enough control. I have a slightly different take on that. I actually think we should have less control! For instance I never know what value I should use for the Calibration step or the max RA and Dec duration. These determine the steps taken during calibration and again I never know what the optimal amount of steps it should take W-E and N-S. This has led to some frustration and multiple attempts at calibration and guiding before I finally settle on something. I have also had issues with guiding failing after a meridian flip. It didn’t happen every session but it happened often enough that it became a frustration. I would much rather ZWO introduced something along the lines of PHD2’s guiding assistant and use the suggested settings from that as initial default inputs for guiding. I’m not saying there’s not a place for advanced controls somewhere but ASIAir’s selling point is the simplicity and I think they could perhaps improve here. Having said that this was my first outing with multistar guiding and wow! Guiding was on average from 0.5-0.6”RMS error and at times it was even as low as 0.35”. Typically I’m in the 0.7-0.8” range.
Autorun sequence
The Autorun function is pretty straight forward. You decide how many subframes and how long each subframe should be. You have the option of picking filters if you’re shooting mono and you can set up an autorun for calibration frames too. I know it can be used to image multiple targets in one night too but I haven’t tried that. I set mine up for 60x180s images and let it run.
WiFi Range
One of the main reasons I ended up buying the Plus was for the extended WiFi. The range on the Pro was disappointing to say the least. When imaging I am sitting less than 3m away in the living room and I can’t get a signal either directly to the Pro or via my home network. My only work around was taking a satellite router outside and using that to connect to my home network. However, I wasn’t keen leaving that out all night and just as I was going going to bite the bullet and but then WiFi extender the Plus was announced. I can happily report that with the Plus I get a stable connection throughout my whole house now. Max distance from unit is probably ~5m. I briefly tested it outside and on 2.4Ghz I was still connected >10m away. So undoubtedly a big improvement.
I’ll come back again later with a conclusion and some final thoughts but the ASIAir Plus done what I bought it to do. Collected the data I wanted with minimum fuss. Overall, I think the Plus is more revolution than evolution but that’s no bad thing in IMO. It’s shows ZWO are listening and are willing to make these incremental improvements the community are craving. Here’s the final image of M31. This is 60x180sec with the ASI2600MC on an Esprit100ED. I’m delighted with it, it’s not perfect and a critical eye would certainly have some comments but that’s a different discussion.
In the meantime if you want a more thorough go through of the device I highly recommend Cuiv the Lazy Geek on YouTube. I’ve always thought he gives a balanced and honest opinion on the products he reviews and his ones on the ASIAir Plus are no different.
That really is an amazing write up on the product. Very clearly written. You’ve totally sold me on getting one.
Have been considering it for a while - and indeed I will continue to wrestle with the laptop and ASCOM and ASTAP, etc for a while - just simply because it gives me a better understanding how everything works under the bonnet before going more automated.
Just out of interest, for quick and short sessions with minimal set-up, is the ASIAir suitable for EAA (specifically live stacking on motorised alt-az mounts while still plate solving).


Help me choose the best starter Dob
in Getting Started Equipment Help and Advice
Posted · Edited by Jules Tohpipi
To perhaps overly simplify things (rather than getting wrapped up in some of the deeper details).
For visual astronomy only (i.e. putting your own eye to the telescope rather than a camera) then an 8" dob is without doubt a fantastic choice. It gathers lots of light for seeing dimmer objects and has the resolution for great planetary views. In order to find objects quickly - particularly if under city light pollution - then the Celestron StarSense version becomes the self-recommending choice. Otherwise you could lose hours/days finding individual DSOs under light polluted skies - if inexperienced.
So far so good then, job done. Except... it's not exactly a small telescope to store. Nor would it be a first-choice telescope for moving around in a car, especially if other luggage is coming along for the journey. I promised myself I would take my dob out and about but never did. Well once actually and it seemed like too much of an expedition all things considered. And perhaps the worst of it, the vast majority of DSOs will still look like tiny grey smudges even through an 8" dob. I hesitate to use the word disappointing on general DSOs, but only because I've got very very well adjusted expectations of what's possible.
Let me make you aware of a possible alternative path for consideration. My daughter is also interested in astronomy and has just begun the GCSE course. Our main equipment is now focussed around the AZ-GTi mount bearing smaller and lighter telescopes. The first is the Sky-Watcher 127 Mak which offers similar focal length/FOV/magnification as the 8" dob but in a much more compact package - it's great for planetary views, but not so good on dimmer objects. We also have the Sky-Watcher Startravel 102T for the AZ-GTi. This gives good wide-field views at lower magnifications. But here's the rub, with the Startravel 102, I have recently added a camera to it for astrophotography. I use the word 'astrophotography' but what I specifically mean is EAA or EEVA as it's also know as. It's a simpler, cheaper, faster form of astrophotography that yields quick results by using less lengthy exposure times and doesn't require an equatorial mount. The results of which are closer to astronomy internet photos than grey smudges - and so much more than I've ever seen through my 10" dob, and could be much more inspiring as a hobby to a science-orientated young person. Of course, that full path is slightly more costly but it's a path that can be trodden in stages by adding equipment to the AZ-GTi (rather than replacing equipment). For example, you could just start with either the refractor or the Mak on an AZ-GTi for visual use only at around £500 and build onwards from there if the bug bites. Check out the EEVA sub-forums here to see members posting their own nightly images, made possible by just adding a camera to a tracking GOTO system. Plus it's all easier to store away and transport.