


AstroKriss
-
Posts
28 -
Joined
-
Last visited
Content Type
Profiles
Forums
Gallery
Events
Blogs
Posts posted by AstroKriss
-
-
5 hours ago, mikeDnight said:
I agree with Mr Spock. A 250mm apochromat would be the ultimate observatory set-up. It would have to have a nice observatory building and dome to complement it though! My first choice would be a 250mm Takahashi on a Tak equatorial.

and just to give a sense of scale:
A close second would be an observatory set-up like this
I like Takahashi!!!
Crikey, what a beast... I can't begin to imagine what that must cost lol....
-
2 minutes ago, Mandy D said:
That's a nice setup.
Thanks, only recently finished building my DIY observatory... If you want to take a look: (https://astrokriss.com/observatory-build/)
-
I'm pretty chuffed with my current setup pictured) but what im drooling over at the moment is between an C11 Edge HD SCT, and or a large 120mm Triplet Refractor...... (might need to sell a kidney to get either).
-
 1
1
-
-
It's very exciting, hope they can corroborate and confirm v.soon, and we need to get more advanced tech to be able to get probes out on thier way to explore.
Anyone finished building a warp drive yet?
-
 1
1
-
-
2 hours ago, doublevodka said:
This - https://vaonis.com/hyperia/en/ although it will definitely split opinion on here, I like the design, the way it's fully integrated, and the fact it can be installed outside with no observatory.
Plus it just looks smart in this shot
This looks very sleek
-
1
-
-
Wow, impressive with a 4" Refractor, I thought you need much higher focal length to get that sort of image.
-
 1
1
-
-
7 minutes ago, Paul M said:
It's a while since I used it but here is the method given in the ASTAP user guide:http://www.hnsky.org/astap.htm
So, I'll do it again with the original stacked frames linked in my first post in this thread. See how I do!
")
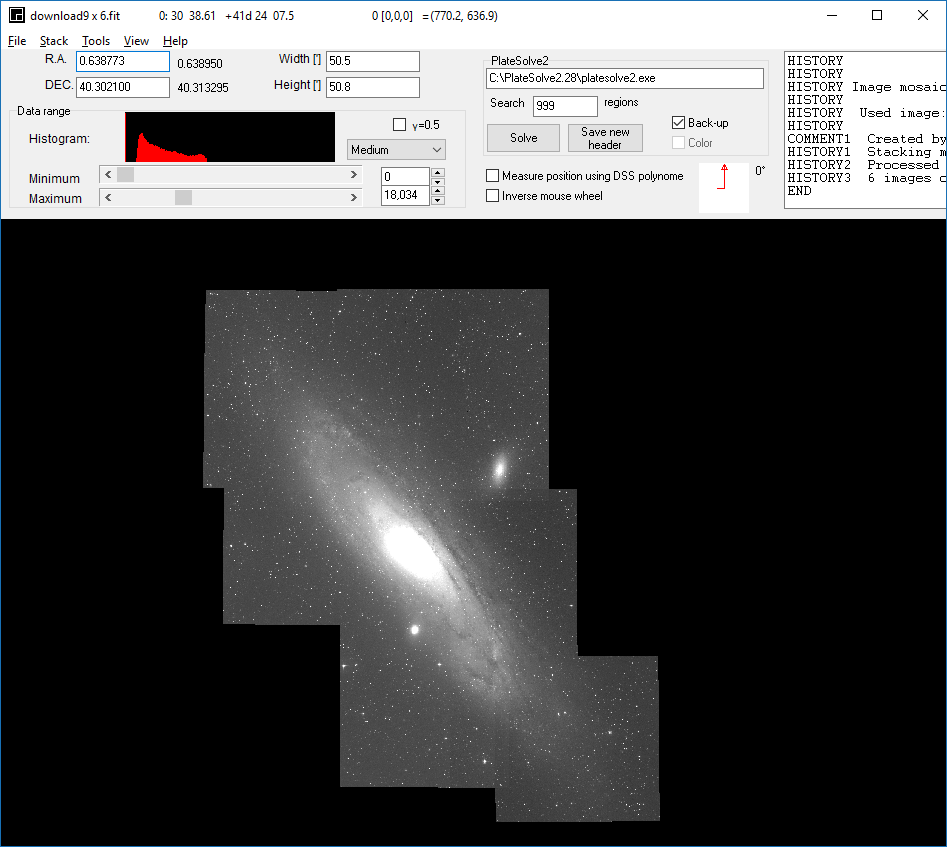
Here are my 6 stacked frames (all calibration done in the stacking of each frame, don't apply flats, darks etc for this stage). Just load them in the "lights" tab and make sure they are all selected. Click analyse and it should look something like this:
In the "Alignment" tab select "Astrometric Alignment". Most of the other settings on that page are defaults for what we are doing now, but can look intimidating.
In the Stack Method" tab select "Image Stitching Mode", and here I've opted to Equalise Background, Merge Overlapping Backgrounds. My mosaic is 2 rows high (the latest version of ASTAP does that automatically but I've had trouble with that development version just now), The 6% auto crop is just a number I liked the look of...
Then select "Stack (image stitching mode)"
After a while my modest lappy gave this:
Which can be cropped by Right Clicking at one corner of the image and dragging out a crop box.
Select Crop and hey presto, I have a whole world of gradients.
The gradients are my problem not ASTAPS.
The very latest version has a box to reduce overcorrection of gradients. But as above, that version wouldn't produce a mosaic on this occasion.
Good Luck.
This is awesome, thanks sharing, I’ll be sure to give this a go
")
-
1
-
-
Looks amazing, great image. That’s the sort of result that makes me want to give mono a go
-
1
-
-
1 hour ago, John_D said:
That looks great to me, it seems to have merged seamlessly. Did you need to be careful with the initial processing of the 4 images to get the merge to work?
( I thought Hugin would work with TIFFs but then again I've only ever used JPGs )
So I fir this one stacked the lights from each panel in SiriL, opened the stacked fit file, cropped out the edges dithering, then only performed histogram and asinh transformations. Save the resultin fit file and as a jpg. Then just used the jogs to stitch together with Hugin.
overall not too difficulty a process.
-
1
-
-
On 08/09/2023 at 22:41, Paul M said:
That's pretty much how ASTAP does it too, for free!!
Hi Paul, do you have link or details on steps to do this in ASTAP? Would like to try it, but not clear on how to. Thanks
-
6 hours ago, aleixandrus said:
3x4 would be marvelous! You're probably right, maybe 2x3 would be just I-want-to-but-I-can't, specially as I don't even has a second rig so I don't know what my requirements will be. Thank you for your insight, really appreciate it. Please, keep this thread updates with future improvements on your obsy or simply your experience using it. That 'post-mortem' feedback is as important as the build itself!
Sure I’ll do an update in a few months with progress using it
and likewise do share yours as you build it.
-
1
-
-
9 hours ago, John_D said:
I've had some success with daytime landscape panoramas using Hugin ( FOSS ) on Linux but I don't know how well it would work here. There is a Mac version but you would have to convert your files to TIFF.
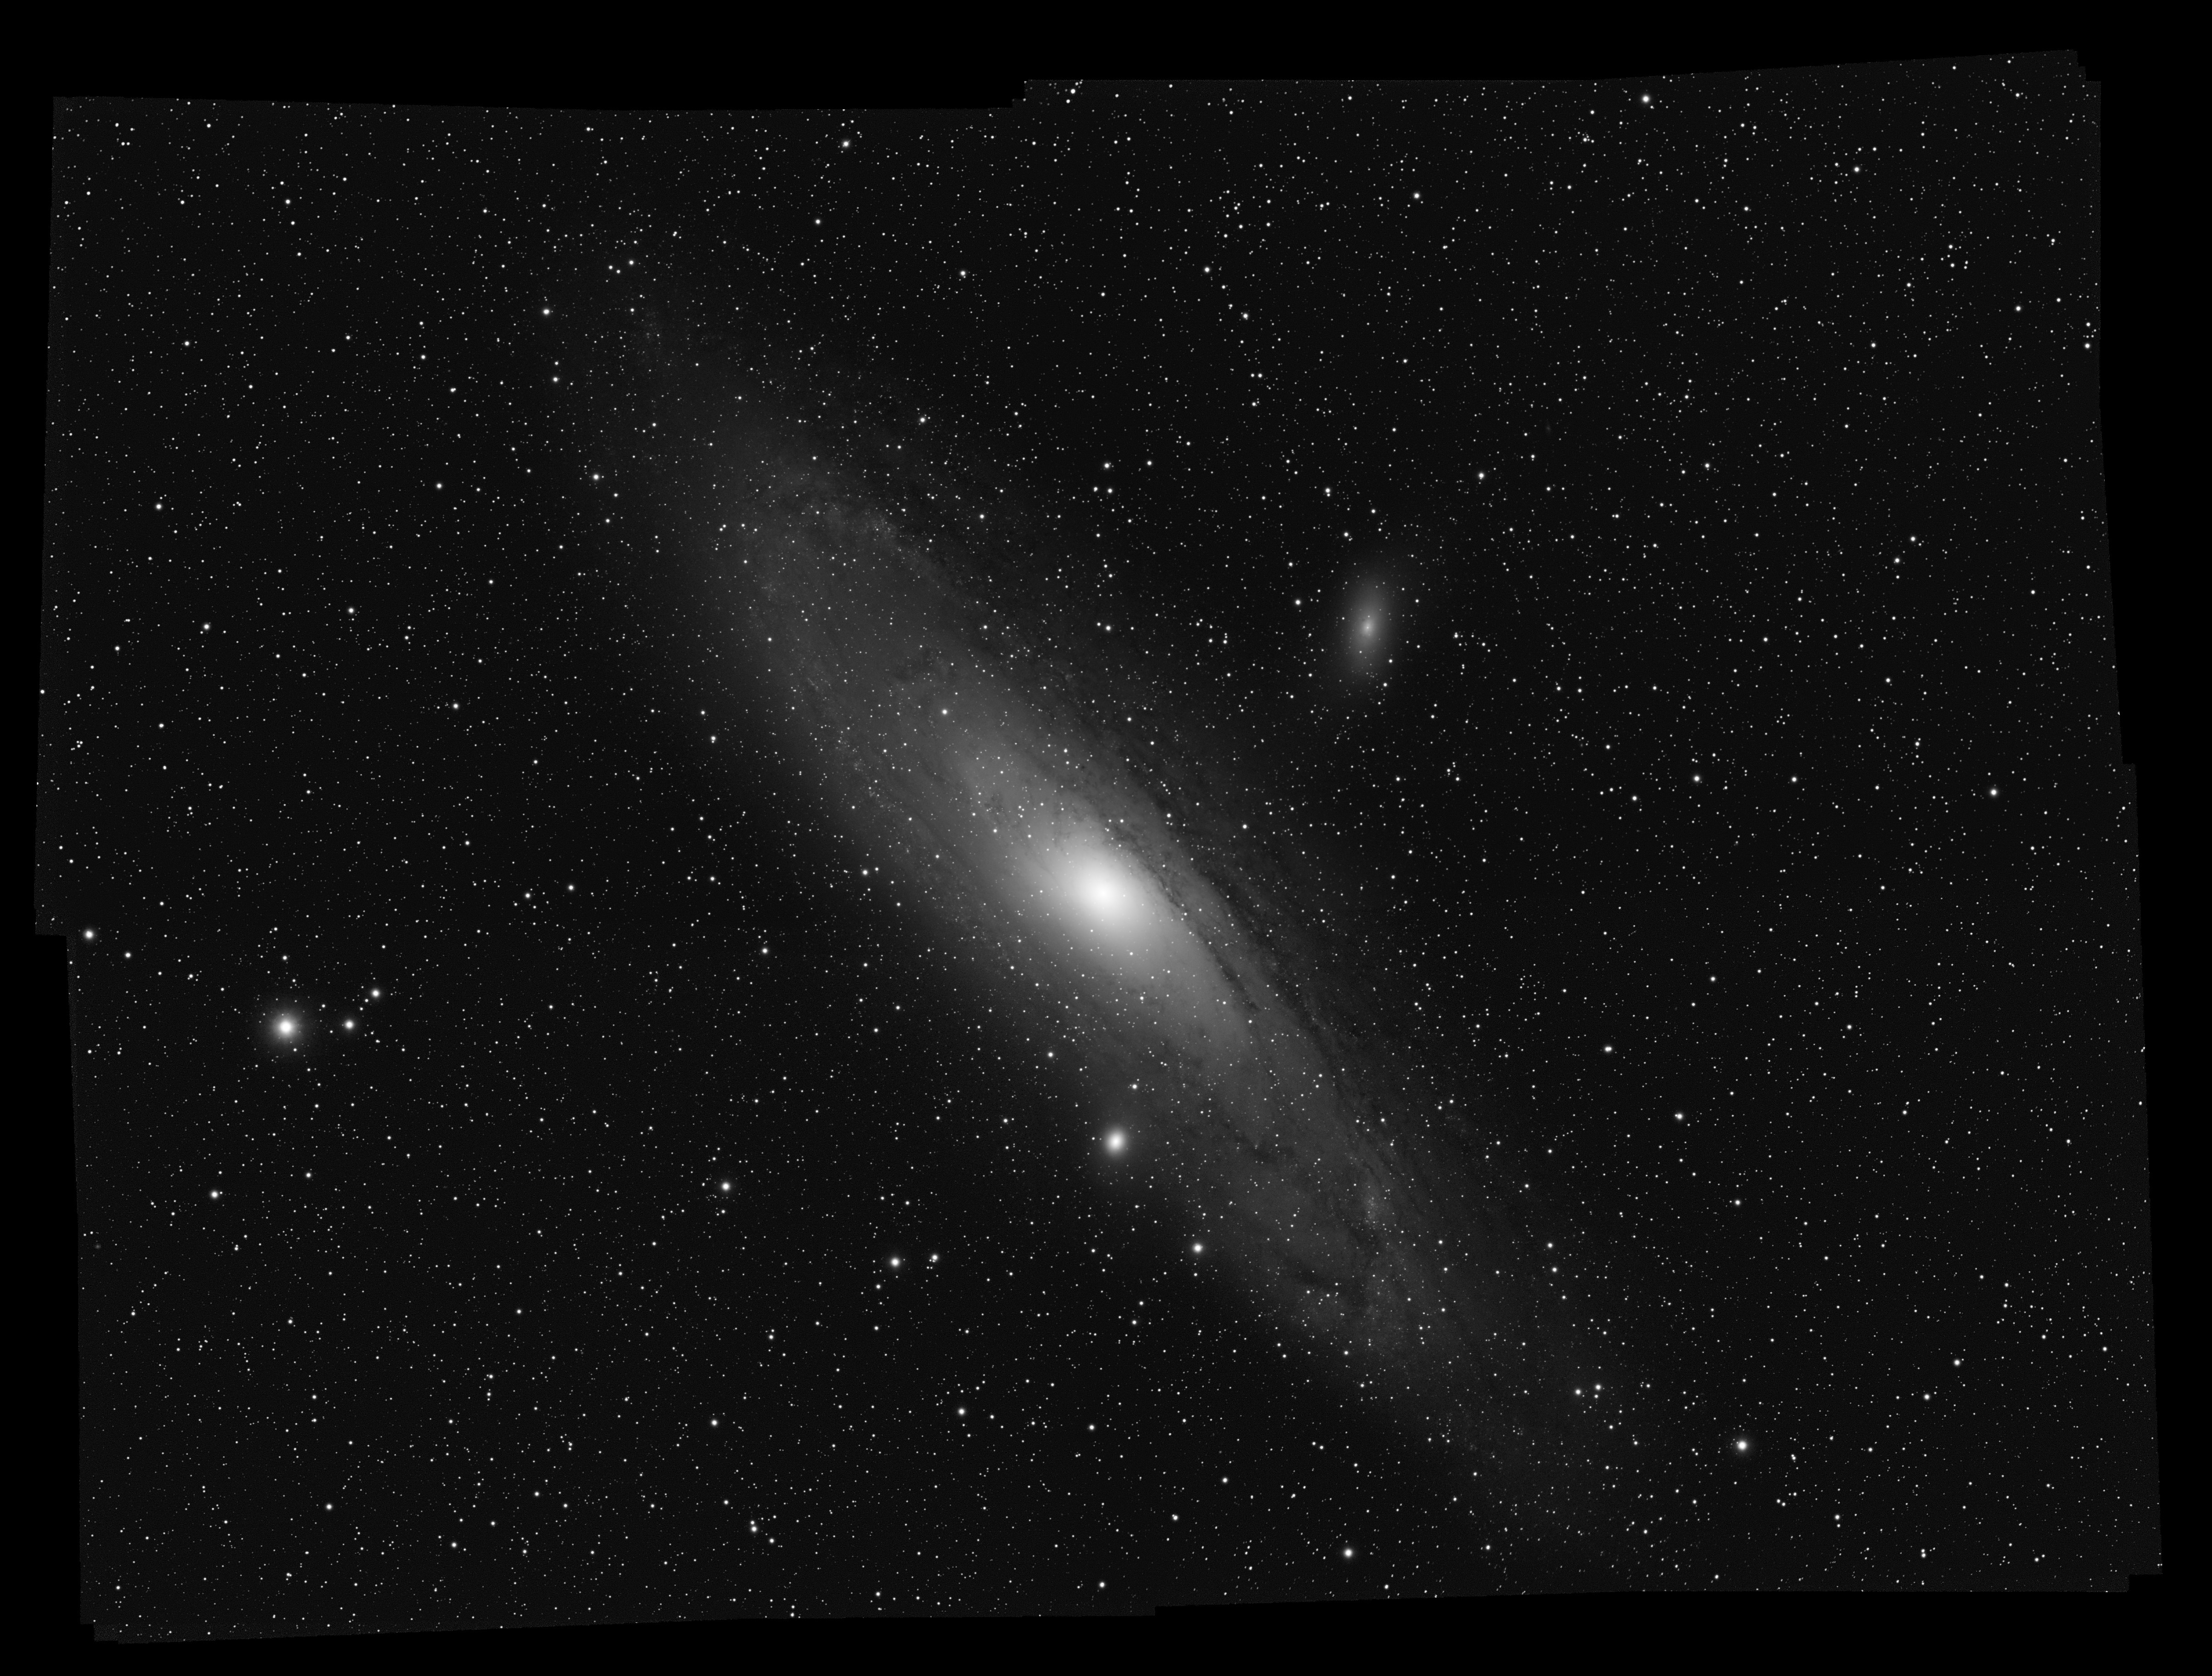
Hi John, yeah I found that yesterday too, seems to be a good option although had to covert to JPEGs first but seemed like I got a good result from it:
https://astrokriss.com/my-photos/galaxies/
The top image of m31 is the result which I’m quite pleased with.
-
1
-
-
6 hours ago, Nigella Bryant said:
Only the new one's I'm afraid.
Ah that’s a shame will try and hunt down one for the original.
-
1
-
-
On 05/09/2023 at 09:29, aleixandrus said:
Thank you for the kind response @AstroKriss. I also plan a 2x2 observatory but I'm 1.90m tall and I would like to be able to stand with the roof closed... It's good to know you don't feel it too narrow. I will need a taller pier but, as I plan to make it of concrete, I suppose I can make it the right size if I take careful measurements. I also live in a residential area but I'm not so constrained to size (although I need to keep it at a minimum). I'm also considering 2x3m, leaving a bit of space for a second pier for an small refractor or even a portable/moveable pier... Do you feel it possible with that dimensions, based on your experience?
Oh, by the way. @Starflyer, I also use a IR cam to control my scope when in the backyard and, despite I tend to turn IR off except when actively monitoring, I didn't notice any issue with my 6.5nm SHO filters.
Hi @aleixandrus Im not sure 2x3m would be enough for a second Pier, I think you'd likely want a bit more space, you might get a small portable ring in there but would likely have limited space to use it, but again I'm no expert. I think If I had lots of room, I'd have made it 3m x 4m, which I think would be plenty of room for 2 piers and some storage.
-
3 hours ago, Paul M said:
I've used ASTAP for mosaic stitching. It worked very well although my individual panels had such strong gradients the final image was a bit pants!
Here is a post I made midway through a topic I'd started.
The ASTAP user guide gives details. It's just a case of making sure the right settings have been selected.
Stack method tab, Image stiching method (Mosaic)
Astrometric image stiching is possible with the internal astrometric solver. The reference of each pixel is the astronomical position. So stacking is not done against a reference image but against an position array set by the first image. You have to set the in tab alignment the settings for "Image stiching (method)" correctly. If you stitch 4 images, you have set "Mosaic width/height in tiles:" at 2. This will provide enough space to place for the 2x2 mosaic.
Here a suggested work method:- Stack the tiles separately using method "SIGMA-CLIP-average" and use for the alignment the internal STAR alignment method. Inspect the resulting tiles and crop them if required. You can also crop them later automatically with "Mosaic skip outside pixels" Do this for each color separately if you have separate files.
- In tab "stack method" select option "IMAGE STICHING METHOD" and select astrometic alignment using either the internal solver.
- In tab "stack method", set the "mosaic width/height" correct and check-mark the option "equalise background". If the input images have poor borders, set option crop images larger then 0%.
- Select the files. Most likely the files names contain "_stacked, so you have the check-mark the files after selection.
- Click on the button Stack check marked images|
- Crop the stacked result using the image crop option in the viewer mouse pop-up menu.
- Adjusted the stretch range and save as JPEG, 90% quality.
Here an example mosaic x 4 of M31 made with ASTAP:
http://www.hnsky.org/astap_mosaic x 4.jpg
Here an example of a mosaic build of DSS images:
http://www.hnsky.org/astap_mosaic.png
The size can be reduced by a crop function (right mouse button) later. Making the oversize too large could result in memory overload.
If you have DSLR/OSC sensor and using a monochrome filter like H-alpha, you can split the raw the images in seperate R, G, G, B image using the viewer Tools, Batch processing, Raw colour seperation menu. In case of H-alpha use only the R=red image for future processing.Awesome thanks, will have a go at this
-
1
-
Does anyone know if this will work on the original EQ8, not the new ones?
-
1
-
-
Hi all, I recently attempted my first 4 panel mosaic image capture through my ASIAir. I have I have stacked all the images from each panel, and cropped out Dithering artifacts so I now have 4 stacked FITS files. But for the life of my I have no idea how to merge the Fits together into a single larger FIT files. Can anyone share some experience on how to this on macOS software?
I know I could just convert them into TIFF or something and try to manually stitch them in PhotosShop, but was hoping to find a way to stitch the Stacked FITs files together before processing them all as one single image.
Any tips or advice? I currently stack and process my images in SiriL.
Thanks
-
That's awesome, I'd love to get a good solar scope to get some Ha images of the sun
-
Thats an excellent first image, well done
-
1
-
-
7 hours ago, Starflyer said:
Great build, I enjoyed reading about your journey on your site.
Do you find that the IR illumination from the webcams shows in your images, do you get any odd gradients?
I tend to turn them off when capturing where I can, and I’ve not noticed any specific issues so far. I’ll keep an eye on it though for sure.
-
1
-
-
13 hours ago, aleixandrus said:
Well, it is really impressive if, as you said, "I had no real idea what I was doing", LOL. Really like it.
I plan building a small shed as yours, different material and constructive approach but same dimensions. Can you please share some details about dimensions? You said it is a 2x2m frame for the base. What's the wall and pier height? How many horizon degrees you lose? It seems you can close the roof without parking that scope. Do you feel the remaining space too constrained? Would you go bigger now you finally build it?
Too many questions, I know, but I really appreciate you answers if possible. Anyway, thanks for sharing that pics!
Hi, thanks so far I’m really happy with it. So as I installed the pier before deciding to build it, the pier is lower than I’d like. The walls are about 1.6m high before the roof, so currently I am loosing quite a bit of horizon, but as I’m in residential area I lose most of that already due to other houses and surrounding trees.
I don’t know pier height to be honest, but I am looking for ways to raise the height of mount by about 20cm but can’t find any specific pier extension for EQ8, so might have to be something custom at a later date.
at the moment yeah the roof has about 8cm clearance from the scope so can open and close with telescope in home position.
Considering a larger scope in future that will need a special park position. As I use ASIAir at moment I hope they add that feature before I need it.
in terms of size it perfectly compact for the one pier and scope with a bit of room for growth, and I was limited to size I could build in my garden. of course if I had room I’d definately like it bigger with room for 2 piers
-
1
-
-
Hi folks has any had any experience upgrading the azimuth adjustment bolts on the original EQ8? I’m finding it hard to adjust with the mount being super loose, but want to tighten everything up more but still be able to adjust without using grip wrench.
any suggestions and or links would be greatly appreciated
thanks
-
Thanks, yeah it’s going to be a total blessing for the upcoming cold winter nights
not frosty pack down in the early hours.
-
So I've got a SkyMax 102 and the biggest issue I've had with it is that I found it extremely hard to focus manually as even the slightest touch causes so much wobble I found it almost impossible to focus by hand. I fitted an electric focuser and the helped a lot, but I've not had much luck with it myself. This posts has reminded me to go back and give it another go some time.
I bought an old Skywatcer focuser of e-bay and my father-in-law made a great mount for it on his 3D printer:


What is Your Droolworthy Telescope?
in Discussions - Scopes / Whole setups
Posted
Thanks, now looking forward to some clear dark nights of the UK winter (fingers crossed)