


kentnek
-
Posts
17 -
Joined
-
Last visited
Content Type
Profiles
Forums
Gallery
Events
Blogs
Posts posted by kentnek
-
-
25 minutes ago, vlaiv said:
you need to be below well 7.2" FWHM in order to be under sampled.
Hmm I applied the FWHMEccentricity script to my master light's Luminance channel, and saw FWHM was around 2.440 px. Does this mean it's 2.440 × 4.51 ≈ 11 in arcsecond? 😨
I wasn't too happy with this data as during integration I realized the sky was quite foggy, but I proceeded with stacking anyway to learn the process in PI. I guess drizzling will not help much then 🤣
 25 minutes ago, vlaiv said:
even if we dither, question is can we precisely do partial pixel shifts
Agreed! I'm only dithering to reduce the walking noise on my Canon camera. Without guiding I have to nudge the declination and RA a little bit, even so it translates to quite a large displacement (dozens of pixels).
-
Having used mainly DSS for stacking, I'm currently learning how to stack with PI using the WBPP script.
I'm also experimenting with DrizzleIntegration, which produces a image a tad cleaner than the original master light, but slightly dimmer and less contrast-y (especially around the fainter Horsehead Nebula region):
left is master light, right is drizzled, only autostretch + ABE applied
With my highly undersampled setup (4.51"/pixel), I think drizzling would be beneficial. However, it seems like the SNR is lower after doing so. Is this expected, and which image should I continue my editing process on? Any help/suggestion is highly appreciated!
-
Hi @DroneSaif, I'm interested in getting the FL55SS too, possibly to pair with a ASI533MC. Since the 533's 1" sensor is pretty small, do you think I need a flattener for this scope?
And if I add in the reducer for a wider FOV, is the flattener needed as well? Thank you!
-
9 hours ago, 900SL said:
I had the same experience with a Skywatcher Star adventurer. Pot metal cheap Chinese poor tolerance poorly machined product. Worked after a fashion after a complete strip and rebuild. Vowed never to buy another of their products.
Having said that, there seems to be quite a few happy owners out there.
I almost went for the SA 2i as well, but decided against that after reading about the subpar quality of the product, especially the included equatorial wedge base. No doubt, it's cheap for what it is and attracts a large fan base, who comes up with a plethora of mods and maintenance guides to improve the tracker. And if one is willing to spend (considerable) time (and perhaps money) on tinkering and modding it, admirable results can be achieved.
However, I'd prefer to use that time/money on something better right at the beginning, so I can enjoy astrophotography without being frustrated at the equipment.
-
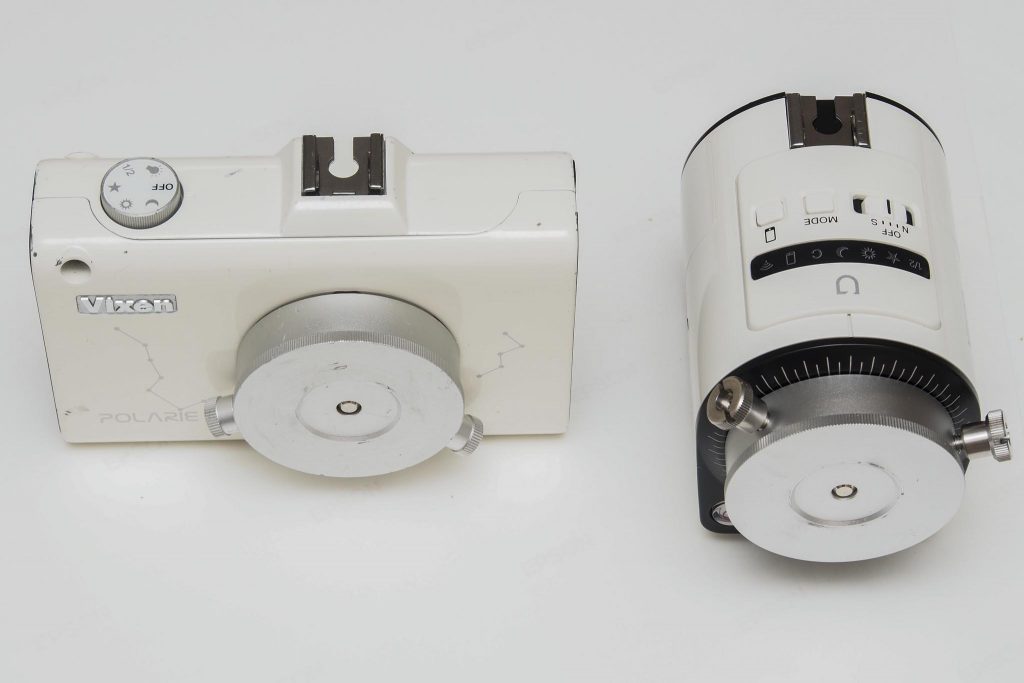
Having owned a Vixen Polarie, I experimented with DSO photography and started to approach the weight limit of the little tracker. After getting suggestions from AnakChan's thread, I decided to upgrade to the new Polarie U, which is a tad smaller than the Star-Adventurer Mini, while having more advanced functionalities similar to the SA 2i (Wifi/app but retaining physical buttons on the unit, auto guiding support, intervalometer for camera, etc.).
As my priority is smaller size and lighter weight, I opted for the K-ASTEC XY60 wedge and subsequently T-Factory's counterweight kit. Since the counterweight kit is currently out of stock, temporarily I'm using a MSM Z-plate to imitate a declination bracket. The Polarie U is rated with a weight limit of 2.5kg (a little higher than the original Polarie's 2kg), so I guess it should be fine for now as my camera and lens are quite light too.
With this setup and a rudimentary polar alignment using the Vixen Polar Meter/Compass (Polaris is not visible in my location), I could get 4min at 70mm and 1-2min at 200mm before stars started to trail. When I get hold of the counterweight kit and a more suitable tripod, it should perform at least as good (or even a little bit better) as the SA 2i pro:
(photo not by me)
One nice thing about the Polarie U compared to the original Polarie is the ability to set custom tracking rate, which is useful for the DARV (drift alignment) method. Unfortunately, the Polarie U app currently doesn't support changing the speed while the tracker is running, so I had to press the physical Mode button on the U itself (to switch between 0x and 2x sidereal speed), which caused some wiggling to my V trail:
The good new is, I sent a feedback to Vixen and they quickly replied that "We would like to consider adding an automatic drift alignment to the Polarie U app in our future update." This would make the process much easier.
-
 2
2
-
-
Just a quick update, I've received my Polarie U and the XY60. A small but definitely capable setup:
I'm waiting for T-Factory to restock the counterweight kit, and then it'll be complete!
-
8 hours ago, sharkmelley said:
stray light causes an obvious central circle which flats will not remove.
Yeah, thanks for confirming my suspicion! It's a good idea to avoid nights with the Moon up in the sky then. I was curious and tried to push my equipment (stock DSLR + 70-200 lens) to the extreme, under a light-polluted Bortle 8 sky + moonlight. And unsurprisingly my Pleiades were totally washed out haha
-
After a few days busy with work, I finally got some time to continue editing my photos. I reshot the flats:
And the result is marginally worse than before 🤣
However looking at these more carefully, I notice that the top left quarter of the circle is missing, which is the direction of the moon (yes I shot this on a gibbous moon night). So I guess the moon is causing this shadowy circle thing.
DBE could remove the moon glare but not the circle:
While reading on this topic I came across "synthetic flats". Not sure if making those would solve this, so I'll try it later when I have time.
-
11 minutes ago, ONIKKINEN said:
Too bright flats can be bad and not capture properly because the exposure time is so short
Ohh this is interesting. I wasn't aware that too short exposure times would have an effect on the flats.
11 minutes ago, ONIKKINEN said:I suppose there could also be internal reflections between the lens elements and the ipad surface that are different from your lights?
Hmm I didn't think of that. Perhaps next time I should put the iPad on my lens hood to allow a bit of distance between the iPad's screen and the lens elements, and use a white shirt or cloth to diffuse the light further. Thanks for the input!
-
@ONIKKINEN I placed an iPad on my lens 🤣 All other settings are the same except for shutter speed, which was set for 50% peak in the histogram.
-
Thanks for the thread! It looks quite informative, so I'll have a more careful read in the morning. It appears I should try stacking in PI itself, as mentioned in that thread and other posts I found.
Regarding the circle artifact, is it due to my optics (unlikely as I even see it after stacking pictures taken with my wide angle 15-35mm lens), or my flats? If I understand correctly, the flats should be able to help remove that circle right?
-
7 hours ago, Ouroboros said:
Have you tried removing them with the canon banding reduction script in PS? Odd thing is whenever I’ve seen them they run horizontally.
Hi @Ouroboros, thanks for the tip! Running the script AFTER AutomaticBackgroundExtractor does help:
When reading about the script I saw others running it right after integration and before ABE/DBE, so I experimented doing so. While it was able to reduce the original columns, it introduced some new bands:
I guess if I perform a DynamicBackgroundExtractor I can reduce the dark circle to some extent.
But I'm still curious about what causes these artifacts in the first place.
-
Hi everyone, I'm trying to use PixInsight to process my stack output from DeepSkyStacker. I'm getting this weird reddish column patterns after using AutomaticBackgroundExtractor (and an auto stretch), not to mention a dark circle in the middle:
This was shot with an unmodified Canon R6 with a RF 70-200f4 lens. I took:
- 44 light frames (30s each)
- 21 dark frames (30s)
- 30 flat frames
- 50 Bias
All of these are ISO400, f5.6.
The master calibration frames look normal to me:
If I open a single light frame and do an auto stretch, I think I can see the red bands faintly so it's likely due to the light frame. However, the sharp circle in the stacked photo does not appear here, and I believe any vignette should have been removed with the flats.
Does anyone know what the red bands and the dark circle are, and how to edit them out? Thank you!
-
These are great photos! Thank you for sharing. This makes me even more convinced that Vixen's engineering is superb, even for a small tracker like the Polarie.
I also realize that I'm leaning towards the functionalities of the SA pro but really concerned about its weight and size. So, I feel I'd prefer to spend a bit more for a tracker as compact as the Polarie-U, than to kill my back with the SA 2i pro. After reading the review here, I've decided to get the Polarie U + the XY60. It's so small, but still supports autoguiding if I wish to up my game in the future:
Thank you for helping me make my mind!
-
1
-
-
Hi @AnakChan, really appreciate your response!
6 hours ago, AnakChan said:A bolt passes through from under the XY50D through it base and the cradle into the Polarie's base.
Yes this is what I wanted to know. I saw the bolt in your picture but I wasn't sure how it was inserted. I guess if I get the XY60, I should get the Arca-Swiss clamp (also from K-Astec) to make it easier to mount my Polarie.
6 hours ago, AnakChan said:however with modern 3D printing these days, you'd probably can find someone who can design and print it.
Yep this is what I intended to do, as I have a 3D printer.
6 hours ago, AnakChan said:just to clarify you're comparing the Polarie or the newer Polarie-U
The original Polarie. The U is too new and the price is kinda crazy, if I were to get one I'd chooses the SA 2i Pro over the Polarie U.
Looking at this thread on the SA pro, I know the SA 2i Pro is a very capable tracker, but its hefty size is putting me off a little bit. Its other plus point is autoguiding support, but I don't think I'll need super long exposures with an unmodified camera under my Bortle 8 sky, at least at the moment.
That's why I'm leaning towards your Polarie setup with the compact XY50D mount + the PCB-EQ2 counterweight kit. Do you have any DSO photos taken with this kit?
So far, I think my next step is to get the XY60 wedge. I can even use this wedge with the SA if I'm to get this in the future, as the stock wedge isn't that good anyway.
How smooth do you find your XY50D while doing micro-adjustments? I tried the Vixen Fine Adjusment Unit in person but wasn't happy with it due to its limited panning movement and inaccuracy while operating.
Thanks again!
-
Hi AnakChan, I've been looking at your marvelous Polarie setup here and CN for some time, and I just had to register an account here to ask a few questions 🤣
With the help of the info in your posts, I'm able to find the wedge (K-ASTEC XY60 - the recent newer version of the XY60D) and Telesco Factory's PCB-EQ3 counter weight kit.
While patiently waiting for Kyoei and Telesco Factory to reply my order emails, I do realize that these accessories are not cheap - with the same amount of money I can buy another tracker like the SA 2i Pro, which already comes with a latitude mount and counterweights. Nevertheless, I still love the portability of the Vixen, and equally the XY60, which is much smaller (and probably more reliable) than the plasticky mount bundled with the SA.
So the question is, do you still think I should continue maxing out the capabilities of the Vixen Polarie with these accessories, or should I get the SA 2i Pro instead?
Also, you mentioned the cradle. How does that attach to the XY50D? From the picture I see a screw but I'm not sure how you turn it to fix the Polarie on top.
Thanks!


Darker image after DrizzleIntegration
in Imaging - Deep Sky
Posted
Yes, you're spot on! I do suspect there's a slight tilt in my imaging train, and attaching a full frame sensor to the scope magnifies the problem. However I'll be upgrading to an ASI533MC soon, so the tilt won't affect the 1" sensor that much I think.
Apart from the lower SNR on fainter nebula, I do see the drizzled version is cleaner. Would that be a benefit?