


ONIKKINEN
-
Posts
2,422 -
Joined
-
Last visited
-
Days Won
5
Content Type
Profiles
Forums
Gallery
Events
Blogs
Posts posted by ONIKKINEN
-
-
14 hours ago, Clarkey said:
I have used the SW Aplanatic which is the same as the TSGPU I believe. I tried the Baader MPCC with my F4 6" Newtonian and it did not perform as well as I had hoped. The Aplanatic however is spot on but it is sensitive to sensor distance. I had to shim it out a fraction of a mm. I use it on my 1600 pro which is marginally smaller than APS-C and it gives pinpoint stars to the corners. I did consider the paracorr and others but I was put off by the price. The other option is the ES HR, but I don't know much about it.
Here are a couple of images using the kit described. These equate to about 1.3"/px at a FL of 600mm.

Looks great!
I cant really see any coma in the corners, which is what i expected from the GPU.
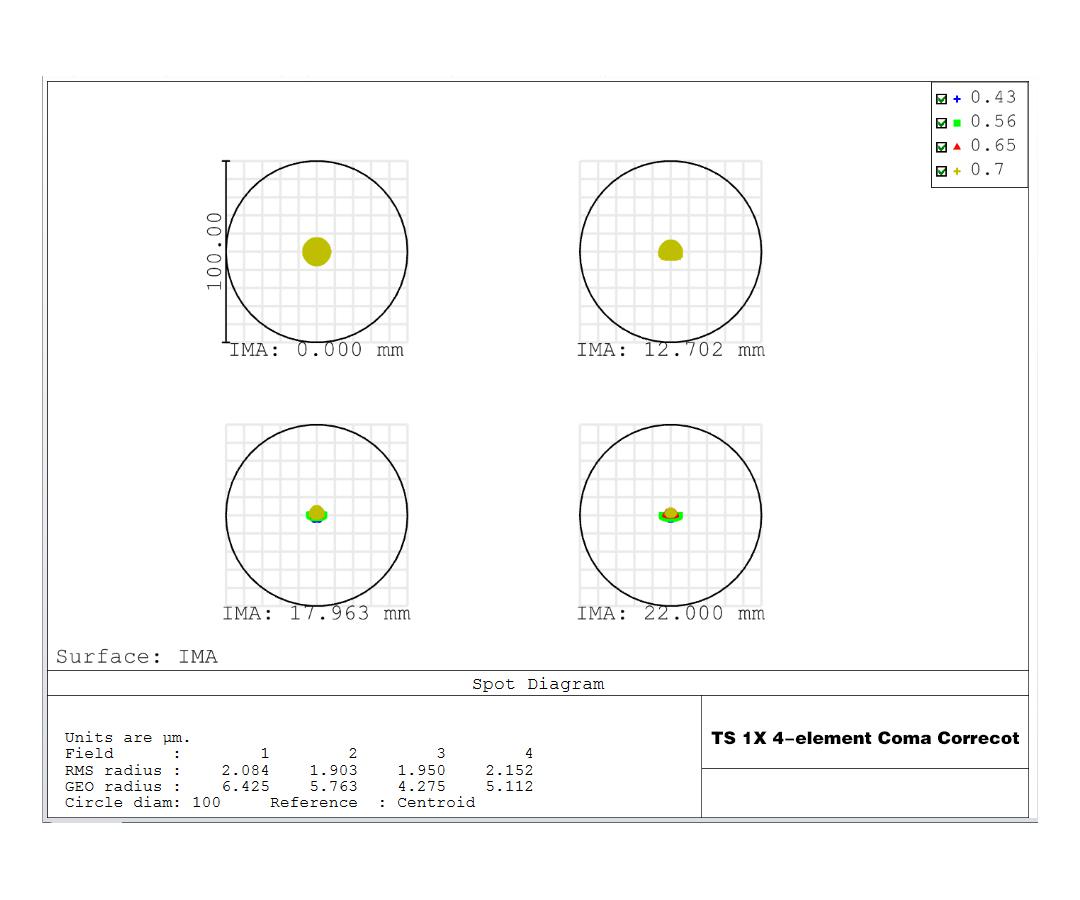
On the topic of the Explore scientific corrector i thought i would have a look at some spot diagrams, below is what i found. These are difficult to compare since some of them do not state what scope they were tested with but its better than nothing.
Explore scientific HR:
TS GPU:
Televue Paracorr:
This is the only graph i could find for the paracorr for some reason.
And the TS maxfield 0.95 that i am replacing:
Out of these the maxfield 0.95 is obviously the worst, no contest. Between the GPU and explore scientific its more even, but looking at these i would favour the GPU more. The paracorr looks like it would be the best out of these, but the graph is very different looking so not sure how to interpret it. The RMS radius curve would point to significantly lower values compared to the others. Also not really sure what the difference between the RMS radius and GEO radius measurements are. They are quite different between all of these too so not sure what to make of it.
-
I have a VX8 F4.5 newtonian and up until this point i have been imaging with a TS maxfield 0.95x coma corrector which initially i liked, but using it more and improving my capturing in other parts the coma corrector comes out as a weak link. I dont think it performs all that well up to my APS-C sensor size and really its not that sharp even in the middle so its time to look for an upgrade. The corrector will also be used for visual.
For now there is no straight up budget limit and i dont really need to order one right now, but im weighing the different options here so that i know what i am saving money for. The GPU i could buy now, but some of the more expensive ones would have to wait.
My Rising Cam IMX571 OSC has 3.76 micron pixels so this is something i have to keep in mind with image scale. Most correctors will need binning, or some other method to half the resolution (like superpixel debayer, splitting etc, when i say bin i mean one of these methods).
Top contenders i am thinking of:
TSGPU 1.0x, giving 1.72''/p BIN2
TeleVue Paracorr 1.15x, giving 1.5''/p BIN2
Some other correctors that come to mind:
One of the 0.73x correctors or the new starizona 0.75x giving 1.18''/p unbinned
APM 1.5x corrector/barlow giving 1.15''/p BIN2
Looking at the best subs i have taken so far cropped to half the frame to lessen the effect to FWHM from the poorly performing maxfield 0.95 i have gotten down to 2.5'' FWHM stars, but most of them are closer to 3''. There is still a chance that my mount muddied the shots further since the EQM35 for me has a seismograph like movement in RA so its possible it was not the best possible frame for my conditions. Now with the AZEQ6 (i dont have imaging data from this yet) this problem should be gone.
This leads me to think that the 0.73x correctors unbinned would probably be a bit optimistic, as would be the APM 1.5x. Also havent really heard much from the APM 1.5x and the spot diagrams are maybe not as good as i would like so probably wont go this way. The real competition here is between the TSGPU which i have not heard really any negatives off and the Paracorr, which i really haven't heard negatives or positives from since it seems less common for imaging. The Paracorr is also twice the price, but includes a handy top for visual use whereas the TSGPU will require adapters (which i have so no cost).
If anyone has first hand experience using the GPU and especially the Paracorr for imaging i would love to hear them, negatives and positives. Also please do point out if my hopes for the resolution i will be getting are optimistic or pessimistic, they are just guesses.
-
This patch of the sky is desperately in need of vacuuming, that's a lot of dust.
Not sure where to look in the image with so much going on, great stuff!
-
7 minutes ago, tomato said:
I could see how the geomagnetic storm would put them out of action but not cause them to re-enter the earth’s atmosphere. However, the storm causes the atmosphere to become denser at higher altitudes, that’s something I didn’t know.
His rockets need more umph…
They are actually launched to dangerously low orbit on purpose and that's a very good thing. At a perigee of 210km (where they are launched to) they would not spend long in orbit if there was a malfunction. This low orbit is a no-control failsafe that removes faulty satellites quickly without adding space junk and causing hazards to functional satellites. When launched they check that everything works and only then start the slow orbit raising burns with the on board hall-effect ion thrusters. The orbit raising itself takes weeks because while these thrusters are very efficient, they only provide fractions of a newton of thrust. So in the case of very unusual atmospheric conditions the satellite will lose more velocity to drag than the little thruster can provide.
I am actually quite surprised SpaceX is willing to take these precautions. The Falcon 9 would have no trouble sending the stack of satellites to any low earth orbit altitude so they can only lose money doing this. The public likes this though so the PR gains are probably worth it or they would not take the risk.
-
 2
2
-
 1
1
-
-
How long did you wait from bringing the scope inside to taking flats? Dew can take an hour or more to go away.
I would guess its the outside of the sensor window thats dewing up rather than the inside, unless your camera is old and the desiccant is really saturated.
-
For galaxies and other stellar targets if the goal is to get a real colour result: Would never use one as its counterproductive. Well, maybe if i was imaging from a location that has all of its street lights be the old yellow ones, instead of any LED lights. But even then i would cut off a huge chunk of the galaxy signal when using CLS filters.
For nebulae maybe, but probably not in bortle 5 or darker. But then again i dont really image nebulae so no i would not use one in any level of light pollution.
-
Not sure whats going on in your flats, but it looks like it could be dew forming on the sensor? Or could be something else entirely, but heres what i see in your flats using histogram stretch and false colour rainbow rendering to make details easily visible:
red:
Green:
Blue:
Flats have a very uneven profile in terms of vignetting. Why is that? I have not imaged with refractors so if this is something thats common with refractors im sure someone will point that out (or if you even used a refractor, but no diffraction spikes so that is my guess). But if i got flats like these with my newtonian something would be horribly wrong. Green looks OK to me but red is square and blue is very off center, dont know what to make of this.
The reason why i think dew might be to blame is that in the red channel your image center is actually not the brightest part of the image. Its difficult to see but there are loads of cold pixels that have lower values than slightly outside this area. I think the shape is also somewhat similar to the bright spot in your stacked image. Since the stacked image shows the issue as brighter than should it would mean that the flats must have a darker than should spot in the same place, which looks to be the case. If you had dew during lights as well the center spot would have been calibrated out and both lights and flats would have this shape in them. I am guessing something dewed over while or before taking the flats, but not for the duration of your lights.
If its too difficult to see i took some measurements with a 150x150 pixel area selection and took the red values in median ADU: center, should be brightest: 18650, slightly off center: 18700.
Im not sure why the other 2 channels look so different, and dont seem to have this kind of issue though. Not sure if dew could somehow only shadow the red channel? Probably not now that i think of it, but its a guess.
-
1
-
-
Just now, vlaiv said:
That is how I process OSC data "by default". Split channels without debayering and stack each as if is mono.
Green gets x2 number of subs "boost" over blue and red that way (which is x1.41 SNR improvement).
I have played around with this as well. I have a script in Siril that calibrates my frames and outputs split mono frames in the end, only thing i need to do is to put the frames in their folders in the working directory (i use symbolic links so no copying). Siril does this really fast and its only a minor nuisance now that im used to it.
-
You can split the sub into its 4 base components: 1 red 2 green and 1 blue monochrome subs without debayering. Then you see that each of the mono subs are now only 1/4 the resolution or sampled at half the rate compared to the resolution advertised. This is the real resolution captured by the camera and no interpolation takes place during debayering (because it is not debayered).
Not sure i would recommend doing this, but if you're bored you can play with this idea and process OSC as you would mono. The downside of course is extra faff during preprocessing and you get 4x the amount of subs to stack as a result.
-
13 hours ago, raadoo said:
For astronomy cameras, where there is no shutter, there's no benefit to delaying exposures.
The reason one is advised to employ such techniques with DSLRs is to avoid what is commonly known as mirror slap. A DSLR's mirror rising to allow for an exposure creates vibrations which could ruin a long exposure if not allowed some time to settle. With astronomy cameras, the only settling needed is after a dither.
@ONIKKINEN I ran a quick test with my ASI183MC Pro, indoors, doing 100 biases after cooling it to my usual -10°C to test if the quick exposures would create enough heat to move that temperature point. Cooler was running at 60%-70%. I can report it didn't move around more than + / - 0.1°C. So I guess that's one data point that says the ASI183 cooler does a good job?
Sounds like its working well.
My particular camera advertises this : -35°C below Ambient under Short Exposure/ -40°C under Long Exposure Time(> 1s)
So it looks like this extra waste heat for short exposures issue is known and not some special problem. Could be for my sensor (IMX571) or just this model of camera thats the culprit.
-
Unless the cooler is not working as intended, no point in doing this.
In very short exposures you can have issues with rapid heating with some sensors. My camera can heat up as much as 0.5C when taking very short exposures, like 0.1s flats or biases. I'm not sure if its a common issue across different models but with mine it is. The harder the cooler works the more this effect matters for my camera, so if im taking calibration frames at room temperature with the cooler running at 30 below ambient i may have to leave some delays between shots or just set the temperature a bit cooler than actually needed. Outside when the cooler is hardly working at all, no issues with this.
But generally no, there is no point in setting delays.
-
1 minute ago, powerlord said:
@ONIKKINEN - do you know if there is any success in running zwo firmware with the rising cam imx251 ? I'm a through and thorugh asiair'er (3 of them), and I'd love to grabo one of these beauties if I can make it compatible with my asiair. otherwise, it's a non starter.
I know, it's a long shot bot though if you are following risingcam forums, etc you might know ?
stu
Sorry, dont know if there is a way. I'm not super technically oriented so im not sure how to go about figuring if this could be done somehow. Maybe some electronics wizard could get the RisingCam to appear as a ZWO product to the ASIAIR but i wont be risking my unit becoming one ⚡.
-
3 minutes ago, BrendanC said:
Interesting, I've heard of RisingCam before. I would probably be looking at a second-hand QHY though, I've seen them for around the £500 mark, and I doubt there are many second-hand RisingCams around. Also the support would worry me, paying something that price..
The reason I like the QHY cam is that I keep hearing good things about it, it has a wopping great sensor, and huge pixels.
Well, i wont be putting my RisingCam up for sale any time soon, lets put it that way 😁.
-
Would be better in terms of specs in almost every category, and with binning or super pixel debayering you get a similar resolution as the QHY8L. Price is difficult to say, many places have wildly different prices.
Astroshop: https://www.astroshop.eu/astronomical-cameras/qhy-camera-8l-color/p,58166
Rother valley optics: https://www.rothervalleyoptics.co.uk/qhy8l-one-shot-colour-ccd-camera.html
The Rising cam would be cheaper than the one Astroshop sells but more expensive than the RVO one. Not sure how there can be this much price difference between the 2?
Anyway, specs wise the Rising cam IMX571 will beat the QHY8L so not sure i would go for the QHY8L, unless you get it used for very cheap.
If you dont want to go for a less known brand you could always get something like the ZWO 294MC, which also will beat the QHY8L in specs. Any particular reason you wanted the QHY8L specifically?
-
1
-
-
25 minutes ago, drjolo said:
Then selection of coma corrector (probably TS 0.95x Maxvision) and that tube should work well with APS-C format sensor. I will write about the results for sure.
I have the TS 0.95 maxfield (i assume its the same) and wouldnt buy it again now that i have used it a bunch. I also have an APS-C sized sensor and there is noticeable coma left in the corners while stars are generally larger than they should be even at the image center.
I would look for the TS GPU corrector. I dont have that myself but i dont see the same issues with images taken with one and most users recommend it so i will probably change to that some day.
-
1
-
-
I would guess them to be reflections between any glass surfaces in the camera side of things rather than something in your mirrors. You have the sensor itself, the sensor window, the filter, and several lenses in your coma corrector. The reflections could be between any of these so im not sure how i would troubleshoot this.
You could try to figure out exactly which surface is responsible for this using the reflection/dust bunny tool: https://astronomy.tools/calculators/dust_reflection_calculator
-
1
-
-
Just a quick gradient removal, colour balancing and a stretch in Siril. Looks very red to me, shot in H-alpha? I dont know anything about shooting objects like this so dont know if its what its supposed to look like.
-
2
-
-
I have the OOUK VX8 and do find the optics very good for when it matters. Speaking of that, it probably doesn't matter that much for long exposure since tracking and seeing will mask the little differences between a decent mirror and a great mirror (that is you could have a lemon in a Skywatcher and there are no guarantees its decent although rare to get complete shaving mirrors). For planetary/lunar/visual sure but i dont think there would be a big difference for DSO. Other than the optics the telescope is not really a stable imaging platform in its stock form. I have replaced the secondary spider with a sturdier one and the focuser with a Baader diamond steeltrack. Now i find myself looking for new rings and a losmandy plate for scopeside and a vixen rail for topside accessories. The vixen plate and rings this scope is meant to mate with are quite short so this is less than ideal with the bendy and very light aluminum tube so having a longer losmandy to the mount and vixen on top combo would strengthen the tube nicely. Overall the price will be quite high at that point but then i dont think i could complain about anything in the scope... The CT8 would definitely be cheaper, but that one still has the same focuser and the same spider so i would personally want to upgrade those.
The VX series is not great if you want to have a ready to go AP scope but its hard to beat the price, i got a 1/10 PV 0.991 strehl scope for 800e. Just the mirror could cost more than that in many cases so ill live with the modifications...
I was thinking of buying something like this as well: https://www.teleskop-express.de/shop/product_info.php/info/p5763_TS-Optics-8--f-4-5-ONTC-Carbon-Tube-Newtonian-telescope---fully-customizable.html
That one has a certified good mirror and sturdy mechanics ready to go for AP. Add a focuser to that (does not have one) and you are in the 2300-2500e pricerange so quite expensive but much cheaper than the AG8 for sure. I think i would go for that one if my VX8 somehow gets destroyed or stolen or something else.
-
Light leaks, definitely. Since you mention moonlight its probably the moonlight that finds its way to the camera then. If its bright enough outside for you to see your own feet (always) your camera can definitely see this as well. And if leaks exist they will be in the darks.
If your shooting location is not perfectly dark you will get light leaks through all sorts of gaps, especially on a newtonian.
You have 4 main ways for light to get into the sensor:
Front of scope, your cap is probably not light tight even if it appears that way. Back of scope, you have an open mirror in the back and if you dont block this somehow you will get light leaks through there. Actually you want to plug this during imaging as well (as long as the scope is cooled) unless you image from perfect darkness. Gaps between the focuser drawtube and the focuser body, these gaps must exist or your focuser cannot move and some light will find its way through. The fourth possibility would be your cameras tilt plate itself. It can have a little gap from which light could get through.
Take the camera out and plug it somehow completley for darks (put it in a box or something), or they wont really work properly.
-
1
-
-
For planets and the Moon you would want to use a barlow anyway so the focus issue is no problem. If yours is the non go-to version then you will have to deal with drifting obviously.
Planetary and Lunar is best done by shooting a video with very high framerates, which is something that DSLRs are not best suited for. I dont know if the 60D has an uninterpolated crop mode to shoot video with, but if it does you could use that. My 550D has a "movie crop mode" which takes a 480p area on the center of the sensor and records that to a video. This is usable because there is no pixel skipping involved. In other video modes like 1080p or even 4k or whatever you typically have pixel skipping where entire rows of pixels are just skipped for the recording. This makes the actual capture resolution very bad and pretty much unsuitable for planetary, and not that great for lunar.
But for the Moon you can just shoot individual frames without the video recording hassle and either use those as your image or try to stack the individual frames. For stacking you should take as many as your patience can endure. Shoot away until the Moon has drifted to the edge and re-center. Obviously with the tracking dob would be much easier but no real reason you cant do this without the tracking base. You can also shoot planets this way, but your framerate will be terrible and so its not that great, but will get you started and some results.
Although my image here was taken with a tracking mount, you could do the same with fast exposure times untracked, just takes fiddling around. This is the sort of image you could expect from a single shot Jupiter (i took this with the 550D and a VX8, cropped quite a bit):
Its not the best image, but you can recognize it as Jupiter and a shadow of one of the moons on it.
If you want to spend money on a proper planetary camera then there are many options to choose from, but all require the use of a computer or capture device of some sort to use them.
-
1
-
-
2'' barrel to T2 thread adapter would probably be easiest?
Just clamp it in to the focuser as you would any other accessory and screw the other end to the camera.
-
1
-
-
On 02/02/2022 at 16:22, Louis D said:
Having bright streetlights can be counterproductive when people forget to turn on their headlights because the roads are so bright. Sure, they can see the road just fine, but other drivers can't see that car nearly as easily as if their headlights and taillights were on. I'll flash my high beams at them when I pass them, but they always remain oblivious. Following them, I notice that they only turn them on once they enter an area without streetlighting.
This doesn't apply to GM and other cars that have sensors to automatically turn on the car's lights at twilight and during wiper usage. It surprises me this feature hasn't been mandated for all cars by now.
Until a few years ago here in Finland it was mandatory for all motor vehicles to have lights on at all times when driving regardless of how bright it is outside, so there really was no situation where you can forget to put them on. The law was changed to lights only being mandatory for when its dark and now some cars have this kind of automatic daylight-headlight switch when it gets dark or just the good old lights on at all times for cars that dont have this feature. I dont know anyone who for some reason toggles off their lights for daytime and almost everyone just keeps them on if they dont have the automatic lights.
The benefit in this is that you cant forget they are on, and you can notice when your lights are burnt in daytime (well the police can notice and remind you with a fine😁). Not that many negatives really, since if its bright enough outside to not need lights, its bright enough for the lights to not bother anyone.
-
2 minutes ago, vlaiv said:
I was just wondering if sharpcap did actual measurement or relied on driver reported value.
The process takes around 90 minutes with several steps in between sometimes covering the camera for dark exposures and other times re-introducing the light panel so i am pretty sure it does go through various exposure lengths and does some calibration of its own too.
-
I'm pretty sure you could get away with using one of the 30mm F4 scopes for your setup: https://www.firstlightoptics.com/guide-cameras/astro-essentials-32mm-f4-mini-guide-scope.html


Imaging/visual coma corrector options for 2 inch focusers - TSGPU/Paracorr/alternatives
in Imaging - Discussion
Posted
The Maxfield is not that picky about the backfocus it seems. I accidentally forgot to put a 0.5mm shim in that i thought i needed, but imaged several sessions without and noticed no difference afterwards 😅.
Problem with the maxfield is easy to see in the spot diagrams (looking at the RMS radius numbers, i ignore the visuals in the graphs as the scale is arbitrary), the size is very different in the center compared to the edges, which means if one focuses on a star in the center one gets soft stars in the edges but decent ones in the center. If one focuses with image statistics from the entire shot, like NINAs HFR calculations you tend to get a generally soft focus as the ideal HFR value is probably somewhere halfway from the center to the edges. I focus with NINAs HFR values, i find it gives the best result out of the tools i have at hand (no autofocuser) and still this extra coma issue is present.
With the other correctors this issue is much smaller. The GPU stays close to 2 micron RMS spot size so i assume that means the image would be flat and focusing on any point is valid. With the ES HR i see that the spot size doubles compared to the center in the edges, but the size of the spot itself is still very small. Paracorr claims to be between 1 and 1.5 micron RMS on an APS-C sized field so on paper its the best. The maxfield is the clear outlier from these and the spot size quadruples between the center and the edge of the field. If the GEO measurement is used its even worse, but i dont know what that means anyway so maybe not.