


The Lazy Astronomer
-
Posts
952 -
Joined
-
Last visited
-
Days Won
1
Content Type
Profiles
Forums
Gallery
Events
Blogs
Posts posted by The Lazy Astronomer
-
-
Rejection algorithms will deal with satellite trials when stacking. It's like camera amp glow - easily removed and a complete non-issue.
-
2 hours ago, Giles_B said:
I'm delving into the dark arts of LRGB imaging with a 1600MM Pro and trying to work out optimal exposure times, guided by this post https://www.dpreview.com/forums/thread/4377640
Having taken some test shots I've determined my SQM=18.5 [Bortle 7]
Using the calculator linked to in the post, I've determined my sky electron rate in e/pixels/s for LRGB
L filter = Sky Electron Rate 8.99 e/pixel/s
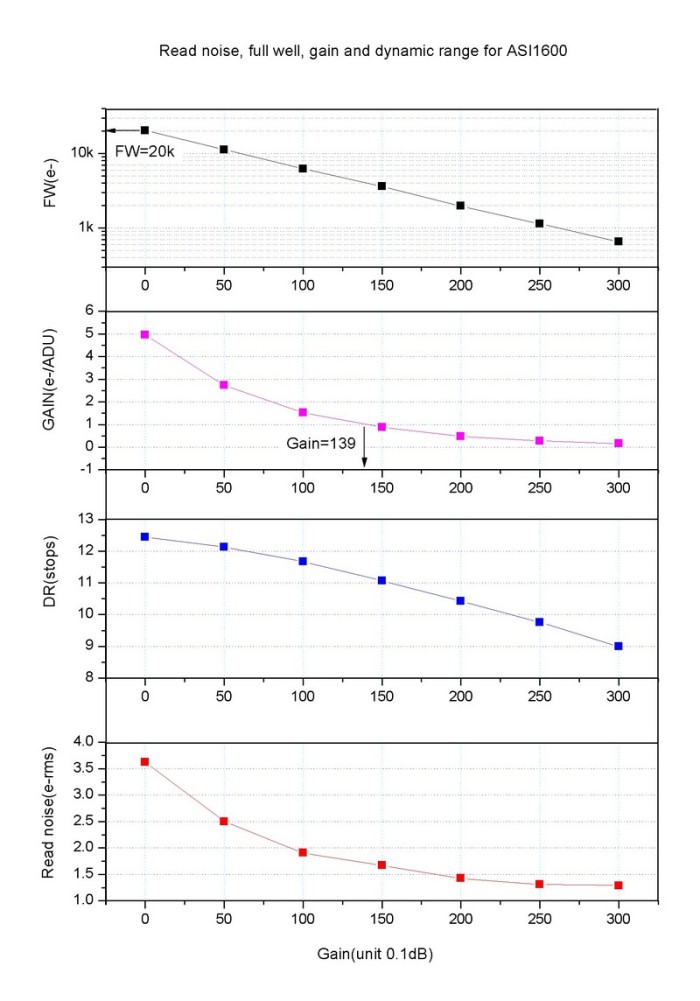
RGB = 3 e/pixels/sHowever, when I look at the technical data for the 1600MM I get either a base read noise of 1.2e or a graph that plots read noise in e-rms against gain (below). I can't work out how to relate the e/pixels/s number to e-rms, and the more I read the more confused I'm getting - could someone walk me through an answer?

As far as my understanding goes, the e-rms figures given can be used in place of e-/px/s. Essentially, each pixel of a CMOS camera has its own circuitry and therefore its own independent read noise figure. The rms figures are a way of averaging these to give a number for the sensor as a whole.
That said, do not get too obsessed with optimal sub exposure time. In high light pollution areas, you'll likely find the theoretical optimal time is <5s which, frankly, is impractical for DSO imaging. Spend 10 or 15 minutes one night doing some test exposures of somewhere between 30s - 5m and look at the image histogram to check it's not too far lifted from the left. Decide what your best compromise is between a good exposure, mount tracking ability, and storage space.
Personally, when I do mono (with a 294mm), I use 2m L and 5m RGB (bortle 5-ish).
-
 1
1
-
-
Possible interpolation artifacts - what settings did you use for stacking?
-
 1
1
-
-
4 hours ago, ollypenrice said:
That's a great result. The band of dust is much in favour at the moment and is superb in this rendition.
Olly
High praise indeed! Thanks very much. I've gone a bit mad for dust in general at the minute, which perhaps is not the smartest thing to be trying from a B5-ish area. Perhaps a trip to Les Granges is in order 🤔
2 hours ago, geeklee said:Ah, that's a nice bonus and something I've not had a chance to utilise yet. I'm looking forward to PixInsight's MARS project. Thanks for the extra details 👍
Before this image, I wasn't sure of the benefit of MARS, given how good all the various gradient removal methods are, but now I'm convinced. Last I heard they had around 1/3 of the northern hemisphere covered, so probably still quite a way to go until it's released, sadly.
-
1
-
-
13 hours ago, Icesheet said:
I would love it if my destruction ended up like this! Great image 👏🏻
You didn't see the previous 4 versions!! 😆
-
4 hours ago, geeklee said:
Superb result! Was is difficult working with the different data sets and bringing them together? Looks like RGB from the lower FL/resolution rig and the L and Ha from the higher FL/resolution one?
That must have felt good
")
Thanks! Yeah the smaller scope collected the colour, the L and Ha are from the bigger one. It wasn't difficult at all to work with them; no different to doing a normal LRGB image all from a mono cam. Actually slightly easier, because I only had to stack 2 sets instead of 4. The RGB data is rescaled, aligned, and cropped to match the L data, all handled by PI's StarAlignment without issue.
The biggest difficulty in combining the data was trying to keep the Ha largely out of the dust and restrict it to Barnard's Loop.
An unexpected advantage was the wider FOV from the little Sharpstar allowed me to use the multiscale gradient removal technique on the Esprit data which helped no end - DBE was pretty much impossible on it 'cos there ain't exactly a lot of background there!
-
1
-
-
4 hours ago, WolfieGlos said:
ME! This one looks familiar, haha.
Great image, nice detail in the core and star colours too.
Haha yeah, I did consider posting it upside down to create some distinction from yours, and I have to admit I did use your image and the feedback you got on it as a reference, particularly your blues.
-
1
-
-
In November last year, I finally pulled the trigger and got myself a second scope and camera for speeding up data acquisition. After a bit of faff getting everything set up, I was able to take advantage of a couple of good nights in December and grab a solid 20hrs on M78, which felt very satisfying.
Since then, I've spent most of January finding as many ways as possible to totally destroy the data in PI (who'd have thought faint dust and dark nebula would be difficult! 🤪). I have now settled on something I'm happy which I think respects the data, but open to any feedback or critique.
Portrait:
Landscape:
Details:
Approx. 9hrs L, Esprit 100, 294MM
Approx. 7.5hrs RGB, 61 EDPHIII, 533MC
Approx. 2hrs Ha, Esprit 100, 294MM
-
22
-
-
I'd agree with geeklee, very punchy when viewing direct from the post, but a full size inspection reveals some ringing on the stars, which is a classic artifact produced by pushing sharpening or deconvolution a touch too far.
I do very much enjoy the way the reds of the hydrogen are framed by the darker dust.
-
1
-
-
I'm not very good at getting around to actually processing, so I'm less of an astroimager, more of a data acquirer... But anyway here's the four I managed to finish last year:
1. C/2022 E3 ZTF
2. M42 & M43
3. Tadpoles in SHO
4. Crescent in HOO
-
10
-
-
It's a pretty relaxed affair for me - I leave everything set up, so the whole kit gets moved in one go. Plug in data and power cables, quick power align in Sharpcap and away we go! Takes 10 or so mins start to finish (but I'll admit I don't look forward to the actual 'moving it' but, it's a bloomin' heavy lump!!)
-
Ah another one of these announcements for an announcement...
The picture may be a red herring, but I agree it looks like a rasa 6 of some form. Not sure if there's anything to be read into the inclusion of that camera in the image (looks different to anything in their current range) - maybe they want to try and take on ZWO??
-
Core of M42 is blown out, 4/10 must try harder 🤣
In all seriousness, I keep coming back here just to have another look, there's just so much going on I don't think it can be fully appreciated in a single visit.
Also interesting to see the proximity of the spaghetti nebula to Orion. I don't really know where I thought it was, but it was nowhere near there!
-
1
-
-
Well I'm not sure where you guys all live, but just to buck the trend here, I had my third clear night of the month last night. The forecast was pretty sketchy, so only set up to conduct some tests, but all the clouds just seemed to skip around me all night. Ended up imaging all the way until 2, only stopping when my target moved behind a tree. When I went out to pack up, it was nothing but clear sky all around as far as I could see.
-
2
-
-
My favourite image tends to be my most recent one, but this year I think the novelty of my first and to only comet from just pips it for the win. Not least because the sky miraculously cleared up for me when it was basically at its closest approach!
It's not been a hugely productive year for finished images owing to weather and other commitments. I must have around 60ish hours worth of part finished projects, so hopefully next year I can get at least some of them completed!!
-
10
-
-
Yep, should be no problem, but may depend on which stacker you use. I know PI can register images with different image scales, not sure about any others.
-
A 1.25" filter will be too small for an aps-c sensor. You'd have to crop the frame to around the size of a 4/3 sensor.
I'm not aware of any work around with the SW FF - I think the only option really is the Starizona FF which has 55mm back focus.
-
1
-
-
You have to start the search from within whatever sub forum you want to search
-
On the mobile Web browser version, there's an option in the search box (you have to select the search box first, then the drop down list appears)
-
If you don't have a flattener already, then yes.
If you have a flattener, then your backfocal distance is wrong (camera is too close) - see below:
-
3
-
-
Very much depends on the proximity of the comet. When C/2022 E3 ZTF made its closest approach earlier this year I shot it at 550mm using a 4/3 sensor, and to be honest, I'd have liked a wider fov.
-
1
-
-
8 hours ago, Carbon Brush said:
+1 for @Synchronicity comments.
The common drive assemblies all use cheapie connectors. No gold other non corrosive plating. No sealed assemblies. Then we let them get damp.
When you reassemble, put a bit of silicon grease in the contacts to inhibit further corrosion.
You don't have to be neat and tidy. An electrical or food grade grease won't harm plastics.
Alternatively petroluem jelly - vaseline.
If you use car type greases you risk reaction with plastics in the long term.I regard the corrsion prevention as an 'always do this' process, whether dealing with scope stuff, changing a car bulb, or opening a car electrical connector.
HTH, David.
Off topic excursion, but your comment reminded me of an experience some years ago where my motorbike wouldn't start one day after work - lights and dash all came on, but no fuel pump prime and no crank. Oh dear, I thought, this could be expensive... I then had the thought to just check the killswitch as I'd heard about issues with corrosion causing this sort of problem. Upon opening the housing I saw no corrosion, but discovered a piece of dried leaf had somehow got in there and managed to wedge itself perfectly between the contacts!! Once de-leafed, function was returned and off home I was able to go.
-
21 minutes ago, Icesheet said:
Another great image! How are you adding RGB colour to the Ha stars?
I did use star removal and I can keep it small enough it’s really the halo that I’m struggling with. You don’t seem to have any here which I’m jealous of!
Thank you! Although I'm looking at it now in comparison to the others here and thinking I can do better... I think I smell a reprocess coming along (I mean, what else have we got to do - certainly no new data captured recently!!)
This was from a couple of years ago, so I'm afraid I can't be very helpful with how I did it. I think I just applied Ha stars as luminance to the RGB stars then some saturation boosting.
Re: halos, I'm not sure how I got away with none on alnitak, but I'm currently working on a jellyfish nebula image with some fairly large halos around propus and tejat (in Ha and Sii, but not Oiii, interestingly). The tejat one was particularly tricky as it sat over areas of nebulousity as well as background sky; what seems to have worked well so far is to use the GAME script to create a luminance mask around the halo and massively increase the contrast to try and provide more protection to the non-background areas and use some pixelmath to reduce the impact of the halo.
It can also be done more simply with masking and curves - I wasn't able to get a satisfactory result with curves, but then I am something of pixel peeper..
-
1
-
-
Using GHS for stretching, applying RGB colour to Ha stars, and using Starnet to allow a seperate gentler stretch on the stars worked well enough for me I think.
-
2
-


GBv4.png.8940c1ecafabe4f3fdc8134477a28d64.png)
GBv4(1).png.6c9531c3bf083d55789b0086c40ad902.png)


Clear outside eh??
in Getting Started General Help and Advice
Posted
Green = low or no cloud, red = loadsa cloud. The accuracy of the forecast will vary, so maybe don't plan your life around it.
The yellow/orange/blue/black bar is the daylight and civil, nautical, and astronomic darkness times. The grey/blue bar represents whether the moon is above the horizon (grey = moon up)
If you expand the day you'll get an hour by hour breakdown from 3 seperate cloud forecasts, which may or may not agree with each other, or indeed, reality.