


gian
-
Posts
22 -
Joined
-
Last visited
Content Type
Profiles
Forums
Gallery
Events
Blogs
Posts posted by gian
-
-
i have located a used TS optics 150/750 with a EQ3-1 mount and tripod, with all the bits and pieces, for the equivalent of 120 euro
might just get it, sell the 150/750 and keep the rest for the 130p
-
i have located a EQ-3 with tripod but the seller says he is fixing it because of a small defect, so waiting
i also found this from the usual suspects
would it be ok for a 130p?
https://www.teleskop-express.de/shop/product_info.php?products_id=4949#cs
-
On 26/10/2019 at 18:19, Alan64 said:
That's quite a low-profile focusser as it came originally. If you're referring to those of the Chinese eBay listings, I've seen them. They appear to be viable, and of metal, but again it would need to be shortened somehow, rather drastically I'd say, and yet another DIY project if possible.
Hi Alan
thanks for the info, i think i will order one. shortening is not a big deal. i could actually design and build a focuser but modifying an existing one can be cheaper and quicker. together with my extra trusses should work fine, and the support bracket will be lower than the stock one. my only doubt is the funny angle of the stock 130p focuser. ill take more measurements but it doesnt look 90 degs with the main tube"
"used EQ-2 mount(about 60 eur), although EQ3 would be much better, this one has a bit of whiplash"
thanks, will keep eyes open for a EQ3
gm
-
Hi Sub Dwarf, i might have located one of those eq mounts, if they ship to Switzerland
i have seen that on ebay there are rack and pinion focusers for sale cheap, around 35 dollars, are those any good (better than the stock 130P focuser) or no point in wasting time and money? im almost done reinforcing the focuser support and i could easily replace the standard focuser with something better
-
 1
1
-
-
6 hours ago, Chriske said:
Someone suggested Google : 3d printer fire.
Do the same and Google also : washing-machine fire, dish-washing machines fire, laundry dryer fire...etc...I'm not saying ignore safety measures, let that be clear.
the difference is here: it is safe to assume there is a washermachine in every house. so yes, occasionally they burn, but is a very rare event considering the installed base.
plus washermachines have to go through testings and certifications. on average, they are built very very well, i have opened/fixed a few and the amount of engineering behind a washermachine is enormous. literally decades of evolution and millions/billions units built.
on the other side, there might be one 3d printer every 1,000 houses or probably less, still you can find several cases of 3d printers burning.
plus, a 3d printer will have up to over a kg of fuel sitting in close vicinity: the filament.
i am far from being paranoid about fires, but i am aware of the limitations of 3d printers, the amount of engineering in them (pretty low, expecially the homebuilt ones...) and the quality of the components used so i will leave a washermachine running unattended, but i will not do that with my 3d printer just yet...
power supplies: yes i know most PSU are chinese built nowadays but there are huge differences in build quality, materials used, design. some are pretty good, some are just outright dangerous. plenty videos on YT of people taking apart chinese electronics and finding abysmal stuff.
i have usually trusted them, until one PSU i fitted to a CNC router i built went in flames right in front of my eyes. amazingly, the PSU kept working until i switched everything off.
a bad cap is enough to ruin your day, and chinese are not famous for using good quality caps and transformers, which are what stands between you and a fire or an electrocution in a switching power supply.
All printers are protected by a firmware settingi work in software industry, pretty big and expensive stuff.
trusting my life on firmware? nnnope....gmr
-
PLA mechanical qualities are too poor for prodicing parts that will see real world use. PLA parts will shrink and warp just esposing them to the summer sun if of dark color
thing is, i have not found any reason to use PLA. where i buy filament from, PLa and PETG cost the same, so why bother.
3D printers are not really a "consumer" item yet,
i disagree good quality, well assembled printers will work right out of the box if the part to print is printable.
there is no real reason why they should not. the problem imho is that some cheap printers do not have proper (or any) support and one has to figure out all printer calibration. settings and parameters. for comparison, you dont have to setup and calibrate the ink jet printer you buy, they are already properly designed, engineered and setup. else. printing would be next to impossible.
of course one has to choose whether the printer is a tool that must produce useful parts, or a hobby in itself
as for leaving 3d printers unattended
https://www.thissmarthouse.net/dont-burn-your-house-down-3d-printing-a-cautionary-tale/
 just google 3d printer fire.
PLA ignites at 340C, PET at 390. an extruder out of control will easily reach that. then there is the power supply. chinese built generic power supplies are not to be trusted, believe me. cheap caps and crappy transformers are perfect for starting fires. personally seen several of those burning, or blowing up,
i personally wouldnt do it, expecially with self built, untested rigs.
-
hi all
i have no experience with 3d printers other than the prusa I3 mk3s. at the time i did some research and ended up deciding to pay some more and get something that would work, and work out of the box, without spending weeks tweaking the 10000 paramenters of slicer and printer.
bed leveling is extremely important. if leveling is not correct filament will not stick to the bed, or will be dragged by the nozzle. the difference between these two is really small, less than .1 mm .
also, first layer is what will makes a difference between a printed part or a mess. id suggest designing a 2x2cm rectangle half mm thick, place several on the bed, slice and print, looking at the quality of the first layer on the different areas of the bed. when filament is changed, run this print to be sure first layer is ok.
if the first layer is not good, all the rest will fail. first layer must be spot on, and reliable.
slower first layer (10-14mm/sec) always improves quality of the prints,
filament: i get always the same filament from the same supplier. no time to spend hours experimenting with different filaments to theoretically save a few cents. and believe it or not, same filament of different color will require Z axis adjustment. i only print with PETG, PLA is only good for toys or prototyping, not for stuff that will be used for anything practical.
bed preparation: spring steel bed with PEI surface. i use a thin layer of glue stick, put a few dabs here and there and spread it with a slightly wet sponge. tried lots of other methods. but this works. glue has to be fresh, or at least sponged up a little to make it wet before printing.
i always print from sd card. it will work reliably, even though my computers run on linux and dont reboot by themselves.
i NEVER print at night, with printer unattended. even though the prusa is very reliable, i live in a wooden house...
gmr
-
Hi all
as there is already this thread on the 130p i post here
i am reinforcing the focuser assembly with two more alu trusses and 3d printed brackets. i opened a thread in the DIY section
but the best would be to replace this focuser with a rack and pinion type.
i have seen metal rack and pinion focusers on ebay around 30/35 dollars, does anyone have experience with those? are they any good?
gmr
-
struggled a bit with the links...
-
Hi all
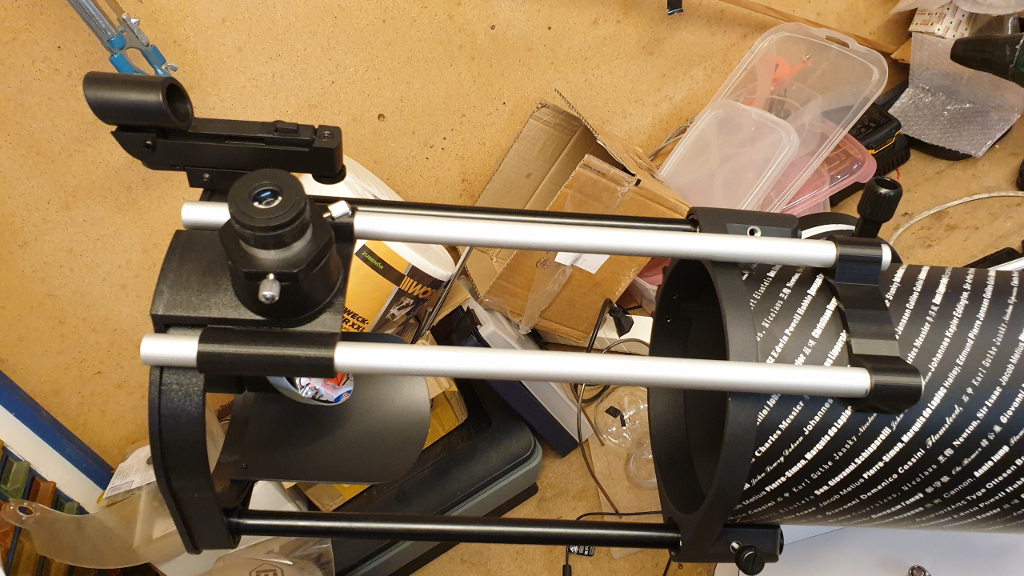
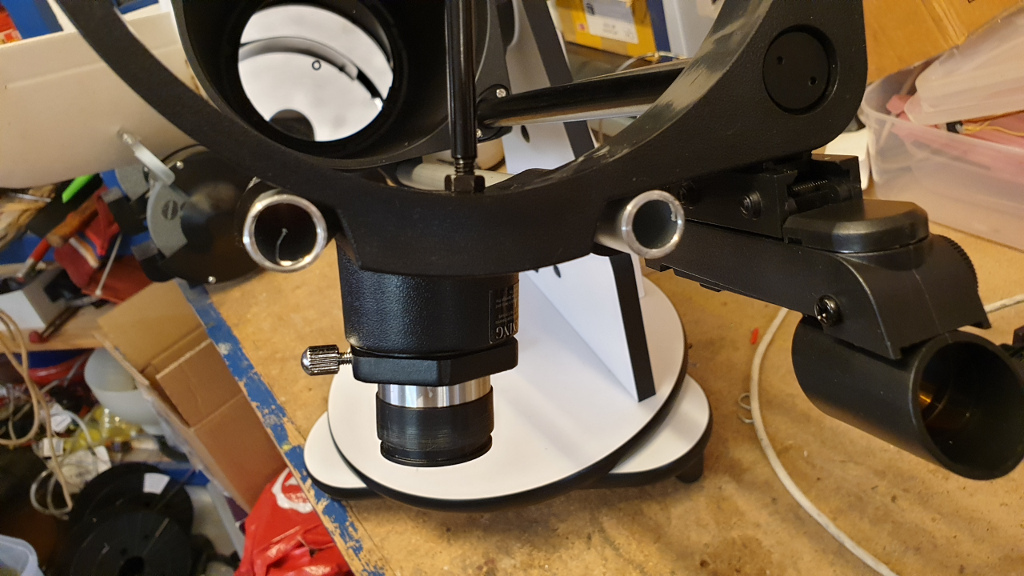
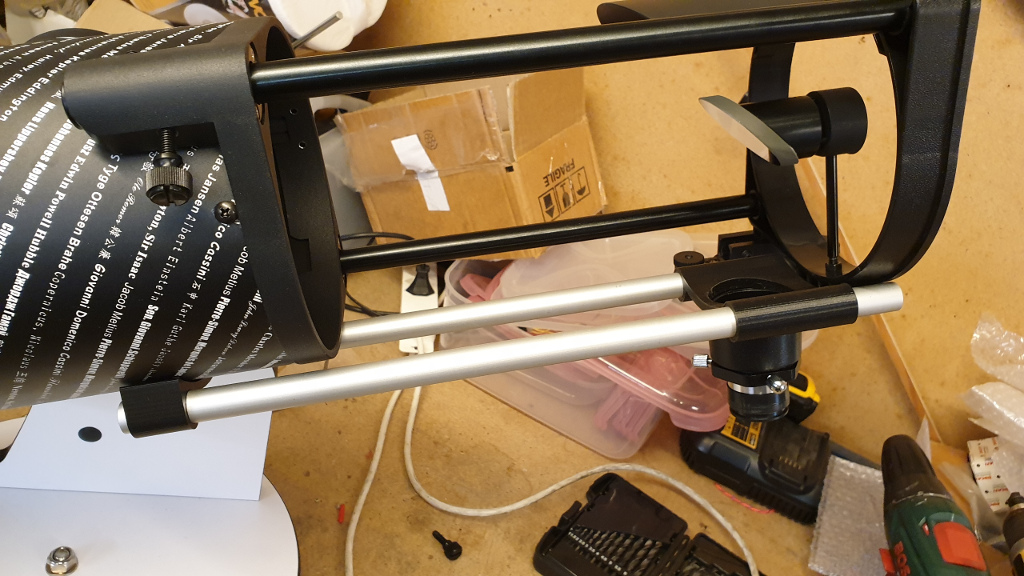
following a discussion on the beginner section re beginner's astrophotography with this entry level telescope, and the shortcomings of the 130p focuser assembly, i have put together a support. it still allows the telescope to be collapsed for transport and storage
with this support, the assembly is a lot more rigid and will not flex, also stabilizing the secondary mirror (the secondary mirror will move a lot when the focuser assembly is moved even by a small amount
this would allow the use of a heavier camera (a DSLR perhaps) mounted on the standard eyepiece. this might also permit the installation of a better focuser, i havent checked whats available, or if one can be easily homemade
i have however noticed that the focuser assy does not point straight at 90% towards the secondary mirror, but is canted slightly towards the bottom of the scope. not sure whether it is a defect of the plastic part or a design feature
at this stage, i could glue/screw the support to the focuser assembly as it is, or bend it to straighten it up. i think my preference would be to glue the support to the assy as it is.
opinions?
all parts are 3d printed, the aluminium is a standard anodized alu tube 15mm OD that can be found in the usual DIY shops
-
14 hours ago, happy-kat said:
The telescope is the OneSky in the US and has a massive following (a very long thread on cloudynights). of everything I've read I've never read the focuser failed, I wouldn't worry about it.
Hi Kat
the focuser will not fail, as the plastic part is quite substantial but it flexes a lot. and when flexing it carries with it the secondary mirror, amplifying the flex by at least an order of magnitude. so much for carefully aligning the mirrors lol
i have quickly taken some measures and designed this part. the ring can be plasma cut from steel and thats quite cheap process, or cut on a decent router. the focuser assembly tab is 8mm steel and is welded to the ring.
the ring can be screwed to the existing plastic ring, or even glued. probably enough zip ties would even do and eliminate most of the flex
this can be installed so that the original focuser support remains in place and the mod can be rolled back with minor impact on the telescope
two extra 6 or 8 mm trusses can be easily added, with two 3d printed guides that then get glued to the main tube.
a better focuser assembly can then be fitted to this ring. i dont have any idea what sort of focusers are available on the market at a decent price and what sort of attachment they have so my design stops there.
this part in steel would weight 640m grams, so not light, but i have designed it very massive and thats a worst case scenario. this can also be done in alu, but i dont have an AC tig welder . alu is also much easier to cut but less strong
Sub-Dwarf, i think i have seen that mod before. pretty cool.

-
1 hour ago, CraigT82 said:
I would steer clear of the eyepiece projection, just use a T ring and 1.25" nosepiece and shoot at prime focus.
Though I'm not sure how the focuser assembly would handle the weight of a DSLR, might twist or sag
i share your feelings about the focuser assembly. but the D40 is rather light at more or less 500 grams. my D3300 is even lighter and has liveview mode so i can use the lcd
i can also design and install some sort of support. im planning to beef up the focuser assembly anyway as it is really flimsy.
the focuser assembly is probably by far the crappiest component of this telescope. im surprised, considering how many have been probably built, that there is no metal (or at least more rigid) retrofit
-
i also found this thing
https://www.thingiverse.com/thing:3334364
is an adapter to fit a nikon body directly over an eyepiece. i thought this would not be possible? well, this is easy and might try it. filament is cheap.
also found adapter to fit a nikon camera body to a 1.25 focusser. might also try that. weather sucks, and the 3d printer sits idle
-
5 hours ago, Cosmic Geoff said:
If you are into serious DIY, consider making a proper equatorial mount with RA drive. Amateur telescope makers used to do this in the days before Chinese-made mounts and credit cards. Or keep an eye on the second-hand market and see what comes up.
A budget alt-azimuth GoTo mount (e.g. Celestron Nexstar SLT or Skywatcher Synscan) will work quite well for short exposures with a small telescope, if you fancy that route. See my posts under EEVA reports.
Hi
i had a look at that stuff. will sure consider it for the future. my doubt is how long it takes to set these up for observation. i dont have a fixed observatory so i need a rig that i can set up quickly.
i saw things like this
https://www.instructables.com/id/Control-Your-Telescope-Using-Stellarium-Arduino/
or the OnStep
however for the time being i think ill go for an equatorial platform
on a different note, i found a tip on a YT video about a thing to accurate focus, is basically a front cover with two holes
something like this
pretty quick to make or 3d print,
-
31 minutes ago, MimasDeathStar said:
Is it this one?
www.umich.edu/~lowbrows/reflections/2010/yinugi.4.html
I've got this one saved on my computer browser, I thought it might have worked for my little refractor but it seems it requires slightly more DIY knowledge than I have.
this is an interesting link. costruction is fairly simple.
i would probably use something more powerful and stable than a kitchen timer. stepper motors are very cheap nowadays and driving them is also cheap and straighforward to anyone with a little knowledge of electronics and microcontrollers
here a good link on how to use a stepper motor. these things are very precise, usually 400 steps per turn.
https://lastminuteengineers.com/stepper-motor-l298n-arduino-tutorial/
-
what did you use to connect the 1100d to the 130p?
-
Hi Happy kat
that was an awesome moon picture. definitely the large high quality sensors of DSLR cameras are in a different league, i will try the DSLR setup when i have some time. actually i have a nikon D40 abandoned somewhere so i could do something with it, is rather light and expendable
in the meanwhile i tested the C270 webcam with its lenses and adapter, fitted to a 10mm eyepiece. it works and focuses ok pointing at the neighbours' trees. printing a different adapter now so to introduce some relief between eyepiece and webcam
a front arrived so no sky in sight and will be like this for some days, so i can work on the telescope
i will definitely look at the barn door, i have previously seen something similar on hackaday website i think
actually, in the workshop i have seen a wheel bearing assembly that would be precise and solid enough to build a homemade equatorial plarform 🙂 but thats for another day
-
Hi all
thanks again for the good info
a friend warned me that astrophotography will make a heroin addiction look cheap and healthy

i wanted to clarify one thing, this is my son's hobby, he is only 9 and for the time being we are not going to throw thousands or even hundreds at this. also we are limited by the fact that he goes to school so he needs to go to bed early therefore our scoping sessions are short, and limited to the hours from sunset to 2130 or so. i will help him of course with some equipment but mostly we will try to extract as much as possible from this scope spending as little as possible. after all, anyone can put a couple thousands on the table and buy better equipment, but one of the things my son is learning is how to do more with less, and to use the brain and hands instead of the credit card (which would be my CC btw )
after all, if we wanted high quality pictures made with expensive equipment, then it would be enough to download what people do with more hardware and skills
one thing he is learning quickly is to lower expectations to real world level 🙂 so he accepted that quasars and pulsars are out of reach, and he is concentrating on planets and moon.
i have a well equipped workshop, i can weld, machine, 3d print, and i can program microcontrollers to drive stepper motors or actuators
i am aware of the limitations of this telescope. the dobsonian rig is a PITA, and the focuser assembly is plastic that flexes and vibrates a lot.
equatorial mounts and serious tripods are expensive so we might opt for an equatorial platform we can build ourselves
i am also considering fitting a servo motor at least on the elevation axis, which would be rather easy to do and would stabilize things a lot, and perhaps a servo motor for the focusser, which would make possible to focus without touching the telescope.
reinforcing the focusser assembly is also a possibility, i am giving it some though, it should be possible even to build a metal one that would be far more rigid.
i was a bit disappointed by the results of the C270 webcam sensor on prime focus, but to be honest, the FoV is so small that there is no time to play with camera controls and all i got was a rather washed out image. must be said though that conditions were far from optimal, with the moon still low in a so-so sky. tried to image saturn but all i got was a white oval on the screen. and very tricky to find and focus.
will give it another shot in the future, for the moment i have designed and printed an adapter to use the C270 with its lenses mounted on an eyepiece, lets see what happens there. the good thing of 3d printing is that building parts for tests is very cheap and i can design and print the parts while i work.
i will probably get that Sony sensor module, is cheap enough and i can recycle it for other stuff if it is not suitable for use in the telescope.
in the long term, we have family in spain in a tiny village in the middle of nowhere, 1000mt altitude, 20/25% relative humidity, no pollution of any kind, and skies there are like i have never seen anywhere else, we will be in holiday so we will be able to have longer telescoping sessions, and by then i hope we will have the scope setup for some decent observations/pictures.
-
2 minutes ago, MimasDeathStar said:
I may be wrong but my understanding is that the field of view is related to a combination of the focal length and the eyepiece. When you replace the eyepiece with a DSLR which has a nice big sensor its the equivalent of using an bigger eyepiece (like a 25 or 30mm for example) but when you use a camera with a very small sensor its the equivalent of using a very high zoom eyepiece (more like a 5mm eyepiece) so your field of view will always be very small.
Hi
yes it looks like that is the case. dont think using a DSRL is feasible with this small telescope
-
1
-
-
23 minutes ago, Cornelius Varley said:
Hello and welcome to SGL. The camera module you linked to has very small pixels (2.9 microns) so the actual size of the sensor is probably no different to webcam you have already used. A useful tool for determining the FOV of a camera / telescope combination can be found here .
Hi Peter
thanks for the answer
yes i think sensor size is similar so i would run into the same problem. perhaps a reducer could be an option?
i will play with that tool, thanks for the link.
for what i have seen larger sensors become very expensive very fast... and a DSLR is probably too heavy for this telescope.
i assume that having the least amount of glass or plastic between secondary mirror and sensor is best.
-
Hi all,
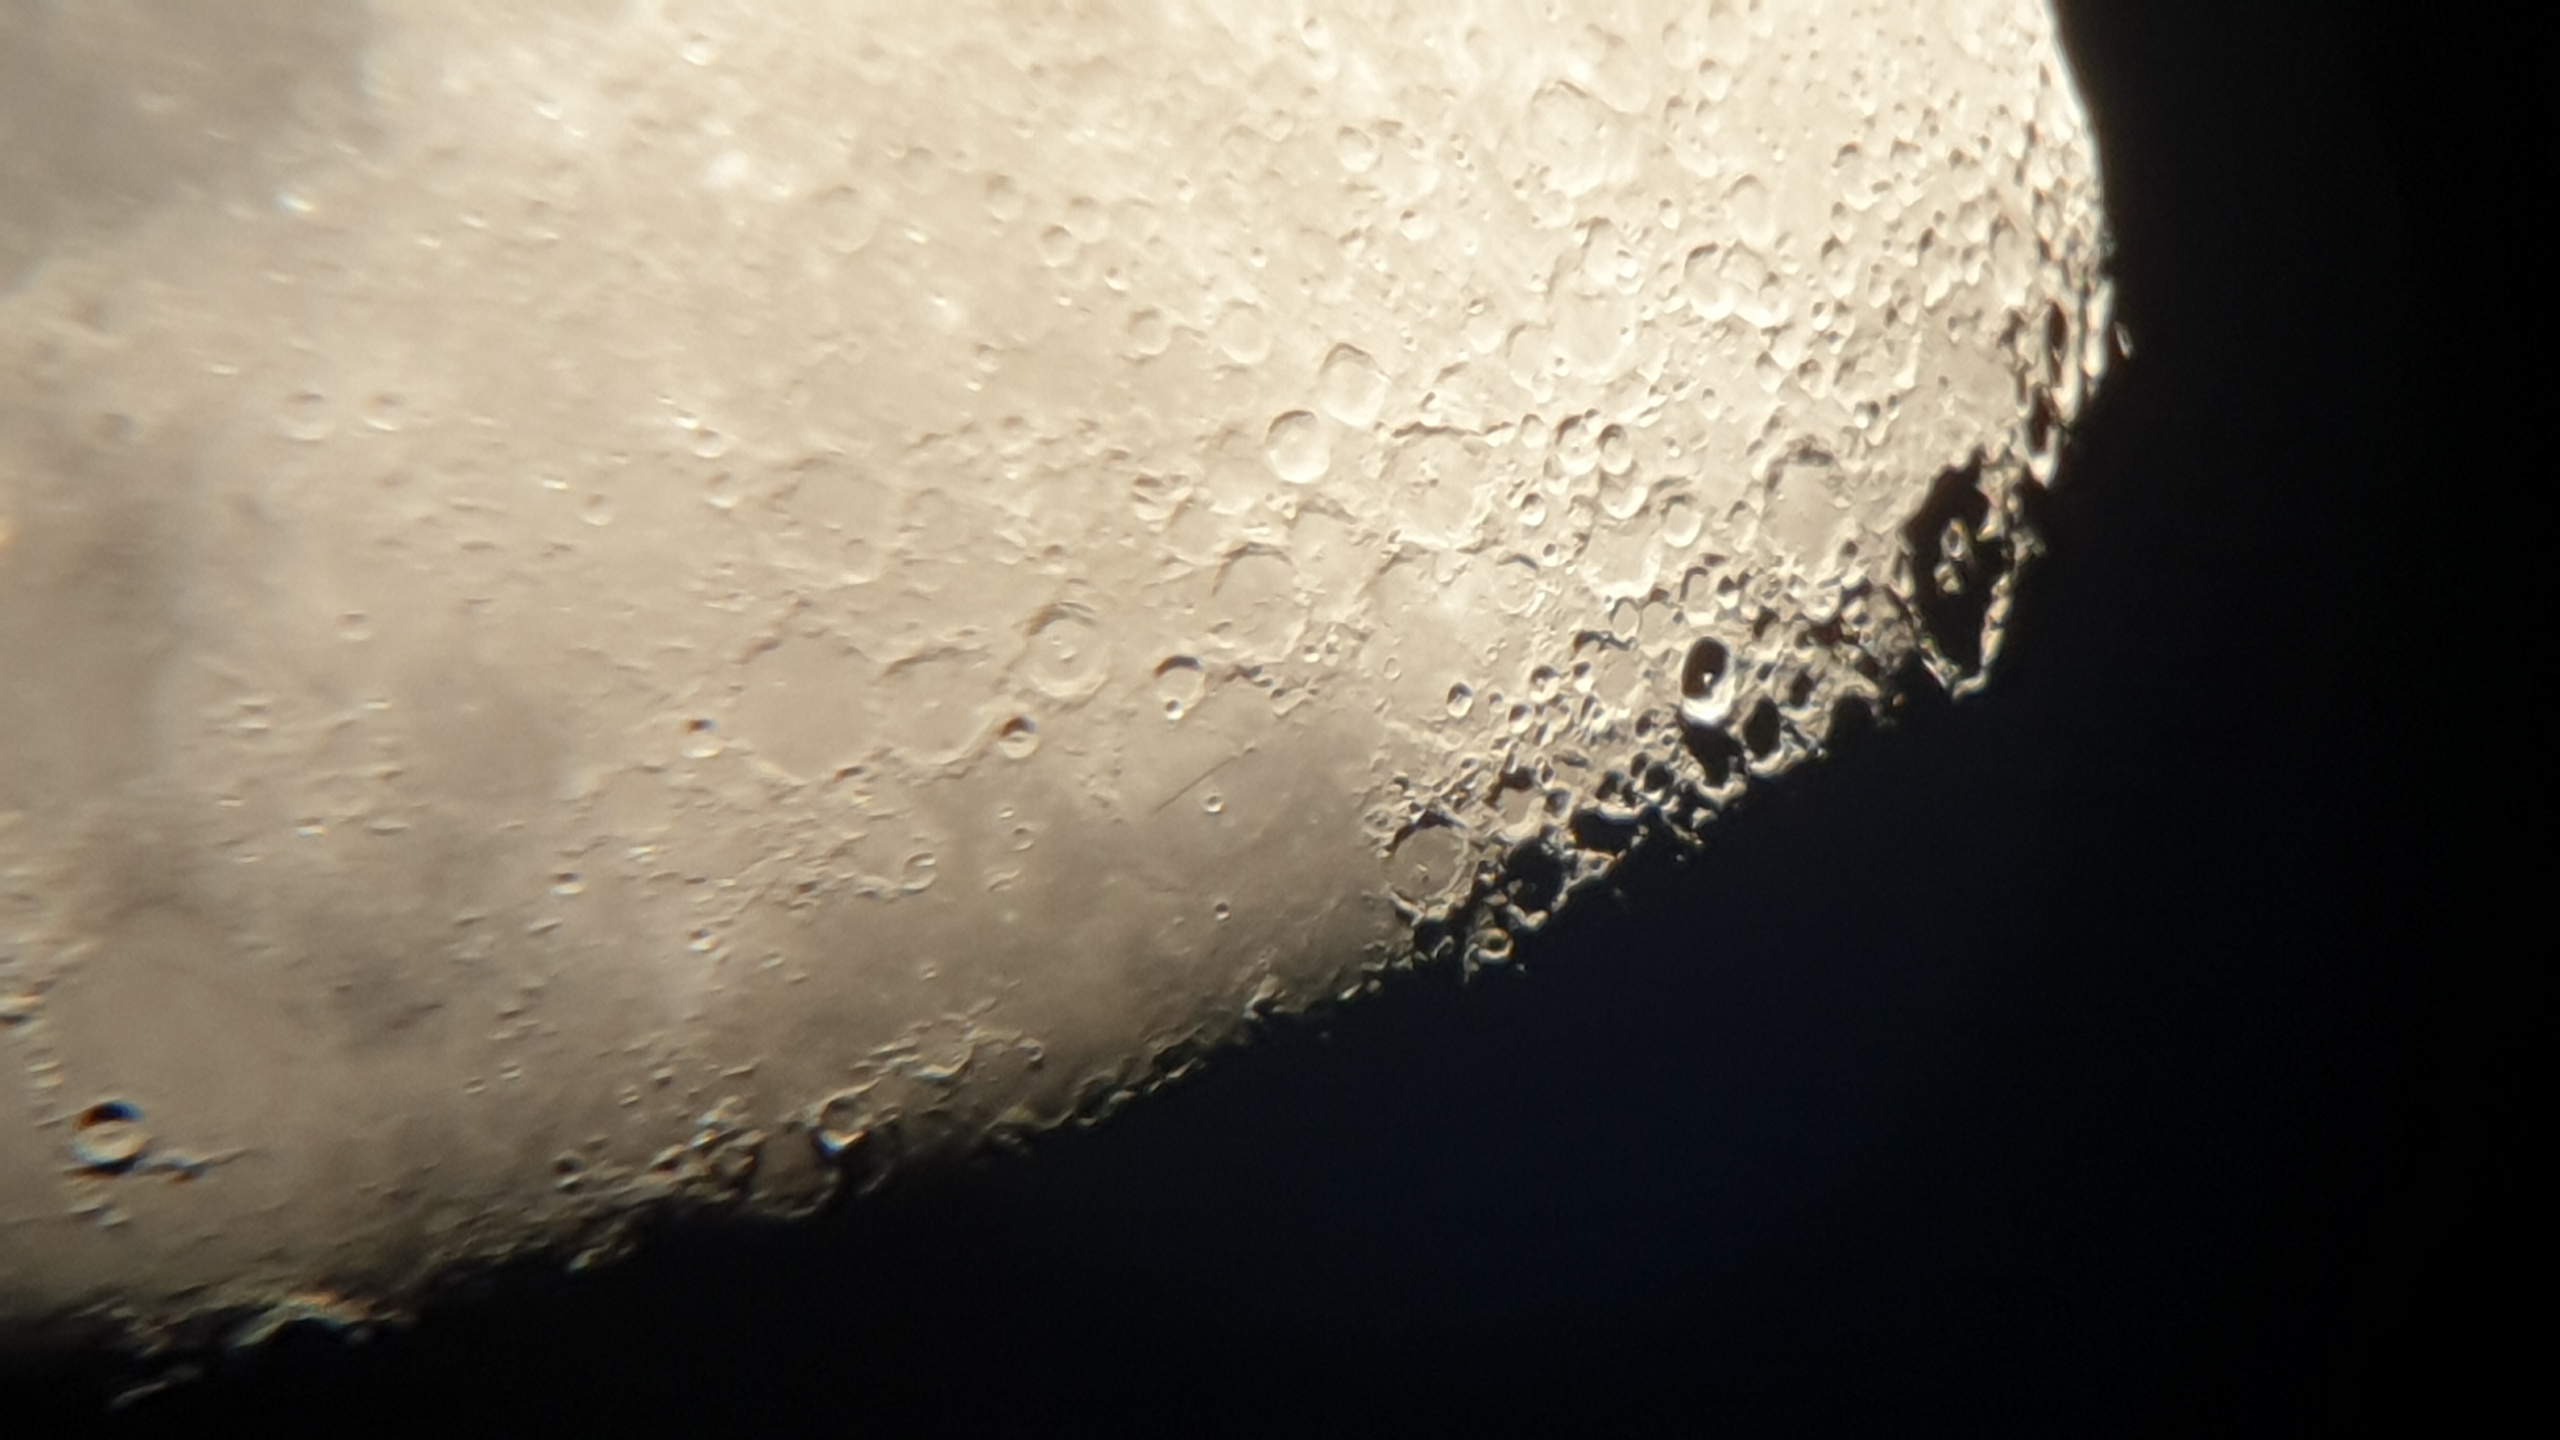
my son wanted a telescope for his birthday and thanks also to the very good info i found here we went for a sky watcher heritage 130p
i am really impressed with this little scope, we can clearly see Jupiter's moons, Saturn's rings, and amazing views of the moon. i live in the countryside and we are 5minutes drive from a hill with a bench and no lights around, perfect to set up the scope
now of course my son wants to take pictures to share them with his friends so we have been experimenting with cameras. our goals are ( for the moment ) rather modest, take pictures of the moon, and possibly an image where saturn rings are visible.
i have designed a 3d printed an eyepiece adapter for my S9 and we can take really nice pictures of the moon, below a link to an example of our first attempts
i also got a Logitech C270 and modified it to fit the eyepiece mount.
as expected, i have to retract a little the secondary mirror in order to focus, but the main problem is that the FoV is then tiny. finding anything except the moon is extremely hard, and objects disappear in literally seconds.
i also tried through a 2x Barlow, i can then focus without retracting the secondary mirror but FoV is even smaller.
i think the problem is that the sensor is too small, and catches only a small part of the available FoV. but i would like confirmation from people more expert than me (which is easy, i know next to nothing about all this)
i am considering trying the C270 with its original lenses and building an adapter for an eyepiece, maybe someone has an opinion?
i have also located this sensor module, its a CMOS but is supposed to be very high quality, havent found anything regarding its use for astrophotograpy
thanks to anyone who would want to comment
http://gianmarco.dyndns.org/public/astro/moon1.jpg
-
2
-


photography with a Heritage 130p
in Getting Started With Imaging
Posted
Hi
i actually got that focuser, but the version with the thread instead of the flange. it is a 2 " focuser so pretty large for a 130p. i have designed and built a completely new support system for the focuser but it is a bit small for this 2" one. will need to modify it slightly in order to make space for the thread. then i need to shorten the focuser as it is too long.
however i dont want to remove the stock focuser so i will need to do a little more designing for the new support that will be in parallel with the original focuser.
lots of projects currently on my bench, and workshop is bloody cold... but it is slowly progressing.
we had some clear nights and had a chance to take a look at Venus finally. not so exciting, as expected, and the atmosphere is really moving!
if anyone would like to comment, what do you think of the EQ3-1 vs the EQ3-2? i had the chance to look closely at a EQ3-2 and seems a very nice piece of hw. i am still not sure about that TS 150/700 mounted on top of a EQ3-1, price is pretty good but is a 2hrs drive to go pick ut up
gm