


Andrew*
-
Posts
6,824 -
Joined
-
Last visited
Content Type
Profiles
Forums
Gallery
Events
Blogs
Posts posted by Andrew*
-
-
It's very loose and swings freely. Needs to be finely balanced if you want to leave the clutch off, and cannot be balanced at all with the supplied dovetail and heavy eyepieces.
-
 1
1
-
-
I use a case I got from Telescope House some years back. Most slip into pre plucked holes. The bigger stuff, goes in sideways in the rectangular slots.....
Cheers,
Andy.
ps: The threaded adapter is for the Speers variable eyepiece. Turns it into a 3 - 4.8mm from a 5 - 8mm.
Lots of interesting stuff there Andy!
Could you please annotate the picture - I can't work out what a few items are!
-
I took advantage of the 10% bank holiday discount and ordered a few winged rubber eye guards and a Telrad base plate on 25th May. They arrived today, so can't really fault that

I've ordered several times from TH and always had a similarly efficient experience.
And I can highly recommend the winged eye guards

Andrew
-
Nothing wrong with an Orion Shorty. A Shorty-Plus would have been even better, but at around double the price...
Well done
Andrew
-
EP focal length and the selection is one thing, it would be good to answer the questionn "All you wanted to know about Eyepieces but were afraid to ask" type o "which is better 1.25in or 2in eyepieces?". Perhaps expand this into af post

Perhaps this is the kind of guide you are talking about:
http://stargazerslounge.com/primers-tutorials/63184-primer-understanding-choosing-eyepieces.html
It also goes into the difference between 1.25" and 2" eyepieces.
HTH
Andrew
-
-
Excellent experience with RVO. Emailed them on Saturday requesting a price-match on Scopes 'n' Skies price on a 15mm Antares plossl (£19.99 incl postage). I received a reply same day, and they honoured their "price match promise". I ordered over the phone on Monday and received the eyepiece the next day (today). Couldn't be better in my book.

Andrew
-
I've very recently gone to all-in-one case that carries everything I could need in a night (minus laptop and power). I haven't actually used it yet but I think it will be a great improvement over the 3 different aluminium cases I dealt with before, which between them didn't hold everything. It doesn't offer quite the same protection as the alu cases, but it stays upright, doesn't go about much and offers perfectly adequate protection I think.
I got it in B&Q for a reasonable £17.49, it has a top section and a bottom section, with a few spaces for bits and bobs too. Build is not the best, but okay.
The top section holds my eyepieces, the bottom everything else. I made an eyepiece shelf from wood, as you can see in the photos. It holds all I currently have with space for more. I change my eyepieces quite often, and I think this arrangement will be more "future proof" than foam. The eyepieces in there are listed in my signature.
Andrew


-
It is very common to see questions posted about filters for visual use on SGL. I have decided to write an article to help people understand the use of filters.
How Filters Work
Filters are coated to alter the light transmission – the wavelengths of light that reach your eye. The eye is sensitive to light from 400nm (violet) to 700nm (red) in wavelength. By blocking out specific wavelengths, or colours, detail in the unblocked colours will stand out more. For example, if you are viewing a planetary detail which is particularly strongly red, blocking out blue and green will improve the contrast on that detail. Thus you need to be aware of what filters work on what targets.
A light transmission curve gives a good idea of what a filter does. This is a plot of percentage transmission over the visible spectrum, with 0-100% transmission on the vertical axis and the spectrum on the horizontal axis. The following is an example showing a UV and IR pass filter. It transmits up to 50% of UV (at ~380nm) and up to 60% of IR (at ~950nm), but 0% throughout the visible spectrum (400-700nm). Of course, this example would be of no use for visual applications as it would appear completely black.

There are two main coating types used on filters: dichroic, which reflects unwanted light, and absorptive, which absorbs the unwanted light. The rest is transmitted. Generally speaking dichroic filters have a more exact and accurate transmission curve, and more efficiently manage the light. They appear very shiny when light is reflected. Where a specific wavelength must be blocked or transmitted, dichroic coatings will be used. Absorption coatings are more general and are used for ND and colour filters, where the filtration need not be so specific. Naturally, dichroic filters are generally more expensive.
Types of Filter
Neutral Density (ND)
This blocks out a portion of light from the entire visual spectrum, thus retaining a neutral colour balance. This cuts down on glare and the dazzling effect from very bright objects – most commonly used on the moon. NB: UNSUITABLE FOR SOLAR USE!! Good manufacturers of ND filters will state the transmission percentage, e.g. 25% means a quarter of the available light reaches your eye (75% blocked).
Polarising
These actually consist of two polarising filters that when rotated against each other will vary the light transmission, so in use acts as a variable ND filter - very useful for tuning the brightness to suit your need.
Colour
These come in all different colours and strengths and are most commonly used on solar system objects to improve contrast. Colours are often stated by their Wratten number. For a guide to using colour filters, see this primer.
Light Pollution
Some streetlights emit light in specific wavelengths. By blocking out the most common wavelengths in light pollution, but transmitting across the rest of the spectrum, a filter can reduce the background brightness in light polluted areas and thereby improve contrast on faint objects. There are many different filters available from different manufacturers, suited to different types of light pollution. Unfortunately experimentation is the only way to find the filter most suited to the type of light pollution you suffer from.
Nebula
Emission nebulae and planetary nebulae emit light in specific wavelengths, so specific in fact, that a filter can block the entire spectrum except a few nanometers centred on the desired wavelength (emission line). Thus everything is dimmed except the light from the nebula. Hydrogen Alpha (Ha), Hydrogen Beta (Hb) and Oxygen III (OIII) are the most common emission lines.
The range of transmitted wavelengths is called the bandwidth. The narrower the bandwidth, the more the emission light is isolated. Emission line filters are commonly called narrowband as they typically transmit a narrow bandwidth (6-13nm). Light pollution filters (above), are called broadband filters because they transmit broad bandwidths. Views through narrowband filters can be very dim and even more so in small telescopes. Some observers prefer to only use them in large telescopes where the view is brighter.
Ha
Unfortunately, despite the fact that Ha is so common in nebulae, it falls in the deep red end of the spectrum where eye sensitivity is very low, and therefore we cannot see Ha in nebulae, and there are no visual Ha filters available.
Hb
Hb is related to Ha, but much fainter. However, it is blue/green, to which the eye is more sensitive. There are only a few objects with a strong source of Hb.
OIII
OIII also falls in the green/blue part of the spectrum. It is bright in many nebulae, on which contrast can be massively increased by use of an OIII filter.
Ultra-High Contrast (UHC)
UHC filters transmit OIII and Hb, and sometimes Ha too. Because OIII and Hb are so close in the spectrum, UHC filters transmit the wavelengths in between too, which makes the band broader. This results in a brighter and more versatile filter, more suitable for smaller telescopes.
Broadband UHC
This is just like a UHC except it is much more broadband, and is targeted for use with smaller telescopes.
Which Filter for Which Target?
Here are some notes on what filters to use on specific targets.
Moon and planets – see this primer.
Nebulae – see this website for use on specific nebulae. The Lumicon Deep Sky filter mentioned is an example of a broadband UHC filter.
Planetary nebulae can be difficult to find as they are sometimes very small and can be confused with a star. A good method of spotting it is to use an OIII filter and place it between your eye and the eyepiece. The starlight will all be almost blocked but the filter will let through the nebula and it will “pop” out.
Galaxies, clusters and stars – stars, and therefore clusters and galaxies, emit light across the entire visual spectrum (continuum). Therefore no filter will help dramatically to improve views of these objects and there is no substitute for good dark skies. However, an LP filter well suited to your kind of LP may make small improvements on contrast.
Did you find this primer useful? Please make any comments here.
-
9
-
-
great post, Warthog and a nice way of simplifying it all. Easy to understand and will help people get the most out of their money but more importantly most of what they can get out of their scope.
Andrew
-
1
-
-
My first: you can imagine my jaw dropping to the ground when this popped up on the screen after 30s exposure! :shock: One of those special moments!
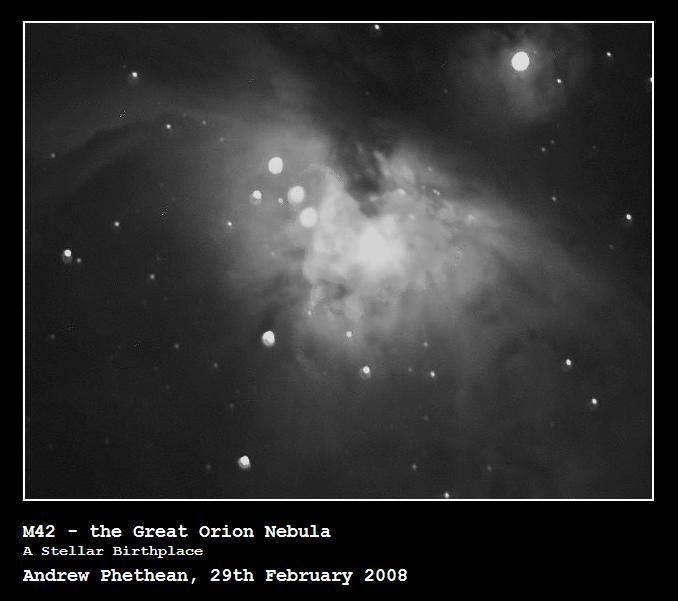
(click to enlarge)
Andrew
-
2
-
-
Thanks Ian and John. I appreciate it.
Andrew
-
Thanks all!

Glad you got something from it.
Steve, I took 10 minutes this morning and cut about 200 words from the text by taking your advice
 but I'm sure if I spent some more time on it I could cut another 200...
John, my suggestion would be to write an article targeted to a more an audience with a higher level of understanding to avoid having to type things over and over again. My primer covers the basics - to write anything more advanced is out of my depth and out of the depth of the potential audience. The last thing I want to do is mislead beginners, which is why I have heeded your advice to alter what is there.
cheers
Andrew
-
Thanks for your advice Steve. How to reduce its length is just what it needs!
I'll look into shortening it later.
Andrew
-
Thanks for the detailed response Ajohn. As this primer is designed more for beginners, I can't afford to go into great detail on many aspects, otherwise it would get too long and too complicated.
I will make adjustments where my figures were not accurate, but I am not comfortable with adding further complications. I already spent some time to make sure I kept it simple.
Cheers
Andrew
-
Thanks Mik!
I'm glad it was helpful to you.
Andrew
-
Any feedback on my primer you are most welcome to post in this thread. I appreciate all your comments!
Cheers
Andrew
-
-
-
I'll see if I can dig them up. I'm sure I've got them around here somewhere...
Andrew
-
Perhaps the answer would be to look at it from another angle ,ie an adjustable viewing platform that can be maneuvered around the pillar ?
Karlo
sorry just seen the link- I'm sure I've come across an American who built a pier with something like that . I'll get my coat !
Thought of that too. My first thought was --- wait for it!--- a stepladder! But something a little more complex could be thought up.
Check these people out.
http://www.hollinapplications.co.uk/Lifting%20Aids.htm
No prices that I could find, but you could e-mail them with a specification and see what happens.
Will do that. KK, I appreciate you doing my research!!
Cheers
ANdrew
-
KK
Cheers for clarification. I thought maybe if the system is pretty accurate, I could do a proper drift align afterwards when I'm planning an image. I'll probably kill myself later though...
I'll re-view the whole idea. Maybe the tripod legs idea might work...? I would imagine there would be some room for error with this idea, because the tripod head might not be completely level after adjusting.
How do you think the folk in Helen's link do it and "guarantee" a perfect polar alignment?
Andrew
-
KK,
I thought of that. Do you think lining up two markers wouldn't be accurate enough? Or what about having the a slot in the middle shaft and a rod in the outside shaft so that it couldn't be rotated?
Andrew
-
I went for two piers, a tall one and a short one. You might need two mounts, or swap the mount head from one pier to the other depending on your equipment for the night. If you're doing a viewing for several people, it also makes sense that you have more than one setup at a time.
A pier with adjustable height that doesn't need a lot of realignment after height adjustment is going to be a costly thing, more so than a second pier, so go cheap, go the two pier route.
Interesting idea, KK.
However, unless the shed observatory will be at least 8x10 I can't see two piers going in there!
What about having a simple extension tube to sit between the pier and the mount? Would that be sturdy enough?
You see, my problem at the moment is that I simply don't understand this "stability" thing. I mean, in terms of how it's built, what's the difference between a pretty sturdy pier and really amazingly rock solid in a nublear explosion pier?
For example, people get away with fine images with a tripod sitting on grass in their back garden. That sits on soil which to quite an extent wobbles the tripod legs about when you walk within a foot of them. So a pier, sat in a tonne of concrete, and separated from the floor you stand on, surely a basic height adjustment mechanism that locks say as sturdily as the legs on your tripod (I'm not saying the same mechanism) won't affect stability that much. Especially considering that the comparitively delicate nature of simple fixtures such as tube rings or, for that matter, the tube itself, will surely let down the stability of the image far more than what it all sits on.
I hope you understand that ramble. I need to clarify this before leaping in to anything!
Does anyone have any mroe thoughts on this?
cheers
Andrew


Debayering a DSLR's Bayer matrix.
in DIY Astronomer
Posted
Forty-two white knuckle nail-biting pages!
Well done to all the debayering pioneers. It looks like you've overcome a lot of hurdles and found out a lot about the structure of DSLRs, which I'm sure will help a lot of others.
I'll be leaving my 450D alone for now, but maybe if CCD fever kicks in and a few people have done a successful debayer on 450Ds I'll reconsider it... Nowhere near as brave as you guys!