


12dstring
-
Posts
111 -
Joined
-
Last visited
Content Type
Profiles
Forums
Gallery
Events
Blogs
Posts posted by 12dstring
-
-
Some great progress here guys

I finally managed to get a few test shots last night. Unfortunately I wasn't set up for bulb exposures so was limited to 30 seconds.
Here's a comparison of M57 with a stock 350D, the 'normal' IR filter mod (Baader ACF replacement), and then the sensor with CFA removed.
Shot with an Astronomik 1.25" 12nm H-alpha filter on an f/10 LX200, 4 x 30s, no calibration frames.

Also got a quick M31, 10 x 30s with 4 darks, using a 2" Baader neodymium filter:

Looks like no flat issues here. I still haven't finished cleaning up the sensor and it's looking pretty good at f/10
-
 2
2
-
-
The scratches on the lamp post still only show 1 in 4 pixels, they're just brighter. They could actually be a slither of microlenses that are still there.
Searching around though there are a couple of small spots where the filters have been removed.

-
Bad news I'm sorry to say, the bayer filter is definitely still there.
The first image has definite colour to it, and in the seconds one with the H-alpha filter you can see that only one in four pixels has signal
first tests with a plastic needle resulted on sratches (bad ones...) on the underlayer, but with yout technic (woden paint brush) it came out easilly
I wonder if in fact with the plastic needle you were removing the filter matrix, but not with the wood paint brush. I tried a wooden tooth pick and it couldn't scrape away the edges of the filter, let alone break through the surface. Also I've never managed to scratch the layer below the filters using a plastic tool, only with a metal one.


-
Could you attach one of the cr2 files here? I'd be able to tell what's going on.
You're right though that the sensor picture definitely looks the right gold colour.
-
I hate to be the one to say it, but could it be that only the microlenses were removed and not the filters?

I processed the second image you posted a bit, and there seems to be colour in there, although muted.
Perhaps take a photo of this image https://upload.wikimedia.org/wikipedia/commons/0/0e/Red-green-blue_flag.svg - you should only see different shades, not different colours.
Alistair, the Bayer Drizzle still seems to output a colour image. Although it doesn't interpolate, it will give each pixel a colour and a saved FITS file will have 3 planes for RGB. Since DSS uses DCRAW, it should be pretty simple to add the option we need though.
I think most of the time the Super Pixel method will be fine, unless you plan to display/print your photos at full resolution (a rarity for me at least).


-
Hi Luís.
Your pictures look great, but there's a couple of things:
It's odd that you can still see the matrix pattern in IRIS, as this shouldn't be possible. Could you maybe upload the raw file somewhere?
Also, what are you selecting in the RAW / FITS settings in DeepskyStacker? As far as I can see there's only four options, none of which seems to give an un-interpolated monochrome output.
-
was that the 350d sensor you used in the video?
did you just use the raw output for your images after the mod?
Gina, did you have to do anything like disable sensors to use the camera electronics in a custom body?
will it work bare bone as in without assembly?
Hi Alistair,
Yes that's a 350D in the video. I've got a few of them from ebay that I've revived from the dead over the years so I know them inside out.
After the mod just use set the camera to raw mode (jpeg settings will do weird things with the colours and you'll lose the gained resolution increase). You can then use the dcraw program to convert them to 16 bit tiff files with full resolution if you're not using something with built-in support (i.e. MaxIm)
As for disabling other bits, and bare bones, you might want to look at this thread, where I did the same as Gina and just removed a bit and tested it. Some things are obviously not needed for astronomy (assuming rehousing) such as the autofocus circuit, lcd, flash, and viewfinder - but certain bits are still needed such as the hotshoe as the camera gets upset if it doesn't detect them.
-
Great work! What method did you use for removing the filter?
For dcraw I use "DCRAW -d -4 -T image.cr2" - which outputs a 16 bit linear TIFF file that just needs a little stretching in photoshop.
A heads up for anyone in the UK; 'camnology' on eBay is selling camera parts, including CMOS sensors from Canon DSLRs. They're listed as untested/for spares and repairs, but I picked up a cheap 350D sensor that works fine. Might be worth a shot if you want to have a go with less risk.
-
1
-
-
You'll need two boards for complete isolation, as the communication to the mount is bidirectional and the two opto-isolators on the board share the same power supply so you can't use both. You'd also need a 5V regulator as the power coming from the mount is ~12V.
But otherwise there's nothing in the schematic to suggest it wouldn't work.
-
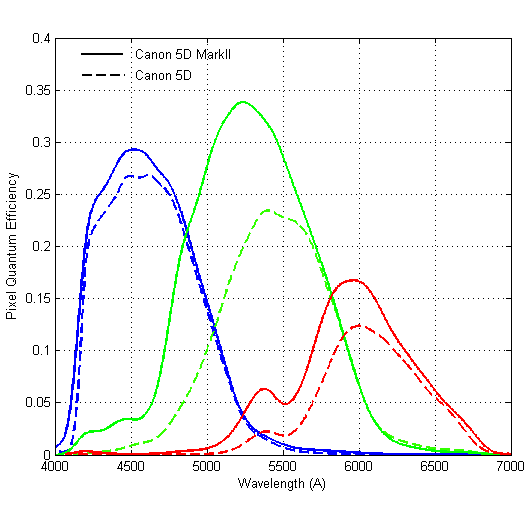
It would be each filter absorbs 50-70% of white light and transmits 30-50%. The transmittance of red light through a red filter would be much higher.
For an 'ideal' filter array it would be 33% transmittance of white light in each filter, as for example the red filter would transmit all red light, and no green or blue light. The Baader RGB filters for example are pretty close to that.
However you can see the response from a Canon DSLR isn't quite so simple as there aren't sharp cutoffs, and lots of overlap between filters, and they're not all equal (note that image also factors in the response of the sensor just to confuse matters).
-
At full scale there's definitely a resolution improvement (comparing to the same image with the interpolation algorithm applied). You can see finer detail, however the interpolation has the effect of appearing to reduce noise a bit due to the blurring, so it does look slightly noisier in the details.
Something to note though is that unless you are cropping a small portion of the image, or printing out in a large format you probably won't make use of this as, if like me, you downsize the final image for displaying on the web/computer.
Sensitivity under normal light isn't much changed, at least using the camera's auto metering results in an image that isn't under or over exposed. As mentioned earlier removing the filter array pretty much undoes the sensitivity loss of removing the microlenses with the net effect being not a lot of change in full spectrum light.
That said, my aim with this (apart from just having fun) is to have a better narrowband camera. Next time I can I'll take some shots of the sun in h-alpha with this camera and an unmodded one. This should show off the resolution improvement and big sensitivity improvement for narrowband use.
-
Proof it still works, and an outside shot. You can view the full image here: www.12dstring.me.uk/images/equipment/350d/debayering/0008-full.jpg
Also attached is a new flat, after a bit more scraping and some cleaning with a fine brush and compressed air. Will finish the right edge and do a proper clean at the weekend hopefully. The rest can be cropped out.


-
Thanks, that's interesting. Although earlier in the thread:
I won't be doing any Canons. There are three of us (that I know of) who have attempted monochrome conversions. My Nikon D100 was successful. A friend's Nikon D2X was successful. These were done with failty common aliaphatic solvents. A Canon 20D was reported to have met with dismal failure, either the microlenses or the Bayer filters (or both) are epoxy based, and cannot be dissolved with readily available chemicals.So perhaps it's not so simple with Canons, or some of them anyway. I'll keep experimenting with my dead sensor so will throw some solvents at it some time.
I've cleaned up my other one a bit more, and couldn't resist a bit more debayering. I was going to announce the bad news that I'd somehow severed another gold wire, but the good news is the sensor still somehow works. Hopefully it's just an extra ground connection and not something too important...
I'm thinking about putting a dab of electronics silicone on the wires to give them some resistance from accidental touch. It's way too easy to brush one of them and then it's game over.
-
It depends what the hardness of the scraping tool is.
With a microscope it's easy to see if you've scratched the glass layer below. I started out with a metal tool as it was smaller and removed the CFA very easily but, as you can see in the video above, it does occasionally scratch the glass underneath. But as I only used this on the first broken sensor, I'm not sure how much this degrades the image.
I soon moved on to a sharpened plastic (I think perspex) tool, which has to be resharpened every now and then to be effective, but can't scratch the glass below.
That's why I think a chemical approach would be safer. Less chance of damaging the sensor.Has anyone has any success with chemically removing a DSLR CFA? It would be great if it worked, I just remain a bit skeptical how effective it would be..
-
I've added annotations, but in case they're not working:
4x magnification at the beginning, switching to 10x at 1:23
The section on the left at the beginning is untouched, with microlenses. There's a small area just left of centre at the bottom where the microlenses are 'squashed' but not removed.
The dark section in the top right is with the microlenses totally removed but the CFA still there, and the yellowy/green section in the bottom right is with the CFA already removed.
When it switches to 10x it's just CFA minus microlenses (save for a few in the top left) at the top, and CFA removed at the bottom.
-
1
-
-
Here's a video showing how the CFA scrapes away.
I used the metal pick which, although can scrape the layer below, is a lot finer so it's easier to see what's happening (and I was only using the broken 'practice' sensor).
-
1
-
-
Fred, I think this is just the white balance. You can balance it so that the debayed part of the image is grey and then the filtered part will be green/yellow, or balance it so that the filtered part is normal in which case the debayed part will be pink/blue.
-
Taking off the microlenses has a noticeable effect on the sensitivity, but it's more than made up for by removing the filter array.
The net result isn't a huge increase in sensitivity for standard unfiltered luminance imaging. However the big advantages will be:
- A big increase in sensitivity and dynamic range for narrowband imaging. For example with an H-alpha filter you'd normally have the red pixel containing the light, which is then interpolated with the surrounding green/blue pixels which will just add noise. By removing the filter array you'll see over a 4x increase in sensitivity by using every pixel to collect the H-alpha light, and by not having the cover glass and red bayer filter to also cause light loss.
- Resolution increase by not having to interpolate pixels values.
- Spectral response increase into the UV and IR by removing the filters and cover glass, probably more useful with webcams.
-
how far down did you go if I may ask? the dye layer or metal layer below
Just down to the filter layer. The gold-coloured metal layer (which I assume is the photodiodes) is covered by a glassy layer, and with a microscope it's very easy to tell if you've made a mark in it.
I think it'd be easiest to explain if I took some video under the microscope scraping away the different layers, won't be til the end of the week though.
At risk of being cheeky here, may I kindly suggest you clean the sensor thoroughly and assemble the camera even without finishing the edges? And maybe finishing the job later?That's fair enough. I guess seeing how good the resultant flat field can be would be more useful to people at this stage. I'll clean it up at the end of the week so hopefully can show you some images at the weekend.
-
2
-
-
Wouldn't it be easier to stick 4 lines of thin black tape on the edges, covering the untidy bits? You wouldn't lose much of the sensor area and the optical assembly would look nice and tidy.
I think trying to put masking tape on the edges would be harder than finishing the filter removal! If you have a look at the picture in RAC's first post you can see the gold connecting wires that rise above the height of the sensor. They'll happily disconnect with little force and you really don't want that.
What would be easier is to just crop the image to remove the edges, but I'm stupid/brave and having made it this far I can't help but try and finish the job...
How do you intent to clean the sensor now?The sensor's still covered in bits of the broken away CFA, so that should blow off fairly easily with some compressed air. Then I'll give it a bit of wipe down with a bit off IPA or similar to clean off anything else that's stuck on.
Another thing that occurs to me is that, I might be saying something stupid but, isn't it the case that the camera's software is programmed to run colour interpolation algorithms? Shouldn't that be having an effect on the quality of the pictures in the debayered sensor?The Canon RAW files contain the data as it comes off of the sensor before the colour interpolation, it's only lost if it's saved as a JPEG. Note that some software doesn't give you the option to turn off the demosaicing, but you can use dcraw to output TIFFs with no debayering. Any program that uses dcraw, such as DeepSkyStacker would be able to (but not necessarily can now) turn off demosaicing. Hopefully if we have proven success then the developers will have a reason to add the option to their software so we wouldn't have to convert to TIFFs in dcraw first.
Hi 12dstring, do you think there is a chance that the microlenses and the bayer array could be peeled off as entire layers; as if you were removing a sticker? Or are they stamped on the sensor independently?I don't think so unfortunately. The microlens layer has a gel-like consistancy under the microscope and comes off very easily, but doesn't ever seem to come off it large chunks. The filter layer I would describe as almost crumbly - it doesn't seem like the coloured pixels in the layer itself are held together, only stuck to the layer beneath.
That said the idea of scraping it off with something very thin by getting underneath might work. But the trouble would be getting something to a sharp enough edge without it being made of metal or something that would scratch the glass. I'll happily experiment with my broken sensor.
My opinion is that the blind polishing technique is not the way to go, as others have found out it's hard to get right and you don't really know how far you've gone into the layers want to keep. I don't think it's ever going to be a popular mod as the risk is so high and it really isn't easy. I think the only way to do it consistantly is take it off layer by layer under a microscope so you can see exactly how far down you've gone, and I imagine this is how the guys offering this commercially are doing it. Not that I want to discourage anyone at all, I just suggest not trying to cut corners or attempting with minimal tools/magnification.
-
1
-
-
Be very glad you don't have the tiny connecting wires, they're the only thing that makes me nervous!
The circuitry is on the bottom layer of the sensor, where the photodiodes are. The CFA is just an array of glass filters on top of that, it's not connected electrically in any way, and the camera electronics will unaffected.
-
It's easy to imagine that different manufacturers, and even models would have different types of layers in the sensor.
Interestingly in the CN thread you linked to Jim said that Nikons were easier to work with than Canons. Seeing how we're into relatively uncharted territory each new model could throw up suprises.
My first sensor died when I broke two of the tiny gold connecting wires when removing the cover glass, so I used that to practice the technique. With the second attempt I've had no problems. Electrically it's all fine, I can't see any problems with the sensor at all at the pixel level using DCRAW to convert from RAW.
The layer below the CFA is pretty tough, I suspect it's a glass 'planarizing layer'. That said it's possible to scratch it with the metal pick I first used, and this will leave a permanent mark - although hasn't appeared to damage the photodiodes underneath at all.
-
2
-
-
I gave toothpaste a try when playing around with the broken sensor. It didn't seem to help an aweful lot - although I was going more for scraping away the CFA layer rather than polishing it down.
It did get rather messy though. The bright microscope light dries it out pretty quickly which didn't make it easy to clean off.
-
Sorry guys, I've been super busy over the past couple of months so unfortunately haven't made much progress, but I'll get back to it as soon as I can.
Can you post a picture of your paintbrush handle tool? Also what power magnification do you think would be good for this operation?Hi Tristan, I've attached a picture of the scraper tool. It's simply the end of a paintbrush sharpened with a knife. The plastic is hard enough that the sharp edge holds well and can easily scrape away the layer (unlike other plastic things I tried, or toothpicks), but not hard enough to scratch the underlying surface (as the metal scraper did).
Most of the time I was using a 4x objective, switching to 10x sometimes for a close look, with a 17mm Baader Hyperion eyepiece - they make great wide microscope eyepieces.
I'm still looking out for the perfect smaller tool to get to the edges, I don't want to ruin it having made it this far in the search for perfection.
Also debating whether to turn it into a dedicated astro cam and rehouse/cool/amp-off, or keep it as a normal camera - could be pretty cool for daytime IR photography.

-
2
-


Debayering a DSLR's Bayer matrix.
in DIY Astronomer
Posted
I should have mentioned I stretched the images seperately so that the background and nebula were around the same brightness, perhaps not the best way of doing it but it shows the signal strength above the noise. The stock camera should be around 16x less sensitive to H-alpha than the debayered one, as the IR filter block 75% of that wavelength, and the CFA blocks another 75%.
Of course the dark and bias noise are not affected by these mods so should be pretty much the same. The one with just the IR filter changed might actually be less noisy than the others as it has a cold finger attached (cooler not on, but would still draw the heat away). The stock and debayered one are actually the same camera, I just swaps the sensors and IR filter during the run.