


Vega
-
Posts
2,414 -
Joined
-
Last visited
Content Type
Profiles
Forums
Gallery
Events
Blogs
Posts posted by Vega
-
-
Hi All
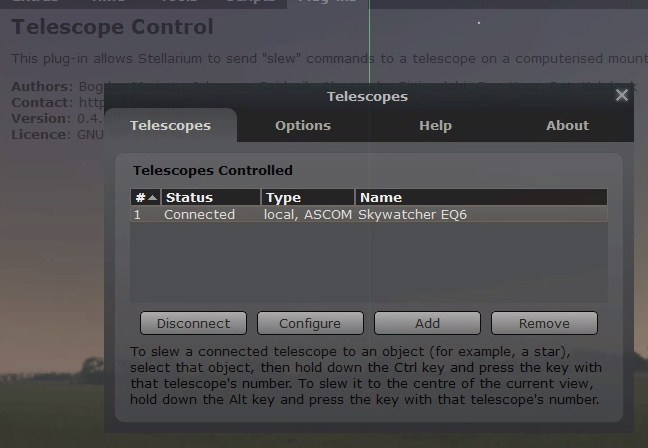
So having updated Stellarium to 0.20.1, I double checked that there wasn't a new version of StellariumScope too. I then read on the website "that Stellarium supports ASCOM telescopes natively since version 0.19.3. There’s no need to use StellariumScope in order to use your ASCOM telescopes with Stellarium anymore"
"Fantastic" I thought to myself! Went right in to the Telescope Control plugin and there it was, an ASCOM option.

I selected my EQ6 mount form the familiar Ascom drop-down menu and connected fine. Slewing and ctrl-1 ing everywhere. However, when I tried the sync (ctrl-3) option... nothing. I realised that StellariumScope used to put the three entries in the Telescope Control panel #1 Slew, #3 Sync and #5 Cancel. Now I just have the one local, ASCOM entry that I created with ASCOM.
Here's what StellariumScope used to set up in Telescope Control (as External software)
Has anyone managed to get a Sync option working in Stellarium without the use of StellariumScope?
Thanks
Matt
-
Hi
I'm just looking for some second opinions on software for polar alignment. I've been looking around at software such as SharpCap, Kstars etc. Most of them however recommend a field of view of at least 1 degree...
So here comes my problem. The only camera I have that can take video is my trusty Philips ToUcam (my current guide camera). I attach this to my Skylux 70/700mm guide scope. Needless to say, this provides a small FoV of about 0.3 degrees. Would this setup still work for these softwares? Is 0.3 deg a lost cause ? Any other recommendations? I'm trying to avoid doing the drift alignment method which is so painful and timely. I've polar aligned using the EQ6's polar scope so far. This is for the purposes of imaging rather than observing.
Thanks
Matt
-
Hi all sorry for the late report back... blame the weather. We'll what can I say. Stargazerslounge never disappoints! Thank-you all for your sound advice. I would probably have not thought of the tightness issue on the mirror.
I can now achieve perfect focus. Confessions time, it appears I had tightened the screws as far as they could go. Having loosened them all round and had another go I could see an immediate improvement. Zooming in to 10x on the DSLR live view however still showed the spiking affect. I took it all apart again and loosened each holder until I could see a clear gap, then slowly tightened until barely touching the mirror. I was worried this wouldn't secure the mirror enough but it certainly does keep it solid regardless. Mounted it back up and tried it on a mag 3 star. Perfect focus!
Thanks again
")
-
 4
4
-
-
Will un-tighten today and report back tonight... oh wait clouds rolled in of course! 🙄.
-
Thanks for confirming Steppenwolf. Will loosen them first thing tomorrow! Shame I missed a gorgeous night for imaging tonight.
Jonathan, will certainly consider flocking -
Ouroboros and MIkednight you both may be right. I tightened them quite tight from memory. It’s been screwed in for a few days now. I presume the twisting I f the glass will not be permanent?
-
Please help, very worried astronomer!
After 12 years of use, I cleaned my primary mirror the other day taking great care not to ruin any coatings. I researched and followed several videos and guides online.
I submerged the mirror in a bowl of luke-warm water with one drop of fairy liquid diluted. Let it soak then rinsed. Then used an individual cotton wool piece under it's own weight for one, smooth brush across the mirror in one direction. Repeated this with new cotton wool until the whole mirror was cleaned. I then did the final rinse with de-ionised water and left almost upright to dry (most water drained off right away anyway).
I put the mirror back in the back plate and all back in it's place in the original orientation (used markers for this). Next I re-collimated all seemed fine. Got it bang on.
Anyhow, after trying first light tonight, it seemed like I could not achieve focus (see video below). This was my DSLR attached to the scope on 3rd magnitude star Almaaz. When getting close to focus, it appears to develop streaks then goes through the focus point (star does not appear to reach true focus), followed by the streaks again in the other axis. The out-of-focus circle appears to look more like a hexagon rather than a circle.
I've also taken a photo of the primary mirror before treatment, after and now in the scope tube. If you look closely on the third image, I 'think' I can see faint streaks across the mirror from each cotton wool clean. Obviously being a flash photo you can see every speck of dust on there but this is to be expected.
My worrying questions are:
-Is my mirror ruined?
-Should I attempt to somehow remove the streaks?
-If so how?
-Am I missing something and something else could be causing the focusing issue?
-
Thanks Paul, interesting report
I had a quick try with my 10” dob... I *think* I saw it by hopping from u aura Maj, h Ursa Maj then to a little isosceles triangle that ‘points’ right to it. Desperately ain’t in the 2” 40mm EP. Not any better in other EPs.
No AC power to the EQ6 at the mo. I used to have 12v solution now moving to AC (AC to 12v cig lighter supposed to be coming from amazon tomorrow but not sure if it will come since the announcement in the U.K. tonight).
hey ho might try again in a week or two unless C/2019 Y4 decides to outburst.
Anyone else have anime more luck?
-
1
-
-
Thanks for all the replies.
I've already upgraded to the latest firmware. Still the same problem. It could be the RS-232 link but he never had this problem with the CG-5 mount. It worked every time and that used exactly the same connections. My own EQ6 Pro works fine in PC-Driect mode with StellariumScope and EQAscom. With the EQ6-R it's very hard to hear the motors tracking but when looking at a target through the finder scope after slewing to it, it's definitely not tracking (or tracking extremely slowly) as the target simply moves off the cross-hairs and eventually out of FOV. I know that an EQ direct cable is a solution but don't want to give him the bad news of more expense (and probably the need of buying an xbox controller or the like so that there is still a manual slewing option off screen). I cant remember off hand if he has a spare USB slot either. :\\
-
Dear fellow stargazers...
I'm helping a friend with a tracking issue using Eqmod. He has used EQAscom for a number of years with his Celestron CG-5 no problem. Having moved over to the new fancy Skywatcher EQ6-R mount (I'm not jelous... not one bit), he now has a problem with EQAscom. Having chosen PC-Drect mode on the hand-controller, EQAscom connects to the mount and slews perfectly, however when using Stellarium Scope and slewing to an object, the mount does not then continue to track the target (even after pressing the siderial rate button on EQAscom). We have checked EQAscoms 'default siderial rate' and it is as it should be.
It does work however by then going back to the hand-controller setup menu and re-selecting 'Siderial Rate' under tracking, then choosing PC-direct mode again. Then EQAscom/Stellarium Scope works normally with tracking.
Although we have found this temporary fix, it is quite annoying to have to go through this procedure with every session. Has anyone else come across this issue or had no problems using the EQ6-R with EQAscom? Were trying to decipher if it is a compatibility problem with the new mount (as it is a new kid on the block with different motor drives etc).
Thanks in advance for any comments/suggestions
Matt
-
How about THIS for a photographic challenge! I'm game, anyone else?
-
1
-
-
Very informative post. Thanks for that.
Here's some info on viewing mars this opposition.
-
2
-
-
Rest in peace Sir Patrick, your contribution to astronomy is un-measurable. What a legend.
-
Have to agree with whats been said. 3" to 10" will make a whopping difference to your viewing experience (light pollution or no light pollution). The 250px is a cracking scope. Moon and planets are as bright as hell but thats never a bad thing. I live on the edge of town but still plenty of light pollution. The larger aperture makes a HUGE difference to DSO viewing but you have to choose the right night for it. Your light pollution can vary from night to night. Basically if depends on how messy the sky is up there to relfect the orange glow back down. I find on a cold clear crisp northerly wind, the light pollution is not as half as bad and it makes for great DSO viewing.
Here's some targets i've viewed and comments
M13 - Stunning in this scope, really comes alive to the core with the right eyepeice!
(More magnification seems to improve the view believe it or not 200x seems to be the sweet spot)
M81/M82 A real treat once you've found them!
M51 - (Whirlpool Glx) Seen spiral arms in good conditions
M57 - (Ring Nebula) Fabulous (200x seems best)
Leo Triplet - No problem in good conditions
NGC4565 - Yep, no probs on moonless night with good conditions
Veil Nebula - With an OIII filter I was surprised to see both the Eastern and Western veils with ease (Without filter, very difficult)
Horsehead? Forget it ! Never seen this darn thing with or without filters, imaged it tho lol
-
Is this free version still available?
-
Yep.. Saturn is 'Da Bomb' of the skies for me too lol. Same for me Talitha, never forget that first viewing of it and remembering that moment brings a humble smile to my face.
Eagleseye, Never thought of that (moving South along the ecliptic). I remember in 2006 when it was close to the Beehive reaching nearly 60deg altitude at opposition
 . I guess we've been spoilt the last few years.
Matt
-
What a fab thread...
Here's mine, luckily I got my DSLR for Christmas 2006, so my first target was one of the easiest to get results... namely M42... It's a composite of 3 jpg images 3 mins, 2 mins and 1 min as I had no clue what I was doing. (I lost my original single shots). When the first exposure of this nebula showed up on my LCD screen I was blown sideways, will never forget that moment.

Notice the fabulous natural colouring of the razer sharp pinpointy stars

-
3
-
-
Well ok, I guess I have to reveal my secret formulae for capturing the ISS prime focus style.... I'm afraid it's nothing special or new really but I will outline how I did my last few successful shot's. This guide is only for when using dobsonians...
Equipment Used
Skyliner 250px Dobsonian
Phillips ToUcam Pro II & 1.25" Nosepiece adaptor w/ UV/IR block filter attached
2x Barlow (optional depending on how lucky I feel!)
Phillips V-lounge capture software
Laptop
Preparation
First up, be well prepared, this is something you don't wanna be rushing. As that 17,000mph station screams towards your location it can be on you and gone before you know it. You need to be well up on what time and more importantly, where in the sky the ISS will move at your location. As most of you will already know this can all be obtained from heavens-above.com. I then make sure all the equipment is out, finderscope aligned and ready a good half hour before the pass (if the sky is dark enough to enable me to). Another small thing worth checking is the positioning of your equipment. Check that you can freely move the dob in altitude with webcam attached without hitting any tables/laptops/tangling any wires etc. Easily tested beforehand.
Finderscope Alignment (THE VITAL BIT)
I cannot stress just how important this bit is. The finderscope alignment with the main scope has to be bang on if you want any chance of getting the ISS anywhere near that webcam field of view. I align the finderscope with the main scope as normal using a bright star and aligning with a 25mm eyepiece then with a 6mm for added accuracy. This is then re-tested in the next bit when toucam is turned on. Note: This whole procedure can prove difficult if the impending pass is very early in the evening as you have to wait until you can see at least 1 bright star to align with. Time sometimes is against you.
Focusing the Webcam
If you want to capture nice detail of the station then this also requires extra care and attention. Drop in the toucam (either in the scope eyepiece holder or in the 2x barlow if ur a super confident nutter). Turn on your capture software and move the scope to a brightish star for focusing by watching it on screen. If your using a long focal length scope and/or 2x barlow this can be very difficult as a dobsonian is not tracking the star movement. It's a case of magnification vs ease of use. You have to keep moving the scope to track the star giving you enough time to watch it on the laptop screen. It's best to let the star drift across the screen while you make a focusing adjustment then move the scope a bit and keep repeating until your happy with the focusing (depends how fussy you are). Note: Some people like to use the moon to focus their webcam with because it's a nice large target. This is all good and well but using a star is much more accurate, especially for Newtonion's.
Webcam Settings
Hate to break it to you but there is no secret formula here. shutter speeds and webcam settings will vary from scope to scope. If your using a 10" Newt and Philips Toucam Pro II like me then here's what mine are generally...
-10fps or 20fps (been successful with both and cant go any higher with my laptop/USB capabilities)
-Shutter Speed - 1/2000 - 1/2500 (or 1/1000 with 2x barlow) on overhead passes only
-Gain - just below half way to remove noise
-Brightness - Just above half way to compensate for the above
-Auto White balance
-Hue / Saturation - Halfway
HERE SHE COMES
With everything setup hopefully you've had some spare time to look over everything. Be sure to have the capture software ready whereby all you have to do is click 'OK' to start the video capture. When the ISS is visible low in the West, don't rush to the finderscope to catch some frames. A rising space station is still very far away and would look very small in any frames you've captured. As it's rising move behind your dobsonian in relation to the ISS. Move it in azm so it is pointing right at it. This way you should only need to make very minor future adjustments in azm and do the rest in alt. When the station is about 20 deg up I press the ok button to start video capture. For the next 2 minutes you should be looking at nothing else but the sky and/or the finderscope crosshairs. Don't even think of trying to follow it on screen... it wont be there and you'll waste precious time! You'll have all the time in the world to play back the capture afterwards. I use the 'both eyes open' method with one eye on the spacestation in the sky and the other lining it up with the crosshairs. The rest is plain and simple aiming. Try to keep that bright thing as close to the center of the cross hairs as you can. Try to get ahead of it and let it pass through the crosshairs. If your focusing is good, all you need is one still frame to capture it's detail.
AAAAH ZENITH!
The best time to capture the ISS in video is when it's right overhead because that's when it is closest to you and looks the largest in the camera. But guess what.. this is also the hardest time to keep the ISS in those crosshairs..
 . It's the point at which it moves fastest in the sky. Not only that, but at some point your dob will be standing upright and this is your que to swing the the dob around 180 degrees (think of it as a dance ) and follow the ISS in the Eastern sky. Hopefully you have thought about your USB cable length here and the dob can freely move through 180 degrees. This is the last desperate stretch to catch some more precious frames before it shrinks in size slowing down in the sky all the way to the horizon.
 AND BREEEATH
Now's the time to stop the capture on the laptop and have a look back through the whole movie to see if there are any bright blips across the screen. If there are... BINGO!
 . don't take your eyes off the movie because 1 frame with the ISS in it can blip by in the blink of an eye.
GETTING THE PHOTO
I use virtual dub to extract any frames I got and use them as photo's. If you are lucky enough to get loads of frames that have captured the ISS at a similar angle, you can run them through registax to stack them in to an improved image.
Other notable problems that may occur.
-Misting up of finderscope.. I find by the time I'm at the zenith, the heat from my face mists up the finderscope which hides those vital crosshairs. My quick fix at the moment is a hair dryer VERY close by for a very quick blast.
-Cannot see crosshairs.. similar to above but sometimes the sky is too inky dark to see the crosshairs if like me your finderscope is not illuminated. I'm working on a DIY illuminator for this.
-A pass of the ISS that has quite a curve in it's motion is VERY hard to manually track with the dob. Reason being you have no choice but to move it in both axis. Trying to get smooth alt & azm movement in a dob is no easy task. I tend to only attempt serious ISS photography on passes that reach at least 80-85 deg in altitude when it tends to move in a straight line.
I hope this helps some of you, sorry for the waffling but attention to detail makes a lot of difference on this malarkey
Good luck with your ISS capturing!
Matt
-
16
-
-
dudes... we are alone... stop kidding yourselves lol


EQ6 Dec slippage. Help!
in Discussions - Mounts
Posted
Hi
I have an EQ6 GOTO Pro which is several years old now. I’ve been experiencing some play in Dec when the bolts are locked.
Please see attached video. This is me able to slightly move Dec with my hands while locked. Since recording the video, I decided to put the cover on the scope and the DEC head slipped completely around (when still locked). 😩
Does this require just tightening some screws somewhere? Any help greatly appreciated.