


dmahon
-
Posts
1,813 -
Joined
-
Last visited
Content Type
Profiles
Forums
Gallery
Events
Blogs
Posts posted by dmahon
-
-
Thank you David, your offer is much appreciated. As I said I do intend to give it another go. It is not being recognised because it is on "different network" to the router 192.168.1.150 instead of what I wanted 192.168.0.150. I am awaiting one of the cables to allow me to re-program onto the same subnet as the router. The instruction manual tells me I should be able to access it then. I guess its a bit of lazyness in that the system is up and working with the 9258 but it is my nature not to have things that do not work as advertised. I will let you know how I get on!
Regards
Mike
You could just (temporarily) tell a computer to use IP address 192.268.1.151 subnet 255.255.255.0 and use that computer to log onto the Apc to change its settings. No new cables needed.
-
If you still can't get the Apc working, I'd be happy to give it a go if you send it here.
-
 1
1
-
-
If you get 0-0-0-0 it hasn't got an IP address.
To log on to it with website, first you need an IP address. Then just put that address in a web browser. Username and password are both apc.
Out of the factory, it is set up to take an address from a dhcp or bootp server.
(I'd disable the requirement of vendor specific cookie at the first opportunity)
http://www.apc.com/products/resource/include/techspec_index.cfm?base_sku=ap7921&tab=documentation
See manual, page 10
Best bet is use the wizard, page 9, download here;
http://www.apc.com/products/resource/include/techspec_index.cfm?base_sku=ap7921&tab=software
Otherwise, use the telnet options (ping seems easiest way).
As long as the password is the default.
Otherwise, you will need the special serial cable (on ebay)
-
Power switch doesn't need a driver - it's driven from a web interface.
Default username and password is apc. Manual is online.
Press and hold button to find it's IP address. Hopefully set up already with a static address or DHCP without the magic cookie. Otherwise you need a cable.
-
1
-
-
Glad you're up and running. Beware the ACP power switch has an unusual way of using DHCP if you set that option.
What's the second solar panel for?
-
1
-
-
Yes, it does.
The dome design has changed though - the dome I have allows the motor to be fixed to the wall and AC driven wheels drive on the dome. The old design I believe has a battery powered motor fixed to the dome and the wheels drive on the wall.
You'd have to speak to Pulsar to see if it works with the old drive system. Don't see why not, but you'd have to have some kind of flying lead to the computer or wireless RS232 adapter.
I also now have the wireless shutter control.
-
Well, I got the impression it was free anyway - although I'd be happy to pay a small amount (and will certainly offer to pay the postage, which is not inconsiderable).
You can see my settings above. Similar settings (different units) are also in the scopedome program itself (click setup on the same program that you click slave to scope).
-
Hi David,
Just a bit of information for you David, indeed all out there thinking of automating a Pulsar Dome. I have just about completed mine, all working, just about, but I did have problems with the shutter closing which Gary at Pulsar put down to the positional IR sensors, it wouldn't close on the computer or switch only by waving your hand in front of the sensor even when correctly aligned in the Home position. To cut a long Pulsar have now binned the IR Sensors and have a radio link to the dome which means that the shutter can open and close anywhere in the 360 arc, no need to motor to the home position. I had my upgrade (possibly the first) fitted last week and it works like a dream, absolutely perfect operation; a good improvement to the automation installation.
regards
Mike
Yes, I heard. I had a few problems with the IR sensors too, though I could usually get them to work on the second attempt if not the first. What helped was reducing the size of the metal "home" position foil. The other thing I noticed was that the shutter opened itself on occasion - especially when taking photographs with flash for these threads.
Anyway, Gary called me a month or two ago and told me about their plans - and offered me a free wireless upgrade, I think for helping talk someone else through their installation. I've been away so only got round to sending the units back to him this morning (I live a few hundred miles away, so mine is coming in the post rather than a personal installation). Glad to hear that it's much better. The other suggestion I had for him was some kind of spring mechanism on the little grey "counting" wheel to ensure it keeps good contact.
Hi .What would be the cost of
something like this.
Steve.
See http://www.pulsarobservatories.com/
(but about £6,000)
-
Sorry - just found this but see you found the thread already. Good luck with your build.
-
The only modification I have made to the standard setup so far is the addition of non-slip tape.
-
Nice Dome and video, is there some kind of sensor for when it starts to rain and how quickly can it close if it does rain.
The video is real time - it closes at one speed only. I haven't counted, but it's about 10 seconds.
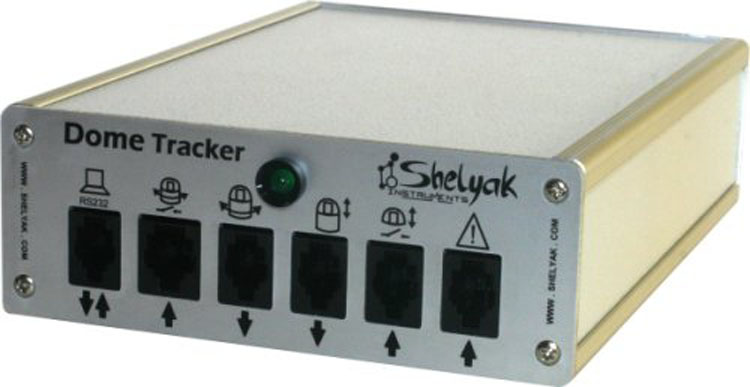
There is an "emergency" input on the Shelyak Dome Tracker. This can be linked to a weather station or rain sensor (or even a big red button). If activated, a signal would be sent to close the shutter. HOWEVER, the way that the shutter controller is wired up by Pulsar means that it will only close if it is in the home position (which is rather unlikely).
I may look into changing the standard pulsar IR wiring for some kind of wireless affair, so that the dome could be made to open/close at any point of rotation.
-
1
-
-
Like many of us, I was a little bit peeved at the time it takes to move about 50-100Kg of kit, set it up, make all the electrical connections, polar align, calibrate the GOTO system and fix anything that has gone wrong (it always does) prior to starting out a session - and that's if it's still clear. And then there's the packing it away again at the end of the night. It was such a chore that unless the forecast was clear all night long I tended not to bother.
To make my hobby enjoyable again, I needed an observatory. There are a number of options:
1) Roll-off roof
2) Roll-off shed
3) Clamshell
4) Dome
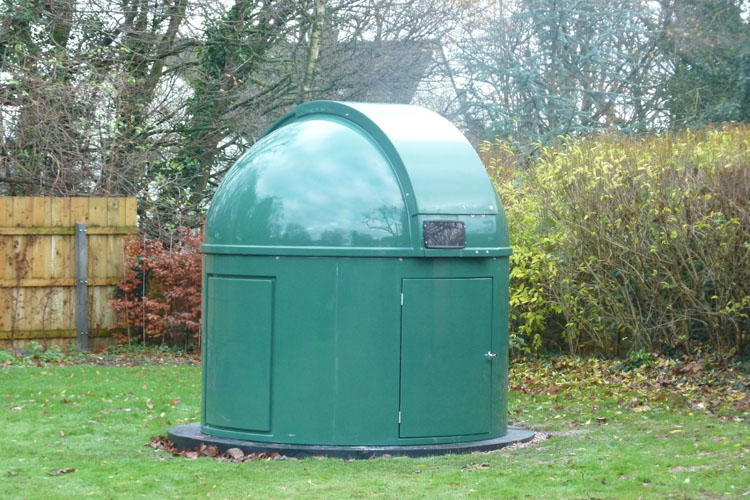
These all have their pros and cons. 1 & 2 are cheap, but need additional garden space to roll them off. The way my garden was set up, and the location I wanted the observatory, meant that I discounted them. The only clamshell easily available in the UK is the SkyPod, and whilst I considered it for some time, I finally got put off by the trouble imaging straight up and the reports of leaks. So that left a dome. The problem with a dome is that they are expensive - and for imaging they need automating (even more expensive). Still, that seemed like the best solution for me. In The UK, the dome that is most easily available is the one from Pulsar observatories. It is available in 2.2 and 2.7m sizes and can be made in white or green (possibly other colours too, white and green are the only ones I have seen). I had seen a dome at a fellow astronomers house - and he had successfully motorized it which meant that I could follow his plans. I'm, OK at tinkering with things, and can actually even be good at it, but for expediencies sake I'd rather get something off the shelf and I'd be rather upset if I found that I couldn't motorize it as I wouldn't be able to image which is my only interest in the hobby. So when Pulsar adjusted their design (see later) and made a fully motorised observatory "off the shelf" an option I decided to go for it. I bought a dome, dome controller, shutter controller and a Shelyak Dome Tracker.
Pulsar 2.2m Dome Oberservatory
I took a while building the base in my garden - there's a separate thread for that. It needs at least a 2.4m circular or square concrete slab. I went the circular route as it's much harder to build. They suggest a 1m square base for the pier, but I decided 75cm would be more than enough.

I made a £500 deposit by credit card (for the protection it offers) and then the rest was paid by bank transfer 3 months later when the dome was ready to deliver. Unfortunately they are built in Norwich and I live in Somerset, so there was a hefty delivery charge. They also offer to assemble everything for a small fee and given that I was into this for quite a sum already, I thought I may as well ensure it got set up properly. I bought an Astro Engineering pier from them too. On the appointed day the guys from Pulsar arrived and set about work, fortunately in good weather. They were finished by mid-afternoon and showed me how the observatory worked - as well as installing up the basic Shelyak Dome Tracker software on my PC. Unfortunately we hit a bit of a snag here, as it wouldn't work! I got a second laptop out, and fortunately it did work on that - but when I checked it again a few hours later after they had gone, it didn't work anymore. Time to pull my hair out! To cut a long story short, I had email communication with the guys from Shelyak and Pulsar over the next 24 hours - they identified a problem with a component not working properly at low temperatures (a December install) and they sent me a new unit. They also wrote a new driver, which meant that the faulty component wouldn't cause trouble anymore anyway. Good service.
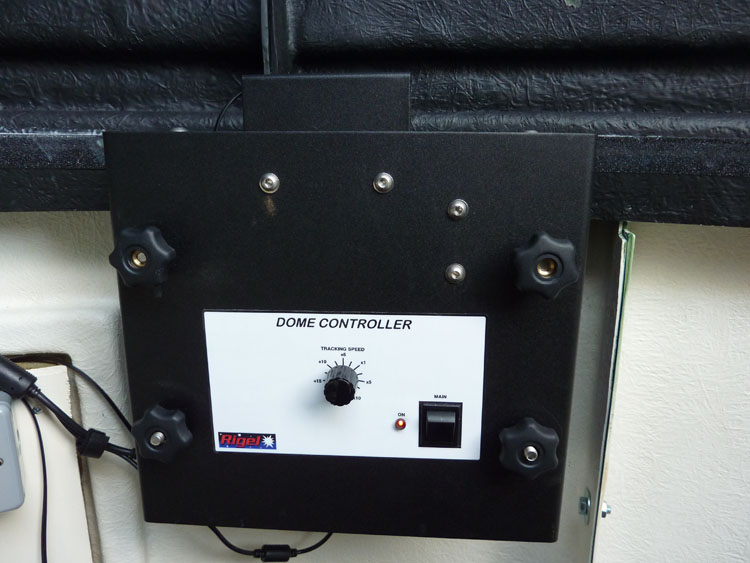
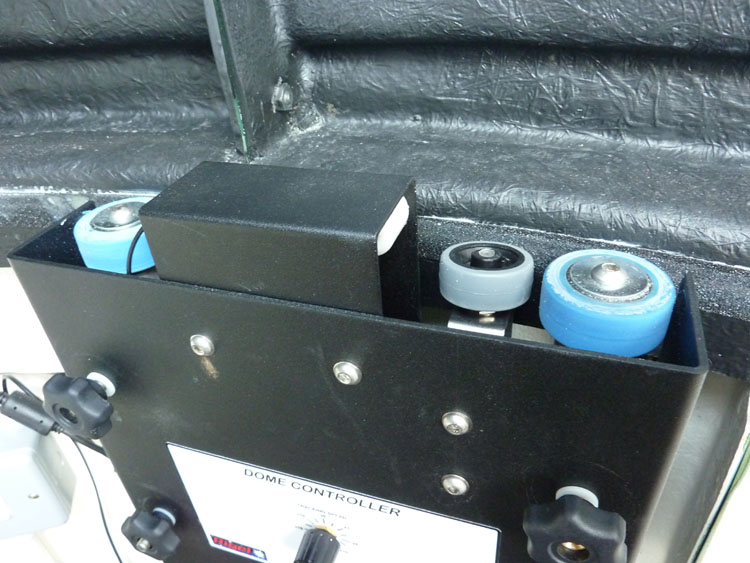
When I finally got permanent electricity installed to my observatory, I set up my kit properly. The dome moves by two motorised wheels (blue) pressing on the side of the dome. These are powered by a 12v 10a transformer. There is another wheel (the grey one) which is attached to a rotary encoder so the dome knows how far it has travelled. The "home" position is set by a metallic sensor - mine is at 290 degrees. You can see it in between the IR sensors below - it's just a bit of tin foil. When the dome is told to home itself, it rotates until it finds the home sensor and then sets its internal position to 290. From there on, it counts clockwise and anticlockwise motion via the rotary encoder. In addition to the computer control, the dome can be set to track at sidereal rate (or various fractions/multiples thereof - remember, the dome isn't equatorially mounted) if you didn't want to use a computer. The Shelyak unit is nicely hidden away behind the dome controller metalwork too. It connects to the computer via RS232, but they throw in a USB-RS232 cable in case you need one.
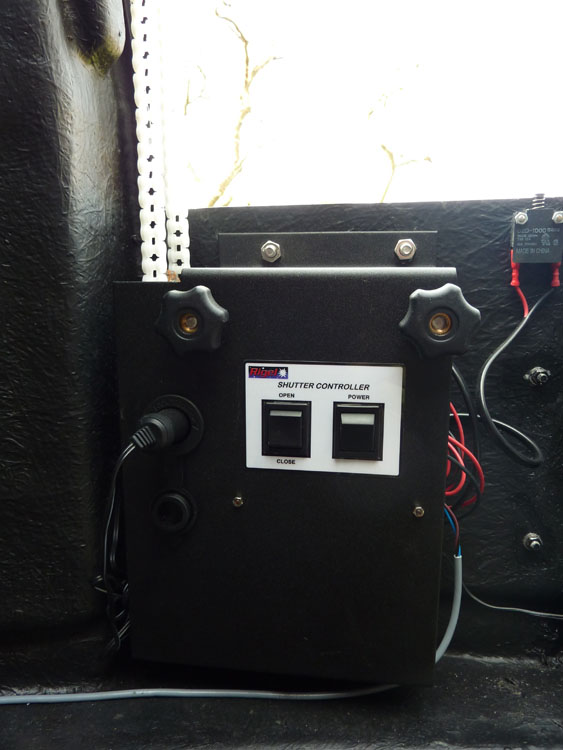
The shutter mechanism is attached to the dome part which makes getting power to it more difficult. The solution that Pulsar have come up with is a 12V battery and a solar panel. To send signals from the Shelyak Dome Tracker, they have utilised an IR connection. The open/close shutter will thus only work when the dome is at the home position, as this is when the IR sensors are aligned. It closes the shutter by means of a chain and sprocket. There is a manual open/close button in addition to the computer control.

To get the dome automated you need to enter a few details, such as the size of the observatory, the number of steps for a full revolution, the position of the pier how high the centre of the scope is above the rotation axis of the mount.
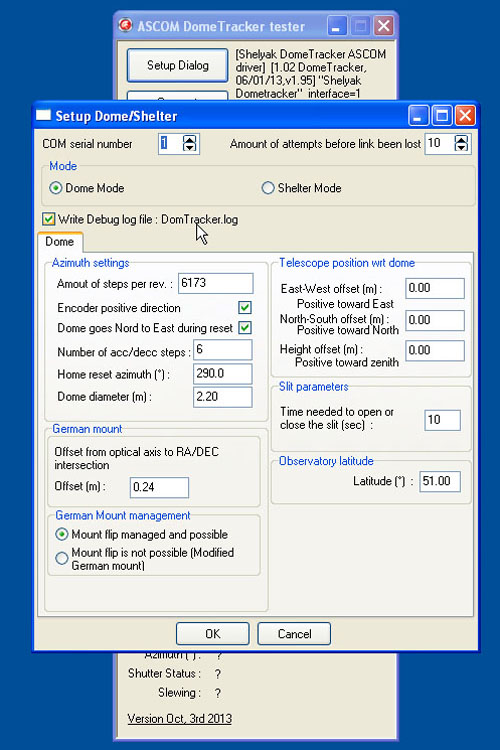
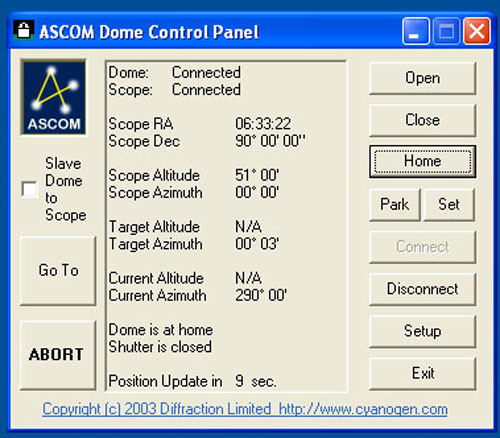
After that, it's plain sailing - rather than use the normal ASCOM driver for the mount, you use the ASCOM Dome Control driver instead (comes with ASCOM) - which itself connects to the dome and to the mount. You slave the dome to the mount and then when you issue slew commands, it moves both the dome and the mount to the right position and keeps them there throughout the night.
And this is it in action:
-
7
-
-
How tall is the box? If more than 90cm, can you have it roll off and over somehow (garage roller door type action), rather than off horizontally?
-
If you're paying that much, the tried and tested astroengineering pier (model AC282) is solid as a rock and includes the mount adaptor.
-
The larger one in the video is for a "trike", so will be substantially bigger than the motorcycle one that has specifications above it.
-
Or get resin capsules. Like little test tubes with resin in, just slip them into the drill hole and then screw the bolt into it, activating the resin. Don't have to worry about mixing and the applicator getting clogged. Should be able to get them from screwfix and toolstation. Suspect there will even be a youtube video.
-
You only need a spacer if you also bought the field flattener.
If you bought the flattener, you have to put the chip of the camera at a specific distance behind it. Often they design it, or give you adapters, to make a DSLR fit perfectly. If you have a CCD you have to make it act the same size as a DSLR. You can often buy T2 threaded adapters the right size, either individually or in combination.
-
it's frustrating - if it isn't one thing it's another! My dome is having problems, just waiting for a firmware upgrade. My filterwheel is playing silly buggers and my DC focus motor is now moving at a snail's pace.
I think I'll bring it all inside when I get the chance, strip it down and see what's what.
Good news for me too. Unbolted the focuser and bolted it back on - seems to work fine now. Moot point anyway as I'd ordered a stepper based focuser only a few hours before. Will give it away with the HiTec Astro controller that will shortly be in the classifieds.
The filterwheel was slipping - undid the central bolt a bit and works fine again now. Bit of a grinding noise at one point but always had that and Terry from SX has of offered to look at it anyway.
-
1
-
-
it's frustrating - if it isn't one thing it's another! My dome is having problems, just waiting for a firmware upgrade. My filterwheel is playing silly buggers and my DC focus motor is now moving at a snail's pace.
I think I'll bring it all inside when I get the chance, strip it down and see what's what.
-
That's concerning - I thought the whole point of the triplet was that the focus was the same for all colours and you didn't get the dreaded blue bloat?
-
You need a reticule eyepiece - there are some decent 12mm ones around for about £40 I think.
-
Thanks.
There's a few spots of light tonight too. It won't last.
-
Esprit 80ED with flattener plus OAG, EFW2 and 460EX now mounted on 11" ADM Losmandy style dovetail ready to be attached to the EQ8. For anyone concerned about the balance, the centre of gravity of this rig is just about dead centre of the dovetail

Gina (or anyone else who has one) - What's the gap between the two screws that go into the foot of the Esprit 80?
There doesn't look to be much room between the 11" dovetail and the filterwheel - is the focuser racked all the way in?
-
I was thinking more about motorising the provided focuser than ripping it out altogether and replacing it.


New Observatory in Norfolk UK
in DIY Observatories
Posted · Edited by dmahon
Argh, typo - fat fingers on iPad. I hope you spotted it. 192.168.1.151 (not 268).
The computer and the APC need to be on the same network.
If the subnet is set to 255.255.255.0 (usual for this type of setup), the first three numbers need to be the same on both computer and APC, but the fourth number needs to be different.
You then put 192.168.1.150 into the address bar at the top of IE/Chrome/Safari to get the Apc login screen.