


kookoo_gr
-
Posts
440 -
Joined
-
Last visited
Content Type
Profiles
Forums
Gallery
Events
Blogs
Posts posted by kookoo_gr
-
-
This is the imaging setup i have for my skywatched80. It is an atik 383l+, atik efw2, atik oag, pegasus falcon rotator and astrotech 2'' flattener.

As you can see from the image in order to focus i need to have almost all the drawtube racked inside with very little room for autofocus adjustment. I managed this by shortening the imaging system as much as possible and i replaced my baader clicklock with a low profile focus ring from primaluce. The biggest issue i have with this setup is that my camera is too heavy (2.6 kg) for the focus ring and i have hard time tightening it thus making it dangerous for my camera to fall off the focuser. Also the camera sags at the focus ring, you can see it in the photo, and the field in not being illuminated evenly and have flexure at my guiding.
After a lot of search i have the following options and all of them include the removal of the primaluce ring and i would like some advice
1. Cut the OTA by at least 40mm in order to have the factory focuser and use the baader clicklock. The camera is rock solid on this thing
2. Buy a new focuser with a length including adapters less than 90mm (the factory focuser is 90mm long from the OTA to the drawtube). If you have an option on this one please share it
3. Buy the skywatcher 0.85 reducer/ flattener . I had a few emails with FLO which were very helpful but i would like some extra info.
How long is the reducer? The astrotech flattener i use is 33mm long, the part that is outside the focuser. Also for those that use it with an ed80 how much did the drawtube go out in order to achieve focus?
4. As a desperation option, sell the ed80 and buy another frac which is my least favorite option and have the fear of not achieving focus with the new one.
-
I think this must also be the case because last night i had similar behavior with my mount evem though it's connected directly to my pc and the rotator not working with NINA and SGP
-
This the third time or fifth time, i have lost track at this point that sgp has given me serious trouble at my imaging session and each time has a different issue and also i want to vent some steam. I am trying to image ic 343 and the flame nebula for over a year. I have some L 1x1 data and some RGB 2x2 but i wanted to get more data. I finally got some clear weather and started to image some RGB bin 2x2 data. I set up my gear and i try to slew to IC 343. That's when thing start to go wonky. My mount started to slew and then stop, slew again and stop, this happened four times and i got a message that the mount may not be tracking. I park and unpark the mount and slew with no issues to ic343. I start imaging RGB at bin 2x2. After 1h30m i notice that when a frame starts, sgp pops a message at the bottom of the screen, "Setting x filter" but i see no problems with the images so i don't pay much attention. After the meridian flip sgp tries to plate solve and slew but i get at my images trails and the plate solve fails. I need to start guiding in order for the mount to settle and center the target. I finish the session and i start taking flats. Then i notice that at the filter wheel tab i have the filter set to L even though i am taking flats at the colour filters and also notice the popup message setting x filter. I finish the flats and start trying to set the filter to my RGB filter but i see no changes, also i hear no sound from my filter wheel that the filters are changing even though when i power off/on the wheel i can hear the movement. I shut down the camera close sgp and restart it, connect to my Filter wheel and i change the filters with success. and sgp shows the current filter. Needless to say i have 3 hours of bin 2x2 L data almost no colour data and i am [removed word] that sgp will randomly decide to mess my imaging session, whether it's with focusing, plate solving, downloading and messing imaging data, equipment connection issues and more. Has anyone had any wonky behavior with sgp? I tried NINA but the user interface is clunky for my liking
Sorry for the harsh tone but i also wanted to vent some steam since for year almost every time something will go wrong at my imaging sessions
-
Could those issues you mentioned be caused from not having the camera properly aligned? I believe i took this image before the primary collimation
-
I redid the collimation combining Davie's and Nicolas' methods and here are the results. First of all i had to spend over half an hour alligning the camera with the scope in order to collimate the primary mirror. Even though i collimated the primary mirror, i had to make adjustments with a star in order to fine tune it.
The secondary was also a bit tricky since i had issues aligning the camera with the hole, so i did the collimation as best as i could and hoped for the best. As for the focuser i checked and adjusted its alignment after the primary collimation was done
When i did my star tests i had bad seeing and some wind so i am not sure about the quality of the images but ccdinspector and pix show good results even though there is some small aberation at the lower right corner which might be due to bad sky conditions and/or maybe being slighlty off focus.
-
Don't worry Dave i will try your method, i have made a plastic disc and i will try it now that i am on vacation, the only problem is we will have bad weather until Saturday. Also i am making plans of turning a metal collimator like Nicolàs has at his site and will screw at the M90 ring i mentioned, so that i will eliminate any errors from loose elements and be able to use the tak collimator or the HG laser
-
 1
1
-
-
13 hours ago, billhinge said:
Whats the difference between the two saddles, one is $170, the other is cheaper.
Did you order from the US, if so did you get hit for import duty?
I can't tell the difference because i went direrctly for the ADM since i have at my ehq5 pro an adm saddle. I can't tell about import taxes for UK since i live in Greece but i did pay import taxes when it came in the mail. If you order from the US contact them and make sure they package the saddle with extra protection, mine came a bit banged up.
-
I have the adm saddle and it is amazing. The scope is rock solid on the mount and i can easily balance the scope on the saddle. The only drawbacks it has if you can call them drawbacks are that it is heavier than the stock saddle and the counterweight bar extends a few mm when you want it fully retracted.
-
From my collimation attempts the last months i found the following issues i had not considered at all
1. In order to have my camera centered at my focuser drawtube i used a baader clicklock which is great but with a major issue i found while collimating my scope. The 2'' barrel of the clicklock has a groove for better use with the brass strip the focusers use in order not to scratch any accessories placed in the focuser and it is a few mm away for the main body. When placed in the focuser drawtube and tightened it will always be out of alignment and this will affect the focuser alignment. This happens when i completely insert the clicklock so that it is flush at the drawtube, but if i move the clicklock outside just a tiny bit so that the thumbsrcews with the brass strip align with the groove then i have flexure at the focuser and bad centering.
2. The same thing applies for the Tak collimator which has a huge groove at the 2'' barrel that will not allow for flush placement of the collimator on the focuser. If i align the groove with the brass strip of the focuser then the collimator is not centered and tight in the drawtube.
When using the tak collimator first i had to align the focuser with my HG laser then use the tak collimator for the secondary mirror in which i aligned the groove of the 2'' barrel with the brass strip of the drawtube. Finally i used my HG laser for primary collimation and the end result was a good collimation. This issue with the grooves was the main reason i stopped using the tak collimator since every time i used it i had different results, now i know what the issue is i will use an adapter for a flush 2'' barell and recheck the collimation using some 3d printed parts for use with a webcam and maybe i will purchase this adapter https://rafcamera.com/adapter-m90x1f-to-m36-4x1f
The issue with my elongated star is that the secondary needs a little adjustment which i intend to do the following days on my vacation. The end result of this discussion is that for a reliable collimation of the scope is to first align the optics without the focuser and at the end align the focuser with the secondary mirror
-
After many days of setbacks i got back on my rc 8 i redid the collimation with a tak collimation scope for the secondary and my howie glatter for the primary and went outside for my tests. I rechecked the distance with the ronchie eyepiece and this the result i have, i believe that the distance is correct now and pic show me at 1634.93 mm with a resolution of 0.681 arcsec/px
I redid the collimation to the best of my power at the field and gave a shot to collimating my scope with the help of ccdinspector. The end result is not perfect but next time i will try to redo the collimation with the plastic card again since i didn't have any luck the last time. But i saw a big improvement at my guide stars since i use an oag and the stars are more round in the guider's FOV
-
1
-
-
I have used a pi under high humidity (as many others on this forum), almost 100% within its case, on my scope and i didn't have overheating issues (the temperature of the pi was near 60C if memory sreves me right) nor any significant condensation. Granted, you will use it 24/7 i believe it may be of concern during the summer days (if the scope is directly under the sun) but then again you will not be using any applications that will need lots of processing power to overheat the pi, especially if you use it to record temp/humidity.
Even if you place it (with its case) at a metal surface the heat disipation will be minimal at best.
Whem it comes to placing it on the mount to protect the electronis, this will not affect the mount at all, we use these mounts under almost 100% humidity and i haven't read any post in any forum that the mount's electronics were fried from humidity nor that their operation was affected by humidity.
Placing the pi near any mirrors in order to prevent any condensation will not affect them in the slightest, we have dew heaters that we place almost directly on the optics to prevent dew. On my ed80 i have a dew strap and i have covered it in a bandage in order to minimize heat loss in the air and it looks like it just came out of the hospital 😛
For comparison, i used a Mini pc (dimensions about 10cm x 3cm), a pi and now i use a nuc pc on my scopes and none of them was nowhere near in overheating and none of them had any significant condensation
Personally if i wanted to record temperature/humidity 24/7 in order to monitor the status of the scope under the cover, i would use a seperate logger with a pi zero and have the data downloaded/transered in my house and use the pi for my imaging sessions and record at the pi the temperature/humidity while imaging
-
17 hours ago, mercandrea said:
I spied this in the earlier post too and am planning something similar. I'm also taking nervous steps towards having my setup permanently outside though so might try to fashion some sort of housing for my hub and raspberry pi that attaches to the tripod legs or the accessory tray. Currently they live in an old recycling box that sits between the tripod legs, keeps them out of the weather ok but the cables snag occasionally having everything so close to ground.
Wouldn't it be better if you placed the hub,pi, power supply on top of the scope? You will save a lot of space, cables and they will be far better protected form the weather and any accidents with cable snagging when placed at the legs
-
thanks for the comment, i will use metal and not 3d print them, they are only for sanity check of the dimensions. One idea that popped into mind. With this method we remove the focuser and collimate only the mirrors and at the end we align the focuser with the mirros in order not to have any errors the focuser may introduce. Would it be possible to use the howie glatter collimator in the place of the light source in this method and collimate the mirrors?
-
Thanks for your reply nicolas. I made a design for 3d printing (in various formats)for sanity check of the dimensions you posted. I think i will have some adapters turned too since colimation is giviing a headache right now and the plastic ring didn't help at all. Maybe i am doing something wrong and i will try to follow your instructions
colimation adapter obj.zip colimation adapter slt.stl colimation adapter svg.svg
-
On 27/08/2020 at 18:16, inFINNity Deck said:
Hi David,
yesterday I tried your method on a RC8 of a befriended amateur astronomer. Your method is very easy and works like a charm. I added a few minor improvements to your method that makes the collimation of the primary mirror even more easy and more accurate and have written an article about it on a Dutch forum (of course with acknowledgements to you). Opening it in Chrome should translate it nicely into English: http://www.starry-night.nl/stap-voor-stap-collimatie-van-een-rc/
It also discusses finding the proper mirror-distance using a Neumann photographic ronchi-filter (images included) and shows the final and successful inspection using a holographic Howie Glatter laser (again image included).
Another RC8 fit for service!
Nicolàs
Hi Nicolas,
Are there any blueprints for the adapter you made for thr collmation?
-
After 8 months of owning the eq6-rand being disappointed as it performed like my old hypertuned heq5-pro i finally managed to get it to outperfom my heq5-pro. The main issue i have with it is that that the axes are too stiff maybe from excessive and not proper grease at the gears thus making it too hard to balance the mount. The other day i found a video on using a clamp-meter to measure the current of the mount and balance it . Needless to say that night the backlash of the mount was the smallest i had in months and the guiding error dropped to 0.3'' from 0.8'' that was the norm i had in good conditions. Here is the aforementioned video
and some images form my calibration and guiding. One question though do you guys have lower Dec backlash than what i show here? Is that normal?

-
3
-
 2
2
-
-
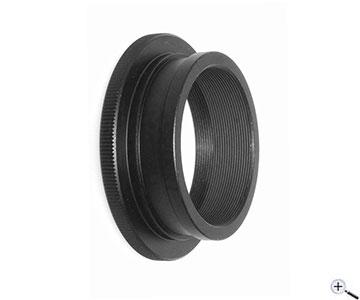
Recently i bought the Falcon rotator from Pegasus astro and i do not have sufficient backfocus at my ed80 and i would like some advice.
I have the old ED80 with the stock focuser which has a leght of 90mm, the drawtube extends at 17mm and i have a baader clicklock 36mm in length.
My current imaging system has an astrotech flattener which has a lenght of 41mm along with the adapter that connects to the falcon rotator. The rotator along with the extension i have put, since the oag focuser ring is to wide, is at 47mm As you can see from the photos the total backfocus i need is about 88mm which the focuser cannot provide. I would like some opinions on how to find 71mm in order to focus my imaging system on the ed80. Is there a shorter focuser for the ed80? Maybe a combination of focuser and flattener?
-
I would advise against it, you will add a lot more weight on the mount with the accesories and you will need a counterweiht to add on the scope in order to offset the primary mirror + camera thus stressing the mount. This is the main reason i got the eq6-r. Even though i modded my mount with the Rowan belt mod and i had really good pictures there were times that it was strainning. For reference at my scope i have the following thing attched to it
Atik EFW2 and OAG
Atik 383L+
SX Lodestar
Pegasus Falcon Rotator (new purchase)
Moonlite focuser with stepper motor
focuser extension
A nuc mini pc in order to control the setup along with a pegasus mini power box, pegasus focus cube
Power supply box in order to stabilize and increase the power to 13.5V
Usb hub
An ADM Losmandy saddle and an ADM dual clamp in order to have a 1kg conterweight on the scope
As you can see these add much more weight on the scope and the HEQ5 has hard time tracking, even on the EQ6-r i have an extra 5kg counterweight and a conterweight extension bar
-
I checked the collimation of my rc and did another ronchi test at my scope. It appears that the optics are ok. The only things that i need to is to replace the 3d printed T2 to canon lens adaptor since the camera is not centered with the lens that's why the images are not centered, i ordered a new adaptor and i will redo the test. Finally i need to take some images and check the FL of the scope since these tests are made under heavy light polluted sky and pix can't find enough stars even at m13.
-
How do i correct the coma? Collimation? The scope does need some slight recollimation and from my first test with the ronchi the lines will be converging if the collimation is off. Here are two videos i captured maybe this is seeing?
-
This is the last image for this night, it seems that the scope is corrected but i may be wrong so i need second opinion. I also did a visual check and the lines were curved only when i had three lines but as per the instructions most telescopes will not pass the three lines test. (sorry for the image not being centered but the 3d adaptor must have some play and i am not sure if that affects the test.
-
1
-
-
Here is my attempt with my equipment, what do you think?
-
This is my setup for the Ronchi Eyepiece. I had a friend of mine 3d print a T2 to canon lens adaptor and used my old 18-55mm canon lens on my ASI120MC, i then bought from a local photography equipment shop a cheap M58 to M52 ring (8 euros) and installed the ronchi eyepiece which will go to my scope using a T2 ring. As is the setup focuses at 35mm and i haven't managed any trials because clouds, let's hope tonight is the lucky night
-
well for once i don't have the instructions for the photographic eyepiece so i'll have to ask for a copy but from the description at the shop it mentions a lens but it is not very clear, i will also ask for this possibility


![20200807_125707[1].jpg](http://content.invisioncic.com/g327141/monthly_2020_08/564496066_20200807_1257071.jpg.c6d9033385c93ea4e93228328462634d.jpg)
![20200807_125712[1].jpg](http://content.invisioncic.com/g327141/monthly_2020_08/709299667_20200807_1257121.jpg.e37b0d349eb3a896171cce528bbb509d.jpg)


EQ6-R owners club
in Discussions - Mounts
Posted
One question about the eq6-r that bugs me for some time. Can i remove the handle the mount has during imaging and screw it back when transporting? It is in the way of my filter wheel usb cable when the mount slews past the point of the handle and i don't want to damage anything