


AlastairW
-
Posts
131 -
Joined
-
Last visited
Content Type
Profiles
Forums
Gallery
Events
Blogs
Posts posted by AlastairW
-
-
Getting to grips with my new(ish) QHY Img2pro (314l+ equiv). Bi colour image from my 130pds of the Bubble Nebula NGC7635.
Info
7 x 600second Ha
10 x 600second OIII
10 x 600second darks
Skywatcher 130pds, HEQ5
QHY Img2pro
6nm Ha Astronomik Clip filter
12nm OIII Astronomik Clip filter
-
 6
6
-
-
After a few years imaging I've taken the plunge and moved to CCD (QHY IMG2PRO) from DSLR. First light from last night. 4 x 10mins. No calibration (yet). Spacing is a bit off but for a first CCD image I am fairly happy. Clear skies folks :-)

-
5
-
-
Hello all. I'd been imaging with a SW150p for the past three years but wanted something with a bit more FOV. I opted for the 130pds as I could use my existing SW CC and heard great reports of its performance for AP. I've recently started doing some narrowband imaging after modding my 350d (ir/uv removal and CFA debayering). This little scope is an absolute joy
 Just wanted to share my efforts from the other night. Clear skies folks.
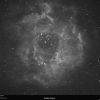
-
6
-
-
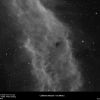
Finally, a clear night to test the camera properly following the debayer procedure. California Nebula in 6nm Ha (mono). 7 x 10min IS1600 lights + flats & bias (no darks - yet). Skywatcher 150p, HEQ, PHD2 (ST80 & QHY5L-II)
-
1
-
-
well done Alistair! Indeed now use it and show us what it is capable of...
Good job. Now get out and use it! Good to see someone not killing their camera lol.
Cheers guys. Been eagerly awaiting some clear spells to test. Suppose with the UK cloud coverage at least we get to experiment and have time to complete these projects :-)
-
Thanks Gina
 Thanks to you and all the other contributors on this thread.
 -
1
-
-
What a fantastic thread, which I've been following for some time now. I've had a 350d sitting around for a while, feeling sorry for itself, so I thought I'd treat it to a CFA removal. Thought it'd be helpful to share my experience.
I performed the standard IR/UV removal on the 350 as a start, which went very smoothly (apart from the pain of desoldering the protection plate). Disassembly of the sensor itself was fairly easy. I didn't find removing the glass in front of the sensor too hard. I placed some insulating tape on the glass itself in case of an 'incident' while removing it to avoid any glass shards dropping on the sensor. I then gently slid an old style razor blade under the edge of the glass and it came off in one piece.
On to the microlens and CFA removal. I'd decided to use the sharpened edge of a 00 paint brush for removal. The microlens layer came off very easily and took about 10 mins. The CFA is a lot tougher though. I had to start off the CFA removal with a flat head screwdriver (exerting very little pressure), just to get a tiny score in the CFA. Once the score was made, the paint brush end did the trick but it took ages (about 1.5hrs) to fully remove the CFA.
This is the final result once I reassembled the camera. The whole operation took approx 5 hrs. I also used a cheapo USB microsope to check the sensor. I found this very useful as it clearly showed me the layers I was removing.
-
3
-


Imaging with the 130pds
in Getting Started With Imaging
Posted · Edited by AlastairW
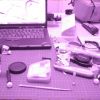
Hi Adam. Yes, I have a Astronomik clip to M48 adapter. I'd been imaging with my clips on a debayered 350d but recently moved to an Img2pro (to learn the ropes of CCD imaging). Rather than splash out again on Ha and OIII 1.25 filters I thought for 20 quid it was worth a shot. Turns out the adapter works brilliantly. Pop the filter in and screw on to the end of the img2pro (img2pro, variable spacer, coma corrector, clip adapter - see image). Obviously it's not as easy as using a filter wheel but it's a viable alternative if you've already invested in clip filters.