


jager945
-
Posts
96 -
Joined
-
Last visited
Content Type
Profiles
Forums
Gallery
Events
Blogs
Posts posted by jager945
-
-
Nice going! The star halos are likely caused by chromatic aberration. You can use the Filter module in StarTools to kill those fringes; create a star mask with the offending stars in it, then, back in the module, set Filter Mode to Fringe Killer. Now click on different halos and different parts of the halos (e.g. not the star cores, but the halos themselves!) until they have all but disappeared. You'll end up with white-ish stars for the stars that were affected, but many prefer this over the fringes.

Finally, if you are suffering from colour blindness, be sure to make use of the MaxRGB mode in the Color module. It should allow you to check your colouring and colour balance to a good degree, as long as you can distinguish the brightness of the 3 maxima ok (most people can). See here for more info on how to use it.
Clear skies!
-
 3
3
-
-
Hi,
I had a quick look at the datasets. While the Ha signal is really nice, it seems the R, G and B data has all sorts of anomalous patches going on.
It appears something has gone wrong here. The Green dataset in particular looks like you shot clouds, or perhaps something in your optical train dewed over;
(this was th green channel binned to 35%, Crop, default AutoDev for diagnostics)
As such, I can understand you're having trouble getting anything useful in the visual spectrum,
That said, your Ha signal is fantastic and you can always create a false color Ha image if you want.
Once you do acquire a useful RGB signal, you will want to use the Compose module to process chrominance and luminance separately yet simultaneously. You can, for example, use Ha as luminance and R+Ha as red, with G and B as normal.
Hope this helps!
-
Looking great!
I would highly recommend software-binning your dataset, as the image at its full size is very much oversampled.
Once you've binned and converted the "useless" resolution into a better signal at a lower resolution, you push the dataset more and noise should also be much less apparent.
Clear skies & stay healthy,
-
1
-
 1
1
-
-
31 minutes ago, vlaiv said:
this approach to creating synthetic luminance is quite wrong.
Ok. 🤗
-
2 hours ago, Adreneline said:
Thank you! I’m assuming you used the .fit files I posted to achieve the image in your post. Is your image a straight HOO or is it a luminance augmented HOO? - sorry I’m a little confused. How did you create the synthetic luminance image?
Thanks again for your help and sorry if I’m missing something obvious.
Adrian
Apologies for any confusion Adrian! The two datasets were used by StarTools to automatically;
- Create a synthetic luminance master (e.g. making the proper blend of 920s of O-III + and 2280s of Ha). You just tell ST the exposure times and it figures it out, but it in this instance, it would have calculated a signal precision of 1.77:1 (Ha:O-III), derived from sqrt(2880/920) for Ha vs sqrt(920/920). So I believe that would have yielded a 1/(1+1.77) * 100% = ~36% OIII vs 1.77/(1+1.77) * 100% = ~64% Ha blend.
- Create a synthetic chrominance master at the same time (e.g. mapping Ha to red, O-III to green and also blue)
If you are using PS or PI, then you can stop reading here as the following will not be possible (you will want to process both datasets with separate workflows and then afterwards combine chrominance and luminance into one image to the best of your abilities).
In ST, the engine processes both synthetic luminance and chrominance masters simultaneously yet separately (for example, during gradient removal both datasets are treated at once). Most operations only affect the luminance portion (stretching, wavelet sharpening, decon, etc.) until you do final color calibration towards the end (please don't do color calibration this late in PS or PI though!) of your processing flow, which will seamlessly merge color and luminance. During this step, you can boost the color contribution of any channel (or remap channels at will), completely separate to the brightness and detail you brought out. It's one work flow, one integrated process with full control over luminance and chrominance interplay of the final result.
If interested, this was the entire work flow for that image in ST 1.6;
--- Compose
Load Ha as red, O-III as green and O-III - again - as blue
Parameter [Luminance, Color] set to [L + Synthetic L From RGB, RGB]
Parameter [Blue Total Exposure] set to [Not set] (we only want to count O-III's contribution once)
Parameter [Green Total Exposure] set to [0h16m (16m) (960s)]
Parameter [Red Total Exposure] set to [0h37m (37m) (2220s)] (exposure times have to be multiples of 60s; close enough") )
)
--- Bin
Parameter [Scale] set to [(scale/noise reduction 35.38%)/(798.89%)/(+3.00 bits)]
Image size is 1663 x 1256
--- Crop
Parameter [X1] set to [78 pixels]
Parameter [Y1] set to [24 pixels]
Parameter [X2] set to [1613 pixels (-50)]
Parameter [Y2] set to [1203 pixels (-53)]
Image size is 1535 x 1179
--- WipeWill remove gradients and vignetting in both synthetic datasets (Use Color button to toggle between datasets).
Parameter [Dark Anomaly Filter] set to [6 pixels]
Parameter [Drop Off Point] set to [0 %]
Parameter [Corner Aggressiveness] set to [95 %]
--- Auto Develop
Parameter [Ignore Fine Detail <] set to [3.0 pixels]
Parameter [RoI X1] set to [466 pixels]
Parameter [RoI Y1] set to [60 pixels]
Parameter [RoI X2] set to [779 pixels (-756)]
Parameter [RoI Y2] set to [472 pixels (-707)]
--- HDR
Defaults--- Deconvolution
Parameter [Primary PSF] set to [Moffat Beta=4.765 (Trujillo)]
Parameter [Tracking Propagation] set to [During Regularization (Quality)]
Parameter [Primary Radius] set to [1.3 pixels]
--- ColorDuoband preset (defaults parameter [Matrix] to [HOO Duoband 100R,50G+50B,50G+50B])
Parameter [Bright Saturation] set to [4.70]
Parameter [Red Bias Reduce] set to [6.91] to boost the blue/teal of the O-III to taste
--- Psycho-Visual Grain Equalization De-Noise (switch signal evolution tracking off, choose 'Grain Equalize')
Parameter [Grain Size] set to [7.0 pixels]
Parameter [Grain Removal] set to [60 %](I think I bumped up the saturation just a little afterwards in the Color module)
Hope that helps!
-
4
-
If Ha and OIII are weighted properly to make a synthetic luminance frame, you have some pretty decent signal (your calibration is quite excellent!).
If your software does not have an automatic weighting feature when compositing your synthetic luminance, then it is important to remember that, if you are weighting stacks made up of sub frames of equal exposure times, however with different numbers of subs, then relative signal quality in these individual stacks only increases with the square root of the amount of exposures.
E.g. if you have twice as many Ha sub frames as O-III frames, then signal in the Ha stack is sqrt(2) ~ 1.4x better (not 2x!).
As the human eye is extremely forgiving when it comes to noise in colour data, you don't need too much signal if your calibration is otherwise very good to augment your (deep) luminance rendition with O-III colouring. Creating, for example, a typical HOO bi-color then becomes fairly trivial (as usual, however, stars are pretty dominant in the O-III band however);
Hope this helps!
-
On 02/02/2020 at 08:35, alacant said:
Hi. Yeah, I was looking for a free lunch too! I tried StarTools' HDR (I think that's what Ivo would use?) but unfortunately you can't mask in the HDR module, so you end up with a full frame HDR when what you want is just the core. Maybe worth asking over on st.
Thanks
**We've just bagged the 10s frames, so my participation is over, but they too look dangerously blown in EKOS' fitsviewer. Here's hoping the auto-stretch has overdone it.
You may indeed be able to rescue some details from the highlights, but if an area is overexposed (very easy to on M42), the detail and/or colour information is just not there and you will have change tack;
In that case, you will want to take a shorter exposure stack, make sure it is aligned with the longer exposure stack, process it to taste (preferably fairly similar to the other stack) and then use the Layer module to create a High Dynamic Range composite. To do this, put the one of the two finished images in the foreground and the other in the background. Then choose the 'Minimum Distance to 1/2 Unity' Filter. This filter creates a composite that switches between the background and foreground image, depending on which pixel is closes to gray (1/2/ unity). To make the switching less apparent/abrupt, bump up the Filter Kernel Radius. This will make the transitions nice and smooth.
-
2
-
-
32 minutes ago, vlaiv said:
I'm not sure that you understand concept of illuminant.
I'm going to respectfully bow out here. 😁
If you wish to learn more about illuminants (and their whitepoints) in the context of color spaces and color space conversions, have a look here;
https://en.wikipedia.org/wiki/Standard_illuminant
Lastly, I will leave with you a link/site that discusses different attempts to generate RGB values from blackbody temperatures, and discusses some pros and cons of choosing different white points, methods/formulas. sources for each, and the problem of intensity.
http://www.vendian.org/mncharity/dir3/blackbody/
http://www.vendian.org/mncharity/dir3/starcolor/details.html
Clear skies,
-
1 hour ago, vlaiv said:
It really depends on how you process your color image. What do you think about following approach:
ratio_r = r / max(r, g, b)
ratio_g = g / max(r, g, b)
ratio_b = b / max(r, g, b)final_r = gamma(inverse_gamma(stretched_luminance)*ratio_r)
final_g = gamma(inverse_gamma(stretched_luminance)*ratio_g)
final_b = gamma(inverse_gamma(stretched_luminance)*ratio_b)where r,g,b are color balanced - or (r,g,b) = (raw_r, raw_g, raw_b) * raw_to_xyz_matrix * xyz_to_linear_srgb_matrix
This approach keeps proper rgb ratio in linear phase regardless of how much you blow out luminance due to processing so there is no color bleed. It does sacrifice wanted light intensity distribution but we are already using non linear transforms on intensity so it won't matter much.
Again - it is not subjective thing unless you make it. I agree about perception. Take photograph printed on paper of anything and use yellow light and complain how color is subjective - it is not fault in photograph - it contains proper color information (within gamut of media used to display image). I also noticed that you mention monitor calibration in first post as something relevant to this topic - it is irrelevant to proper color calibration. Image will contain proper information and with proper display medium it will show intended color. It can't be responsible for your decision to view it on wrong display device.
Spectrum of light is physical thing - it is absolute and not left to interpretation. We are in a sense measuring this physical quantity and trying to reproduce this quantity. We are not actually reproducing spectrum with our displays but tristimulus value since our vision system will give same response to different spectra as long as they stimulate receptors in our eye in equal measure. This is physical process and that is what we are "capturing" here. What comes after that and how our brain interprets things is outside of this realm.
Yup, that looks like a simple way to process luminance and color separately.
With regards to the colouring, you're almost getting it; you will notice, for example, color space conversions requires you specify an illuminant. For sRGB it's D65 (6500K). E.g. an image is supposed to be viewed under cloudy sky conditions in an office environment.
However in space there is no "standard" illuminant. That's why it is equally valid to take a G2V star as an illuminant, a random selection of stars as an illuminant, or a nearby galaxy in the frame as an illuminant, yet in photometry, white stars are bluer again than the sun, which is considered a yellow star. The method you choose here for your color rendition is arbitrary.
Further to colorspaces, the CIELab and CIE 1931 colorspaces were precisely crafted using by the interpretation of colors by people (a group of 17 observers in the instance of 1931). Color perception is not absolute. It is subject to intepretation and (cultural) consensus.
-
9 minutes ago, alacant said:
Hi. No, it's this one. To our -untrained eyes- it looks fine. We don't have high end equipment; this was taken at 1200mm with an old canon 450d. I'm not sure we can improve...
I'm sorry... I'm at a loss as to what would be wrong or weird about this image. 😕
Even the most modest equipment can do great things under good skies and competent acquisition techniques.
-
2 minutes ago, alacant said:
Hi. It's the image posted here, but I'm told that the background is wrong. I honesty can't see it!
Cheers and clear skies
If it's the first image at the start of this thread, then the histogram does look a little weird in that the there is very little to the right of the mode (it's mostly all contained in one bin when binned to 256 possible values). Is this what you're seeing too? (could be some artifact of JPEG compression as well).
Regardless, the background doesn't look weird to me; I can see plenty of undulation/noise/detail as a result of the right part of the "bell curve" containing plenty of Poissonian noise/detail if I zoom in. What is the main objection of those saying it is "wrong"?
-
3 minutes ago, alacant said:
Ah, so my non-symmetrical histogram is what you'd expect in a finished image?
TIA
That histogram looks quite "healthy" to me indeed if it is indeed of the image behind the dialog. The mode (peak of the bell curve) and the noise (and treatment of it) on both sides of the mode seems like a good example of what I was trying to explain.
-
1
-
-
Hi vlaiv,
I'm sad that the point I was trying to make was not clear enough. That point boling down to; processing color information along with luminance (e.g. making linear data non-linear) destroys/mangles said color information in ways that make comparing images impossible.
There are ample examples on the web or astrobin of white, desaturated M42 cores in long (but not over exposing!) exposures of M42, whereas M42's core is really a teal green (due to dominant OIII emissions), a colour which is even visible with the naked eye in a big enough scope. I'm talking about effects like these;
Left is stretching color information along with luminance (as often still practiced), right is retaining color RGB ratios; IMHO the color constancy is instrumental in relaying that the O-III emissions are continuing (and indeed the same) in the darker and brighter parts of the core, while the red serpentine/ribbon feature clearly stretches from the core into the rest of the complex.
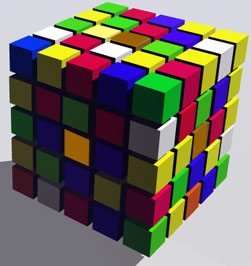
Colouring in AP is a highly subjective thing, for a whole host of different reasons already mentioned, but chiefly because color perception is a highly subjective thing to begin with. My favourite example of this;
(it may surprise you to learn that the squares in the middle of each cube face are the same RGB colour)
I'm not looking for an argument . All I can do is wish you the best of luck with your personal journey in trying to understanding the fundamentals of image and signal processing.
Wishing you all clear skies,
-
Hi,
Without singling anyone out here, there may be a few misconceptions here in this thread about coloring, histograms, background calibration, noise and clipping.
In case there is, for those interested I will address some of these;
On colouring
As many already know, coloring in AP is a highly subjective thing. First off, B-V to Kelvin to RGB is fraught with arbitrary assumptions about white points, error margins, filter characteristics. Add to that atmospheric extinction, exposure choices, non-linear camera response, post processing choices (more on those later) and it becomes clear that coloring is... challenging. And that's without squabbling about aesthetics in the mix.
There is, however, one bright spot in all this. And that is that the objects out there 1. don't care how they are being recorded and processed - they will keep emitting exactly the same radiation signature, 2. often have siblings, twins or analogs in terms of chemical makeup, temperature of physical processes goings on.
You can exploit point 1 and 2 for the purpose of your visual spectrum color renditions;
1. Recording the same radiation signature will yield the same R:G:B ratios in the linear domain (provided you don't over expose and our camera's response is linear throughout the dynamic range of course). If I record 1:2:3 for R:G:B for one second, then I should/will record 2:4:6 if my exposure is two seconds instead (or is, for example, twice as bright). The ratios remain constant, just the multiplication factor changes. If I completely ignore the multiplication factor, I can make the radiation signature I'm recording exposure independent. Keeping this exposure independent radiation signature separate from the desired luminance processing, now allows for the luminance portion - once finished to taste - to be colored consistently. Remember objects out there don't magically change color (hue, nor saturation) depending on how a single human chose his/her exposure setting! (note that even this coloring is subject to arbitrary decisions with regards to R:G:B ratio color retention)
2. Comparable objects (in terms of radiation signatures, processes, chemical makeup) should - it can be argued - look the same. For example, HII areas and the processes within them are fairly well understood; hot, short-lived O and B-class blue giants are often born here and ionise and blow away the gas around their birthplace. E.g. you're looking at blue stars, red Ha emissions, blue reflection nebulosity. Mix the red Ha emissions and blue reflection nebulosity and you get a purple/pink. Once you have processed a few different objects in this manner (or even compare other people's images with entirely different gear who have processed images in this manner), you will start noticing very clear similarities in coloring. And you'd be right. HII areas/knots in nearby galaxies will have the exact same coloring and signatures as M42, M17, etc. That's because they're the same stuff, undergoing the same things. An important part of science is ensuring proof is repeatable for anyone who chooses to repeat it.
Or... you can just completely ignore preserving R:G:B ratios and radiation signature in this manner and 'naively' squash and stretch hue and saturation along with the luminance signal, as has been the case in legacy software for the past few decades. I certainly will not pass judgement on that choice (as long as it's an informed, conscious aesthetic choice and not the result of a 'habit' or dogma). If that's your thing - power to you! (in ST it's literally a single click if you're not on board with scientific color constancy)
On background calibration and histograms
Having a discernible bell ('Gaussian') curve around a central background value is - in a perfectly 'empty', linear image of a single value/constant signal - caused by shot/Poissonian noise. Once it is stretched this bell curve will become lopsided (right side of the mode (mode = peak of the bell curve) will expand, while the left side will contract). This bell curve noise signature is not (should not be) visible any more in a finished image, especially if the signal to noise ratio was good (and thus the width/FWHM of the bull curve was small to begin with).
Background subtraction that is based around a filtered local minimum (e.g. determining a "darkest" local background value by looking at the minimum value in an area of the image) will often correct undershoot (e.g. subtracting more than a negative outlier can 'handle' - resulting in a negative value). Undershooting is then often corrected by increasing the pedestal to accommodate the - previously - negative value. However a scalar to such values is often applied first before raising the pedestal value. E.g. the application of a scalar, rather than truncation, means that values are not clipped! The result is that outliers are still very much in the image, but occupy less dynamic range than they otherwise would, freeing up dynamic range for 'real' signal. This can manifest itself in a further 'squashing' of the area left of the mode, depending on subsequent stretching. Again, the rationale here is that values to the left of the mode are outliers (they are darker than the detected 'real' background, even after filtering and allowance for some deviation from the mode).
Finally, there is nothing prescribing a particular value for the background mode, other than personal taste, catering to poorly calibrated screens, catering to specific color profiles (sRGB specifies a linear response for the first few values, for example), or perhaps the desire to depict/incorporate natural atmospheric/earth-bound phenomena like Gegenschein or airglow.
I hope this information helps anyone & wishing you all clear skies!
-
2
-
-
Quickie in 1.6 beta;
---
Type of Data: Linear, was not Bayered, or was Bayered + white balanced
Note that you can now, as of DSS version 4.2.3, save your images without white balancing in DSS. This indeed allows for reweighing of the luminance portion due to more precise green channel. However, since this dataset was colour balanced and matrix corrected, this is currently not possible.
--- Auto DevelopTo see what we got. We can see a severe light pollution bias, noise and oversampling.
--- Crop
Parameter [X1] set to [1669 pixels]
Parameter [Y1] set to [608 pixels]
Parameter [X2] set to [3166 pixels (-2858)]
Parameter [Y2] set to [2853 pixels (-1171)]
Image size is 1497 x 2245
--- Rotate
Parameter [Angle] set to [270.00]
--- BinTo convert oversampling into noise reduction.
Parameter [Scale] set to [(scale/noise reduction 35.38%)/(798.89%)/(+3.00 bits)]
Image size is 794 x 529
--- WipeTo get rid of light pollution bias.
Parameter [Dark Anomaly Filter] set to [4 pixels] to catch darker-than-real-background pixels (recommended in cases of severe noise).
--- Auto DevelopFinal global stretch.
Parameter [Ignore Fine Detail <] set to [3.9 pixels] to make AutoDev "blind" to the noise grain and focus on bigger structures/details only.--- Deconvolution
Usually worth a try. Let Decon make a "conservative" automatic mask. Some small improvement.
Parameter [Radius] set to [1.5 pixels]
Parameter [Iterations] set to [6]
Parameter [Regularization] set to [0.80 (noisier, extra detail)]--- Color
Your stars exhibit chromatic aberration (the blue halos) and DSS' colour balancing will have introduced some further anomalous colouring in the highlights.
--- Color
Parameter [Bias Slider Mode] set to [Sliders Reduce Color Bias]
Parameter [Style] set to [Scientific (Color Constancy)]
Parameter [LRGB Method Emulation] set to [Straight CIELab Luminance Retention]
Parameter [Matrix] set to [Identity (OFF)]
Parameter [Dark Saturation] set to [6.00]
Parameter [Bright Saturation] set to [Full]
Parameter [Saturation Amount] set to [200 %]
Parameter [Blue Bias Reduce] set to [1.39]
Parameter [Green Bias Reduce] set to [1.14]
Parameter [Red Bias Reduce] set to [1.18]
Parameter [Mask Fuzz] set to [1.0 pixels]
Parameter [Cap Green] set to [100 %]
Parameter [Highlight Repair] set to [Off]What you're looking for in terms of colour, is a good representation of all star (black body) temperatures (from red, orange and yellow, up to white and blue). Reflection nebulosity should appear blue and Ha emissions should appear red to purple (when mixed with blue reflection nebulosity). M42's core should be a teal green (O-III emissions all powered by the hot young blue O and B-class giants in the core, this colour is also perceptible with the naked eye in a big enough scope). As a useful guide for this object, there is a star just south of M43 that should be very deep red (but I was unable to achieve this at this scale with the signal at hand).
Final noise reduction (I used Denoise Classic for this one as the noise is too heavy for "aesthetic" purposes).
--- Filter
Parameter [Filter Mode] set to [Fringe Killer]Put stars with their halos in a mask and click on the offending star halos and their colours. This should neutralise them.
--- Wavelet De-Noise
Parameter [Grain Dispersion] set to [6.9 pixels]
Hope you like this rendition & wishing you clear skies!
-
5
-
-
Thanks for the details Andy!
Bortle 4 is definitely helping you here, allowing you to easily capture fainter objects (e.g. galaxies) and nebulosity. The CLS filter will skew colours a little, as it removes part of the spectrum. Yellows are usually impacted once the image is properly color balanced (usually yielding foreground starfields that have a distinct lack of yellow stars). It's not the end of the world, just something to be mindful of.
If you're using a 600D, ISO 800 seems to be recommended. For a 6D, it's 1600 or 3200 (source).
As far as ST goes, if you want to reduce the Saturation, in the Color module use the slider named... Saturation
If you'd like to switch color rendering from scientifically useful Color Constancy to something PI/PS/GIMP users are more used to (e.g. desaturated highlights), try the "Legacy" preset. Finally, a maintenance release update for 1.5 was released a couple of days ago with some bug fixes. Updating is highly recommended. And if you feel adventurous, you can also try the 1.6 alpha, which comes with an upgraded signal quality-aware multi-scale (wavelet) sharpener.
Clear skies!
-
1
-
-
Hi Andy,
That's an excellent start! At a glance, your images look nice and clean and well calibrated. It bodes very well!
Can you tell us if you used a light pollution filter in the optical train? What software did you use to stack? Exposure times for each image and what sort of skies are you dealing with (e.g. Bortle scale)? I'm asking as it gives us an idea of what to you can reasonably expect.
The stars in image of the North American nebula are suffering from the Gibbs phenomenon (aka "panda eye" effect). This is most apparent when using "dumb" sharpening filters such as Unsharp Mask. If you used StarTools deconvolution module, the choosing a "Radius" parameter that is too high will start introducing these ringing artifacts. Not using a star mask will also cause ringing artifacts around overexposing stars.
Cheers!
-
1
-
-
That is a rather excellent image with fantastic usage of the duoband filter!
You may be interested in the first 1.6 alpha version of StarTools (just uploaded) which includes some specific Duoband functionality in the Color module. It lets you choose from different channel assignments and blends (and thus color schemes) without having to reprocess/reload the data. I love the HOO-ish rendering above though. 👍 -
1 hour ago, bottletopburly said:
Thanks ivo 👍 imaging equipment canon 1000d Astro Modified ur filter removed , Tecnosky 70 Q /346mm quadruplet
idasD2 filter , Stacked in deepskystacker (wb from camera not sure if I should have checked that ) processed in startools , taken from my location on edge of town , led street lights fitted all around town bortle 6 sky
Say no more. IMHO, that's not bad at all for Bortle 6 and a 1000D! Light pollution is such a killer for fainter objects.
The mod explains how you were able to get the HII areas showing. Nice!
-
1
-
-
This looks quite good to me. I would have expected a somewhat deeper and more noise free signal for 8.5h though. What instrument did you use to acquire the data? How is the light pollution at your location?
I can't quite place Peter's comments about the colours and clipping however...
The foreground stars show all temperatures of the black body curves equally (red->orange->yellow->white->blue are all accounted for). The yellow core is present (older stars), the bluer outer rim is correct (younger OB stars, more star formation), the all too often neglected purple/pink HII areas (as can be corroborated/seen here) are just about coming through in the outer rim (responsible for the star formation), the red/brown dust lanes are present. You have produced a scientifically valuable image in terms of coloring of temperatures and emissions. Finally, your histogram looks just fine to me and shows no clipping that I can see;
I'd say nicely done!
-
2
-
-
5 hours ago, paul mc c said:
My apologies......i did'nt realise that,feel like a right muppet now.
I'm the muppet here!
 My apologies - I should've made clear I'm the developer. I usually have this in my signature on other forums. I just updated my profile pic to avoid any confusion in the future.
Clear skies!
-
2
-
-
Hi Paul,
You are producing some fairly good data - kudos!
Now I could be wrong, but from the color signature (a lack of yellow) I get the impression you are using a light pollution filter. Is that correct?
The only obvious thing I can recommend to improve your datasets, woudl be to try dithering between frames, as I can see some walking noise ('streaks').
When processing spiral galaxies, things to look out for are a yellow core (older stars, less star formation), blue outer rim (younger blue stars, more star formation) and purplish/pink HII areas dotted around the arms (you captured these too). You'd also be looking for a good even foreground distribution of star colors, ranging from red->orange->yellow (missing here)->white->blue.
You are definitely well on your way!
FWIW I processed your image in StarTools 1.5 as follows;
--- Auto Develop
Default parameters, to see what we are working with. We can see some stacking artifacts, gradients, walking noise, dust donut at the top.
--- CropCropping away stacking artifacts and dust.
Parameter [X1] set to [20 pixels]
Parameter [Y1] set to [55 pixels]
Parameter [X2] set to [2129 pixels (-16)]
Parameter [Y2] set to [1414 pixels (-14)]
Image size is 2109 x 1359
--- WipeGetting rid of gradients. Default parameters.
Parameter [Dark Anomaly Filter] set to [4 pixels]
--- Auto DevelopFinal stretch. Clicked and dragged a Region of Interest (RoI) over part of the galaxy.
Parameter [Ignore Fine Detail <] set to [2.5 pixels]
Parameter [RoI X1] set to [95 pixels]
Parameter [RoI Y1] set to [607 pixels]
Parameter [RoI X2] set to [1963 pixels (-146)]
Parameter [RoI Y2] set to [964 pixels (-395)]--- Deconvolution
Auto mask. Default settings. Usually worth a try, as the module tends to "know" when and where improvements can be made. It didn't do too much in this case.
--- HDRDefault parameters. Shows a little more detail in the core.
--- ColorSee notes above about what to look for.
Parameter [Bright Saturation] set to [3.00] (less saturation in the highlights to hide some color channel alignment issues)
Parameter [Green Bias Reduce] set to [1.09]
Parameter [Red Bias Reduce] set to [2.09]
Parameter [Cap Green] set to [100 %] (only when you're done color balancing)--- Wavelet De-Noise
Default parameters.
Parameter [Grain Dispersion] set to [7.5 pixels]Hope this helps at all!
-
3
-
1
-
-
Hi Danjc,
The short version of what's going on; stacking artifacts. Crop them away. They are fairly obvious in the image you posted.
The long version; any StarTools tutorial or video will start by telling you to crop away stacking artefacts. The application itself will warn you about them too if they are detected (as it does with the dataset you posted). When you launch the Wipe module without cropping them away, you are effectively asking Wipe to create and subtract a light pollution model where those stacking artifacts are not being clipped (StarTools will virtually never clip your data unless you explicitly allow it to). In order to satisfy this, Wipe creates a model that locally backs off (e.g. locally subtracts no light pollution at all), causing local light pollution remnants around the edges where the stacking artefacts are located.
Tutorials can be found here, including a "Quick start" tutorial if you're in a hurry.
With regards to your dataset, it is fairly noisy (even when binned), which may make it hard(er) for AutoDev to lock onto the detail. A manual Develop will yield better/easier results in that case.
When/if using Wipe, use the Narrowband preset (as of v 1.5) for this H-alpha data. You may not need to use Wipe if your data is well calibrated and there are no obvious gradients and/or bias signals in your dataset. Your dataset is well calibrated, with nothing too obvious in terms of bias signal.
You can get something like the above with a simple workflow like this;
--- Auto Develop
Default values, to see what we got.
We can see stacking artefacts (thin lines around all edges), noise, oversampling.
--- Bin
Converting oversampling into noise reduction.
Parameter [Scale] set to [(scale/noise reduction 50.00%)/(400.00%)/(+2.00 bits)]
Image size is 1374 x 918--- Crop
Getting rid of stacking artefacts.
Parameter [X1] set to [7 pixels]
Parameter [Y1] set to [8 pixels]
Parameter [X2] set to [1369 pixels (-5)]
Parameter [Y2] set to [911 pixels (-7)]
Image size is 1362 x 903--- Wipe
Optional, I'd say (see also comments/reasons above).
--- Develop
Final stretch. Choosing a manual Develop here, AutoDev will have trouble locking onto the finer, fainter detail to to overwhelming noise.
Parameter [Digital Development] set to [96.76 %]
Parameter [Dark Anomaly Filter] set to [20.0 pixels]--- Deconvolution
Usually worth a try. Auto-generate star mask. Only very marginal improvement visible due to signal quality.
Parameter [Radius] set to [1.3 pixels]
--- Wavelet Sharpen
Default parameters. Using same mask that was auto-generated during Decon.
--- Wavelet De-Noise
Default parameters. Parameter [Grain Size] set to [8.0 pixels]
Hope this helps!
-
1
-
-
On 19/08/2019 at 01:50, Mikey07 said:
Well here's a screenshot of what I got from last night's data and it's fair to say that it aint good. It looks like someone has taken a sander to it! Any pointers on where I'm going wrong would be appreciated. The images were taken using........
SW Esprit 100ED, SW HEQ5 Mount, Flattener (which is brand new and the first time I've used it), Modified Canon 600D, 24x120s and ISO800.
I also have a decent .FTS file of M42 from last February so I'll run that through StarTools as well and see how it comes out.
AutoDev serves a dual purpose; first it is used to show any defects in your image, then it is used to perform your final global stretch after you have mitigated the issues you found earlier.
In the above image, we can see gradients, dust donuts and (rather severe) walking noise. Flats are the #1 way to improve your image (and processing enjoyment! 😀), with dithering between frames a close 2nd (this solves the walking noise issue). They are really not optional and they don't really cost anything, except some time.
Also don't forget you can (should) click and drag a Region of Interest for AutoDev to optimize for (by default the RoI is the entire image). In the case of the image above, a slice of M31, including its core would constitute a good dynamic range sample we'd be interested in.
There are also cases where AutoDev simply cannot lock onto celestial detail. These cases usually involve heavy noise and/or lots of "empty" background. The latter can be solved with an RoI. The former can be solved by increasing the "Ignore fine detail <" parameter, which makes AutoDev "blind" to small noise grain. If you cannot fix or work around the calibration/acquisition issues in your dataset and cannot obtain a good result with AutoDev, you can always resort to a manual Develop.
As bottletopburly already highlighted though, post-processing becomes infinitely easier and repeatable when you have "good" data. I'm putting "good" between quotes here, because it just means "properly calibrated". It doesn't have to be deep, gradient free or noise free, as long as it has been dithered and properly calibrated with - at least - flats.
Hope this helps!
-
3
-


.jpg.d6fa275435cf76e503abd2854ca1b87f.jpg)

re processed M101 in Startools
in Imaging - Deep Sky
Posted
Glad I could help! With regards to the spiral arms, it depends on your dataset. If you'd like to upload it somewhere I'd be happy to have a look.
For images like these, the HDR module's Reveal All mode may help, as well as the Sharp module from ST 1.6 (DSO Dark preset, overdrive the strength). You'd use these tools specifically as they govern small-medium scale detail.
It's also possible a different global stretch (with a Region of Interest in AutoDev) can lift some more detail from the murk. Much depends on your "murk" (e.g. how clean and well-calibrated the background is) as well")