


Measurement of Doubles and a Jovian Moon - Baader Micro Guide

Entry posted by Qualia
4,022 views
Measurement of Doubles and a Jovian Moon - Baader Micro Guide
Introduction
The reason for this rather long blog entry is to highlight what has been possible using simple and relatively inexpensive gear to measure the separation and position angle of a number of double stars and the sizes and distances of various objects within the Solar System.
The preliminary goal was fivefold:
- to further skills in star-hopping and to gain a deeper understanding and appreciation of star magnitude.
- to garner some experience in measuring double stars as accurately as possible.
- to work out the sizes and distances of a number of night sky objects.
- to evaluate the capabilities of the 4” refractor.
- to pass on information that may be of interest or use to others.
The Gear
Mounted on an equatorial CG-5, I used a four-inch Tal 100rs f/10, a Celestron x2 Barlow and a Baader Micro Guide. This particular eyepiece is an Orthoscopic Abbe with a focal length of 12.5mm and equipped with a laser-etched reticle and screw on red-light variable illumination system.
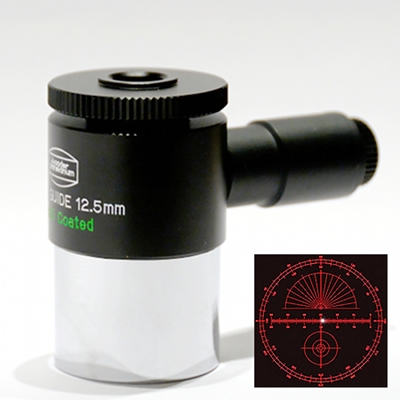
The multi-function astro-metric eyepiece provides sharp images across the field of view and has a twist up and down focuser which is not for eye-relief but to sharpen the finely etched designs for the observer. When focused at the centre, the edges of the scale do not blur and are crisp throughout but might be difficult to read on occasions due to the illumination system sometimes being uneven.
There is no glare, stray light or internal reflection from the illuminator but on tighter doubles with a dimmer secondary component or on faint DSOs, for example, one finds they fade between subtle differences in reticle brightness. Lessening this brightness to capture the dimmer object sometimes makes it complicated to read the 360º protractor scale and I have found that the best remedy on such occasions is to dim in and out and use the eye’s memory to capture the reading.
The sharply etched reticle scales include a 360° protractor at the edge of the field of view (4), a number of concentric guiding circles (3), a semicircle (2) and a linear scale across the centre (1).

For general beginner’s use, the Micro Guide will be very useful to those who wish to work out seperations and angular distances of binary stars and sizes and distences of Solar phenomena, Lunar features, and other objects found within the Solar System and beyond.
Focal Length
In measuring a binary star’s separation in something as small as arcseconds, it is important to maximise that separation by using as much of the linear scale as possible. By using a barlow, one effectively increases the telescope’s focal length which in turn ensures not only a greater magnification but also a more accurate measurement along the 60 divisions etched onto the Micro Guide’s 6mm linear scale. This means that if separations or sizes are to be measured evermore accurately with only this eyepiece, different and greater focal lengths will eventually be required.
Calibration
Before being able to use the Micro Guide it is necessary to calibrate its linear scale, that is, to estimate the number of arcseconds in each division in accordance with the given telescope and if used, the given barlow. If ever the barlow or telescope is changed for another or not used, one must repeat calibration with the new set up. There are a number of ways of going about this and I include two methods, ignoring those given by the instruction manuel.
The Split Method
Find a known double star and note the number of divisions on the linear scale separating the primary from the secondary. If, for example, Albireo has a separation of 34.7” arcseconds and I see that this separation spans 4.6 divisions on the reticle’s scale, then I conclude that each division is 7.54” arcseconds in length.
It is a good idea to measure the chosen double star 30º above the horizon to avoid overt atmospheric disturbance or refraction and to take a good number of measurements of that given star to find the mean average. For this method I chose similar partners in beauty but of various separations none of which were so tight that measurements would be rendered near guesses.
| Star | Rho ( ρ) | Counted Divisions | Scale Constant |
| Albireo | 34.7" | 4.8 | 7.23" |
| Almach | 9.7" | 1.3 | 7.46" |
| η Cas | 12" | 1.7 | 7.06" |
| ζ Lyrae | 43.7" | 5.9 | 7.8" |
Summing and finding the average I now had a workable scale constant of 7.38" which would remain valid so long as I used the same gear.
The Drift Method
Again, the drift method is to determine the scale constant – the number of arcseconds per division - but I feel gives a more detailed approach and one less reliant of guessing. However, with that said the final scale constant was very similar to the Split method.
Turn off any mount drives and time the passage a given star makes along the length of the linear scale from zero to sixty. The star doesn not have to be a double but will need a stopwatch counting to the 100th of a second. It's a good idea to find a star above 30º declination and not too near the Cestial Pole. You turn the eyepiece until the star drifts exactly along or parallel to the linear scale and as it crosses the zero line start timing until it crosses the sixtieth division. You repeat this process about 20 to 30 times in total over a number of days. To ensure as much accuracy as possible try to measure three different stars over a week and with the various timings for each star, calculate their mean average.
The Drift’s Scale Constant
You’ll then need to convert these particular results into arcseconds with the following formula:
S.C. = 15.0411 (T.avg) cos (dec) / D
S.C. – Scale Constant.
15.0411 – Earth’s rotation rate per hour in degrees.
T.avg – The given star’s mean average drift time.
Cos (dec) – The cosine of the star’s declination
/ - Divided by
D – The number of division on the linear scale
And that’s it.
The resulting figure will be your scale constant and will remain valid so long as the optical gear you use remains the same. In my own case, I found that the average scale constant was again around 7.5” arcseconds per division.
Putting Numbers into Practice
Over the following days, I tried to measure a number of double stars in the constellation of Perseus. In particular, doubles that I had never worked with. I chose Eta Persei, Struve 331 and Epsilon Persei as guinea pigs for the experiment. I took a number of measurements for each star and again estimated their average separation. The following highlights the concluding results where Est Rho is my estimation and Rho is the official separation.
| Star | Est Rho ( ρ) | Rho ( ρ) | Error |
| η Per | 28.5" | 28.3" | 0.7% |
| Σ 331 | 12.9" | 12.3" | 4.8% |
| ε Per | 8.1" | 8.7" | 7.4% |
As can be seen the margin of percentage error is significant and there is room for improvement. Nevertheless, the results were all within 1” arcsecond of error which accords with the kind of results expected from the Micro Guide. Baader informs the reader that “...such measurements can be estimated to an accuracy of about...2” for a focal length of 2000mm.”
Working Out Position Angle
I found that working out how to take a binary’s position angle quite complicated but eventually the following procedure was taken.

The binary is centred in the eyepiece and aligned in such a manner that both components drift through the bisected middle linear division marked 30 on the Micro Guide. The two stars are allowed to drift toward the etched 180º semi-circle and as the primary crosses the inner 360º protractor scale one reads the given angle. It’s a good idea to take a number of measurements, but better still, place those stars dead centre for a general reading error of about 1º to 2º degrees.
Measuring Sizes and Distances
To measure size (S), count the number of divisions the given object takes up on the linear scale (sc). Divide this number by your set up’s focal length (fl) which will give you a general image-size (i). Multiply this with the known distance to that object (d).
S = d (sc / fl)
For example, to work out an estimate of the size of Ganymede, I found that it measured no more than about 0.01mm or 0.02mm on the linear scale: a mere dot on the etched reticle.
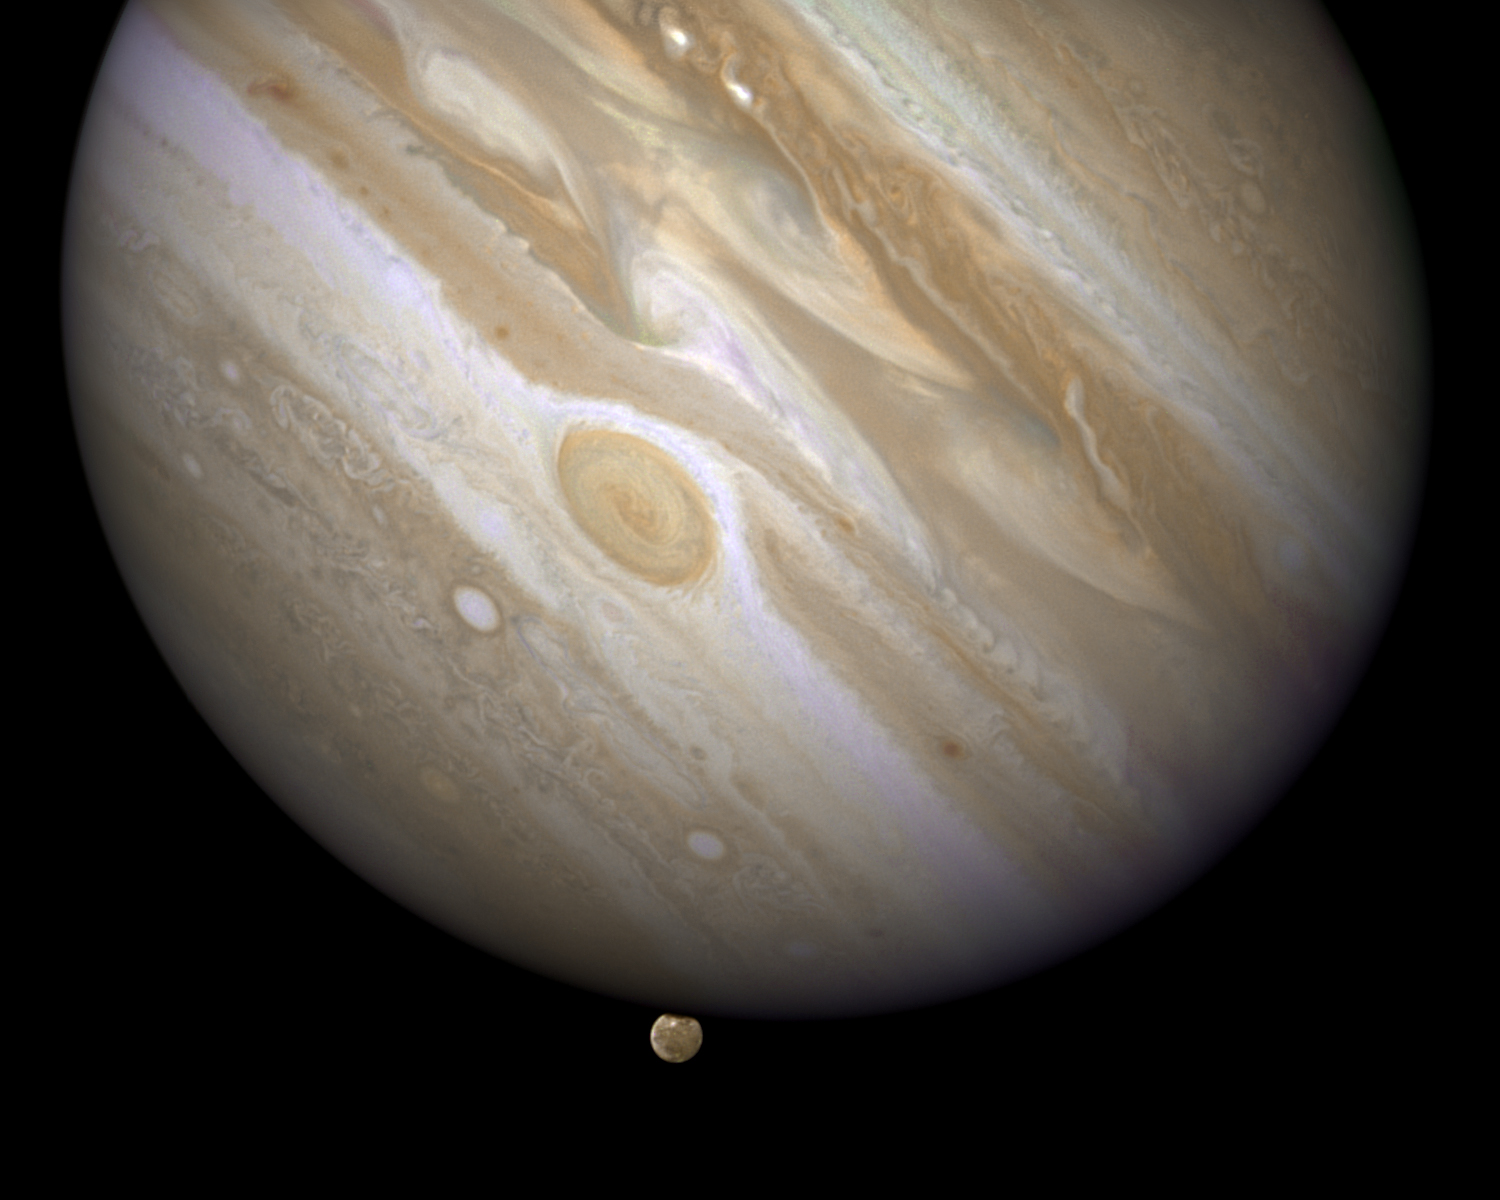
The mean average of this number was divided by my set up’s focal length, giving me the estimated image-size. Noting that Jupiter was about 4.8 AU from Earth (718,069,776km) and that Ganymede has a average distance of about 1,605,000km from Jupiter, I calculated that Ganymede was around 716,464,776km from Earth. This number was multiplied by the image-size giving me a rough size of Ganymede at around 5,373km in diameter. An error of about 2% or around a 100km out.
To calculate distance (d), you divide your focal length (fl) by the image-size (i) and multiply this by the known size (s) of the object.
d = s (fl / i)
Ganymede’s distance from Earth, I knew its size was about 5,373km (really its 5,268km) and was measured on the scale at about 0.015mm. You then divide the focal length by that image-size and multiply by the size of the object. In my case, I found Ganymede’s distance from Earth was about 716,400,000km. Again, an error margin of around 2%.
Conclusion
The Baader Micro Guide does not come cheap. In Europe it sells for around €165. In the boxed package you receive instructions (often vague), a decent 12.5mm Abbe Orthoscopic eyepiece with the built in finely etched reticle and a battery operated screw-on illuminator.
Most will probably think that such an item is an unnecessary expense to include in their eyepiece collection but to counter this argument there is something rewarding in the challenge of meticuously recording and calculating distances and angles and sizes and separations – even if the experience can sometimes be frustrating and that these numbers have already be worked out for you.
I have found the Micro Guide to be a useful resource for not only testing patience and recording skills, or the acuity of vision but also an aid in astronomical study.
Like sketching or logging, the astro-metric eyepiece helps increase observing skills for it forces you to take note rather than just casually glancing. Indirectly, it helps increase knowledge about the objects you are looking at, for it is necessary to research such variables as size, distance, separations and position angles and by researching these variables and actively working with them, overtime you are gradually able to estimate such things in the field. Finally, it also acts as an impetus to structure a part of your observing session.
After a good month with the eyepiece, working with the Sun and objects of the Solar System, I also feel I have come to appreciate a lot more such diverse factors as the quality of my optics and observing site, the effects of atmospheric seeing, sky glow, astronomical and mathematical data, patience, fatigue, mental disposition, and so on. Such insights will not only deepen your understanding of stargazing but also in coming to understand a little more about yourself – which afterall, must be one of the most important goals set out for us.
-
 6
6

1 Comment
Recommended Comments
Create an account or sign in to comment
You need to be a member in order to leave a comment
Create an account
Sign up for a new account in our community. It's easy!
Register a new accountSign in
Already have an account? Sign in here.
Sign In Now